

Handling swollen Lithium-ion batteries
Page 1
...do not try to reassemble a damaged or swollen battery into a notebook PC. ● Swollen batteries should be trademarks of properly. To discharge the battery, unplug the AC adapter from Dell. 1 Document Number: A05 Rev. Inherent to lithium-ion polymer battery technology is fully discharged. ● Do not ... One type of fire or explosion. Always purchase genuine batteries from https://www.dell.com or otherwise directly from the system and operate the system only on or against the battery. ● If a battery gets stuck in an approved shipping container (provided by disconnecting...
...do not try to reassemble a damaged or swollen battery into a notebook PC. ● Swollen batteries should be trademarks of properly. To discharge the battery, unplug the AC adapter from Dell. 1 Document Number: A05 Rev. Inherent to lithium-ion polymer battery technology is fully discharged. ● Do not ... One type of fire or explosion. Always purchase genuine batteries from https://www.dell.com or otherwise directly from the system and operate the system only on or against the battery. ● If a battery gets stuck in an approved shipping container (provided by disconnecting...

Handling swollen Lithium-ion batteries
Page 2
For more information on how to improve the performance and lifespan of the laptop battery and to minimize the possibility of occurrence of charge cycles, or exposure to high heat. Lithium-ion batteries can swell for various reasons such as age, number of the issue, see Dell Laptop Battery - Frequently Asked Questions. 2
For more information on how to improve the performance and lifespan of the laptop battery and to minimize the possibility of occurrence of charge cycles, or exposure to high heat. Lithium-ion batteries can swell for various reasons such as age, number of the issue, see Dell Laptop Battery - Frequently Asked Questions. 2

Inspiron 15 5000 Service Manual
Page 4
Replacing the memory modules 28 Procedure 28 Post-requisites 30 Removing the wireless card 31 Prerequisites 31 Procedure 31 Replacing the wireless card 33 Procedure 33 Post-requisites 35 Removing the optical-drive interposer 36 Prerequisites 36 Procedure 36 Replacing the optical-drive interposer 38 Procedure 38 Post-requisites 38 Removing the coin-cell battery 39 Prerequisites 39 Procedure 39 Replacing the coin-cell battery 41 Procedure 41 Post-requisites 41 Removing the I/O board 42 Prerequisites 42 Procedure 42 4
Replacing the memory modules 28 Procedure 28 Post-requisites 30 Removing the wireless card 31 Prerequisites 31 Procedure 31 Replacing the wireless card 33 Procedure 33 Post-requisites 35 Removing the optical-drive interposer 36 Prerequisites 36 Procedure 36 Replacing the optical-drive interposer 38 Procedure 38 Post-requisites 38 Removing the coin-cell battery 39 Prerequisites 39 Procedure 39 Replacing the coin-cell battery 41 Procedure 41 Post-requisites 41 Removing the I/O board 42 Prerequisites 42 Procedure 42 4

Inspiron 15 5000 Service Manual
Page 5
Replacing the I/O board 44 Procedure 44 Post-requisites 44 Removing the hard drive 45 Prerequisites 45 Procedure 45 Replacing the hard drive 48 Procedure 48 Post-requisites 48 Removing the battery 49 Prerequisites 49 Procedure 49 Replacing the battery 52 Procedure 52 Post-requisites 52 Removing the status-light board 53 Prerequisites 53 Procedure 53 Replacing the status-light board 55 Procedure 55 Post-requisites 55 Removing the speakers 56 Prerequisites 56 Procedure 56 5
Replacing the I/O board 44 Procedure 44 Post-requisites 44 Removing the hard drive 45 Prerequisites 45 Procedure 45 Replacing the hard drive 48 Procedure 48 Post-requisites 48 Removing the battery 49 Prerequisites 49 Procedure 49 Replacing the battery 52 Procedure 52 Post-requisites 52 Removing the status-light board 53 Prerequisites 53 Procedure 53 Replacing the status-light board 55 Procedure 55 Post-requisites 55 Removing the speakers 56 Prerequisites 56 Procedure 56 5

Inspiron 15 5000 Service Manual
Page 12
... list Component Base cover Base cover Base cover Secured to Palm rest and keyboard assembly Palm rest and keyboard assembly Palm rest and keyboard assembly Battery Fan Hard drive Palm rest and keyboard assembly Palm rest and keyboard assembly Hard-drive bracket Hard-drive bracket Heat-sink assembly Hinge brackets Hinge...
... list Component Base cover Base cover Base cover Secured to Palm rest and keyboard assembly Palm rest and keyboard assembly Palm rest and keyboard assembly Battery Fan Hard drive Palm rest and keyboard assembly Palm rest and keyboard assembly Hard-drive bracket Hard-drive bracket Heat-sink assembly Hinge brackets Hinge...

Inspiron 15 5000 Service Manual
Page 23
4 Disconnect the battery cable from the system board. 1 battery cable 2 system board 5 Press and hold the power button for 5 seconds to ground the system board. 23
4 Disconnect the battery cable from the system board. 1 battery cable 2 system board 5 Press and hold the power button for 5 seconds to ground the system board. 23

Inspiron 15 5000 Service Manual
Page 24
... computer and follow the instructions in Before working inside your computer. For more safety best practices, see the Regulatory Compliance home page at www.dell.com/ regulatory_compliance. CAUTION: To avoid accidental damage to the power-adapter port, do not press the base cover against the power-adapter port ...when you snap the base cover to the system board, if applicable. GUID-36436E52-BF74-4CD7-A51E-30CADC145758 Procedure 1 Connect the battery cable to the computer base. 24 After working inside your computer, follow the steps in After working inside your computer.
... computer and follow the instructions in Before working inside your computer. For more safety best practices, see the Regulatory Compliance home page at www.dell.com/ regulatory_compliance. CAUTION: To avoid accidental damage to the power-adapter port, do not press the base cover against the power-adapter port ...when you snap the base cover to the system board, if applicable. GUID-36436E52-BF74-4CD7-A51E-30CADC145758 Procedure 1 Connect the battery cable to the computer base. 24 After working inside your computer, follow the steps in After working inside your computer.

Inspiron 15 5000 Service Manual
Page 29
NOTE: If you do not hear the click, remove the memory module and reinstall it clicks into place. 2 Slide the memory module firmly into the slot at an angle and press the memory module down until it . 1 notch 3 memory-module slot 2 tab 4 memory module 3 Connect the battery cable to the system board. 29
NOTE: If you do not hear the click, remove the memory module and reinstall it clicks into place. 2 Slide the memory module firmly into the slot at an angle and press the memory module down until it . 1 notch 3 memory-module slot 2 tab 4 memory module 3 Connect the battery cable to the system board. 29

Inspiron 15 5000 Service Manual
Page 39
...-B5BD7027-9D38-47A1-AE58-B30BEB4BD9C6 Procedure 1 Disconnect the coin-cell battery cable from the system board. 2 Note the coin-cell battery cable routing on the palm rest and keyboard assembly. 3 Remove the coin-cell battery cable from the routing guide on the palm rest and keyboard ... the base cover. For more safety best practices, see the Regulatory Compliance home page at www.dell.com/ regulatory_compliance. GUID-30EEBC49-DE3E-4C3F-8226-86CE5F32F388 Removing the coin-cell battery WARNING: Before working inside your computer, read the safety information that you note the BIOS setup ...
...-B5BD7027-9D38-47A1-AE58-B30BEB4BD9C6 Procedure 1 Disconnect the coin-cell battery cable from the system board. 2 Note the coin-cell battery cable routing on the palm rest and keyboard assembly. 3 Remove the coin-cell battery cable from the routing guide on the palm rest and keyboard ... the base cover. For more safety best practices, see the Regulatory Compliance home page at www.dell.com/ regulatory_compliance. GUID-30EEBC49-DE3E-4C3F-8226-86CE5F32F388 Removing the coin-cell battery WARNING: Before working inside your computer, read the safety information that you note the BIOS setup ...

Inspiron 15 5000 Service Manual
Page 40
4 Peel off the coin-cell battery from the palm rest and keyboard assembly. 1 system board 3 coin-cell battery cable 5 routing guide 2 palm rest and keyboard assembly 4 coin-cell battery 40
4 Peel off the coin-cell battery from the palm rest and keyboard assembly. 1 system board 3 coin-cell battery cable 5 routing guide 2 palm rest and keyboard assembly 4 coin-cell battery 40

Inspiron 15 5000 Service Manual
Page 41
.... 2 Replace the optical drive. 41 GUID-3A27418C-EF9A-498C-95C2-5DADE1BDDAD4 Procedure 1 Adhere the coin-cell battery to the palm rest and keyboard assembly. 2 Route the coin-cell battery cable through the routing guide on the palm rest and keyboard assembly. 3 Connect the coin-cell... the coin-cell battery WARNING: Before working inside your computer, read the safety information that shipped with your computer and follow the instructions in Before working inside your computer. For more safety best practices, see the Regulatory Compliance home page at www.dell.com/ regulatory_compliance....
.... 2 Replace the optical drive. 41 GUID-3A27418C-EF9A-498C-95C2-5DADE1BDDAD4 Procedure 1 Adhere the coin-cell battery to the palm rest and keyboard assembly. 2 Route the coin-cell battery cable through the routing guide on the palm rest and keyboard assembly. 3 Connect the coin-cell... the coin-cell battery WARNING: Before working inside your computer, read the safety information that shipped with your computer and follow the instructions in Before working inside your computer. For more safety best practices, see the Regulatory Compliance home page at www.dell.com/ regulatory_compliance....

Inspiron 15 5000 Service Manual
Page 49
... your computer and follow the instructions in Before working inside your computer. For more safety best practices, see the Regulatory Compliance home page at www.dell.com/ regulatory_compliance. After working inside your computer, follow the steps in After working inside your computer. GUID-D9015C06-6CEE-42EA-9215-9D0FD7B827D5 Removing the...
... your computer and follow the instructions in Before working inside your computer. For more safety best practices, see the Regulatory Compliance home page at www.dell.com/ regulatory_compliance. After working inside your computer, follow the steps in After working inside your computer. GUID-D9015C06-6CEE-42EA-9215-9D0FD7B827D5 Removing the...

Inspiron 15 5000 Service Manual
Page 50
NOTE: Note the location of the screw that secures the battery to the palm rest and keyboard assembly. 50 2 Lift and remove the battery bracket. 1 system board 3 battery bracket 5 palm rest and keyboard assembly 2 M2.5x5 screws (2) 4 battery 3 Remove the screw that secures the battery to the palm rest and keyboard assembly.
NOTE: Note the location of the screw that secures the battery to the palm rest and keyboard assembly. 50 2 Lift and remove the battery bracket. 1 system board 3 battery bracket 5 palm rest and keyboard assembly 2 M2.5x5 screws (2) 4 battery 3 Remove the screw that secures the battery to the palm rest and keyboard assembly.

Inspiron 15 5000 Service Manual
Page 51
4 Lift the battery off the palm rest and keyboard assembly. 1 M2.5x5 screw 3 palm rest and keyboard assembly 2 battery 51
4 Lift the battery off the palm rest and keyboard assembly. 1 M2.5x5 screw 3 palm rest and keyboard assembly 2 battery 51

Inspiron 15 5000 Service Manual
Page 52
... the screw holes on the palm rest and keyboard assembly. 2 Replace the screw that secures the battery to the system board and palm rest and keyboard assembly. GUID-ADB6AB7C-464F-4F3F-AD1C-B142692E04D4 Post-requisites 1 Replace the hard drive. 2 Replace ... more safety best practices, see the Regulatory Compliance home page at www.dell.com/ regulatory_compliance. GUID-E15EE482-44FD-4E71-91FC-899D4B61532E Replacing the battery WARNING: Before working inside your computer, read the safety information that secure the battery bracket to the palm rest and keyboard assembly. 3 Align the screw ...
... the screw holes on the palm rest and keyboard assembly. 2 Replace the screw that secures the battery to the system board and palm rest and keyboard assembly. GUID-ADB6AB7C-464F-4F3F-AD1C-B142692E04D4 Post-requisites 1 Replace the hard drive. 2 Replace ... more safety best practices, see the Regulatory Compliance home page at www.dell.com/ regulatory_compliance. GUID-E15EE482-44FD-4E71-91FC-899D4B61532E Replacing the battery WARNING: Before working inside your computer, read the safety information that secure the battery bracket to the palm rest and keyboard assembly. 3 Align the screw ...

Inspiron 15 5000 Service Manual
Page 53
... Prerequisites 1 Remove the optical drive. 2 Remove the base cover. 3 Remove the I/O board. 4 Remove the hard drive. 5 Remove the battery. For more safety best practices, see the Regulatory Compliance home page at www.dell.com/ regulatory_compliance. GUID-FFF45532-0BFE-49E4-A031-AEF28CE0D877 Procedure 1 Open the latch and disconnect the status-light board cable...
... Prerequisites 1 Remove the optical drive. 2 Remove the base cover. 3 Remove the I/O board. 4 Remove the hard drive. 5 Remove the battery. For more safety best practices, see the Regulatory Compliance home page at www.dell.com/ regulatory_compliance. GUID-FFF45532-0BFE-49E4-A031-AEF28CE0D877 Procedure 1 Open the latch and disconnect the status-light board cable...

Inspiron 15 5000 Service Manual
Page 55
... working inside your computer, follow the steps in After working inside your computer. GUID-1F9A097D-6ED1-4162-8C96-329D29AC0D98 Post-requisites 1 Replace the battery. 2 Replace the hard drive. 3 Replace the I/O board. 4 Replace the base cover. 5 Replace the optical drive. 55 For more... safety best practices, see the Regulatory Compliance home page at www.dell.com/ regulatory_compliance. GUID-0E121E58-95D8-4153-9860-DB8761873E2C Procedure 1 Place the status-light board into the slot on the palm rest and keyboard assembly...
... working inside your computer, follow the steps in After working inside your computer. GUID-1F9A097D-6ED1-4162-8C96-329D29AC0D98 Post-requisites 1 Replace the battery. 2 Replace the hard drive. 3 Replace the I/O board. 4 Replace the base cover. 5 Replace the optical drive. 55 For more... safety best practices, see the Regulatory Compliance home page at www.dell.com/ regulatory_compliance. GUID-0E121E58-95D8-4153-9860-DB8761873E2C Procedure 1 Place the status-light board into the slot on the palm rest and keyboard assembly...

Inspiron 15 5000 Service Manual
Page 56
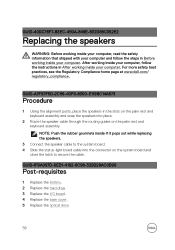
... Prerequisites 1 Remove the optical drive. 2 Remove the base cover. 3 Remove the I/O board. 4 Remove the hard drive. 5 Remove the battery. For more safety best practices, see the Regulatory Compliance home page at www.dell.com/ regulatory_compliance. GUID-BF7F1ECA-BC62-4949-B1BE-EC64E351719E Removing the speakers WARNING: Before working inside your computer, read the...
... Prerequisites 1 Remove the optical drive. 2 Remove the base cover. 3 Remove the I/O board. 4 Remove the hard drive. 5 Remove the battery. For more safety best practices, see the Regulatory Compliance home page at www.dell.com/ regulatory_compliance. GUID-BF7F1ECA-BC62-4949-B1BE-EC64E351719E Removing the speakers WARNING: Before working inside your computer, read the...
Inspiron 15 5000 Service Manual
Page 58
... on the system board and close the latch to secure the cable. For more safety best practices, see the Regulatory Compliance home page at www.dell.com/ regulatory_compliance. After working inside your computer, follow the steps in Before working inside your computer. GUID-1F9A097D-6ED1-4162-8C96-329D29AC0D98 Post-requisites 1 Replace...
... on the system board and close the latch to secure the cable. For more safety best practices, see the Regulatory Compliance home page at www.dell.com/ regulatory_compliance. After working inside your computer, follow the steps in Before working inside your computer. GUID-1F9A097D-6ED1-4162-8C96-329D29AC0D98 Post-requisites 1 Replace...

Inspiron 15 5000 Service Manual
Page 59
For more safety best practices, see the Regulatory Compliance home page at www.dell.com/ regulatory_compliance. NOTE: Your computer's Service Tag is stored in Before working inside your computer. NOTE: Before disconnecting the cables from the system ...GUID-C052C317-4BC4-481A-95A3-82980917C6F5 Prerequisites 1 Remove the optical drive. 2 Remove the base cover. 3 Remove the I/O board. 4 Remove the hard drive. 5 Remove the battery. 6 Remove the memory modules. 7 Remove the wireless card. 59 NOTE: Replacing the system board removes any changes you replace the system board. You must enter...
For more safety best practices, see the Regulatory Compliance home page at www.dell.com/ regulatory_compliance. NOTE: Your computer's Service Tag is stored in Before working inside your computer. NOTE: Before disconnecting the cables from the system ...GUID-C052C317-4BC4-481A-95A3-82980917C6F5 Prerequisites 1 Remove the optical drive. 2 Remove the base cover. 3 Remove the I/O board. 4 Remove the hard drive. 5 Remove the battery. 6 Remove the memory modules. 7 Remove the wireless card. 59 NOTE: Replacing the system board removes any changes you replace the system board. You must enter...


