

Me and My Dell
Page 24
...batteries generally have a longer life-cycle, since you must replace the battery. NOTE: For tips on . Coin-Cell Battery Coin-cell battery provides power to replace. Depending on the computer model, the battery on . 24 Battery Under normal usage conditions, the coin-cell battery can be user replaceable... so on your computer may require a Dell service technician to the Complementary Metal‑Oxide Semiconductor (CMOS) chip while the computer is powered off . The battery allows you to low capacity batteries. After the battery life-cycle reaches its end, you need...
...batteries generally have a longer life-cycle, since you must replace the battery. NOTE: For tips on . Coin-Cell Battery Coin-cell battery provides power to replace. Depending on the computer model, the battery on . 24 Battery Under normal usage conditions, the coin-cell battery can be user replaceable... so on your computer may require a Dell service technician to the Complementary Metal‑Oxide Semiconductor (CMOS) chip while the computer is powered off . The battery allows you to low capacity batteries. After the battery life-cycle reaches its end, you need...
Me and My Dell
Page 91
... system boards on . You can configure your computer, see the Service Manual at dell.com/support. NOTE: For more information on location of the coin‑cell battery and instruction on removing and replacing it, see the Service Manual at dell.com/support. WARNING: Read the safety instructions before working inside your computer to...
... system boards on . You can configure your computer, see the Service Manual at dell.com/support. NOTE: For more information on location of the coin‑cell battery and instruction on removing and replacing it, see the Service Manual at dell.com/support. WARNING: Read the safety instructions before working inside your computer to...

Inspiron 14z N411z Owners Manual
Page 3
Contents 1 Before You Begin 9 Recommended Tools 9 Turning Off Your Computer 9 Before Working Inside Your Computer 10 2 Battery 13 Removing the Battery 13 Replacing the Battery 14 3 Module Cover 15 Removing the Module Cover 15 Replacing the Module Cover 16 4 Coin-Cell Battery 17 Removing the Coin-Cell Battery 17 Replacing the Coin-Cell Battery 18 5 Hard-Drive Assembly 19 Removing the Hard-Drive Assembly 19 Contents 3
Contents 1 Before You Begin 9 Recommended Tools 9 Turning Off Your Computer 9 Before Working Inside Your Computer 10 2 Battery 13 Removing the Battery 13 Replacing the Battery 14 3 Module Cover 15 Removing the Module Cover 15 Replacing the Module Cover 16 4 Coin-Cell Battery 17 Removing the Coin-Cell Battery 17 Replacing the Coin-Cell Battery 18 5 Hard-Drive Assembly 19 Removing the Hard-Drive Assembly 19 Contents 3

Inspiron 14z N411z Owners Manual
Page 14
2 1 1 battery 2 battery-release latches (2) Replacing the Battery 1 Follow the instructions in "Before You Begin" on page 9. 2 Place the battery in the battery bay and press down until the battery clicks into place. 3 Ensure that both the battery-release latches are in the locked position. 14 Battery
2 1 1 battery 2 battery-release latches (2) Replacing the Battery 1 Follow the instructions in "Before You Begin" on page 9. 2 Place the battery in the battery bay and press down until the battery clicks into place. 3 Ensure that both the battery-release latches are in the locked position. 14 Battery

Inspiron 14z N411z Owners Manual
Page 16
1 2 3 4 1 module cover 3 tabs 2 captive screw 4 computer base Replacing the Module Cover 1 Follow the instructions in "Before You Begin" on page 9. 2 Align the tabs on the module cover with the slots on page 14. 16 Module Cover See "Replacing the Battery" on the computer base and snap the module cover into place. 3 Tighten the captive screw that secures the module cover to the computer base. 4 Replace the battery.
1 2 3 4 1 module cover 3 tabs 2 captive screw 4 computer base Replacing the Module Cover 1 Follow the instructions in "Before You Begin" on page 9. 2 Align the tabs on the module cover with the slots on page 14. 16 Module Cover See "Replacing the Battery" on the computer base and snap the module cover into place. 3 Tighten the captive screw that secures the module cover to the computer base. 4 Replace the battery.

Inspiron 14z N411z Owners Manual
Page 18
See "Replacing the Module Cover" on the computer, replace all screws and ensure that no stray screws remain inside the computer. CAUTION: Before turning on page 16. 4 Replace the battery. See "Replacing the Battery" on the system board. 3 Replace the module cover. 1 2 1 plastic scribe 2 coin-cell battery Replacing the Coin-Cell Battery 1 Follow the instructions in damage to the computer. 18 Coin-Cell Battery Failure to do so may result in "Before You Begin" on page 9. 2 With the positive side facing up, snap the coin-cell battery into the battery socket on page 14.
See "Replacing the Module Cover" on the computer, replace all screws and ensure that no stray screws remain inside the computer. CAUTION: Before turning on page 16. 4 Replace the battery. See "Replacing the Battery" on the system board. 3 Replace the module cover. 1 2 1 plastic scribe 2 coin-cell battery Replacing the Coin-Cell Battery 1 Follow the instructions in damage to the computer. 18 Coin-Cell Battery Failure to do so may result in "Before You Begin" on page 9. 2 With the positive side facing up, snap the coin-cell battery into the battery socket on page 14.

Inspiron 14z N411z Owners Manual
Page 22
... the operating system, drivers, and utilities for your computer, as needed. CAUTION: Before turning on the computer, replace all attached devices to electrical outlets, and turn them on page 14. See "Replacing the Battery" on . 11 Install the operating system for your computer, as needed. 12 Install the drivers and utilities for... your computer and all screws and ensure that no stray screws remain inside the computer. 9 Replace the battery. Failure to do so may result in damage to the computer. 10 Connect your computer, see Me and My...
... the operating system, drivers, and utilities for your computer, as needed. CAUTION: Before turning on the computer, replace all attached devices to electrical outlets, and turn them on page 14. See "Replacing the Battery" on . 11 Install the operating system for your computer, as needed. 12 Install the drivers and utilities for... your computer and all screws and ensure that no stray screws remain inside the computer. 9 Replace the battery. Failure to do so may result in damage to the computer. 10 Connect your computer, see Me and My...

Inspiron 14z N411z Owners Manual
Page 26
8 Replace the battery. Failure to do so may result in damage to the computer. 26 Optical Drive See "Replacing the Battery" on the computer, replace all screws and ensure that no stray screws remain inside the computer. CAUTION: Before turning on page 14.
8 Replace the battery. Failure to do so may result in damage to the computer. 26 Optical Drive See "Replacing the Battery" on the computer, replace all screws and ensure that no stray screws remain inside the computer. CAUTION: Before turning on page 14.
Inspiron 14z N411z Owners Manual
Page 29
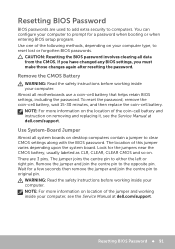
b Turn the computer over. 6 Replace the module cover. If you replaced the memory module in the DIMM A connector: a Replace the keyboard. See "Replacing the Module Cover" on page 14. See "Replacing the Battery" on page 16. 7 Replace the battery. 2 Align the notch on the memory module with the tab in the memory-module connector. 3 Slide the memory module firmly...
b Turn the computer over. 6 Replace the module cover. If you replaced the memory module in the DIMM A connector: a Replace the keyboard. See "Replacing the Module Cover" on page 14. See "Replacing the Battery" on page 16. 7 Replace the battery. 2 Align the notch on the memory module with the tab in the memory-module connector. 3 Slide the memory module firmly...

Inspiron 14z N411z Owners Manual
Page 31
...and disengage the keyboard. CAUTION: To help prevent damage to replace. Failure to servicing that shipped with your computer. Damage due to do so could result in "Before You Begin" on page 9. 2 Remove the battery. CAUTION: The keycaps on the keyboard are fragile, easily ...when removing and handling the keyboard. 8 Keyboard WARNING: Before working inside your computer, read the safety information that is not authorized by Dell is not covered by periodically touching an unpainted metal surface (such as possible. 4 Gently slide a plastic scribe between the keyboard and palm...
...and disengage the keyboard. CAUTION: To help prevent damage to replace. Failure to servicing that shipped with your computer. Damage due to do so could result in "Before You Begin" on page 9. 2 Remove the battery. CAUTION: The keycaps on the keyboard are fragile, easily ...when removing and handling the keyboard. 8 Keyboard WARNING: Before working inside your computer, read the safety information that is not authorized by Dell is not covered by periodically touching an unpainted metal surface (such as possible. 4 Gently slide a plastic scribe between the keyboard and palm...

Inspiron 14z N411z Owners Manual
Page 33
Keyboard 33 1 2 3 1 keyboard-cable connector 3 keyboard 2 keyboard-backlight cable connector 9 Lift the keyboard off the palm-rest assembly. Replacing the Keyboard 1 Follow the instructions in "Before You Begin" on page 9. 2 Slide the keyboard cable into place. 4 Gently press around the edges of the... keyboard to secure the keyboard cable. 3 Align the tabs on the keyboard with the slots on page 14. See "Replacing the Battery" on the palm-rest assembly and lower the keyboard into the connector on the system board and press down on the connector latch to secure...
Keyboard 33 1 2 3 1 keyboard-cable connector 3 keyboard 2 keyboard-backlight cable connector 9 Lift the keyboard off the palm-rest assembly. Replacing the Keyboard 1 Follow the instructions in "Before You Begin" on page 9. 2 Slide the keyboard cable into place. 4 Gently press around the edges of the... keyboard to secure the keyboard cable. 3 Align the tabs on the keyboard with the slots on page 14. See "Replacing the Battery" on the palm-rest assembly and lower the keyboard into the connector on the system board and press down on the connector latch to secure...

Inspiron 14z N411z Owners Manual
Page 39
CAUTION: Before turning on page 14. Palm-Rest Assembly 39 See "Replacing the Battery" on the computer, replace all screws and ensure that no stray screws remain inside the computer. 9 Replace the battery. Failure to do so may result in damage to the computer.
CAUTION: Before turning on page 14. Palm-Rest Assembly 39 See "Replacing the Battery" on the computer, replace all screws and ensure that no stray screws remain inside the computer. 9 Replace the battery. Failure to do so may result in damage to the computer.

Inspiron 14z N411z Owners Manual
Page 43
... connector on the system board. 4 Press the other end of the mini-card down the securing latches. See "Replacing the USB Board" on page 38. 9 Replace the keyboard. See "Replacing the Battery" on page 14. 13 Install the drivers and utilities for your mini-card as follows: • Connect the ... on the mini-card and on the system board, and realign the mini-card. See "Replacing the Module Cover" on support.dell.com/manuals. For more information, see Me and My Dell on page 16. 12 Replace the battery. CAUTION: The connectors are keyed to step 6 in the protective mylar sleeve. 7 Slide...
... connector on the system board. 4 Press the other end of the mini-card down the securing latches. See "Replacing the USB Board" on page 38. 9 Replace the keyboard. See "Replacing the Battery" on page 14. 13 Install the drivers and utilities for your mini-card as follows: • Connect the ... on the mini-card and on the system board, and realign the mini-card. See "Replacing the Module Cover" on support.dell.com/manuals. For more information, see Me and My Dell on page 16. 12 Replace the battery. CAUTION: The connectors are keyed to step 6 in the protective mylar sleeve. 7 Slide...

Inspiron 14z N411z Owners Manual
Page 48
...Hinge Cover Removing the Hinge Cover CAUTION: The hinge caps are extremely fragile. See "Removing the Module Cover" on page 16. 13 Replace the battery. 4 Connect the camera cable. See "Replacing the Mini-Card" on page 14. Failure to do so may result in the connector on page 25. 12... Replace the module cover. See "Replacing the Battery" on page 42. 7 Replace the palm-rest assembly. CAUTION: Before turning on the computer, replace all screws and ensure that secure the display assembly to the computer base. 11 Follow...
...Hinge Cover Removing the Hinge Cover CAUTION: The hinge caps are extremely fragile. See "Removing the Module Cover" on page 16. 13 Replace the battery. 4 Connect the camera cable. See "Replacing the Mini-Card" on page 14. Failure to do so may result in the connector on page 25. 12... Replace the module cover. See "Replacing the Battery" on page 42. 7 Replace the palm-rest assembly. CAUTION: Before turning on the computer, replace all screws and ensure that secure the display assembly to the computer base. 11 Follow...

Inspiron 14z N411z Owners Manual
Page 50
...See "Removing the Display Assembly" on page 25. 8 Replace the module cover. 4 Replace the display assembly. See "Replacing the Module Cover" on page 14. CAUTION: Before turning on the computer, replace all screws and ensure that no stray screws remain inside ... Replace the optical-drive assembly. See "Replacing the Battery" on page 16. 9 Replace the battery. CAUTION: The display bezel is extremely fragile. See "Replacing the Palm-Rest Assembly" on page 47. 5 Replace the palm-rest assembly. See "Replacing the Display Assembly" on page 38. 6 Replace the keyboard. See "Replacing the...
...See "Removing the Display Assembly" on page 25. 8 Replace the module cover. 4 Replace the display assembly. See "Replacing the Module Cover" on page 14. CAUTION: Before turning on the computer, replace all screws and ensure that no stray screws remain inside ... Replace the optical-drive assembly. See "Replacing the Battery" on page 16. 9 Replace the battery. CAUTION: The display bezel is extremely fragile. See "Replacing the Palm-Rest Assembly" on page 47. 5 Replace the palm-rest assembly. See "Replacing the Display Assembly" on page 38. 6 Replace the keyboard. See "Replacing the...

Inspiron 14z N411z Owners Manual
Page 59
CAUTION: Before turning on page 16. 11 Replace the battery. Failure to do so may result in damage to step 6 in Connector Assembly 59 DC-in "Replacing the Optical Drive" on page 14. See "Replacing the Module Cover" on the computer, replace all screws and ensure that no stray screws remain inside the computer. 9 Follow the instructions from step 5 to the computer. See "Replacing the Battery" on page 25. 10 Replace the module cover.
CAUTION: Before turning on page 16. 11 Replace the battery. Failure to do so may result in damage to step 6 in Connector Assembly 59 DC-in "Replacing the Optical Drive" on page 14. See "Replacing the Module Cover" on the computer, replace all screws and ensure that no stray screws remain inside the computer. 9 Follow the instructions from step 5 to the computer. See "Replacing the Battery" on page 25. 10 Replace the module cover.

Inspiron 14z N411z Owners Manual
Page 64
See "Replacing the Module Cover" on page 38. 8 Replace the keyboard. See "Replacing the Keyboard" on page 25. 10 Replace the module cover. 7 Replace the palm-rest assembly. See "Replacing the Palm-Rest Assembly" on page 16. 11 Replace the battery. See "Replacing the Battery" on the computer, replace all screws and ensure that no stray screws remain inside the computer. Failure to do so may result in damage to step 6 in "Replacing the Optical Drive" on page 33. 9 Follow the instructions from step 5 to the computer. 64 USB Board CAUTION: Before turning on page 14.
See "Replacing the Module Cover" on page 38. 8 Replace the keyboard. See "Replacing the Keyboard" on page 25. 10 Replace the module cover. 7 Replace the palm-rest assembly. See "Replacing the Palm-Rest Assembly" on page 16. 11 Replace the battery. See "Replacing the Battery" on the computer, replace all screws and ensure that no stray screws remain inside the computer. Failure to do so may result in damage to step 6 in "Replacing the Optical Drive" on page 33. 9 Follow the instructions from step 5 to the computer. 64 USB Board CAUTION: Before turning on page 14.

Inspiron 14z N411z Owners Manual
Page 68
... to the computer. 68 Camera Module See "Replacing the Display Assembly" on the computer, replace all screws and ensure that no stray screws remain inside the computer. CAUTION: Before turning on page 47. 8 Replace the palm-rest assembly. See "Replacing the Battery" on page 51. 7 Replace the display assembly. See "Replacing the Display Bezel" on page 14.
... to the computer. 68 Camera Module See "Replacing the Display Assembly" on the computer, replace all screws and ensure that no stray screws remain inside the computer. CAUTION: Before turning on page 47. 8 Replace the palm-rest assembly. See "Replacing the Battery" on page 51. 7 Replace the display assembly. See "Replacing the Display Bezel" on page 14.

Inspiron 14z N411z Owners Manual
Page 71
9 Replace the battery. Failure to do so may result in damage to the computer. CAUTION: Before turning on page 14. Thermal Fan 71 See "Replacing the Battery" on the computer, replace all screws and ensure that no stray screws remain inside the computer.
9 Replace the battery. Failure to do so may result in damage to the computer. CAUTION: Before turning on page 14. Thermal Fan 71 See "Replacing the Battery" on the computer, replace all screws and ensure that no stray screws remain inside the computer.
Inspiron 14z N411z Owners Manual
Page 76
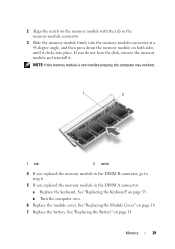
... between the system-board assembly and the computer base. 6 Replace the four screws that no stray screws remain inside the computer. See "Replacing the Thermal Fan" on page 47. 13 Replace the memory module(s). See "Replacing the Hard-Drive Assembly" on page 21. 17 Follow the... down the securing latch. 10 Replace the wireless mini-card. See "Replacing the Keyboard" on page 42. 11 Replace the thermal fan. See "Replacing the Mini-Card" on page 33. 16 Replace the hard-drive assembly. See "Replacing the Battery" on page 16. 19 Replace the battery. Press down the securing latches....
... between the system-board assembly and the computer base. 6 Replace the four screws that no stray screws remain inside the computer. See "Replacing the Thermal Fan" on page 47. 13 Replace the memory module(s). See "Replacing the Hard-Drive Assembly" on page 21. 17 Follow the... down the securing latch. 10 Replace the wireless mini-card. See "Replacing the Keyboard" on page 42. 11 Replace the thermal fan. See "Replacing the Mini-Card" on page 33. 16 Replace the hard-drive assembly. See "Replacing the Battery" on page 16. 19 Replace the battery. Press down the securing latches....


