
Service Manual
Page 7
19 Coin-Cell Battery 87 Removing the Coin-Cell Battery 87 Replacing the Coin-Cell Battery 88 20 Thermal Cooling Assembly 89 Removing the Thermal Cooling Assembly 89 Replacing the Thermal Cooling Assembly 90 21 Processor Module 91 Removing the Processor Module 91 Replacing the Processor Module 92 22 Hard-Drive Assembly 95 Removing the Hard-Drive Assembly 95 Replacing the Hard-Drive Assembly 97 23 I/O Board 99 Removing the I/O Board 99 Replacing the I/O Board 100 24 AC-Adapter Connector 101 Removing the AC-Adapter Connector 101 Contents 7
19 Coin-Cell Battery 87 Removing the Coin-Cell Battery 87 Replacing the Coin-Cell Battery 88 20 Thermal Cooling Assembly 89 Removing the Thermal Cooling Assembly 89 Replacing the Thermal Cooling Assembly 90 21 Processor Module 91 Removing the Processor Module 91 Replacing the Processor Module 92 22 Hard-Drive Assembly 95 Removing the Hard-Drive Assembly 95 Replacing the Hard-Drive Assembly 97 23 I/O Board 99 Removing the I/O Board 99 Replacing the I/O Board 100 24 AC-Adapter Connector 101 Removing the AC-Adapter Connector 101 Contents 7
Service Manual
Page 80
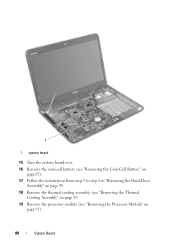
1 1 system board 15 Turn the system board over. 16 Remove the coin-cell battery (see "Removing the Coin-Cell Battery" on page 87). 17 Follow the instructions from step 3 to step 5 in "Removing the Hard-Drive Assembly" on page 95. 18 Remove the thermal cooling assembly (see "Removing the Thermal Cooling Assembly" on page 89. 19 Remove the processor module (see "Removing the Processor Module" on page 91). 80 System Board
1 1 system board 15 Turn the system board over. 16 Remove the coin-cell battery (see "Removing the Coin-Cell Battery" on page 87). 17 Follow the instructions from step 3 to step 5 in "Removing the Hard-Drive Assembly" on page 95. 18 Remove the thermal cooling assembly (see "Removing the Thermal Cooling Assembly" on page 89. 19 Remove the processor module (see "Removing the Processor Module" on page 91). 80 System Board
Service Manual
Page 95
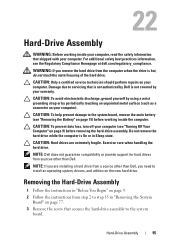
...: To avoid electrostatic discharge, ground yourself by using a wrist grounding strap or by your warranty. CAUTION: Hard drives are installing a hard drive from a source other than Dell, you remove the hard drive from sources other than Dell. Hard-Drive Assembly 95 Damage due to install an operating system, drivers, and utilities on page 9. 2 Follow the instructions from step 2 to step 15...
...: To avoid electrostatic discharge, ground yourself by using a wrist grounding strap or by your warranty. CAUTION: Hard drives are installing a hard drive from a source other than Dell, you remove the hard drive from sources other than Dell. Hard-Drive Assembly 95 Damage due to install an operating system, drivers, and utilities on page 9. 2 Follow the instructions from step 2 to step 15...
Service Manual
Page 96
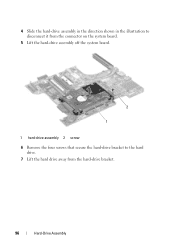
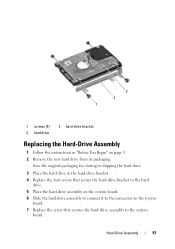
4 Slide the hard-drive assembly in the direction shown in the illustration to disconnect it from the connector on the system board. 5 Lift the hard-drive assembly off the system board. 2 1 1 hard-drive assembly 2 screw 6 Remove the four screws that secure the hard-drive bracket to the hard drive. 7 Lift the hard drive away from the hard-drive bracket. 96 Hard-Drive Assembly
4 Slide the hard-drive assembly in the direction shown in the illustration to disconnect it from the connector on the system board. 5 Lift the hard-drive assembly off the system board. 2 1 1 hard-drive assembly 2 screw 6 Remove the four screws that secure the hard-drive bracket to the hard drive. 7 Lift the hard drive away from the hard-drive bracket. 96 Hard-Drive Assembly
Service Manual
Page 97
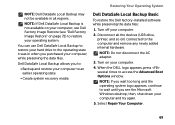
... the hard-drive assembly to the system board. Hard-Drive Assembly 97 3 2 1 1 screws (4) 3 hard drive 2 hard-drive bracket Replacing the Hard-Drive Assembly 1 Follow the instructions in the hard-drive bracket. 4 Replace the four screws that secure the hard-drive bracket to the hard drive. 5 Place the hard-drive assembly on the system board. 6 Slide the hard-drive assembly to connect it to the connector on page 9. 2 Remove the new hard drive from...
... the hard-drive assembly to the system board. Hard-Drive Assembly 97 3 2 1 1 screws (4) 3 hard drive 2 hard-drive bracket Replacing the Hard-Drive Assembly 1 Follow the instructions in the hard-drive bracket. 4 Replace the four screws that secure the hard-drive bracket to the hard drive. 5 Place the hard-drive assembly on the system board. 6 Slide the hard-drive assembly to connect it to the connector on page 9. 2 Remove the new hard drive from...
Setup Guide
Page 71
...in all the devices (USB drive, printer, and so on your computer, use Dell DataSafe Local Backup to restore your hard drive to an earlier operating state • Create system recovery media Dell DataSafe Local Backup Basic To restore the Dell factory-installed software while preserving...Backup and restore your operating system. Dell DataSafe Local Backup allows you purchased your computer. 4. Disconnect all regions. Restoring Your Operating System NOTE: Dell DataSafe Local Backup may not be available in when you to the computer and remove any newly added internal hardware.
...in all the devices (USB drive, printer, and so on your computer, use Dell DataSafe Local Backup to restore your hard drive to an earlier operating state • Create system recovery media Dell DataSafe Local Backup Basic To restore the Dell factory-installed software while preserving...Backup and restore your operating system. Dell DataSafe Local Backup allows you purchased your computer. 4. Disconnect all regions. Restoring Your Operating System NOTE: Dell DataSafe Local Backup may not be available in when you to the computer and remove any newly added internal hardware.
Setup Guide
Page 74
... up the data before using this option. Data files include documents, spreadsheets, e-mail messages, digital photos, music files, and so on the hard drive and removes any programs or drivers installed after you received your operating system permanently deletes all data before using Dell Factory Image Restore. then, shut down your operating system problem.
... up the data before using this option. Data files include documents, spreadsheets, e-mail messages, digital photos, music files, and so on the hard drive and removes any programs or drivers installed after you received your operating system permanently deletes all data before using Dell Factory Image Restore. then, shut down your operating system problem.

Setup Guide
Page 80
... prominently on page 82. 2. Include any accessories that belong with your region, see "Contacting Dell" on the outside of the box. Dell is for any other storage device in the product. lost removable media that may be included with the item(s) being returned, whether for the return. 3....to call for your return. 1. Remove any error messages reported by Dell Diagnostics (see "Diagnostic Checklist" on page 64). 4. Include a copy of the Diagnostics Checklist (see "Dell Diagnostics" on page 81), indicating the tests that you back up any data on the hard drive(s) and on ) if the ...
... prominently on page 82. 2. Include any accessories that belong with your region, see "Contacting Dell" on the outside of the box. Dell is for any other storage device in the product. lost removable media that may be included with the item(s) being returned, whether for the return. 3....to call for your return. 1. Remove any error messages reported by Dell Diagnostics (see "Diagnostic Checklist" on page 64). 4. Include a copy of the Diagnostics Checklist (see "Dell Diagnostics" on page 81), indicating the tests that you back up any data on the hard drive(s) and on ) if the ...


