
Me and My Dell
Page 10
... Restore 132 About Dell Factory Image Restore 132 Starting Dell Factory Image Restore 132 Operating System Disc 133 About Operating System Disc 133 Reinstalling the Operating System Using the Operating System Disc 133 Diagnostics 137 Pre-Boot System Assessment 137 Invoking PSA 137 Enhanced PSA 138 Invoking ePSA 138 Beep Codes 139 Troubleshooting..., or Working Intermittently 143 External Keyboard 143 Laptop Keyboard 144 System Setup (BIOS 147 Entering System Setup (BIOS 147 System Setup Screens 148 Changing the Boot Sequence for the Current Boot 149 10 Contents
... Restore 132 About Dell Factory Image Restore 132 Starting Dell Factory Image Restore 132 Operating System Disc 133 About Operating System Disc 133 Reinstalling the Operating System Using the Operating System Disc 133 Diagnostics 137 Pre-Boot System Assessment 137 Invoking PSA 137 Enhanced PSA 138 Invoking ePSA 138 Beep Codes 139 Troubleshooting..., or Working Intermittently 143 External Keyboard 143 Laptop Keyboard 144 System Setup (BIOS 147 Entering System Setup (BIOS 147 System Setup Screens 148 Changing the Boot Sequence for the Current Boot 149 10 Contents
Me and My Dell
Page 11
Changing the Default Boot Sequence 150 Flashing the BIOS 150 Getting Help and Contacting Dell 155 Self-Help Options 155 Accessing Windows Help and Support 155 Contacting Dell 156 Before Calling Dell 159 Computer Maintenance 160 Ergonomic Instructions for Desktops 160 Ergonomic Instructions for Laptops 162 Dell and the Environment 164 Regulatory Compliance Policy 165 Contact...
Changing the Default Boot Sequence 150 Flashing the BIOS 150 Getting Help and Contacting Dell 155 Self-Help Options 155 Accessing Windows Help and Support 155 Contacting Dell 156 Before Calling Dell 159 Computer Maintenance 160 Ergonomic Instructions for Desktops 160 Ergonomic Instructions for Laptops 162 Dell and the Environment 164 Regulatory Compliance Policy 165 Contact...
Me and My Dell
Page 126
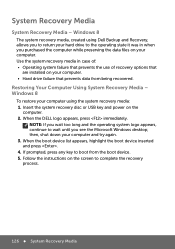
... your computer and try again. 3. When the boot device list appears, highlight the boot device inserted and press . 4. Windows 8 The system recovery media, created using Dell Backup and Recovery, allows you to return your hard drive to boot from being recovered. Windows 8 To restore your computer.... When the DELL logo appears, press immediately. If prompted, press any key to the ...
... your computer and try again. 3. When the boot device list appears, highlight the boot device inserted and press . 4. Windows 8 The system recovery media, created using Dell Backup and Recovery, allows you to return your hard drive to boot from being recovered. Windows 8 To restore your computer.... When the DELL logo appears, press immediately. If prompted, press any key to the ...
Me and My Dell
Page 131
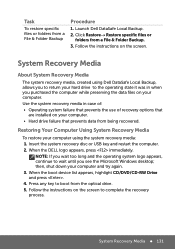
... that prevents data from the optical drive. 5. NOTE: If you wait too long and the operating system logo appears, continue to boot from being recovered. When the boot device list appears, highlight CD/DVD/CD-RW Drive and press . 4. Task To restore specific files or folders from a File ... recovery media in when you see the Microsoft Windows desktop; Insert the system recovery disc or USB key and restart the computer. 2. Launch Dell DataSafe Local Backup. 2. Press any key to wait until you purchased the computer while preserving the data files on your computer. • ...
... that prevents data from the optical drive. 5. NOTE: If you wait too long and the operating system logo appears, continue to boot from being recovered. When the boot device list appears, highlight CD/DVD/CD-RW Drive and press . 4. Task To restore specific files or folders from a File ... recovery media in when you see the Microsoft Windows desktop; Insert the system recovery disc or USB key and restart the computer. 2. Launch Dell DataSafe Local Backup. 2. Press any key to wait until you purchased the computer while preserving the data files on your computer. • ...
Me and My Dell
Page 132
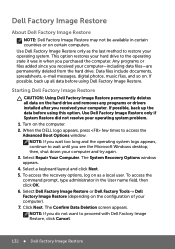
...Next. If possible, back up all data on the configuration of your hard drive to access the Advanced Boot Options window. Select Dell Factory Image Restore or Dell Factory Tools→ Dell Factory Image Restore (depending on the hard drive and removes any programs or drivers installed after you received... e-mail messages, digital photos, music files, and so on as the last method to proceed with Dell Factory Image Restore, click Cancel. 132 Dell Factory Image Restore When the DELL logo appears, press few times to the operating state it was in the User name field, then ...
...Next. If possible, back up all data on the configuration of your hard drive to access the Advanced Boot Options window. Select Dell Factory Image Restore or Dell Factory Tools→ Dell Factory Image Restore (depending on the hard drive and removes any programs or drivers installed after you received... e-mail messages, digital photos, music files, and so on as the last method to proceed with Dell Factory Image Restore, click Cancel. 132 Dell Factory Image Restore When the DELL logo appears, press few times to the operating state it was in the User name field, then ...
Me and My Dell
Page 133
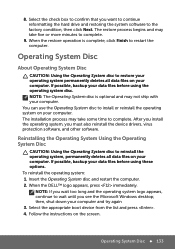
... the Operating System Disc CAUTION: Using the Operating System disc to install or reinstall the operating system on your computer. When the DELL™ logo appears, press immediately. If possible, backup your computer. You can use the Operating System disc to reinstall the operating...the Operating System disc to wait until you must also reinstall the device drivers, virus protection software, and other software. Select the appropriate boot device from the list and press . 4. The installation process may take some time to complete. 9. After you install the operating system...
... the Operating System Disc CAUTION: Using the Operating System disc to install or reinstall the operating system on your computer. When the DELL™ logo appears, press immediately. If possible, backup your computer. You can use the Operating System disc to reinstall the operating...the Operating System disc to wait until you must also reinstall the device drivers, virus protection software, and other software. Select the appropriate boot device from the list and press . 4. The installation process may take some time to complete. 9. After you install the operating system...
Me and My Dell
Page 137
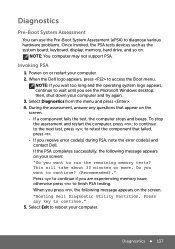
...test, the computer stops and beeps. Press to continue if you receive error code(s) during PSA, note the error code(s) and contact Dell. Press any questions that failed, press . -- Power-on . If the PSA completes successfully, the following message appears on the screen...61557; 137 then, shut down your computer. to continue to access the Boot menu. If you are experiencing memory issue, otherwise press to continue." 5. When you see the Microsoft Windows desktop; "Booting Dell Diagnostic Utility Partition. During the assessment, answer any key to finish PSA ...
...test, the computer stops and beeps. Press to continue if you receive error code(s) during PSA, note the error code(s) and contact Dell. Press any questions that failed, press . -- Power-on . If the PSA completes successfully, the following message appears on the screen...61557; 137 then, shut down your computer. to continue to access the Boot menu. If you are experiencing memory issue, otherwise press to continue." 5. When you see the Microsoft Windows desktop; "Booting Dell Diagnostic Utility Partition. During the assessment, answer any key to finish PSA ...
Me and My Dell
Page 138
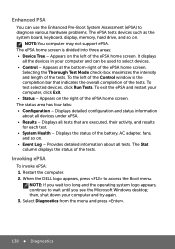
... AC adapter, fans, and so on. • Event Log - Displays all the devices in your computer and can use the Enhanced Pre-Boot System Assessment (ePSA) to wait until you wait too long and the operating system logo appears, continue to diagnose various hardware problems. The ePSA.... Restart the computer. 2. Provides detailed information about all tests. Select Diagnostics from the menu and press . 138 Diagnostics When the DELL logo appears, press to select devices. • Control - NOTE:You computer may not support ePSA. The status area has four tabs: • ...
... AC adapter, fans, and so on. • Event Log - Displays all the devices in your computer and can use the Enhanced Pre-Boot System Assessment (ePSA) to wait until you wait too long and the operating system logo appears, continue to diagnose various hardware problems. The ePSA.... Restart the computer. 2. Provides detailed information about all tests. Select Diagnostics from the menu and press . 138 Diagnostics When the DELL logo appears, press to select devices. • Control - NOTE:You computer may not support ePSA. The status area has four tabs: • ...
Me and My Dell
Page 149
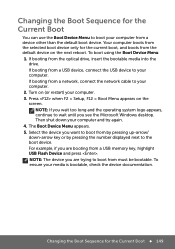
...the device you see the Microsoft Windows desktop. Changing the Boot Sequence for the current boot, and boots from must be bootable. If booting from a USB memory key, highlight USB Flash Device and press . NOTE: The device you are trying to boot from the default device on the next reboot. NOTE: ... the operating system logo appears, continue to wait until you want to boot from the selected boot device only for the Current Boot 149 Your computer boots from by pressing the number displayed next to the boot device. Then shut down -arrow key or by pressing up-arrow/ ...
...the device you see the Microsoft Windows desktop. Changing the Boot Sequence for the current boot, and boots from must be bootable. If booting from a USB memory key, highlight USB Flash Device and press . NOTE: The device you are trying to boot from the default device on the next reboot. NOTE: ... the operating system logo appears, continue to wait until you want to boot from the selected boot device only for the Current Boot 149 Your computer boots from by pressing the number displayed next to the boot device. Then shut down -arrow key or by pressing up-arrow/ ...
Me and My Dell
Page 150
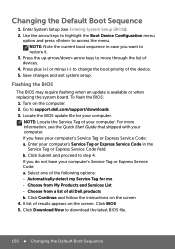
...to access the menu. b. Automatically detect my Service Tag for your computer. Use the arrow keys to highlight the Boot Device Configuration menu option and press to support.dell.com/support/downloads. 3. Locate the BIOS update file for me -- NOTE: Locate the Service Tag of the ... and proceed to download the latest BIOS file. 150 Changing the Default Boot Sequence Choose from a list of results appears on the screen. Changing the Default Boot Sequence 1. A list of all Dell products b. Press the up-arrow/down-arrow keys to restore it. 3. Enter your...
...to access the menu. b. Automatically detect my Service Tag for your computer. Use the arrow keys to highlight the Boot Device Configuration menu option and press to support.dell.com/support/downloads. 3. Locate the BIOS update file for me -- NOTE: Locate the Service Tag of the ... and proceed to download the latest BIOS file. 150 Changing the Default Boot Sequence Choose from a list of results appears on the screen. Changing the Default Boot Sequence 1. A list of all Dell products b. Press the up-arrow/down-arrow keys to restore it. 3. Enter your...

Me and My Dell
Page 151
... select your computer. 8. The file icon appears in the folder and is titled the same as the downloaded BIOS update file. 10. Changing the Default Boot Sequence 151 Navigate to download the file on the screen. If the Download Complete window appears, click Close. 9. In the Save As window, select...
... select your computer. 8. The file icon appears in the folder and is titled the same as the downloaded BIOS update file. 10. Changing the Default Boot Sequence 151 Navigate to download the file on the screen. If the Download Complete window appears, click Close. 9. In the Save As window, select...

Me and My Dell
Page 152
152 Changing the Default Boot Sequence
152 Changing the Default Boot Sequence

Owner's Manual
Page 7
19 System Setup 83 Entering System Setup 83 System Setup Options 84 Boot Sequence 87 Boot Options 87 Changing Boot Sequence for the Current Boot . . 88 Changing Boot Sequence for Future Boots . . . . 88 20 Flashing the BIOS 91 Contents 7
19 System Setup 83 Entering System Setup 83 System Setup Options 84 Boot Sequence 87 Boot Options 87 Changing Boot Sequence for the Current Boot . . 88 Changing Boot Sequence for Future Boots . . . . 88 20 Flashing the BIOS 91 Contents 7

Owner's Manual
Page 19
NOTE: If the memory module is not installed properly, the computer may not boot. 1 2 1 tab 2 notch 4 Replace the module cover. As the computer boots, it detects the memory module(s) and automatically updates the system configuration information. See "Replacing the Module Cover" on page 16. 5 Replace the battery as per ...
NOTE: If the memory module is not installed properly, the computer may not boot. 1 2 1 tab 2 notch 4 Replace the module cover. As the computer boots, it detects the memory module(s) and automatically updates the system configuration information. See "Replacing the Module Cover" on page 16. 5 Replace the battery as per ...
Owner's Manual
Page 86
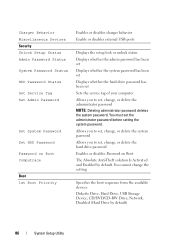
... Password Status System Password Status HDD Password Status Set Service Tag Set Admin Password Set System Password Set HDD Password Password on Boot Computrace Boot 1st Boot Priority Enables or disables charger behavior Enable or disables external USB ports Displays the setup lock or unlock status Displays whether the ...whether the hard drive password has been set Sets the service tag of your computer Allows you to set, change the setting Specifies the boot sequence from the available devices Diskette Drive; Allows you to set, change, or delete the system password Allows you to set the ...
... Password Status System Password Status HDD Password Status Set Service Tag Set Admin Password Set System Password Set HDD Password Password on Boot Computrace Boot 1st Boot Priority Enables or disables charger behavior Enable or disables external USB ports Displays the setup lock or unlock status Displays whether the ...whether the hard drive password has been set Sets the service tag of your computer Allows you to set, change the setting Specifies the boot sequence from the available devices Diskette Drive; Allows you to set, change, or delete the system password Allows you to set the ...

Owner's Manual
Page 87
...Drive - CD/DVD/CD-RW Drive; CD/DVD/CD-RW Drive; Network; Hard Drive; Network; USB Storage Device; The computer attempts to boot from the available devices Diskette Drive; If no operating system is on the drive, the computer generates an error message. • Hard Drive -... Drive; If no operating system is on the drive, the computer generates an error message. 2nd Boot Priority 3rd Boot Priority 4th Boot Priority 5th Boot Priority Exit Exit Options Specifies the boot sequence from the available devices Diskette Drive; Network; CD/DVD/CD-RW Drive; Hard Drive; USB...
...Drive - CD/DVD/CD-RW Drive; CD/DVD/CD-RW Drive; Network; Hard Drive; Network; USB Storage Device; The computer attempts to boot from the available devices Diskette Drive; If no operating system is on the drive, the computer generates an error message. • Hard Drive -... Drive; If no operating system is on the drive, the computer generates an error message. 2nd Boot Priority 3rd Boot Priority 4th Boot Priority 5th Boot Priority Exit Exit Options Specifies the boot sequence from the available devices Diskette Drive; Network; CD/DVD/CD-RW Drive; Hard Drive; USB...

Owner's Manual
Page 88
... and press . Then shut down your device is in the lower-right corner of the screen, press . For example, if you are booting to a USB device, the device must be bootable. If no operating system, the computer generates an error message. • USB Storage Device - The... Boot Device Menu appears, listing all available boot devices. 3 On the Boot Device Menu choose the device you see the Microsoft Windows desktop. NOTE: If you wait too long and the operating system...
... and press . Then shut down your device is in the lower-right corner of the screen, press . For example, if you are booting to a USB device, the device must be bootable. If no operating system, the computer generates an error message. • USB Storage Device - The... Boot Device Menu appears, listing all available boot devices. 3 On the Boot Device Menu choose the device you see the Microsoft Windows desktop. NOTE: If you wait too long and the operating system...
Owner's Manual
Page 89
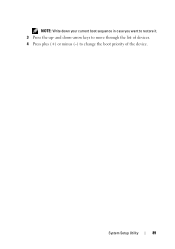
System Setup Utility 89 NOTE: Write down -arrow keys to move through the list of devices. 4 Press plus (+) or minus (-) to restore it. 3 Press the up- and down your current boot sequence in case you want to change the boot priority of the device.
System Setup Utility 89 NOTE: Write down -arrow keys to move through the list of devices. 4 Press plus (+) or minus (-) to restore it. 3 Press the up- and down your current boot sequence in case you want to change the boot priority of the device.


