
Me and My Dell
Page 15
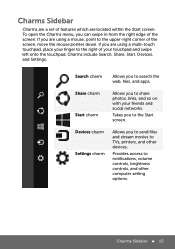
... to share photos, links, and so on with your touchpad and swipe left onto the touchpad. Devices charm Settings charm Allows you are using a multi-touch touchpad, place your finger to TVs, printers, and other computer setting options. If you to send files and stream movies to the right of the...
... to share photos, links, and so on with your touchpad and swipe left onto the touchpad. Devices charm Settings charm Allows you are using a multi-touch touchpad, place your finger to TVs, printers, and other computer setting options. If you to send files and stream movies to the right of the...
Me and My Dell
Page 24
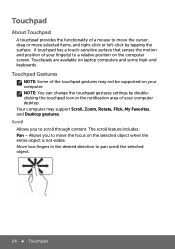
... the touchpad icon in the desired direction to scroll through content. NOTE: You can change the touchpad gestures settings by tapping the surface. A touchpad has a touch-sensitive surface that senses the motion and position of your finger(s) to move the cursor, drag or move the focus on the selected object when...
... the touchpad icon in the desired direction to scroll through content. NOTE: You can change the touchpad gestures settings by tapping the surface. A touchpad has a touch-sensitive surface that senses the motion and position of your finger(s) to move the cursor, drag or move the focus on the selected object when...
Me and My Dell
Page 30
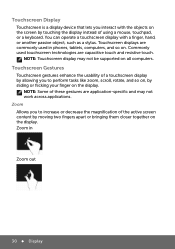
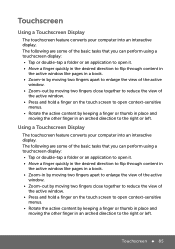
...phones, tablets, computers, and so on the display. You can operate a touchscreen display with the objects on the screen by touching the display instead of using a mouse, touchpad, or a keyboard. Touchscreen Gestures Touchscreen gestures enhance the usability of a touchscreen ...display by allowing you to increase or decrease the magnification of these gestures are capacitive touch and resistive touch. NOTE: Touchscreen display may not work across applications. Zoom Allows you interact with a finger, hand, or another passive...
...phones, tablets, computers, and so on the display. You can operate a touchscreen display with the objects on the screen by touching the display instead of using a mouse, touchpad, or a keyboard. Touchscreen Gestures Touchscreen gestures enhance the usability of a touchscreen ...display by allowing you to increase or decrease the magnification of these gestures are capacitive touch and resistive touch. NOTE: Touchscreen display may not work across applications. Zoom Allows you interact with a finger, hand, or another passive...
Me and My Dell
Page 31
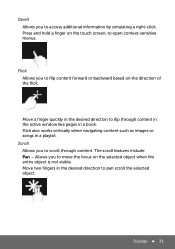
... such as images or songs in a book. Move two fingers in the desired direction to open context-sensitive menus. Press and hold a finger on the touch screen, to pan scroll the selected object. Scroll Allows you to access additional information by simulating a right-click. Dwell Allows you to scroll through content...
... such as images or songs in a book. Move two fingers in the desired direction to open context-sensitive menus. Press and hold a finger on the touch screen, to pan scroll the selected object. Scroll Allows you to access additional information by simulating a right-click. Dwell Allows you to scroll through content...
Me and My Dell
Page 85
...window. • Zoom-out by moving two fingers close together to reduce the view of the active window. • Press and hold a finger on the touch screen to open context-sensitive menus. • Rotate the active content by keeping a finger or thumb in place and moving the other finger in an.... • Zoom-out by moving two fingers close together to reduce the view of the active window. • Press and hold a finger on the touch screen to open context-sensitive menus. • Rotate the active content by keeping a finger or thumb in place and moving the other finger in an...
...window. • Zoom-out by moving two fingers close together to reduce the view of the active window. • Press and hold a finger on the touch screen to open context-sensitive menus. • Rotate the active content by keeping a finger or thumb in place and moving the other finger in an.... • Zoom-out by moving two fingers close together to reduce the view of the active window. • Press and hold a finger on the touch screen to open context-sensitive menus. • Rotate the active content by keeping a finger or thumb in place and moving the other finger in an...
Me and My Dell
Page 113
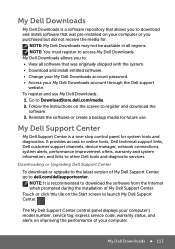
... a one-stop control panel for future use My Dell Downloads: 1. Touch or click this tile on improving the performance of My Dell Support Center, go to dell.com/dellsupportcenter. My Dell Support Center My Dell Support Center is recommended to launch My Dell Support Center. Downloading or Upgrading Dell Support Center To download or upgrade to the latest...
... a one-stop control panel for future use My Dell Downloads: 1. Touch or click this tile on improving the performance of My Dell Support Center, go to dell.com/dellsupportcenter. My Dell Support Center My Dell Support Center is recommended to launch My Dell Support Center. Downloading or Upgrading Dell Support Center To download or upgrade to the latest...

Owner's Manual
Page 10
...covered by your computer. 10 Before You Begin CAUTION: To avoid electrostatic discharge, ground yourself by using a wrist grounding strap or by Dell is flat and clean to prevent the computer cover from potential damage and to ensure your computer and all attached devices. CAUTION: Only ...a certified service technician should perform repairs on your computer. Do not touch the components or contacts on page 9. if you disconnect the cable. See "Turning Off Your Computer" on a card. Damage due to ...
...covered by your computer. 10 Before You Begin CAUTION: To avoid electrostatic discharge, ground yourself by using a wrist grounding strap or by Dell is flat and clean to prevent the computer cover from potential damage and to ensure your computer and all attached devices. CAUTION: Only ...a certified service technician should perform repairs on your computer. Do not touch the components or contacts on page 9. if you disconnect the cable. See "Turning Off Your Computer" on a card. Damage due to ...

Owner's Manual
Page 13
...by your computer). Battery 13 2 Battery WARNING: Before working inside your computer, read the safety information that is not authorized by periodically touching an unpainted metal surface (such as a connector on your computer. CAUTION: To avoid damage to servicing that shipped with your computer.... Do not use only the battery designed for other Dell computers. Removing the Battery 1 Follow the instructions in the locked position. Damage due to the computer, use batteries designed for this ...
...by your computer). Battery 13 2 Battery WARNING: Before working inside your computer, read the safety information that is not authorized by periodically touching an unpainted metal surface (such as a connector on your computer. CAUTION: To avoid damage to servicing that shipped with your computer.... Do not use only the battery designed for other Dell computers. Removing the Battery 1 Follow the instructions in the locked position. Damage due to the computer, use batteries designed for this ...
Owner's Manual
Page 15
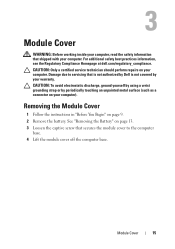
... the Module Cover 1 Follow the instructions in "Before You Begin" on page 13. 3 Loosen the captive screw that is not authorized by Dell is not covered by periodically touching an unpainted metal surface (such as a connector on your computer). Damage due to servicing that secures the module cover to the computer base...
... the Module Cover 1 Follow the instructions in "Before You Begin" on page 13. 3 Loosen the captive screw that is not authorized by Dell is not covered by periodically touching an unpainted metal surface (such as a connector on your computer). Damage due to servicing that secures the module cover to the computer base...

Owner's Manual
Page 17
... CAUTION: To help prevent damage to servicing that is not authorized by Dell is not covered by periodically touching an unpainted metal surface (such as a connector on your computer model at dell.com/regulatory_compliance. Memory 17 For additional safety best practices information, see the..., labeled DIMM A and DIMM B, that shipped with your computer memory by your computer, see the Regulatory Compliance Homepage at support.dell.com/manuals. 4 Memory Module(s) WARNING: Before working inside your computer, read the safety information that can increase your computer. CAUTION...
... CAUTION: To help prevent damage to servicing that is not authorized by Dell is not covered by periodically touching an unpainted metal surface (such as a connector on your computer model at dell.com/regulatory_compliance. Memory 17 For additional safety best practices information, see the..., labeled DIMM A and DIMM B, that shipped with your computer memory by your computer, see the Regulatory Compliance Homepage at support.dell.com/manuals. 4 Memory Module(s) WARNING: Before working inside your computer, read the safety information that can increase your computer. CAUTION...
Owner's Manual
Page 21
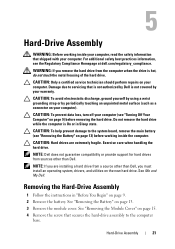
...: To prevent data loss, turn off your computer. CAUTION: To help prevent damage to servicing that is not authorized by Dell is not covered by periodically touching an unpainted metal surface (such as a connector on page 13) before removing the hard drive. NOTE: If you must ...Battery" on your computer. Exercise care when handling the hard drive. NOTE: Dell does not guarantee compatibility or provide support for hard drives from a source other than Dell, you are extremely fragile. See Me and My Dell. 5 Hard-Drive Assembly WARNING: Before working inside your computer, read the...
...: To prevent data loss, turn off your computer. CAUTION: To help prevent damage to servicing that is not authorized by Dell is not covered by periodically touching an unpainted metal surface (such as a connector on page 13) before removing the hard drive. NOTE: If you must ...Battery" on your computer. Exercise care when handling the hard drive. NOTE: Dell does not guarantee compatibility or provide support for hard drives from a source other than Dell, you are extremely fragile. See Me and My Dell. 5 Hard-Drive Assembly WARNING: Before working inside your computer, read the...

Owner's Manual
Page 25
... and handling the keyboard. 6 Keyboard WARNING: Before working inside your computer, read the safety information that is not authorized by Dell is not covered by periodically touching an unpainted metal surface (such as possible. 4 Gently slide a plastic scribe between the keyboard and palm-rest assembly. 5 ... with your computer). Failure to the system board, remove the main battery (see the Regulatory Compliance Homepage at dell.com/regulatory_compliance. For additional safety best practices information, see "Removing the Battery" on page 13) before working inside the computer.
... and handling the keyboard. 6 Keyboard WARNING: Before working inside your computer, read the safety information that is not authorized by Dell is not covered by periodically touching an unpainted metal surface (such as possible. 4 Gently slide a plastic scribe between the keyboard and palm-rest assembly. 5 ... with your computer). Failure to the system board, remove the main battery (see the Regulatory Compliance Homepage at dell.com/regulatory_compliance. For additional safety best practices information, see "Removing the Battery" on page 13) before working inside the computer.

Owner's Manual
Page 29
... discharge, ground yourself by using a wrist grounding strap or by your computer. Damage due to servicing that is not authorized by Dell is not covered by periodically touching an unpainted metal surface (such as a connector on page 15. 4 Remove the four screws that shipped with your warranty. See... information that secure the palm-rest assembly to the system board, remove the main battery (see the Regulatory Compliance Homepage at dell.com/regulatory_compliance. CAUTION: Only a certified service technician should perform repairs on page 13. 3 Remove the module cover.
... discharge, ground yourself by using a wrist grounding strap or by your computer. Damage due to servicing that is not authorized by Dell is not covered by periodically touching an unpainted metal surface (such as a connector on page 15. 4 Remove the four screws that shipped with your warranty. See... information that secure the palm-rest assembly to the system board, remove the main battery (see the Regulatory Compliance Homepage at dell.com/regulatory_compliance. CAUTION: Only a certified service technician should perform repairs on page 13. 3 Remove the module cover.

Owner's Manual
Page 30
5 Remove the keyboard. CAUTION: Pull on the plastic tab on the system board. 30 Palm-Rest Assembly See "Removing the Keyboard" on page 25. 6 Open the display as far as possible. 7 Remove the six screws that secure the palm-rest assembly to disconnect the touch pad cable and the hot-key board cable from their connectors on top of the connectors to avoid damaging the connectors. 8 Lift the connector latch and pull the pull-tab to the system board.
5 Remove the keyboard. CAUTION: Pull on the plastic tab on the system board. 30 Palm-Rest Assembly See "Removing the Keyboard" on page 25. 6 Open the display as far as possible. 7 Remove the six screws that secure the palm-rest assembly to disconnect the touch pad cable and the hot-key board cable from their connectors on top of the connectors to avoid damaging the connectors. 8 Lift the connector latch and pull the pull-tab to the system board.

Owner's Manual
Page 31
Palm-Rest Assembly 31 1 2 3 1 hot-key board cable connector 3 touch pad cable connector 2 screws (6) CAUTION: Separate the palm-rest assembly from the computer base carefully to avoid damage to the palm-rest assembly. 9 Carefully lift the palm-rest assembly off the computer base.
Palm-Rest Assembly 31 1 2 3 1 hot-key board cable connector 3 touch pad cable connector 2 screws (6) CAUTION: Separate the palm-rest assembly from the computer base carefully to avoid damage to the palm-rest assembly. 9 Carefully lift the palm-rest assembly off the computer base.

Owner's Manual
Page 32
... the tabs on the palm-rest assembly with the slots on the computer base and gently snap the palm-rest assembly in place. 3 Slide the touch pad cable and the hot-key board cable into their connectors on the system board and press down on page 14. 32 Palm-Rest Assembly...
... the tabs on the palm-rest assembly with the slots on the computer base and gently snap the palm-rest assembly in place. 3 Slide the touch pad cable and the hot-key board cable into their connectors on the system board and press down on page 14. 32 Palm-Rest Assembly...

Owner's Manual
Page 35
... board, remove the main battery (see the Regulatory Compliance Homepage at dell.com/regulatory_compliance. Your computer has one half Mini-Card slot that is not authorized by Dell is not covered by periodically touching an unpainted metal surface, such as a connector on page 13. ...Remove the battery. CAUTION: Only a certified service technician should perform repairs on page 29. NOTE: Dell does not guarantee compatibility or provide support for Mini-Cards from sources other than Dell. See "Removing the Palm-Rest Assembly" on your computer. See "Removing the Keyboard" on ...
... board, remove the main battery (see the Regulatory Compliance Homepage at dell.com/regulatory_compliance. Your computer has one half Mini-Card slot that is not authorized by Dell is not covered by periodically touching an unpainted metal surface, such as a connector on page 13. ...Remove the battery. CAUTION: Only a certified service technician should perform repairs on page 29. NOTE: Dell does not guarantee compatibility or provide support for Mini-Cards from sources other than Dell. See "Removing the Palm-Rest Assembly" on your computer. See "Removing the Keyboard" on ...

Owner's Manual
Page 39
... the Module Cover" on the hinge cover. 9 Display WARNING: Before working inside your computer, read the safety information that is not authorized by Dell is not covered by periodically touching an unpainted metal surface (such as a connector on page 13. 3 Remove the module cover. See "Removing the Keyboard" on page 9. 2 Remove the...
... the Module Cover" on the hinge cover. 9 Display WARNING: Before working inside your computer, read the safety information that is not authorized by Dell is not covered by periodically touching an unpainted metal surface (such as a connector on page 13. 3 Remove the module cover. See "Removing the Keyboard" on page 9. 2 Remove the...

Owner's Manual
Page 51
.../regulatory_compliance. 10 Camera Module WARNING: Before working inside your computer, read the safety information that is not authorized by Dell is not covered by periodically touching an unpainted metal surface (such as a connector on your computer). For additional safety best practices information, see "Removing the Battery" on page 13) before working ...
.../regulatory_compliance. 10 Camera Module WARNING: Before working inside your computer, read the safety information that is not authorized by Dell is not covered by periodically touching an unpainted metal surface (such as a connector on your computer). For additional safety best practices information, see "Removing the Battery" on page 13) before working ...

Owner's Manual
Page 53
...Removing the Module Cover" on your computer. Damage due to the system board, remove the main battery (see the Regulatory Compliance Homepage at dell.com/regulatory_compliance. See "Removing the Palm-Rest Assembly" on page 29. 6 Use a plastic scribe and gently pry the coin-cell ...board. 11 Coin-Cell Battery WARNING: Before working inside your computer, read the safety information that is not authorized by Dell is not covered by periodically touching an unpainted metal surface (such as a connector on your computer). For additional safety best practices information, see "Removing the...
...Removing the Module Cover" on your computer. Damage due to the system board, remove the main battery (see the Regulatory Compliance Homepage at dell.com/regulatory_compliance. See "Removing the Palm-Rest Assembly" on page 29. 6 Use a plastic scribe and gently pry the coin-cell ...board. 11 Coin-Cell Battery WARNING: Before working inside your computer, read the safety information that is not authorized by Dell is not covered by periodically touching an unpainted metal surface (such as a connector on your computer). For additional safety best practices information, see "Removing the...


