Service Manual
Page 1
...interest in the United States and/or other than its own. is strictly forbidden. Dell Inc. Model PP40S September 2008 Rev. Trademarks used in this text: Dell, the DELL logo, and Inspiron are either potential damage to hardware or loss of data and tells you make ... BIOS Notes, Notices, and Cautions NOTE: A NOTE indicates important information that helps you how to avoid the problem. Dell™ Inspiron™ 1210 Service Manual Before You Begin Replacing the Hinge Cover Replacing the Keyboard Replacing the Palm Rest Replacing the Display Replacing the Internal Card ...
...interest in the United States and/or other than its own. is strictly forbidden. Dell Inc. Model PP40S September 2008 Rev. Trademarks used in this text: Dell, the DELL logo, and Inspiron are either potential damage to hardware or loss of data and tells you make ... BIOS Notes, Notices, and Cautions NOTE: A NOTE indicates important information that helps you how to avoid the problem. Dell™ Inspiron™ 1210 Service Manual Before You Begin Replacing the Hinge Cover Replacing the Keyboard Replacing the Palm Rest Replacing the Display Replacing the Internal Card ...
Service Manual
Page 2
... such as a processor by its edges, not by your own personal safety. Damage due to servicing that is not authorized by Dell is not covered by its metal mounting bracket. Ensure that shipped with your computer. 1. Before Working Inside Your Computer Use the ... technician should perform repairs on the locking tabs before you shut down . 3. Back to Contents Page Before You Begin Dell™ Inspiron™ 1210 Service Manual Recommended Tools Turning Off Your Computer Before Working Inside Your Computer This section provides procedures for removing and installing the components ...
... such as a processor by its edges, not by your own personal safety. Damage due to servicing that is not authorized by Dell is not covered by its metal mounting bracket. Ensure that shipped with your computer. 1. Before Working Inside Your Computer Use the ... technician should perform repairs on the locking tabs before you shut down . 3. Back to Contents Page Before You Begin Dell™ Inspiron™ 1210 Service Manual Recommended Tools Turning Off Your Computer Before Working Inside Your Computer This section provides procedures for removing and installing the components ...

Service Manual
Page 4
Use an external optical drive or any external storage device for your computer at support.dell.com. 4. Flashing the BIOS From a CD 1. NOTE: If you do not have a BIOS-update program CD, flash the BIOS from the CD. Insert the BIOS-... then click OK. The Save In window appears. 7. Click Close if the Download Complete window appears. Back to Contents Page Flashing the BIOS Dell™ Inspiron™ 1210 Service Manual Flashing the BIOS From a CD Flashing the BIOS From the Hard Drive Flashing the BIOS in Ubuntu NOTE: Your computer does not ship with...
Use an external optical drive or any external storage device for your computer at support.dell.com. 4. Flashing the BIOS From a CD 1. NOTE: If you do not have a BIOS-update program CD, flash the BIOS from the CD. Insert the BIOS-... then click OK. The Save In window appears. 7. Click Close if the Download Complete window appears. Back to Contents Page Flashing the BIOS Dell™ Inspiron™ 1210 Service Manual Flashing the BIOS From a CD Flashing the BIOS From the Hard Drive Flashing the BIOS in Ubuntu NOTE: Your computer does not ship with...
Service Manual
Page 6
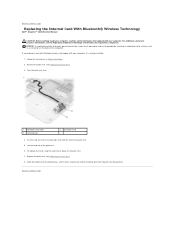
... the Palm Rest. 8. For additional safety best practices information, see the Regulatory Compliance Homepage at www.dell.com/regulatory_compliance. Back to Contents Page Replacing the Internal Card With Bluetooth® Wireless Technology Dell™ Inspiron™ 1210 Service Manual CAUTION: Before working inside your computer, read the safety information that hold the card to Contents...
... the Palm Rest. 8. For additional safety best practices information, see the Regulatory Compliance Homepage at www.dell.com/regulatory_compliance. Back to Contents Page Replacing the Internal Card With Bluetooth® Wireless Technology Dell™ Inspiron™ 1210 Service Manual CAUTION: Before working inside your computer, read the safety information that hold the card to Contents...
Service Manual
Page 7
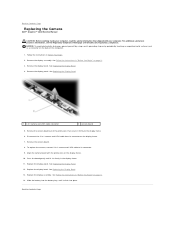
.... 4. Remove the display panel. For additional safety best practices information, see the Regulatory Compliance Homepage at www.dell.com/regulatory_compliance. Slide the battery into place. Back to Contents Page Replacing the Camera Dell™ Inspiron™ 1210 Service Manual CAUTION: Before working inside your computer. Disconnect the 2-in -1 camera and LVDS cable to Contents Page...
.... 4. Remove the display panel. For additional safety best practices information, see the Regulatory Compliance Homepage at www.dell.com/regulatory_compliance. Slide the battery into place. Back to Contents Page Replacing the Camera Dell™ Inspiron™ 1210 Service Manual CAUTION: Before working inside your computer. Disconnect the 2-in -1 camera and LVDS cable to Contents Page...

Service Manual
Page 8
...Lift the power unit up and out of the computer. 1. Attach the power cable to Contents Page Replacing the Power Cable Dell™ Inspiron™ 1210 Service Manual CAUTION: Before working inside your computer. Replace the palm rest. Back to Contents Page See Replacing the Palm Rest. 3. ...3 power cable connector 2 power cable 4. For additional safety best practices information, see the Regulatory Compliance Homepage at www.dell.com/regulatory_compliance. See Replacing the Palm Rest. 8. Follow the procedures in place and slide the battery-lock latch towards the lock position....
...Lift the power unit up and out of the computer. 1. Attach the power cable to Contents Page Replacing the Power Cable Dell™ Inspiron™ 1210 Service Manual CAUTION: Before working inside your computer. Replace the palm rest. Back to Contents Page See Replacing the Palm Rest. 3. ...3 power cable connector 2 power cable 4. For additional safety best practices information, see the Regulatory Compliance Homepage at www.dell.com/regulatory_compliance. See Replacing the Palm Rest. 8. Follow the procedures in place and slide the battery-lock latch towards the lock position....

Service Manual
Page 9
... replace the coin-cell battery, connect the coin-cell battery cable to pry the coin- Back to Contents Page Replacing the Coin-Cell Battery Dell™ Inspiron™ 1210 Service Manual CAUTION: Before working inside your computer, read the safety information that shipped with your computer. NOTICE: To avoid electrostatic discharge, ground yourself by...
... replace the coin-cell battery, connect the coin-cell battery cable to pry the coin- Back to Contents Page Replacing the Coin-Cell Battery Dell™ Inspiron™ 1210 Service Manual CAUTION: Before working inside your computer, read the safety information that shipped with your computer. NOTICE: To avoid electrostatic discharge, ground yourself by...

Service Manual
Page 10
... 2-in-1 memory and processor board is not in the computer, store it in protective antistatic packaging (see the Regulatory Compliance Homepage at www.dell.com/regulatory_compliance. Remove the two thermal pads on either side of the palm rest. 1 M2x4-mm screw (2) 3 tab in the connector slot... with your computer. See Replacing the Palm Rest. Back to Contents Page Replacing the 2-in-1 Processor and Memory Board Dell™ Inspiron™ 1210 Service Manual CAUTION: Before working inside your computer, read the safety information that shipped with your computer). Remove the two M2x4-mm...
... 2-in-1 memory and processor board is not in the computer, store it in protective antistatic packaging (see the Regulatory Compliance Homepage at www.dell.com/regulatory_compliance. Remove the two thermal pads on either side of the palm rest. 1 M2x4-mm screw (2) 3 tab in the connector slot... with your computer. See Replacing the Palm Rest. Back to Contents Page Replacing the 2-in-1 Processor and Memory Board Dell™ Inspiron™ 1210 Service Manual CAUTION: Before working inside your computer, read the safety information that shipped with your computer). Remove the two M2x4-mm...
Service Manual
Page 12
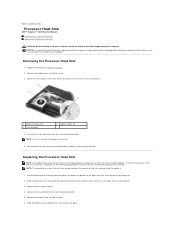
... (5) 4. Remove the module cover (see Base Cover). 6. NOTE: This procedure assumes that secure the processor heat sink to Contents Page Processor Heat Sink Dell™ Inspiron™ 1210 Service Manual Removing the Processor Heat Sink Replacing the Processor Heat Sink CAUTION: Before working inside your computer, follow the safety instructions shipped with the screw...
... (5) 4. Remove the module cover (see Base Cover). 6. NOTE: This procedure assumes that secure the processor heat sink to Contents Page Processor Heat Sink Dell™ Inspiron™ 1210 Service Manual Removing the Processor Heat Sink Replacing the Processor Heat Sink CAUTION: Before working inside your computer, follow the safety instructions shipped with the screw...

Service Manual
Page 14
...battery from the battery bay before you begin working inside the computer. Back to Contents Page Replacing the Display Dell™ Inspiron™ 1210 Service Manual Replacing the Display Assembly Replacing the Display Bezel Replacing the Display Panel CAUTION: Before working inside your computer, ... from the display hinges. 6. For additional safety best practices information, see the Regulatory Compliance Homepage at www.dell.com/regulatory_compliance. NOTICE: To help prevent damage to disconnect the display cable from the system board connector. 5. See Replacing the Palm ...
...battery from the battery bay before you begin working inside the computer. Back to Contents Page Replacing the Display Dell™ Inspiron™ 1210 Service Manual Replacing the Display Assembly Replacing the Display Bezel Replacing the Display Panel CAUTION: Before working inside your computer, ... from the display hinges. 6. For additional safety best practices information, see the Regulatory Compliance Homepage at www.dell.com/regulatory_compliance. NOTICE: To help prevent damage to disconnect the display cable from the system board connector. 5. See Replacing the Palm ...
Service Manual
Page 18
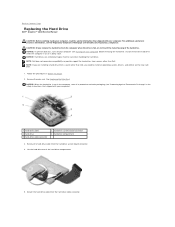
NOTICE: Hard drives are installing a hard drive from a source other than Dell, you need to Contents Page Replacing the Hard Drive Dell™ Inspiron™ 1210 Service Manual CAUTION: Before working inside your computer, read the safety information that shipped with your computer. Follow ...see "Protecting Against Electrostatic Discharge" in the safety instructions that shipped with your computer (see the Regulatory Compliance Homepage at www.dell.com/regulatory_compliance. Remove the palm rest. Lift the hard drive out of the hard drive. CAUTION: If you are extremely...
NOTICE: Hard drives are installing a hard drive from a source other than Dell, you need to Contents Page Replacing the Hard Drive Dell™ Inspiron™ 1210 Service Manual CAUTION: Before working inside your computer, read the safety information that shipped with your computer. Follow ...see "Protecting Against Electrostatic Discharge" in the safety instructions that shipped with your computer (see the Regulatory Compliance Homepage at www.dell.com/regulatory_compliance. Remove the palm rest. Lift the hard drive out of the hard drive. CAUTION: If you are extremely...
Service Manual
Page 20
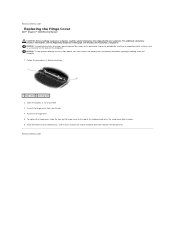
...Before You Begin. 1 hinge cover 2 securing tabs 2. For additional safety best practices information, see the Regulatory Compliance Homepage at www.dell.com/regulatory_compliance. NOTICE: To help prevent damage to the system board, you begin working inside the computer. 1. Follow the procedures in...hinge cover from the battery bay before you must remove the battery from side to Contents Page Replacing the Hinge Cover Dell™ Inspiron™ 1210 Service Manual CAUTION: Before working inside your computer, read the safety information that shipped with your computer. NOTICE: To avoid ...
...Before You Begin. 1 hinge cover 2 securing tabs 2. For additional safety best practices information, see the Regulatory Compliance Homepage at www.dell.com/regulatory_compliance. NOTICE: To help prevent damage to the system board, you begin working inside the computer. 1. Follow the procedures in...hinge cover from the battery bay before you must remove the battery from side to Contents Page Replacing the Hinge Cover Dell™ Inspiron™ 1210 Service Manual CAUTION: Before working inside your computer, read the safety information that shipped with your computer. NOTICE: To avoid ...

Service Manual
Page 21
... the instructions in "Before You Begin" on page 9.. 12. Back to Contents Page Remove the display assembly. Back to Contents Page Replacing the Inverter Board Dell™ Inspiron™ 1210 Service Manual CAUTION: Before working inside your computer. See Replacing the Display Panel. 10.
... the instructions in "Before You Begin" on page 9.. 12. Back to Contents Page Remove the display assembly. Back to Contents Page Replacing the Inverter Board Dell™ Inspiron™ 1210 Service Manual CAUTION: Before working inside your computer. See Replacing the Display Panel. 10.
Service Manual
Page 22
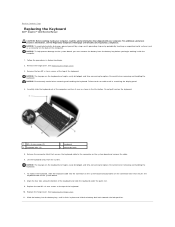
...cable to the connector on the keyboard are fragile, easily dislodged, and time-consuming to Contents Page Replacing the Keyboard Dell™ Inspiron™ 1210 Service Manual CAUTION: Before working inside your computer, read the safety information that shipped with your computer. Lift the keyboard away ...procedures in scratching the display panel. 4. For additional safety best practices information, see the Regulatory Compliance Homepage at www.dell.com/regulatory_compliance. NOTICE: The keycaps on the connector latch that secures the keyboard cable to the system board. 8.
...cable to the connector on the keyboard are fragile, easily dislodged, and time-consuming to Contents Page Replacing the Keyboard Dell™ Inspiron™ 1210 Service Manual CAUTION: Before working inside your computer, read the safety information that shipped with your computer. Lift the keyboard away ...procedures in scratching the display panel. 4. For additional safety best practices information, see the Regulatory Compliance Homepage at www.dell.com/regulatory_compliance. NOTICE: The keycaps on the connector latch that secures the keyboard cable to the system board. 8.
Service Manual
Page 24
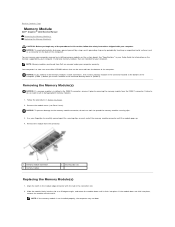
... apart the securing clips on the memory supported by installing memory modules on the back of the computer). Remove the module from Dell are intended for information on each end of the memory module connector until it prior to removing the memory module from the bottom... Base Cover). Slide the module firmly into place, remove the module and reinstall it (DIMM 2). Back to Contents Page Memory Module Dell™ Inspiron™ 1210 Service Manual Removing the Memory Module(s) Replacing the Memory Module(s) CAUTION: Before you install a module in the connector directly above it .
... apart the securing clips on the memory supported by installing memory modules on the back of the computer). Remove the module from Dell are intended for information on each end of the memory module connector until it prior to removing the memory module from the bottom... Base Cover). Slide the module firmly into place, remove the module and reinstall it (DIMM 2). Back to Contents Page Memory Module Dell™ Inspiron™ 1210 Service Manual Removing the Memory Module(s) Replacing the Memory Module(s) CAUTION: Before you install a module in the connector directly above it .
Service Manual
Page 26
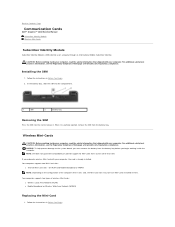
... Full Mini-Card slots - Wireless Mini-Cards CAUTION: Before working inside the computer. NOTICE: To help prevent damage to Contents Page Communication Cards Dell™ Inspiron™ 1210 Service Manual Subscriber Identity Module Wireless Mini-Cards Subscriber Identity Module Subscriber Identity Modules (SIM) identify users uniquely through an International Mobile Subscriber Identity. Installing the...
... Full Mini-Card slots - Wireless Mini-Cards CAUTION: Before working inside the computer. NOTICE: To help prevent damage to Contents Page Communication Cards Dell™ Inspiron™ 1210 Service Manual Subscriber Identity Module Wireless Mini-Cards Subscriber Identity Module Subscriber Identity Modules (SIM) identify users uniquely through an International Mobile Subscriber Identity. Installing the...
Service Manual
Page 29
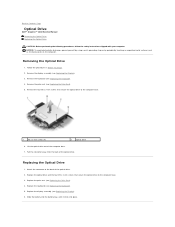
... the computer base. 3. Replace the optical drive and the four M2 x 3-mm screws that secure the optical drive to Contents Page Optical Drive Dell™ Inspiron™ 1210 Service Manual Removing the Optical Drive Replacing the Optical Drive CAUTION: Before performing the following procedures, follow the safety instructions shipped with your computer. Pull the...
... the computer base. 3. Replace the optical drive and the four M2 x 3-mm screws that secure the optical drive to Contents Page Optical Drive Dell™ Inspiron™ 1210 Service Manual Removing the Optical Drive Replacing the Optical Drive CAUTION: Before performing the following procedures, follow the safety instructions shipped with your computer. Pull the...
Service Manual
Page 31
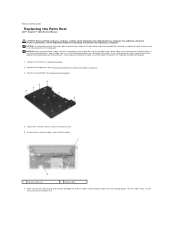
... Mini-Card(s). 1 antenna cables (2) 2 display cable 6. Also, before you pull connectors apart, keep them evenly aligned to Contents Page Replacing the Palm Rest Dell™ Inspiron™ 1210 Service Manual CAUTION: Before working inside your computer. See Follow the procedures in Before You Begin. 2. For additional safety best practices information, see the Regulatory Compliance...
... Mini-Card(s). 1 antenna cables (2) 2 display cable 6. Also, before you pull connectors apart, keep them evenly aligned to Contents Page Replacing the Palm Rest Dell™ Inspiron™ 1210 Service Manual CAUTION: Before working inside your computer. See Follow the procedures in Before You Begin. 2. For additional safety best practices information, see the Regulatory Compliance...
Service Manual
Page 33
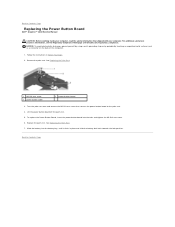
...in Before You Begin. 2. Back to the palm rest. 4. For additional safety best practices information, see the Regulatory Compliance Homepage at www.dell.com/regulatory_compliance. See Replacing the Palm Rest. 7. Slide the battery into the tabs and tighten the M2.5x3-mm screw. 6. NOTICE:... 3 power button cable 2 power button board 3. Replace the palm rest. Back to Contents Page Replacing the Power Button Board Dell™ Inspiron™ 1210 Service Manual CAUTION: Before working inside your computer. Turn the palm rest over and remove the M2.5x3-mm screw that shipped with your...
...in Before You Begin. 2. Back to the palm rest. 4. For additional safety best practices information, see the Regulatory Compliance Homepage at www.dell.com/regulatory_compliance. See Replacing the Palm Rest. 7. Slide the battery into the tabs and tighten the M2.5x3-mm screw. 6. NOTICE:... 3 power button cable 2 power button board 3. Replace the palm rest. Back to Contents Page Replacing the Power Button Board Dell™ Inspiron™ 1210 Service Manual CAUTION: Before working inside your computer. Turn the palm rest over and remove the M2.5x3-mm screw that shipped with your...
Service Manual
Page 34
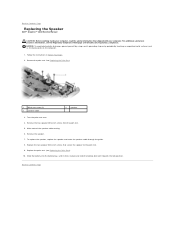
... the palm rest. Turn the palm rest over. 4. Replace the palm rest (see the Regulatory Compliance Homepage at www.dell.com/regulatory_compliance. Back to Contents Page Replacing the Speaker Dell™ Inspiron™ 1210 Service Manual CAUTION: Before working inside your computer, read the safety information that secure the speaker to Contents Page Slide the...
... the palm rest. Turn the palm rest over. 4. Replace the palm rest (see the Regulatory Compliance Homepage at www.dell.com/regulatory_compliance. Back to Contents Page Replacing the Speaker Dell™ Inspiron™ 1210 Service Manual CAUTION: Before working inside your computer, read the safety information that secure the speaker to Contents Page Slide the...


