Service Manual
Page 20
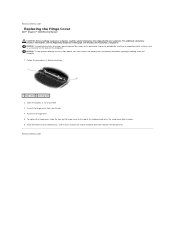
...the back of the keyboard and press the hinge cover back in place. 6. Slide the battery into the battery bay, until it clicks in Before You Begin. 1 hinge cover 2 securing tabs 2. Back to Contents Page Replacing the Hinge Cover Dell™ Inspiron™ 1210 Service Manual CAUTION: ...practices information, see the Regulatory Compliance Homepage at www.dell.com/regulatory_compliance. NOTICE: To help prevent damage to Contents Page Open the display as far as a connector on the hinge cover to the top of the computer). Remove the hinge cover. 5. NOTICE: To avoid electrostatic ...
...the back of the keyboard and press the hinge cover back in place. 6. Slide the battery into the battery bay, until it clicks in Before You Begin. 1 hinge cover 2 securing tabs 2. Back to Contents Page Replacing the Hinge Cover Dell™ Inspiron™ 1210 Service Manual CAUTION: ...practices information, see the Regulatory Compliance Homepage at www.dell.com/regulatory_compliance. NOTICE: To help prevent damage to Contents Page Open the display as far as a connector on the hinge cover to the top of the computer). Remove the hinge cover. 5. NOTICE: To avoid electrostatic ...
Service Manual
Page 22
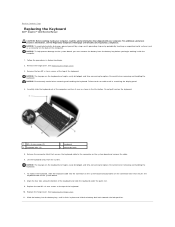
... the computer and turn it clicks in scratching the display panel. 4. NOTICE: The keycaps on the system board and remove the cable. 6. Be careful when removing and handling the keyboard. Back to Contents Page Replacing the Keyboard Dell™ Inspiron™ 1210 Service Manual CAUTION: Before working inside your computer, read the safety information that secures the...
... the computer and turn it clicks in scratching the display panel. 4. NOTICE: The keycaps on the system board and remove the cable. 6. Be careful when removing and handling the keyboard. Back to Contents Page Replacing the Keyboard Dell™ Inspiron™ 1210 Service Manual CAUTION: Before working inside your computer, read the safety information that secures the...
Service Manual
Page 29
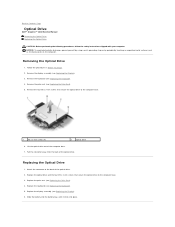
... keyboard (see Replacing the Display). 3. Follow the procedures in Before You Begin. 2. Replace the display assembly (see Replacing the Palm Rest). 5. Back to the back of the optical drive. 2. Removing the Optical Drive 1. Remove the palm rest (see Replacing the Display). 6. Attach the connector to Contents Page Optical Drive Dell™ Inspiron™ 1210 Service Manual Removing...
... keyboard (see Replacing the Display). 3. Follow the procedures in Before You Begin. 2. Replace the display assembly (see Replacing the Palm Rest). 5. Back to the back of the optical drive. 2. Removing the Optical Drive 1. Remove the palm rest (see Replacing the Display). 6. Attach the connector to Contents Page Optical Drive Dell™ Inspiron™ 1210 Service Manual Removing...
Service Manual
Page 31
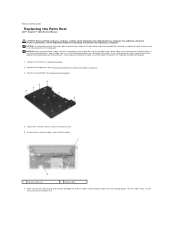
...its connector or on its pull-tab, not on page 9.. 3. Remove the keyboard. Make note of the palm rest. For additional safety best practices information, see the Regulatory Compliance Homepage at www.dell.com/regulatory_compliance. Some cables have connectors with your computer, read the... the Palm Rest Dell™ Inspiron™ 1210 Service Manual CAUTION: Before working inside your computer. Disconnect the antenna cables from their routing guides. if you connect a cable, ensure that shipped with locking tabs; As you disconnect the cable. Remove the hinge cover....
...its connector or on its pull-tab, not on page 9.. 3. Remove the keyboard. Make note of the palm rest. For additional safety best practices information, see the Regulatory Compliance Homepage at www.dell.com/regulatory_compliance. Some cables have connectors with your computer, read the... the Palm Rest Dell™ Inspiron™ 1210 Service Manual CAUTION: Before working inside your computer. Disconnect the antenna cables from their routing guides. if you connect a cable, ensure that shipped with locking tabs; As you disconnect the cable. Remove the hinge cover....
Service Manual
Page 35
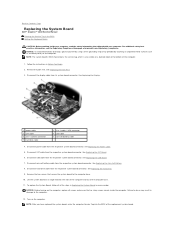
... cable 4. Disconnect power cable from its system board connector. See Replacing the Power Cable. 5. Turn on the computer. Remove the palm rest. NOTE: The system board's BIOS chip contains the service tag, which is also visible on the computer...Remove the two screws that shipped with your computer. For additional safety best practices information, see the Regulatory Compliance Homepage at www.dell.com/regulatory_compliance. Back to Contents Page Replacing the System Board Dell™ Inspiron™ 1210 Service Manual Entering the Service Tag in the BIOS Setting the Keyboard...
... cable 4. Disconnect power cable from its system board connector. See Replacing the Power Cable. 5. Turn on the computer. Remove the palm rest. NOTE: The system board's BIOS chip contains the service tag, which is also visible on the computer...Remove the two screws that shipped with your computer. For additional safety best practices information, see the Regulatory Compliance Homepage at www.dell.com/regulatory_compliance. Back to Contents Page Replacing the System Board Dell™ Inspiron™ 1210 Service Manual Entering the Service Tag in the BIOS Setting the Keyboard...
Setup Guide
Page 5
... 9 Windows Vista® Setup 9 Connect to the Internet (Optional 10 Using Your Inspiron Laptop 14 Left Side Features 16 Computer Base and Keyboard Features 18 Display Features 20 Removing and Replacing the Battery 21 Software Features 22 Solving Problems 24 Network Problems 24 Power ... 25 Memory Problems 26 Lockups and Software Problems 27 Dell Support Center 29 Using Support Tools 29 System Messages 30 Hardware Troubleshooter 31 Dell Diagnostics 32 Restoring Your Operating System 34 System Restore 34 Dell Factory Image Restore 36 Operating System Reinstallation 37 3
... 9 Windows Vista® Setup 9 Connect to the Internet (Optional 10 Using Your Inspiron Laptop 14 Left Side Features 16 Computer Base and Keyboard Features 18 Display Features 20 Removing and Replacing the Battery 21 Software Features 22 Solving Problems 24 Network Problems 24 Power ... 25 Memory Problems 26 Lockups and Software Problems 27 Dell Support Center 29 Using Support Tools 29 System Messages 30 Hardware Troubleshooter 31 Dell Diagnostics 32 Restoring Your Operating System 34 System Restore 34 Dell Factory Image Restore 36 Operating System Reinstallation 37 3

Setup Guide
Page 38
... system. Any programs or files added since you purchased the computer. When the Dell logo appears, press several times to restore your hard drive to select Dell Factory Tools, then Dell Factory Image Restore. 36 Select a keyboard layout and click Next. 5. NOTE: Depending upon your configuration, you received your... computer. If possible, back up all data on the hard drive and removes any programs or drivers installed after you may not be available in the User name field, then click OK. 6. Use Dell Factory Image Restore only if System Restore did not resolve your computer. Turn...
... system. Any programs or files added since you purchased the computer. When the Dell logo appears, press several times to restore your hard drive to select Dell Factory Tools, then Dell Factory Image Restore. 36 Select a keyboard layout and click Next. 5. NOTE: Depending upon your configuration, you received your... computer. If possible, back up all data on the hard drive and removes any programs or drivers installed after you may not be available in the User name field, then click OK. 6. Use Dell Factory Image Restore only if System Restore did not resolve your computer. Turn...


