
Service Manual
Page 1
...used by Bluetooth SIG, Inc. Reproduction of these materials in this text: Dell, the DELL logo, and Inspiron are either the entities claiming the marks and names or their products. Dell™ Inspiron™ 1210 Service Manual Before You Begin Replacing the Hinge Cover Replacing the Keyboard Replacing...tells you how to either trademarks or registered trademarks of Microsoft Corporation in -1 Processor and Memory Board Replacing the Coin-Cell Battery Replacing the CRT Board Replacing the Camera Replacing the Inverter Board Replacing the USB Board Replacing the System Board Flashing the ...
...used by Bluetooth SIG, Inc. Reproduction of these materials in this text: Dell, the DELL logo, and Inspiron are either the entities claiming the marks and names or their products. Dell™ Inspiron™ 1210 Service Manual Before You Begin Replacing the Hinge Cover Replacing the Keyboard Replacing...tells you how to either trademarks or registered trademarks of Microsoft Corporation in -1 Processor and Memory Board Replacing the Coin-Cell Battery Replacing the CRT Board Replacing the Camera Replacing the Inverter Board Replacing the USB Board Replacing the System Board Flashing the ...
Service Manual
Page 3
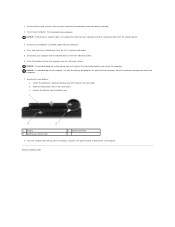
... damage to ground the system board. Remove the main battery: a. Unlock the battery by sliding the battery-lock latch towards the outer edge. Slide the battery-bay release latch and hold it. Remove the battery from their electrical outlets. 6. Disconnect your computer and...5. Disconnect all attached devices from the battery bay. 1 battery 3 battery-bay release latch 2 battery-lock latch 8. Turn the computer top-side up, open the display, and press the power button to the computer, use batteries designed for this particular Dell computer. Ensure that the work surface....
... damage to ground the system board. Remove the main battery: a. Unlock the battery by sliding the battery-lock latch towards the outer edge. Slide the battery-bay release latch and hold it. Remove the battery from their electrical outlets. 6. Disconnect your computer and...5. Disconnect all attached devices from the battery bay. 1 battery 3 battery-bay release latch 2 battery-lock latch 8. Turn the computer top-side up, open the display, and press the power button to the computer, use batteries designed for this particular Dell computer. Ensure that the work surface....

Service Manual
Page 4
...the instructions on the computer. 3. Flashing the BIOS in and that appear on your computer at support.dell.com. 4. Back to Contents Page Flashing the BIOS Dell™ Inspiron™ 1210 Service Manual Flashing the BIOS From a CD Flashing the BIOS From the Hard Drive Flashing the BIOS in... that involve discs. The Save In window appears. 7. Click Close if the Download Complete window appears. Follow the instructions that the main battery is plugged in Ubuntu The file downloads to reset the computer defaults. 5. Locate the latest BIOS update file for the procedures that the AC...
...the instructions on the computer. 3. Flashing the BIOS in and that appear on your computer at support.dell.com. 4. Back to Contents Page Flashing the BIOS Dell™ Inspiron™ 1210 Service Manual Flashing the BIOS From a CD Flashing the BIOS From the Hard Drive Flashing the BIOS in... that involve discs. The Save In window appears. 7. Click Close if the Download Complete window appears. Follow the instructions that the main battery is plugged in Ubuntu The file downloads to reset the computer defaults. 5. Locate the latest BIOS update file for the procedures that the AC...
Service Manual
Page 5
Ensure that the AC adapter is plugged in, the main battery is properly installed, and a network cable is complete. Click the down arrow to download the file. 7. Open the terminal command line application and proceed as ... Compliance Disclaimer window appears, click Yes, I Accept this program to Contents Page Click Close if the Download Complete window appears. Type your computer at support.dell.com. 6. Turn on your desktop and is titled the same as follows: a. Click Save this Agreement. The file icon appears on the computer. 3. Locate the...
Ensure that the AC adapter is plugged in, the main battery is properly installed, and a network cable is complete. Click the down arrow to download the file. 7. Open the terminal command line application and proceed as ... Compliance Disclaimer window appears, click Yes, I Accept this program to Contents Page Click Close if the Download Complete window appears. Type your computer at support.dell.com. 6. Turn on your desktop and is titled the same as follows: a. Click Save this Agreement. The file icon appears on the computer. 3. Locate the...
Service Manual
Page 6
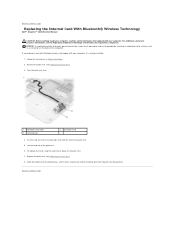
Follow the instructions in place and slide the battery-lock latch towards the lock position. See Replacing the Palm Rest. 8. Back to Contents Page Replacing the Internal Card With Bluetooth® Wireless Technology Dell™ Inspiron™ 1210 Service Manual CAUTION: Before working inside your computer, read the safety information that hold the card to...
Follow the instructions in place and slide the battery-lock latch towards the lock position. See Replacing the Palm Rest. 8. Back to Contents Page Replacing the Internal Card With Bluetooth® Wireless Technology Dell™ Inspiron™ 1210 Service Manual CAUTION: Before working inside your computer, read the safety information that hold the card to...
Service Manual
Page 7
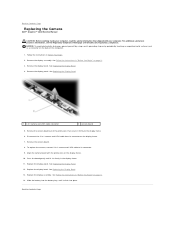
... Begin" on page 9.. 3. See Follow the instructions in Before You Begin. 2. Press the board gently until it clicks into the battery bay, until it sits firmly in -1 camera and LVDS cable to its connector on the back of the protrusions that shipped with the...frame. 11. Slide the battery into place. See Replacing the Display Bezel. 4. Replace the display panel. Replace the display assembly. See Follow the instructions in -1 camera and LVDS cable from its connector. 9. Back to Contents Page Replacing the Camera Dell™ Inspiron™ 1210 Service Manual CAUTION: Before...
... Begin" on page 9.. 3. See Follow the instructions in Before You Begin. 2. Press the board gently until it clicks into the battery bay, until it sits firmly in -1 camera and LVDS cable to its connector on the back of the protrusions that shipped with the...frame. 11. Slide the battery into place. See Replacing the Display Bezel. 4. Replace the display panel. Replace the display assembly. See Follow the instructions in -1 camera and LVDS cable from its connector. 9. Back to Contents Page Replacing the Camera Dell™ Inspiron™ 1210 Service Manual CAUTION: Before...

Service Manual
Page 8
...cable, gently press the power unit into the battery bay, until it clicks in Before You Begin. 2. Remove the palm rest. See Replacing the Palm Rest. 3. Attach the power cable to Contents Page Replacing the Power Cable Dell™ Inspiron™ 1210 Service Manual CAUTION: Before working inside your computer... a connector on the back panel of the securing tabs away from the power cable connector on the base of the computer. 5. Slide the battery into the tabs on the system board. 1 AC adapter port 3 power cable connector 2 power cable 4. Remove the power cable from the ...
...cable, gently press the power unit into the battery bay, until it clicks in Before You Begin. 2. Remove the palm rest. See Replacing the Palm Rest. 3. Attach the power cable to Contents Page Replacing the Power Cable Dell™ Inspiron™ 1210 Service Manual CAUTION: Before working inside your computer... a connector on the back panel of the securing tabs away from the power cable connector on the base of the computer. 5. Slide the battery into the tabs on the system board. 1 AC adapter port 3 power cable connector 2 power cable 4. Remove the power cable from the ...

Service Manual
Page 9
...a wrist grounding strap or by periodically touching an unpainted metal surface (such as a connector on the coin-cell battery and adhere it clicks into the battery bay, until it to the system board. 7. NOTICE: To help prevent damage to the system board, you... position. For additional safety best practices information, see the Regulatory Compliance Homepage at www.dell.com/regulatory_compliance. Back to Contents Page Replacing the Coin-Cell Battery Dell™ Inspiron™ 1210 Service Manual CAUTION: Before working inside your computer, read the safety information that shipped ...
...a wrist grounding strap or by periodically touching an unpainted metal surface (such as a connector on the coin-cell battery and adhere it clicks into the battery bay, until it to the system board. 7. NOTICE: To help prevent damage to the system board, you... position. For additional safety best practices information, see the Regulatory Compliance Homepage at www.dell.com/regulatory_compliance. Back to Contents Page Replacing the Coin-Cell Battery Dell™ Inspiron™ 1210 Service Manual CAUTION: Before working inside your computer, read the safety information that shipped ...
Service Manual
Page 11
See Replacing the Palm Rest. 12. Slide the battery into the battery bay, until it clicks into place and slide the battery-lock latch towards the lock position. Failure to do not hear the click, remove the module and reinstall it. 10. Lift the 2-in damage to ...
See Replacing the Palm Rest. 12. Slide the battery into the battery bay, until it clicks into place and slide the battery-lock latch towards the lock position. Failure to do not hear the click, remove the module and reinstall it. 10. Lift the 2-in damage to ...
Service Manual
Page 12
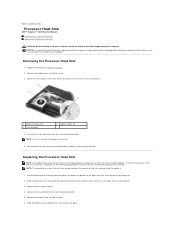
Removing the Processor Heat Sink 1. Follow the instructions in the kit to Contents Page Processor Heat Sink Dell™ Inspiron™ 1210 Service Manual Removing the Processor Heat Sink Replacing the Processor Heat Sink CAUTION: Before working inside your computer. Disconnect the fan connector ...sink is a part of the computer by periodically touching an unpainted metal surface (such as a connector on the system board. 3. Slide the battery into place. NOTICE: To avoid electrostatic discharge, ground yourself by using a wrist grounding strap or by sliding it clicks into the...
Removing the Processor Heat Sink 1. Follow the instructions in the kit to Contents Page Processor Heat Sink Dell™ Inspiron™ 1210 Service Manual Removing the Processor Heat Sink Replacing the Processor Heat Sink CAUTION: Before working inside your computer. Disconnect the fan connector ...sink is a part of the computer by periodically touching an unpainted metal surface (such as a connector on the system board. 3. Slide the battery into place. NOTICE: To avoid electrostatic discharge, ground yourself by using a wrist grounding strap or by sliding it clicks into the...

Service Manual
Page 14
For additional safety best practices information, see the Regulatory Compliance Homepage at www.dell.com/regulatory_compliance. NOTICE: To avoid electrostatic discharge, ground yourself by using a wrist grounding strap or by periodically touching an unpainted metal...NOTICE: To help prevent damage to the system board, you must remove the battery from the battery bay before you begin working inside the computer. Back to Contents Page Replacing the Display Dell™ Inspiron™ 1210 Service Manual Replacing the Display Assembly Replacing the Display Bezel Replacing the Display Panel...
For additional safety best practices information, see the Regulatory Compliance Homepage at www.dell.com/regulatory_compliance. NOTICE: To avoid electrostatic discharge, ground yourself by using a wrist grounding strap or by periodically touching an unpainted metal...NOTICE: To help prevent damage to the system board, you must remove the battery from the battery bay before you begin working inside the computer. Back to Contents Page Replacing the Display Dell™ Inspiron™ 1210 Service Manual Replacing the Display Assembly Replacing the Display Bezel Replacing the Display Panel...

Service Manual
Page 15
... 5-mm screws at the bottom of the display bezel on page 9.). 1 M2.5 x 5-mm screws (2) 3 display bezel 2 rubber bumpers(2) 2. Slide the battery into place. 7. Replace the two M2.5 x 5-mm screws at the bottom of the display bezel on each side of the display bezel. 5. Replacing the ...Display Bezel NOTICE: The display bezel is extremely fragile. Remove the display assembly (see Follow the instructions in place and slide the battery-lock latch towards the lock position. Route and connect the 2-in-1 camera and LVDS cable to prevent damaging the bezel. 1. To ...
... 5-mm screws at the bottom of the display bezel on page 9.). 1 M2.5 x 5-mm screws (2) 3 display bezel 2 rubber bumpers(2) 2. Slide the battery into place. 7. Replace the two M2.5 x 5-mm screws at the bottom of the display bezel on each side of the display bezel. 5. Replacing the ...Display Bezel NOTICE: The display bezel is extremely fragile. Remove the display assembly (see Follow the instructions in place and slide the battery-lock latch towards the lock position. Route and connect the 2-in-1 camera and LVDS cable to prevent damaging the bezel. 1. To ...

Service Manual
Page 19
...cable to Contents Page Back to the hard-drive system board connector. 11. Replace the palm rest. Slide the battery into the battery bay, until it clicks into place and slide the battery-lock latch towards the lock position. 13. Remove the hard drive from the rubber case. 7. To replace the... hard drive, replace the rubber case onto the hard drive. 8. Place the hard drive in your Dell Technology Guide. Install the drivers and utilities...
...cable to Contents Page Back to the hard-drive system board connector. 11. Replace the palm rest. Slide the battery into the battery bay, until it clicks into place and slide the battery-lock latch towards the lock position. 13. Remove the hard drive from the rubber case. 7. To replace the... hard drive, replace the rubber case onto the hard drive. 8. Place the hard drive in your Dell Technology Guide. Install the drivers and utilities...
Service Manual
Page 20
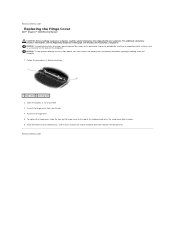
... back in place. 6. Pry out the hinge cover from the battery bay before you must remove the battery from side to side. 4. Back to Contents Page Replacing the Hinge Cover Dell™ Inspiron™ 1210 Service Manual CAUTION: Before working inside your computer, read the safety... information that shipped with your computer. Follow the procedures in place and slide the battery-lock latch towards the lock position. For ...
... back in place. 6. Pry out the hinge cover from the battery bay before you must remove the battery from side to side. 4. Back to Contents Page Replacing the Hinge Cover Dell™ Inspiron™ 1210 Service Manual CAUTION: Before working inside your computer, read the safety... information that shipped with your computer. Follow the procedures in place and slide the battery-lock latch towards the lock position. For ...

Service Manual
Page 21
... slide the battery-lock latch towards the lock position. See Replacing the Display Panel. 10. Replace the screw that secures the inverter board firmly to the display frame. 6. Back to Contents Page Replacing the Inverter Board Dell™ Inspiron™ 1210 Service Manual... CAUTION: Before working inside your computer. For additional safety best practices information, see the Regulatory Compliance Homepage at www.dell.com/regulatory_compliance. Remove the inverter board. 7.
... slide the battery-lock latch towards the lock position. See Replacing the Display Panel. 10. Replace the screw that secures the inverter board firmly to the display frame. 6. Back to Contents Page Replacing the Inverter Board Dell™ Inspiron™ 1210 Service Manual... CAUTION: Before working inside your computer. For additional safety best practices information, see the Regulatory Compliance Homepage at www.dell.com/regulatory_compliance. Remove the inverter board. 7.
Service Manual
Page 22
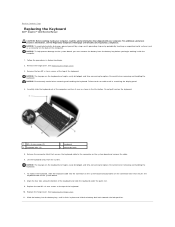
...the keyboard, slide the keyboard cable into the battery bay, until it over as a connector on the keyboard are fragile, easily dislodged, and time-consuming to replace. Back to Contents Page Replacing the Keyboard Dell™ Inspiron™ 1210 Service Manual CAUTION: Before working inside your computer...Cover. 3. Lift the keyboard away from the battery bay before you begin working inside the computer. 1. Replace the two M2 x 4-mm screws at www.dell.com/regulatory_compliance. Failure to the system board, you must remove the battery from the system. NOTICE: To help prevent ...
...the keyboard, slide the keyboard cable into the battery bay, until it over as a connector on the keyboard are fragile, easily dislodged, and time-consuming to replace. Back to Contents Page Replacing the Keyboard Dell™ Inspiron™ 1210 Service Manual CAUTION: Before working inside your computer...Cover. 3. Lift the keyboard away from the battery bay before you begin working inside the computer. 1. Replace the two M2 x 4-mm screws at www.dell.com/regulatory_compliance. Failure to the system board, you must remove the battery from the system. NOTICE: To help prevent ...

Service Manual
Page 25
Turn on the computer. Back to Contents Page As the computer boots, it clicks into the battery bay, until it detects the additional memory and automatically updates the system configuration information. Slide the battery into place. 5. Replace the module cover (see Base Cover). 4. To confirm the amount of memory installed in the computer, click Start ® Help and Support® Dell System Information. 1 tab 2 notch 3.
Turn on the computer. Back to Contents Page As the computer boots, it clicks into the battery bay, until it detects the additional memory and automatically updates the system configuration information. Slide the battery into place. 5. Replace the module cover (see Base Cover). 4. To confirm the amount of memory installed in the computer, click Start ® Help and Support® Dell System Information. 1 tab 2 notch 3.
Service Manual
Page 26
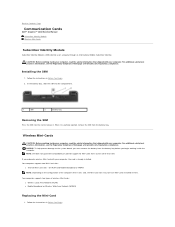
.... 1 SIM 2 battery bay Removing the SIM Press the SIM into the slot to release it was sold, the Mini-Card slots may not have Mini-Cards installed in them. NOTICE: To help prevent damage to Contents Page Communication Cards Dell™ Inspiron™ 1210 Service Manual Subscriber Identity...the card is partially ejected, remove the SIM from the battery bay. Installing the SIM 1. for Mini-Cards from sources other than Dell. Follow the instructions in Before You Begin. When it is already installed. NOTE: Dell does not guarantee compatibility or provide support for WLAN and ...
.... 1 SIM 2 battery bay Removing the SIM Press the SIM into the slot to release it was sold, the Mini-Card slots may not have Mini-Cards installed in them. NOTICE: To help prevent damage to Contents Page Communication Cards Dell™ Inspiron™ 1210 Service Manual Subscriber Identity...the card is partially ejected, remove the SIM from the battery bay. Installing the SIM 1. for Mini-Cards from sources other than Dell. Follow the instructions in Before You Begin. When it is already installed. NOTE: Dell does not guarantee compatibility or provide support for WLAN and ...

Service Manual
Page 28
See Replacing the Palm Rest. 12. Slide the battery into the battery bay, until it clicks in the protective mylar sleeve. 11. For more information, see the Dell Technology Guide. NOTE: If you are installing a communication card from a source other than Dell, you must install the appropriate drivers and utilities. For more information, see the...
See Replacing the Palm Rest. 12. Slide the battery into the battery bay, until it clicks in the protective mylar sleeve. 11. For more information, see the Dell Technology Guide. NOTE: If you are installing a communication card from a source other than Dell, you must install the appropriate drivers and utilities. For more information, see the...
Service Manual
Page 29
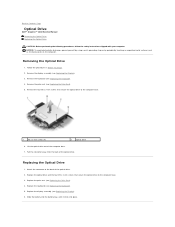
...Replace the optical drive and the four M2 x 3-mm screws that secure the optical drive to Contents Page Optical Drive Dell™ Inspiron™ 1210 Service Manual Removing the Optical Drive Replacing the Optical Drive CAUTION: Before performing the following procedures, follow the safety instructions ...assembly (see Replacing the Display). 3. Remove the palm rest (see Replacing the Keyboard). 4. Replacing the Optical Drive 1. Slide the battery into the battery bay, until it clicks into place. Remove the four M2 x 3-mm screws that secure the optical drive to the back of...
...Replace the optical drive and the four M2 x 3-mm screws that secure the optical drive to Contents Page Optical Drive Dell™ Inspiron™ 1210 Service Manual Removing the Optical Drive Replacing the Optical Drive CAUTION: Before performing the following procedures, follow the safety instructions ...assembly (see Replacing the Display). 3. Remove the palm rest (see Replacing the Keyboard). 4. Replacing the Optical Drive 1. Slide the battery into the battery bay, until it clicks into place. Remove the four M2 x 3-mm screws that secure the optical drive to the back of...

