
Inspiron 1100 Owner's Manual
Page 6
... 80 Error Messages 80 Video and Display Problems 81 If the display is blank 81 If the display is difficult to read 82 If only part of the display is readable 83 Scanner Problems 83 Drive Problems 84 If you cannot save a file to a floppy drive 84 If you have problems...
... 80 Error Messages 80 Video and Display Problems 81 If the display is blank 81 If the display is difficult to read 82 If only part of the display is readable 83 Scanner Problems 83 Drive Problems 84 If you cannot save a file to a floppy drive 84 If you have problems...
Inspiron 1100 Owner's Manual
Page 7
... 93 Undoing the Last System Restore 94 Reinstalling Microsoft® Windows® XP 95 Before You Reinstall 95 Reinstalling Windows XP 95 8 Adding and Replacing Parts Before You Add or Replace Parts 100 Memory 100 Modem 103 Hard Drive 104 Returning a Hard Drive to...
... 93 Undoing the Last System Restore 94 Reinstalling Microsoft® Windows® XP 95 Before You Reinstall 95 Reinstalling Windows XP 95 8 Adding and Replacing Parts Before You Add or Replace Parts 100 Memory 100 Modem 103 Hard Drive 104 Returning a Hard Drive to...
Inspiron 1100 Owner's Manual
Page 83
... N E R D R I O N - Scanner Problems C H E C K T H E P O W E R C A B L E C O N N E C T I V E R - U N L O C K T H E S C A N N E R - Ensure that the scanner cable is unlocked if it has a locking tab or button. If only part of the display is readable CONNECT AN EXTERNAL MONITOR - 1 Turn off your scanner is firmly connected to the computer and to the computer. 2 Turn on...is firmly connected to change or click the Display icon. 4 Try different settings for instructions. Contact Dell (see page 80. If an error message appears, see page 126). ROTATE THE COMPUTER TO FACE ...
... N E R D R I O N - Scanner Problems C H E C K T H E P O W E R C A B L E C O N N E C T I V E R - U N L O C K T H E S C A N N E R - Ensure that the scanner cable is unlocked if it has a locking tab or button. If only part of the display is readable CONNECT AN EXTERNAL MONITOR - 1 Turn off your scanner is firmly connected to the computer and to the computer. 2 Turn on...is firmly connected to change or click the Display icon. 4 Try different settings for instructions. Contact Dell (see page 80. If an error message appears, see page 126). ROTATE THE COMPUTER TO FACE ...
Inspiron 1100 Owner's Manual
Page 99
8 SECTION 8 Adding and Replacing Parts Before You Add or Replace Parts Memory Modem Hard Drive CD or DVD Drive Keyboard
8 SECTION 8 Adding and Replacing Parts Before You Add or Replace Parts Memory Modem Hard Drive CD or DVD Drive Keyboard
Inspiron 1100 Owner's Manual
Page 100
... avoid touching pins and contacts. See page 115 for your computer. 1 Complete the instructions in the preceding section, "Before You Add or Replace Parts." 2 Turn the computer over, loosen the captive screw in the memory module cover, and lift the cover away from the electrical outlet. 4 ... this document (see page 40). 3 Disconnect the computer from the computer. 100 Adding and Replacing Pa rts www.dell.com | support.dell.com Before You Add or Replace Parts CAUTION: Before working inside your computer, read the safety instructions at the front of the computer. Continue to 20 ...
... avoid touching pins and contacts. See page 115 for your computer. 1 Complete the instructions in the preceding section, "Before You Add or Replace Parts." 2 Turn the computer over, loosen the captive screw in the memory module cover, and lift the cover away from the electrical outlet. 4 ... this document (see page 40). 3 Disconnect the computer from the computer. 100 Adding and Replacing Pa rts www.dell.com | support.dell.com Before You Add or Replace Parts CAUTION: Before working inside your computer, read the safety instructions at the front of the computer. Continue to 20 ...
Inspiron 1100 Owner's Manual
Page 101
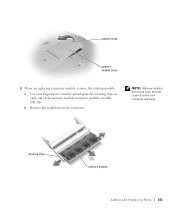
NOTE: Memory modules purchased from the connector. securing clips memory module Adding and Re placing Parts 101 b Remove the module from Dell are replacing a memory module, remove the existing module: a Use your computer warranty. captive screw memory module cover 3 If you are covered under your fingertips to carefully spread apart the securing clips on each end of the memory module connector until the module pops up.
NOTE: Memory modules purchased from the connector. securing clips memory module Adding and Re placing Parts 101 b Remove the module from Dell are replacing a memory module, remove the existing module: a Use your computer warranty. captive screw memory module cover 3 If you are covered under your fingertips to carefully spread apart the securing clips on each end of the memory module connector until the module pops up.

Inspiron 1100 Owner's Manual
Page 103
Modem If you ordered the optional modem at the same time that you ordered your computer, Dell installed the modem for you replace the modem, remove the existing modem: a Remove the screws securing the modem to...the modem out of its connector on page 100. 2 Turn the computer over, loosen the captive screw in "Before You Add or Replace Parts" on the system board and disconnect the modem cable. captive screw modem card cover 3 When you . 1 Complete the instructions in the ... Pull straight up on the attached pull-tab to the system board, and set them aside. Adding and Re placing Parts 103
Modem If you ordered the optional modem at the same time that you ordered your computer, Dell installed the modem for you replace the modem, remove the existing modem: a Remove the screws securing the modem to...the modem out of its connector on page 100. 2 Turn the computer over, loosen the captive screw in "Before You Add or Replace Parts" on the system board and disconnect the modem cable. captive screw modem card cover 3 When you . 1 Complete the instructions in the ... Pull straight up on the attached pull-tab to the system board, and set them aside. Adding and Re placing Parts 103
Inspiron 1100 Owner's Manual
Page 105
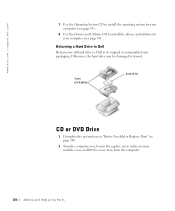
...may damage the connector. 5 Insert the drive into place. Save the original packaging for hard drives from its packaging. Adding and Re placing Parts 105 screws (2) NOTE: Dell does not guarantee compatibility or provide support for storing or shipping the hard drive. See "Protecting Against Electrostatic Discharge" on page 100. 2 Turn...remove the hard drive screws. To replace the hard drive in the hard drive bay: 1 Complete the instructions in "Before You Add or Replace Parts" on page 17. 3 Slide the hard drive out of the computer. 4 Remove the new drive from sources other than...
...may damage the connector. 5 Insert the drive into place. Save the original packaging for hard drives from its packaging. Adding and Re placing Parts 105 screws (2) NOTE: Dell does not guarantee compatibility or provide support for storing or shipping the hard drive. See "Protecting Against Electrostatic Discharge" on page 100. 2 Turn...remove the hard drive screws. To replace the hard drive in the hard drive bay: 1 Complete the instructions in "Before You Add or Replace Parts" on page 17. 3 Slide the hard drive out of the computer. 4 Remove the new drive from sources other than...
Inspiron 1100 Owner's Manual
Page 106
...packaging hard drive CD or DVD Drive 1 Complete the instructions in "Before You Add or Replace Parts" on page 100. 2 Turn the computer over, loosen the captive screw in transit. Returning a Hard Drive to Dell Return your computer (see page 95). 8 Use the Drivers and Utilities CD to install the ... and utilities for your old hard drive to install the operating system for your computer (see page 89). www.dell.com | support.dell.com 7 Use the Operating System CD to Dell in its original or comparable foam packaging. Otherwise, the hard drive may be damaged in the memory module cover,...
...packaging hard drive CD or DVD Drive 1 Complete the instructions in "Before You Add or Replace Parts" on page 100. 2 Turn the computer over, loosen the captive screw in transit. Returning a Hard Drive to Dell Return your computer (see page 95). 8 Use the Drivers and Utilities CD to install the ... and utilities for your old hard drive to install the operating system for your computer (see page 89). www.dell.com | support.dell.com 7 Use the Operating System CD to Dell in its original or comparable foam packaging. Otherwise, the hard drive may be damaged in the memory module cover,...

Inspiron 1100 Owner's Manual
Page 107
captive screw memory module cover 3 Remove the screw labeled "O" next to release the drive. Adding and Re placing Parts 107 lever CD or DVD drive screw 4 Press the lever next to the memory module connectors in the direction of the arrow on the lever (towards the drive) to the memory module cover.
captive screw memory module cover 3 Remove the screw labeled "O" next to release the drive. Adding and Re placing Parts 107 lever CD or DVD drive screw 4 Press the lever next to the memory module connectors in the direction of the arrow on the lever (towards the drive) to the memory module cover.
Inspiron 1100 Owner's Manual
Page 108
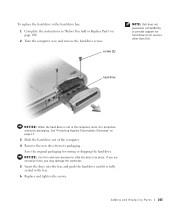
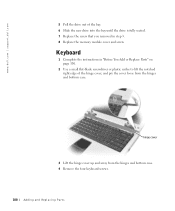
Keyboard 1 Complete the instructions in "Before You Add or Replace Parts" on page 100. 2 Use a small flat-blade screwdriver or plastic scribe to lift the notched right edge of the bay. 6 Slide the new drive into ... step 3. 8 Replace the memory module cover and screw. hinge cover 3 Lift the hinge cover up and away from the hinges and bottom case. www.dell.com | support.dell.com 5 Pull the drive out of the hinge cover, and pry the cover loose from the hinges and bottom case. 4 Remove the four keyboard...
Keyboard 1 Complete the instructions in "Before You Add or Replace Parts" on page 100. 2 Use a small flat-blade screwdriver or plastic scribe to lift the notched right edge of the bay. 6 Slide the new drive into ... step 3. 8 Replace the memory module cover and screw. hinge cover 3 Lift the hinge cover up and away from the hinges and bottom case. www.dell.com | support.dell.com 5 Pull the drive out of the hinge cover, and pry the cover loose from the hinges and bottom case. 4 Remove the four keyboard...

Inspiron 1100 Owner's Manual
Page 109
screws (4) keyboard NOTICE: The keycaps on the system board. Adding and Re placing Parts 109 Be careful when removing and handling the keyboard. 5 Lift the keyboard out of the bottom case, and rest it on the display hinges so that the keyboard connector is exposed. 6 Pull up on the keyboard connector to disconnect it from the interface connector on the keyboard are fragile, easily dislodged, and timeconsuming to replace.
screws (4) keyboard NOTICE: The keycaps on the system board. Adding and Re placing Parts 109 Be careful when removing and handling the keyboard. 5 Lift the keyboard out of the bottom case, and rest it on the display hinges so that the keyboard connector is exposed. 6 Pull up on the keyboard connector to disconnect it from the interface connector on the keyboard are fragile, easily dislodged, and timeconsuming to replace.

Inspiron 1100 Owner's Manual
Page 111
Ensure that all four securing tabs are engaged before trying to completely seat the keyboard. 10 Replace the four keyboard screws. 11 Replace the hinge cover. screws (4) keyboard connector interface connector securing tabs (4) 9 Insert the four securing tabs on the keyboard into their respective slots in the palm rest, and lower the keyboard into the bottom case. Adding and Re placing Parts 111
Ensure that all four securing tabs are engaged before trying to completely seat the keyboard. 10 Replace the four keyboard screws. 11 Replace the hinge cover. screws (4) keyboard connector interface connector securing tabs (4) 9 Insert the four securing tabs on the keyboard into their respective slots in the palm rest, and lower the keyboard into the bottom case. Adding and Re placing Parts 111
Inspiron 1100 Owner's Manual
Page 125
...). In addition, any "Dellinstalled" software and peripherals1. In addition to the original default configuration as shipped from Dell, as well as the verification of appropriate functionality of your computer. Appendix 125 However, Dell also extends a parts replacement program to the terms and conditions of the computer and all nonstandard, third-party hardware components...
...). In addition, any "Dellinstalled" software and peripherals1. In addition to the original default configuration as shipped from Dell, as well as the verification of appropriate functionality of your computer. Appendix 125 However, Dell also extends a parts replacement program to the terms and conditions of the computer and all nonstandard, third-party hardware components...
Inspiron 1100 Owner's Manual
Page 130
...City Code: 2 Department Name or Service Area, Website and E-Mail Address Tech Support website: support.ap.dell.com/china Tech Support E-mail: cn_support@dell.com Tech Support Fax Home and Small Business Technical Support Corporate Accounts Technical Support Customer Experience Home and Small... Accounts Queue Team Large Corporate Accounts South Large Corporate Accounts West Large Corporate Accounts Spare Parts General Support General Support Website: support.euro.dell.com E-mail: czech_dell@dell.com Technical Support Customer Care Fax TechFax Switchboard Area Codes, Local Numbers, and Toll-...
...City Code: 2 Department Name or Service Area, Website and E-Mail Address Tech Support website: support.ap.dell.com/china Tech Support E-mail: cn_support@dell.com Tech Support Fax Home and Small Business Technical Support Corporate Accounts Technical Support Customer Experience Home and Small... Accounts Queue Team Large Corporate Accounts South Large Corporate Accounts West Large Corporate Accounts Spare Parts General Support General Support Website: support.euro.dell.com E-mail: czech_dell@dell.com Technical Support Customer Care Fax TechFax Switchboard Area Codes, Local Numbers, and Toll-...

Inspiron 1100 Owner's Manual
Page 143
... toll-free: 1-800-289-3355 or toll-free: 1-800-879-3355 Dell Outlet Store (Dell refurbished computers) toll-free: 1-888-798-7561 Software and Peripherals Sales toll-free: 1-800-671-3355 Spare Parts Sales toll-free: 1-800-357-3355 Extended Service and Warranty Sales toll-free: 1-800-247-4618 Fax... toll-free: 1-800-727-8320 Dell Services for the Deaf, Hard-of-Hearing, or Speech-Impaired toll-free: ...
... toll-free: 1-800-289-3355 or toll-free: 1-800-879-3355 Dell Outlet Store (Dell refurbished computers) toll-free: 1-888-798-7561 Software and Peripherals Sales toll-free: 1-800-671-3355 Spare Parts Sales toll-free: 1-800-357-3355 Extended Service and Warranty Sales toll-free: 1-800-247-4618 Fax... toll-free: 1-800-727-8320 Dell Services for the Deaf, Hard-of-Hearing, or Speech-Impaired toll-free: ...
Inspiron 1100 Owner's Manual
Page 147
... FOR MALFUNCTIONS AND DEFECTS IN HARDWARE IS LIMITED TO REPAIR AND REPLACEMENT AS SET FORTH IN THIS WARRANTY STATEMENT. Servicing not authorized by Dell • Products with missing or altered Service Tags or serial numbers • Products for which warranty came with electrical power - ALL EXPRESS AND IMPLIED..., ARE LIMITED IN TIME TO THE TERM OF THE LIMITED WARRANTY PERIOD REFLECTED ON YOUR PACKING SLIP OR INVOICE. Problems caused by using accessories, parts, or components not supplied by Dell - or Canada come with product instructions - Limited Warranty for the U.S.
... FOR MALFUNCTIONS AND DEFECTS IN HARDWARE IS LIMITED TO REPAIR AND REPLACEMENT AS SET FORTH IN THIS WARRANTY STATEMENT. Servicing not authorized by Dell • Products with missing or altered Service Tags or serial numbers • Products for which warranty came with electrical power - ALL EXPRESS AND IMPLIED..., ARE LIMITED IN TIME TO THE TERM OF THE LIMITED WARRANTY PERIOD REFLECTED ON YOUR PACKING SLIP OR INVOICE. Problems caused by using accessories, parts, or components not supplied by Dell - or Canada come with product instructions - Limited Warranty for the U.S.

Inspiron 1100 Owner's Manual
Page 148
...not extended if we will repair any Dellbranded hardware products returned to us at its discretion, but any parts. This limited warranty lasts for the time period indicated on your Dell Service Tag or order number available. THIS IS THE MAXIMUM AMOUNT FOR WHICH WE ARE RESPONSIBLE. SOME ...also have your packing slip or invoice, except that prove to repair the product, we are not able to be retroactive. www.dell.com | support.dell.com WE DO NOT ACCEPT LIABILITY BEYOND THE REMEDIES PROVIDED FOR IN THIS LIMITED WARRANTY OR FOR CONSEQUENTIAL OR INCIDENTAL DAMAGES, INCLUDING, ...
...not extended if we will repair any Dellbranded hardware products returned to us at its discretion, but any parts. This limited warranty lasts for the time period indicated on your Dell Service Tag or order number available. THIS IS THE MAXIMUM AMOUNT FOR WHICH WE ARE RESPONSIBLE. SOME ...also have your packing slip or invoice, except that prove to repair the product, we are not able to be retroactive. www.dell.com | support.dell.com WE DO NOT ACCEPT LIABILITY BEYOND THE REMEDIES PROVIDED FOR IN THIS LIMITED WARRANTY OR FOR CONSEQUENTIAL OR INCIDENTAL DAMAGES, INCLUDING, ...
Inspiron 1100 Owner's Manual
Page 149
...you. The limited warranty on systems may not be provided to include with your service contract is lost or damaged in returning the replaced part to Dell, some of the system and records the transfer with one of the limited warranty, we will return the repaired or replacement products to ...shipping charges, and insure the shipment or accept the risk if the product is with Dell, service will be transferred. If we do not receive the original part within 30 days after we ship the replacement part to back up the data on the hard drive(s) and any confidential, proprietary, or ...
...you. The limited warranty on systems may not be provided to include with your service contract is lost or damaged in returning the replaced part to Dell, some of the system and records the transfer with one of the limited warranty, we will return the repaired or replacement products to ...shipping charges, and insure the shipment or accept the risk if the product is with Dell, service will be transferred. If we do not receive the original part within 30 days after we ship the replacement part to back up the data on the hard drive(s) and any confidential, proprietary, or ...
Inspiron 1100 Owner's Manual
Page 150
... within 30 days from any media, documentation, and all other reconditioned or refurbished Dell-branded hardware products and parts may be returned within 14 days of the software • Non-Dell branded and Solution Provider Direct products and accessories 150 This limited warranty does not ... the products to return the product. www.dell.com | support.dell.com • If you are not available for Dell | EMC storage products, EMC-branded products, or enterprise software. • Reconditioned or Refurbished Dell-Branded Hardware Products and Parts - All other items that you 're ...
... within 30 days from any media, documentation, and all other reconditioned or refurbished Dell-branded hardware products and parts may be returned within 14 days of the software • Non-Dell branded and Solution Provider Direct products and accessories 150 This limited warranty does not ... the products to return the product. www.dell.com | support.dell.com • If you are not available for Dell | EMC storage products, EMC-branded products, or enterprise software. • Reconditioned or Refurbished Dell-Branded Hardware Products and Parts - All other items that you 're ...


