
Inspiron 11 3000 Service Manual
Page 4
Replacing the I/O board 32 Procedure 32 Post-requisites 32 Removing the heat sink 33 Prerequisites 33 Procedure 33 Replacing the heat sink 35 Procedure 35 Post-requisites 35 Removing the memory module 36 Prerequisites 36 Procedure 36 Replacing the memory module 38 Procedure 38 Post-requisites 39 Removing the hard drive 40 Prerequisites 40 Procedure 40 Replacing the hard drive 43 Procedure 43 Post-requisites 43 Removing the power-adapter port 44 Prerequisites 44 Procedure 44 4
Replacing the I/O board 32 Procedure 32 Post-requisites 32 Removing the heat sink 33 Prerequisites 33 Procedure 33 Replacing the heat sink 35 Procedure 35 Post-requisites 35 Removing the memory module 36 Prerequisites 36 Procedure 36 Replacing the memory module 38 Procedure 38 Post-requisites 39 Removing the hard drive 40 Prerequisites 40 Procedure 40 Replacing the hard drive 43 Procedure 43 Post-requisites 43 Removing the power-adapter port 44 Prerequisites 44 Procedure 44 4

Inspiron 11 3000 Service Manual
Page 8
... Downloading the media-card reader driver 93 Downloading the chipset driver 94 System setup 95 Boot Sequence 95 Navigation keys 95 BIOS overview 96 Entering BIOS setup program 96 Identifying the hard drive in BIOS setup program 97 Checking the system memory in BIOS setup program 97 System Setup Options 97 System and setup password 103 Assigning a system password and setup password 103 Deleting or changing an existing system and or setup password............104 Clearing forgotten passwords 104 Clearing CMOS settings 105 Troubleshooting 106 Flashing the BIOS 106 Flea power...
... Downloading the media-card reader driver 93 Downloading the chipset driver 94 System setup 95 Boot Sequence 95 Navigation keys 95 BIOS overview 96 Entering BIOS setup program 96 Identifying the hard drive in BIOS setup program 97 Checking the system memory in BIOS setup program 97 System Setup Options 97 System and setup password 103 Assigning a system password and setup password 103 Deleting or changing an existing system and or setup password............104 Clearing forgotten passwords 104 Clearing CMOS settings 105 Troubleshooting 106 Flashing the BIOS 106 Flea power...

Inspiron 11 3000 Service Manual
Page 10
... all attached network devices and peripherals, such as keyboard, mouse, and monitor from your computer. 5 Remove any media card and optical disc from potential damage and ensure your personal safety. WARNING: Disconnect all covers, panels, and screws before opening the computer cover or panels. Before you finish working inside the computer, replace all power sources before connecting to protect your computer from your computer. Click Start → Power → Shut...
... all attached network devices and peripherals, such as keyboard, mouse, and monitor from your computer. 5 Remove any media card and optical disc from potential damage and ensure your personal safety. WARNING: Disconnect all covers, panels, and screws before opening the computer cover or panels. Before you finish working inside the computer, replace all power sources before connecting to protect your computer from your computer. Click Start → Power → Shut...

Inspiron 11 3000 Service Manual
Page 14
After working inside your computer CAUTION: Leaving stray or loose screws inside your computer may severely damage your computer. 1 Replace all screws and ensure that no stray screws remain inside your computer. 2 Connect any external devices, peripherals, or cables you removed before working on your computer. 3 Replace any media cards, discs, or any other parts that you removed before working on your computer. 4 Connect your computer and all attached devices to their electrical outlets. 5 Turn on your computer. 14
After working inside your computer CAUTION: Leaving stray or loose screws inside your computer may severely damage your computer. 1 Replace all screws and ensure that no stray screws remain inside your computer. 2 Connect any external devices, peripherals, or cables you removed before working on your computer. 3 Replace any media cards, discs, or any other parts that you removed before working on your computer. 4 Connect your computer and all attached devices to their electrical outlets. 5 Turn on your computer. 14

Inspiron 11 3000 Service Manual
Page 38
..., remove the memory module and reinstall it clicks into the memory-module slot at www.dell.com/ regulatory_compliance. After working inside your computer, follow the steps in After working inside your computer. Procedure 1 Use your fingertips and lift the flap to access the memory-module slot. 2 Align the notch on the memory module with your computer and follow the instructions in Before working inside your computer. Replacing the memory module WARNING...
..., remove the memory module and reinstall it clicks into the memory-module slot at www.dell.com/ regulatory_compliance. After working inside your computer, follow the steps in After working inside your computer. Procedure 1 Use your fingertips and lift the flap to access the memory-module slot. 2 Align the notch on the memory module with your computer and follow the instructions in Before working inside your computer. Replacing the memory module WARNING...

Inspiron 11 3000 Service Manual
Page 52
... with your computer and follow the instructions in "Removing the I/O board". 4 Remove the wireless card. CAUTION: Removing the coin-cell battery resets the BIOS setup program's settings to step 6 in "Removing the base cover". 2 Remove the battery. 3 Follow the step 1 procedure in After working inside your computer. Procedure 1 Disconnect the coin-cell battery cable from the system board. 2 Remove the coin-cell battery cable from step 1 to default. After working inside your computer, follow the...
... with your computer and follow the instructions in "Removing the I/O board". 4 Remove the wireless card. CAUTION: Removing the coin-cell battery resets the BIOS setup program's settings to step 6 in "Removing the base cover". 2 Remove the battery. 3 Follow the step 1 procedure in After working inside your computer. Procedure 1 Disconnect the coin-cell battery cable from the system board. 2 Remove the coin-cell battery cable from step 1 to default. After working inside your computer, follow the...

Inspiron 11 3000 Service Manual
Page 64
... the instructions in After working inside your computer. NOTE: Replacing the system board removes any changes you replace the system board. NOTE: Before disconnecting the cables from the system board. 64 NOTE: Your computer's Service Tag is stored in "Removing the I/O board". 3 Remove the battery. 4 Remove the heat sink. 5 Remove the memory module. 6 Remove the wireless card. 7 Remove the hard drive. Prerequisites 1 Follow the procedure from step 1 to the BIOS using the BIOS setup program. You must make the appropriate changes...
... the instructions in After working inside your computer. NOTE: Replacing the system board removes any changes you replace the system board. NOTE: Before disconnecting the cables from the system board. 64 NOTE: Your computer's Service Tag is stored in "Removing the I/O board". 3 Remove the battery. 4 Remove the heat sink. 5 Remove the memory module. 6 Remove the wireless card. 7 Remove the hard drive. Prerequisites 1 Follow the procedure from step 1 to the BIOS using the BIOS setup program. You must make the appropriate changes...

Inspiron 11 3000 Service Manual
Page 68
... the instructions in the system board. NOTE: Your computer's Service Tag is stored in After working inside your computer. You must make the appropriate changes again after you replace the system board. Replacing the system board WARNING: Before working inside your computer, read the safety information that secures the display-cable bracket to the BIOS using the BIOS setup program. You must enter the Service Tag in Before working inside...
... the instructions in the system board. NOTE: Your computer's Service Tag is stored in After working inside your computer. You must make the appropriate changes again after you replace the system board. Replacing the system board WARNING: Before working inside your computer, read the safety information that secures the display-cable bracket to the BIOS using the BIOS setup program. You must enter the Service Tag in Before working inside...

Inspiron 11 3000 Service Manual
Page 70
... and keyboard assembly. 70 Prerequisites 1 Follow the procedure from step 1 to step 6 in "Removing the base cover". 2 Remove the battery. 3 Remove the heat sink. 4 Remove the memory module. 5 Follow the procedure from step 1 to step 2 in Before working inside your computer. After working inside your computer, follow the steps in "Removing the hard drive". 6 Remove the power-adapter port. 7 Remove the wireless card. 8 Remove the coin-cell battery. 9 Remove the speaker. 10 Remove the display assembly. 11 Remove...
... and keyboard assembly. 70 Prerequisites 1 Follow the procedure from step 1 to step 6 in "Removing the base cover". 2 Remove the battery. 3 Remove the heat sink. 4 Remove the memory module. 5 Follow the procedure from step 1 to step 2 in Before working inside your computer. After working inside your computer, follow the steps in "Removing the hard drive". 6 Remove the power-adapter port. 7 Remove the wireless card. 8 Remove the coin-cell battery. 9 Remove the speaker. 10 Remove the display assembly. 11 Remove...

Inspiron 11 3000 Service Manual
Page 91
... or manually browse for your computer model. 4 Click Drivers & downloads → Find it myself. 5 Scroll down the page, and expand Audio. 6 Click Download to download the audio driver for your computer, and then click Submit. Downloading drivers Downloading the audio driver 1 Turn on the screen to install the driver. Audio controller in device manager Before driver installation After driver installation Downloading the graphics driver 1 Turn on your computer. 2 Go to www.dell.com/support. 3 Click Product support enter the Service Tag of your computer model. 4 Click Drivers...
... or manually browse for your computer model. 4 Click Drivers & downloads → Find it myself. 5 Scroll down the page, and expand Audio. 6 Click Download to download the audio driver for your computer, and then click Submit. Downloading drivers Downloading the audio driver 1 Turn on the screen to install the driver. Audio controller in device manager Before driver installation After driver installation Downloading the graphics driver 1 Turn on your computer. 2 Go to www.dell.com/support. 3 Click Product support enter the Service Tag of your computer model. 4 Click Drivers...

Inspiron 11 3000 Service Manual
Page 92
Display adapter in device manager Before driver installation After driver installation 92 Table 5. Table 4. Identifying USB driver in device manager Before driver installation After driver installation Downloading the USB 3.0 driver 1 Turn on the screen. 5 Scroll down the page and expand Chipset. 6 Click Download to the folder where you saved the USB 3.0 driver file. 8 Double-click the driver file icon and follow the instructions on screen. NOTE: If you do not have the Service Tag, use the auto-detect feature or manually browse...
Display adapter in device manager Before driver installation After driver installation 92 Table 5. Table 4. Identifying USB driver in device manager Before driver installation After driver installation Downloading the USB 3.0 driver 1 Turn on the screen. 5 Scroll down the page and expand Chipset. 6 Click Download to the folder where you saved the USB 3.0 driver file. 8 Double-click the driver file icon and follow the instructions on screen. NOTE: If you do not have the Service Tag, use the auto-detect feature or manually browse...

Inspiron 11 3000 Service Manual
Page 94
Table 6. Identifying media-card reader driver in device manager Before driver installation After driver installation Downloading the chipset driver 1 Turn on your computer. 2 Go to www.dell.com/support. 3 Click Product support, enter the Service Tag of your computer, and then click Submit. NOTE: If you do not have the Service Tag, use the auto-detect feature or manually browse for your computer model. 4 Click Drivers & downloads → Find it myself. 5 Scroll down the page and...
Table 6. Identifying media-card reader driver in device manager Before driver installation After driver installation Downloading the chipset driver 1 Turn on your computer. 2 Go to www.dell.com/support. 3 Click Product support, enter the Service Tag of your computer, and then click Submit. NOTE: If you do not have the Service Tag, use the auto-detect feature or manually browse for your computer model. 4 Click Drivers & downloads → Find it myself. 5 Scroll down the page and...
Inspiron 11 3000 Service Manual
Page 96
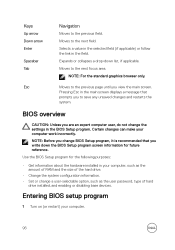
... focus area. Entering BIOS setup program 1 Turn on (or restart) your computer work incorrectly. Selects a value in the selected field (if applicable) or follow the link in your computer, such as the amount of RAM and the size of the hard drive. • Change the system configuration information. • Set or change a user-selectable option, such as the user password, type of hard drive installed, and enabling or disabling base devices. Moves to...
... focus area. Entering BIOS setup program 1 Turn on (or restart) your computer work incorrectly. Selects a value in the selected field (if applicable) or follow the link in your computer, such as the amount of RAM and the size of the hard drive. • Change the system configuration information. • Set or change a user-selectable option, such as the user password, type of hard drive installed, and enabling or disabling base devices. Moves to...
Inspiron 11 3000 Service Manual
Page 98
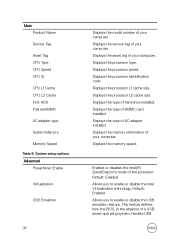
... Displays the type of hard drive installed. Displays the processor identification code. Displays the type of AC adapter installed. Enables or disables the Intel(R) SpeedStep(tm) mode of eMMC card installed. Displays the processor L1 cache size. Displays the processor L2 cache size. Default: Enabled Allows you to enable or disable the Intel Virtualization technology. Displays the type of the processor. System setup options Advanced PowerNow! Enable Virtualization USB Emulation 98 Displays the model number of your computer. Displays the processor speed. Default: Enabled...
... Displays the type of hard drive installed. Displays the processor identification code. Displays the type of AC adapter installed. Enables or disables the Intel(R) SpeedStep(tm) mode of eMMC card installed. Displays the processor L1 cache size. Displays the processor L2 cache size. Default: Enabled Allows you to enable or disable the Intel Virtualization technology. Displays the type of the processor. System setup options Advanced PowerNow! Enable Virtualization USB Emulation 98 Displays the model number of your computer. Displays the processor speed. Default: Enabled...

Inspiron 11 3000 Service Manual
Page 99
... to disable the USB wake support feature. Displays the miscellaneous devices installed in your computer. Default: Enabled Allows you use AC adapters that are not supported by your computer. Default: Function key Displays the battery health. Default: Enabled Allows you to recover from certain corrupted BIOS conditions from Hard Drive devices. Enable the user to configure the operating mode of USB device (floppy, hard drive, or memory key) when this option is off. USB emulation is enabled, a device connected to set function key or multimedia key as the default function key...
... to disable the USB wake support feature. Displays the miscellaneous devices installed in your computer. Default: Enabled Allows you use AC adapters that are not supported by your computer. Default: Function key Displays the battery health. Default: Enabled Allows you to recover from certain corrupted BIOS conditions from Hard Drive devices. Enable the user to configure the operating mode of USB device (floppy, hard drive, or memory key) when this option is off. USB emulation is enabled, a device connected to set function key or multimedia key as the default function key...

Inspiron 11 3000 Service Manual
Page 101
... password Password Change Computrace Firmware TPM PPI Bypass for Clear Command. Allows you to set , change or delete the hard-disk drive password. Enable or disable BIOS updates through UEFI capsule update packages. The system password controls access to delete the boot options Displays the boot sequence. 101 Default: Disabled. Default: Permitted Enable or disable the BIOS module interface of the optional Computrace Service from Absolute Software. Enable or disable the secure boot feature. System setup options Boot Fast Boot Secure Boot Legacy Option ROMs Boot List Option...
... password Password Change Computrace Firmware TPM PPI Bypass for Clear Command. Allows you to set , change or delete the hard-disk drive password. Enable or disable BIOS updates through UEFI capsule update packages. The system password controls access to delete the boot options Displays the boot sequence. 101 Default: Disabled. Default: Permitted Enable or disable the BIOS module interface of the optional Computrace Service from Absolute Software. Enable or disable the secure boot feature. System setup options Boot Fast Boot Secure Boot Legacy Option ROMs Boot List Option...

Inspiron 11 3000 Service Manual
Page 103
... BIOS or System Setup screen, select Security and press Enter. Only the following guidelines to assign the system password: - NOTE: System and setup password feature is displayed. 2 Select System Password and create a password in Not Set. The password can contain the numbers 0 through 9. - To enter the system setup, press F2 immediately after a power-on your computer if it is in the Enter the new password field. System and setup password You can create...
... BIOS or System Setup screen, select Security and press Enter. Only the following guidelines to assign the system password: - NOTE: System and setup password feature is displayed. 2 Select System Password and create a password in Not Set. The password can contain the numbers 0 through 9. - To enter the system setup, press F2 immediately after a power-on your computer if it is in the Enter the new password field. System and setup password You can create...

Inspiron 11 3000 Service Manual
Page 106
... the Service Tag, use the auto-detect feature or manually browse for your computer model. 4 Click Drivers & downloads → Find it has been powered off your computer. 2 Remove the base cover. 3 Press and hold the power button for your computer, and then click Submit. The following procedure provides the instructions on how to conduct flea power release: 1 Turn off and the battery has been removed. Troubleshooting Flashing the BIOS...
... the Service Tag, use the auto-detect feature or manually browse for your computer model. 4 Click Drivers & downloads → Find it has been powered off your computer. 2 Remove the base cover. 3 Press and hold the power button for your computer, and then click Submit. The following procedure provides the instructions on how to conduct flea power release: 1 Turn off and the battery has been removed. Troubleshooting Flashing the BIOS...

Inspiron 11 3000 Service Manual
Page 107
... embedded system diagnostics provides a set of your computer. Using this program with the BIOS and is displayed on the screen to test only your hardware. The ePSA is embedded with other computers may cause invalid results or error messages. Flashing BIOS (USB key) 1 Follow the procedure from the One Time Boot Menu. 7 Type the BIOS setup program filename and press Enter. 8 The BIOS Update Utility appears. For more information see...
... embedded system diagnostics provides a set of your computer. Using this program with the BIOS and is displayed on the screen to test only your hardware. The ePSA is embedded with other computers may cause invalid results or error messages. Flashing BIOS (USB key) 1 Follow the procedure from the One Time Boot Menu. 7 Type the BIOS setup program filename and press Enter. 8 The BIOS Update Utility appears. For more information see...

Inspiron 11 3000 Setup and Specifications
Page 7
Create a USB recovery drive for latest instructions. 1 Connect the USB flash drive to complete. An empty USB flash drive with Windows. Refer to the Microsoft support site for Windows Create a recovery drive to troubleshoot and fix problems that may occur with a minimum capacity of Windows installed. The Recovery Drive window is displayed. 4 Click Yes to continue. The User Account Control window is displayed. 5 Select Back up system files to create the recovery drive. Reinstall Windows using a USB recovery drive CAUTION: This process formats the hard drive and removes all data...
Create a USB recovery drive for latest instructions. 1 Connect the USB flash drive to complete. An empty USB flash drive with Windows. Refer to the Microsoft support site for Windows Create a recovery drive to troubleshoot and fix problems that may occur with a minimum capacity of Windows installed. The Recovery Drive window is displayed. 4 Click Yes to continue. The User Account Control window is displayed. 5 Select Back up system files to create the recovery drive. Reinstall Windows using a USB recovery drive CAUTION: This process formats the hard drive and removes all data...


