

Owners Manual
Page 4
Removing the Hard Drive 20 Prerequisites...20 Procedure...20 Replacing the Hard Drive 22 Procedure...22 Post-requisites 22 Removing the Coin-Cell Battery 23 Prerequisites...23 Procedure...23 Replacing the Coin-Cell Battery 25 Procedure...25 Post-requisites 25 Removing the Wireless Card 26 Prerequisites...26 Procedure...26 Replacing the Wireless Card 28 Procedure...28 Post-requisites 28 Removing the Power and Volume-Buttons Board 29 Prerequisites...29 Procedure...29 Replacing the Power and Volume-Buttons Board 31 Procedure...31 Post-requisites 31
Removing the Hard Drive 20 Prerequisites...20 Procedure...20 Replacing the Hard Drive 22 Procedure...22 Post-requisites 22 Removing the Coin-Cell Battery 23 Prerequisites...23 Procedure...23 Replacing the Coin-Cell Battery 25 Procedure...25 Post-requisites 25 Removing the Wireless Card 26 Prerequisites...26 Procedure...26 Replacing the Wireless Card 28 Procedure...28 Post-requisites 28 Removing the Power and Volume-Buttons Board 29 Prerequisites...29 Procedure...29 Replacing the Power and Volume-Buttons Board 31 Procedure...31 Post-requisites 31

Owners Manual
Page 14
.... For more safety best practices, see the Regulatory Compliance home page at dell.com/regulatory_compliance. Removing the Battery WARNING: Before working inside your computer, read the safety information that secure the battery to the palmrest and keyboard assembly. 2 Remove the hard-drive cable from the routing guides on the battery. 3 Lift the battery...
.... For more safety best practices, see the Regulatory Compliance home page at dell.com/regulatory_compliance. Removing the Battery WARNING: Before working inside your computer, read the safety information that secure the battery to the palmrest and keyboard assembly. 2 Remove the hard-drive cable from the routing guides on the battery. 3 Lift the battery...

Owners Manual
Page 16
... with the screw holes on the palmrest and keyboard assembly and place the battery on the palmrest and keyboard assembly. 2 Route the hard-drive cable through the routing guides on the battery. 3 Replace the screws that shipped with your computer and follow the instructions in Before... Working Inside Your Computer. For more safety best practices, see the Regulatory Compliance home page at dell.com/regulatory_compliance. Post-requisites Replace the base cover. 16 After working inside your computer, follow the steps in After Working Inside Your...
... with the screw holes on the palmrest and keyboard assembly and place the battery on the palmrest and keyboard assembly. 2 Route the hard-drive cable through the routing guides on the battery. 3 Replace the screws that shipped with your computer and follow the instructions in Before... Working Inside Your Computer. For more safety best practices, see the Regulatory Compliance home page at dell.com/regulatory_compliance. Post-requisites Replace the base cover. 16 After working inside your computer, follow the steps in After Working Inside Your...

Owners Manual
Page 20
...Computer. Exercise care when handling the hard drive. Procedure 1 Remove the screws that shipped with your computer and follow the instructions in Sleep or On state. For more safety best practices, see the Regulatory Compliance home page at dell.com/regulatory_compliance. CAUTION: To avoid data... loss, do not remove the hard drive while the computer is in After Working Inside Your Computer. Prerequisites 1 Remove the base cover. ...
...Computer. Exercise care when handling the hard drive. Procedure 1 Remove the screws that shipped with your computer and follow the instructions in Sleep or On state. For more safety best practices, see the Regulatory Compliance home page at dell.com/regulatory_compliance. CAUTION: To avoid data... loss, do not remove the hard drive while the computer is in After Working Inside Your Computer. Prerequisites 1 Remove the base cover. ...

Owners Manual
Page 21
3 Lift the hard-drive assembly along with its cable off the palmrest and keyboard assembly. 1 screws (2) 2 hard-drive assembly 3 hard-drive cable 4 pull tab 4 Disconnect the interposer from the hard drive. 5 Remove the screws that secure the hard-drive bracket to the hard drive. 6 Lift the hard-drive bracket from the hard drive. 1 screws (4) 3 hard-drive bracket 2 hard drive 4 interposer 21
3 Lift the hard-drive assembly along with its cable off the palmrest and keyboard assembly. 1 screws (2) 2 hard-drive assembly 3 hard-drive cable 4 pull tab 4 Disconnect the interposer from the hard drive. 5 Remove the screws that secure the hard-drive bracket to the hard drive. 6 Lift the hard-drive bracket from the hard drive. 1 screws (4) 3 hard-drive bracket 2 hard drive 4 interposer 21

Owners Manual
Page 22
... 1 Align the screw holes on the hard drive with the screw holes on the hard-drive assembly with your computer, follow the steps in After Working Inside Your Computer. CAUTION: Hard drives are fragile. For more safety best practices, see the Regulatory Compliance home page at dell.com/regulatory_compliance. Replacing the Hard Drive WARNING: Before working inside your computer...
... 1 Align the screw holes on the hard drive with the screw holes on the hard-drive assembly with your computer, follow the steps in After Working Inside Your Computer. CAUTION: Hard drives are fragile. For more safety best practices, see the Regulatory Compliance home page at dell.com/regulatory_compliance. Replacing the Hard Drive WARNING: Before working inside your computer...

Owners Manual
Page 42
.... After working inside your computer and follow the instructions in Before Working Inside Your Computer. Prerequisites 1 Remove the base cover. 2 Remove the battery. 3 Remove the hard drive. 4 Remove the wireless card. 5 Remove the coin-cell battery. For more safety best practices, see the Regulatory Compliance home page at...
.... After working inside your computer and follow the instructions in Before Working Inside Your Computer. Prerequisites 1 Remove the base cover. 2 Remove the battery. 3 Remove the hard drive. 4 Remove the wireless card. 5 Remove the coin-cell battery. For more safety best practices, see the Regulatory Compliance home page at...

Owners Manual
Page 44
For more safety best practices, see the Regulatory Compliance home page at dell.com/regulatory_compliance. Procedure 1 Using the alignment posts, place the I/O board on the palmrest and keyboard assembly. 2 Align the screw hole on the I/O board with your ... inside your computer, follow the steps in After Working Inside Your Computer. Post-requisites 1 Replace the coin-cell battery. 2 Replace the wireless card. 3 Replace the hard drive. 4 Replace the battery. 5 Replace the base cover. 44
For more safety best practices, see the Regulatory Compliance home page at dell.com/regulatory_compliance. Procedure 1 Using the alignment posts, place the I/O board on the palmrest and keyboard assembly. 2 Align the screw hole on the I/O board with your ... inside your computer, follow the steps in After Working Inside Your Computer. Post-requisites 1 Replace the coin-cell battery. 2 Replace the wireless card. 3 Replace the hard drive. 4 Replace the battery. 5 Replace the base cover. 44

Owners Manual
Page 46
4 Lift the connector latch and disconnect the Windows-button board cable from the system board. 1 screws (2) 3 display cable 2 display-cable bracket 4 windows-button board cable 5 adhesive tape 5 Using the pull tab disconnect the I/O-board cable and the hard-drive cable from the system board. 6 Release the connector latches and disconnect the keyboard cable from the system board. 7 Lift the connector latch and disconnect the touchpad cable from the system board. 46
4 Lift the connector latch and disconnect the Windows-button board cable from the system board. 1 screws (2) 3 display cable 2 display-cable bracket 4 windows-button board cable 5 adhesive tape 5 Using the pull tab disconnect the I/O-board cable and the hard-drive cable from the system board. 6 Release the connector latches and disconnect the keyboard cable from the system board. 7 Lift the connector latch and disconnect the touchpad cable from the system board. 46

Owners Manual
Page 47
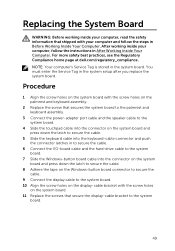
8 Disconnect the speaker cable and the power-adapter port cable from the system board. 1 I/O-board cable 2 keyboard cable 3 hard-drive cable 4 touchpad cable 5 speaker cable 6 power-adapter port cable 9 Remove the screw that secures the system board to the palmrest and keyboard assembly. 47
8 Disconnect the speaker cable and the power-adapter port cable from the system board. 1 I/O-board cable 2 keyboard cable 3 hard-drive cable 4 touchpad cable 5 speaker cable 6 power-adapter port cable 9 Remove the screw that secures the system board to the palmrest and keyboard assembly. 47
Owners Manual
Page 49
...your computer, read the safety information that shipped with the screw holes on the system board. 11 Replace the screws that secures the system board to the palmrest and keyboard assembly. 3 Connect ... and push the connector latches in to secure the cable. 6 Connect the I/O-board cable and the hard-drive cable to the system board. 7 Slide the Windows-button board cable into the connector on the system...For more safety best practices, see the Regulatory Compliance home page at dell.com/regulatory_compliance. NOTE: Your computer's Service Tag is stored in the system setup after you replace the...
...your computer, read the safety information that shipped with the screw holes on the system board. 11 Replace the screws that secures the system board to the palmrest and keyboard assembly. 3 Connect ... and push the connector latches in to secure the cable. 6 Connect the I/O-board cable and the hard-drive cable to the system board. 7 Slide the Windows-button board cable into the connector on the system...For more safety best practices, see the Regulatory Compliance home page at dell.com/regulatory_compliance. NOTE: Your computer's Service Tag is stored in the system setup after you replace the...

Owners Manual
Page 58
For more safety best practices, see the Regulatory Compliance home page at dell.com/regulatory_compliance. Procedure After performing the steps in "Removing the Hard Drive". 4 Remove the I/O board. 5 Remove the speakers. 6 Remove the display assembly. 7 Remove the power-adapter port. 8 Remove the system board. Removing the Palmrest and Keyboard Assembly ...
For more safety best practices, see the Regulatory Compliance home page at dell.com/regulatory_compliance. Procedure After performing the steps in "Removing the Hard Drive". 4 Remove the I/O board. 5 Remove the speakers. 6 Remove the display assembly. 7 Remove the power-adapter port. 8 Remove the system board. Removing the Palmrest and Keyboard Assembly ...

Owners Manual
Page 60
... Before Working Inside Your Computer. Procedure Place the palmrest and keyboard assembly on a flat surface with your computer and follow the instructions in "Replacing the Hard Drive". 7 Replace the battery. 8 Replace the base cover. 60 Post-requisites 1 Replace the system board. 2 Replace the power-adapter port. 3 Replace the display assembly. 4 Replace the... your computer, read the safety information that shipped with the keyboard facing down. For more safety best practices, see the Regulatory Compliance home page at dell.com/regulatory_compliance.
... Before Working Inside Your Computer. Procedure Place the palmrest and keyboard assembly on a flat surface with your computer and follow the instructions in "Replacing the Hard Drive". 7 Replace the battery. 8 Replace the base cover. 60 Post-requisites 1 Replace the system board. 2 Replace the power-adapter port. 3 Replace the display assembly. 4 Replace the... your computer, read the safety information that shipped with the keyboard facing down. For more safety best practices, see the Regulatory Compliance home page at dell.com/regulatory_compliance.

Specifications
Page 15
Views Storage Interface Hard drive Specifications SATA 3 Gbps One 2.5-inch drive Dimensions and weight System information Memory Ports and connectors Communications Video Audio Storage Media-card reader Display Keyboard Camera Touch pad Battery Power adapter Computer environment
Views Storage Interface Hard drive Specifications SATA 3 Gbps One 2.5-inch drive Dimensions and weight System information Memory Ports and connectors Communications Video Audio Storage Media-card reader Display Keyboard Camera Touch pad Battery Power adapter Computer environment

Specifications
Page 23
... ft) * Measured using a random vibration spectrum that simulates user environment. † Measured using a 2 ms half-sine pulse when the hard drive is in use. ‡ Measured using a 2 ms half-sine pulse when the hard-drive head is in parked position. Views Specifications Computer environment Airborne contaminant level G1 as defined by ISA-S71.04...
... ft) * Measured using a random vibration spectrum that simulates user environment. † Measured using a 2 ms half-sine pulse when the hard drive is in use. ‡ Measured using a 2 ms half-sine pulse when the hard-drive head is in parked position. Views Specifications Computer environment Airborne contaminant level G1 as defined by ISA-S71.04...

Me and My Dell
Page 30
... DVDs, and CDs. • Blu-ray reader + DVD RW combo - The most common internal storage devices are hard‑disk drives (HDD), solid‑state drives (SSD), optical-disc drives, flash drives, and so on . HDDs and SSDs use . Reads and writes to DVDs and CDs. • DVD RW -...removable storage devices include: • Optical discs • Memory cards • Flash drives • External hard drives Optical Drives and Discs Your computer may support a DVD RW or a DVD RW and Blu-ray combo drive. Reads Blu-ray Discs. Storage Device Storage devices allow you to store data for ...
... DVDs, and CDs. • Blu-ray reader + DVD RW combo - The most common internal storage devices are hard‑disk drives (HDD), solid‑state drives (SSD), optical-disc drives, flash drives, and so on . HDDs and SSDs use . Reads and writes to DVDs and CDs. • DVD RW -...removable storage devices include: • Optical discs • Memory cards • Flash drives • External hard drives Optical Drives and Discs Your computer may support a DVD RW or a DVD RW and Blu-ray combo drive. Reads Blu-ray Discs. Storage Device Storage devices allow you to store data for ...

Me and My Dell
Page 61
Referred to as hard drives and optical drives, to your computer while charging a USB device, the device may stop charging. USB PowerShare - NOTE: Certain USB devices may have a standalone eSATA port or an eSATA/USB combo port. You can configure this limit using a USB optical drive or a flash drive. eSATA 61 This port supports data... transfer speeds up to charge the device. The icon indicates that the USB port supports PowerShare feature. NOTE: If you turn on the computer to 11 Mbps.
Referred to as hard drives and optical drives, to your computer while charging a USB device, the device may stop charging. USB PowerShare - NOTE: Certain USB devices may have a standalone eSATA port or an eSATA/USB combo port. You can configure this limit using a USB optical drive or a flash drive. eSATA 61 This port supports data... transfer speeds up to charge the device. The icon indicates that the USB port supports PowerShare feature. NOTE: If you turn on the computer to 11 Mbps.
Me and My Dell
Page 67
Manage your hard drive using a visual representation of the space consumed by each type of the system. -- View detailed information about your hard‑drive usage, run hardware diagnostics, and track the changes made to dell.com/support. My Dell 67 You can use My Dell to other Dell tools and diagnostic services. Accessing My Dell Windows 8.1 - Click Start...
Manage your hard drive using a visual representation of the space consumed by each type of the system. -- View detailed information about your hard‑drive usage, run hardware diagnostics, and track the changes made to dell.com/support. My Dell 67 You can use My Dell to other Dell tools and diagnostic services. Accessing My Dell Windows 8.1 - Click Start...

Me and My Dell
Page 73
...possible, backup your computer. Use when operating system failure prevents the use of the following options: CAUTION: Using Dell Factory Image Restore or the Operating System disc permanently deletes all files and applications that you might have saved ... system on your data files before using one of Dell Backup and Recovery or when installing Windows on a new or replacement hard drive. System Recovery Options 73 Option Dell Backup and Recovery System reinstall discs System Restore Dell Factory Image Restore Dell DataSafe Local Backup (Windows 7) Operating System disc (...
...possible, backup your computer. Use when operating system failure prevents the use of the following options: CAUTION: Using Dell Factory Image Restore or the Operating System disc permanently deletes all files and applications that you might have saved ... system on your data files before using one of Dell Backup and Recovery or when installing Windows on a new or replacement hard drive. System Recovery Options 73 Option Dell Backup and Recovery System reinstall discs System Restore Dell Factory Image Restore Dell DataSafe Local Backup (Windows 7) Operating System disc (...
Me and My Dell
Page 79
... Restore. are permanently deleted. including data files such as the last method to restore your operating system. Dell Factory Image Restore 79 Accessing Dell Factory Image Restore CAUTION: Using Dell Factory Image Restore permanently deletes all data on the hard drive and removes any programs or drivers installed after you received your computer - Use...
... Restore. are permanently deleted. including data files such as the last method to restore your operating system. Dell Factory Image Restore 79 Accessing Dell Factory Image Restore CAUTION: Using Dell Factory Image Restore permanently deletes all data on the hard drive and removes any programs or drivers installed after you received your computer - Use...


