
Users Guide
Page 3
Contents About your monitor 5 Package contents 5 Product features 6 Identifying features and controls 7 Pin assignments 19 Plug and play capability 22 LCD monitor quality and pixel policy 22 Maintenance guidelines 22 Setting up the monitor 23 Connecting the stand 23 Connecting your monitor 25 Organizing cables 26 Removing the stand 27 Operating your monitor 30 Turning on the monitor 30 Using the front panel controls 30 Using the OSD lock function 32 Using the On-Screen Display (OSD) menu 36 Setting up display resolution on your monitor 56 Using tilt 58 Contents │ 3
Contents About your monitor 5 Package contents 5 Product features 6 Identifying features and controls 7 Pin assignments 19 Plug and play capability 22 LCD monitor quality and pixel policy 22 Maintenance guidelines 22 Setting up the monitor 23 Connecting the stand 23 Connecting your monitor 25 Organizing cables 26 Removing the stand 27 Operating your monitor 30 Turning on the monitor 30 Using the front panel controls 30 Using the OSD lock function 32 Using the On-Screen Display (OSD) menu 36 Setting up display resolution on your monitor 56 Using tilt 58 Contents │ 3

Users Guide
Page 6
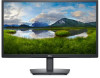
...; Plug and play capable if supported by country. EPEAT registration varies by your monitor ComfortView feature to reduce risk of 178 degrees in vertical and horizontal directions. • Contrast ratio (1000:1). • Digital connectivity with DisplayPort or HDMI. • Height adjustment capability for E2422HS. • Dual built-in speakers for easy setup and screen optimization. • ≤ 0.3 W in .) diagonal viewable area display (measured diagonally). 1920 x 1080 resolution, with LED backlight.
...; Plug and play capable if supported by country. EPEAT registration varies by your monitor ComfortView feature to reduce risk of 178 degrees in vertical and horizontal directions. • Contrast ratio (1000:1). • Digital connectivity with DisplayPort or HDMI. • Height adjustment capability for E2422HS. • Dual built-in speakers for easy setup and screen optimization. • ≤ 0.3 W in .) diagonal viewable area display (measured diagonally). 1920 x 1080 resolution, with LED backlight.

Users Guide
Page 12
... Anti-glare with 3H hardness Backlight LED edgelight system LED edgelight system Response time Normal mode Fast mode Color depth < 8ms < 5ms 16.7 million colors < 8ms < 5ms 16.7 million colors Color gamut Dell display manager compatibility Connectivity Bezel width (edge of monitor to active area) Security Tilt angle 72% (CIE1931) 83% (CIE1976) Yes 72% (CIE1931) 83% (CIE1976) Yes E2422H: 1 x DP1.2, 1 x VGA 1 x DP 1.2, 1 x HDMI 1.4, E2422HN: 1 x HDMI 1.4, 1 x VGA 1 x VGA 12.8 mm (Top) 12...
... Anti-glare with 3H hardness Backlight LED edgelight system LED edgelight system Response time Normal mode Fast mode Color depth < 8ms < 5ms 16.7 million colors < 8ms < 5ms 16.7 million colors Color gamut Dell display manager compatibility Connectivity Bezel width (edge of monitor to active area) Security Tilt angle 72% (CIE1931) 83% (CIE1976) Yes 72% (CIE1931) 83% (CIE1976) Yes E2422H: 1 x DP1.2, 1 x VGA 1 x DP 1.2, 1 x HDMI 1.4, E2422HN: 1 x HDMI 1.4, 1 x VGA 1 x VGA 12.8 mm (Top) 12...

Users Guide
Page 22
... the monitor power cable from the electrical outlet. CAUTION: Read and follow these instructions in use a special screen-cleaning, tissue or solution suitable for one or more information about changing the monitor settings, see Dell Support site at www.dell.com/pixelguidelines. If possible, use . 22 │ About your screen, lightly dampen a soft and clean cloth with water. Most monitor installations are hard to clean the monitor. For more pixels to become fixed...
... the monitor power cable from the electrical outlet. CAUTION: Read and follow these instructions in use a special screen-cleaning, tissue or solution suitable for one or more information about changing the monitor settings, see Dell Support site at www.dell.com/pixelguidelines. If possible, use . 22 │ About your screen, lightly dampen a soft and clean cloth with water. Most monitor installations are hard to clean the monitor. For more pixels to become fixed...

Users Guide
Page 25
... 3C0183R00-xxx-G(A)xx VGA Setting up the monitor │ 25 Connecting VGA cable VGA DELL E2422HS Flat Panel Monitor E2422HS 100-240V ~ 50/60Hz, 1.5A Made in this equipment. Connecting your monitor WARNING: Before you connect them to the computer at the same time. Connect VGA or DP or HDMI cable from the power outlet by grasping the plug firmly. Dell does not guarantee the video quality and performance when using non-Dell cables. WARNING: For your...
... 3C0183R00-xxx-G(A)xx VGA Setting up the monitor │ 25 Connecting VGA cable VGA DELL E2422HS Flat Panel Monitor E2422HS 100-240V ~ 50/60Hz, 1.5A Made in this equipment. Connecting your monitor WARNING: Before you connect them to the computer at the same time. Connect VGA or DP or HDMI cable from the power outlet by grasping the plug firmly. Dell does not guarantee the video quality and performance when using non-Dell cables. WARNING: For your...

Users Guide
Page 32
...to the User's Guide. To unlock the Buttons, refer to lock the Menu Buttons? Yes No E2422H/E2422HN/E2422HS 3. Once locked, pressing any control button will display the lock icon . 32 │ Operating your monitor The following options. Select Yes to the OSD menu and/ or power button. Dell 24 Monitor Brightness / Contrast Auto Adjust Input Source Color Display Menu Personalize Others Language Transparency Timer Lock Reset Menu Menu Buttons Power Button Menu + Power Buttons Disable 2. Using the OSD lock function You can lock the front-panel control buttons to prevent...
...to the User's Guide. To unlock the Buttons, refer to lock the Menu Buttons? Yes No E2422H/E2422HN/E2422HS 3. Once locked, pressing any control button will display the lock icon . 32 │ Operating your monitor The following options. Select Yes to the OSD menu and/ or power button. Dell 24 Monitor Brightness / Contrast Auto Adjust Input Source Color Display Menu Personalize Others Language Transparency Timer Lock Reset Menu Menu Buttons Power Button Menu + Power Buttons Disable 2. Using the OSD lock function You can lock the front-panel control buttons to prevent...

Users Guide
Page 37
... Press the button to increase the contrast and press the button to decrease the brightness (min. 0; Icon Menu and submenus Brightness/ Contrast Description Use this option to control the brightness or contrast settings. E2422H/E2422HN Dell 24 Monitor Brightness / Contrast Auto Adjust Input Source Color Display Menu Personalize Others 75% 75% E2422HS Dell 24 Monitor Brightness / Contrast Auto Adjust Input Source Color Display Audio Menu Personalize Others 75% 75% Brightness Brightness adjusts the luminance of difference between darkness and lightness on the screen. max. 100...
... Press the button to increase the contrast and press the button to decrease the brightness (min. 0; Icon Menu and submenus Brightness/ Contrast Description Use this option to control the brightness or contrast settings. E2422H/E2422HN Dell 24 Monitor Brightness / Contrast Auto Adjust Input Source Color Display Menu Personalize Others 75% 75% E2422HS Dell 24 Monitor Brightness / Contrast Auto Adjust Input Source Color Display Audio Menu Personalize Others 75% 75% Brightness Brightness adjusts the luminance of difference between darkness and lightness on the screen. max. 100...
Users Guide
Page 40
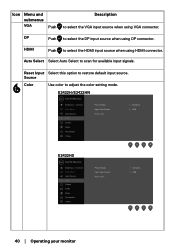
.../ Contrast Auto Adjust Input Source Color Display Menu Personalize Others Preset Modes Input Color Format Reset Color Standard RGB E2422HS Dell 24 Monitor Brightness / Contrast Auto Adjust Input Source Color Display Audio Menu Personalize Others Preset Modes Input Color Format Reset Color Standard RGB 40 │ Operating your monitor Source Color Use color to select the DP input source when using DP connector. DP Push to adjust the color setting mode. Reset Input Select this option to select the HDMI input source when using VGA connector. HDMI Push to restore default input...
.../ Contrast Auto Adjust Input Source Color Display Menu Personalize Others Preset Modes Input Color Format Reset Color Standard RGB E2422HS Dell 24 Monitor Brightness / Contrast Auto Adjust Input Source Color Display Audio Menu Personalize Others Preset Modes Input Color Format Reset Color Standard RGB 40 │ Operating your monitor Source Color Use color to select the DP input source when using DP connector. DP Push to adjust the color setting mode. Reset Input Select this option to select the HDMI input source when using VGA connector. HDMI Push to restore default input...
Users Guide
Page 41
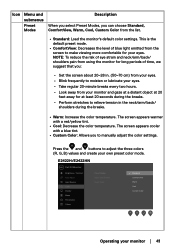
... your monitor │ 41 E2422H/E2422HN Dell 24 Monitor Brightness / Contrast Auto Adjust Input Source Color Display Menu Personalize Others Preset Modes Input Color Format Reset Color Standard ComfortView Warm Cool Custom Color Operating your monitor and gaze at a distant object at 20 feet away for at least 20 seconds during the breaks. • Warm: Increase the color temperature. The screen appears warmer with a blue tint. • Custom Color: Allows you to manually adjust the color settings. Icon Menu...
... your monitor │ 41 E2422H/E2422HN Dell 24 Monitor Brightness / Contrast Auto Adjust Input Source Color Display Menu Personalize Others Preset Modes Input Color Format Reset Color Standard ComfortView Warm Cool Custom Color Operating your monitor and gaze at a distant object at 20 feet away for at least 20 seconds during the breaks. • Warm: Increase the color temperature. The screen appears warmer with a blue tint. • Custom Color: Allows you to manually adjust the color settings. Icon Menu...

Users Guide
Page 43
... Preset Modes Input Color Format Reset Color RGB YCbCr E2422HS Dell 24 Monitor Brightness / Contrast Auto Adjust Input Source Color Display Audio Menu Personalize Others Preset Modes Input Color Format Reset Color RGB YCbCr *When VGA input is selected. E2422H/E2422HN Dell 24 Monitor Brightness / Contrast Auto Adjust Input Source Color Display Menu Personalize Others Aspect Ratio Horizontal Position Vertical Position Sharpness Pixel Clock Phase Response Time Reset Display 16:9 50 Normal Operating your monitor color settings to adjust image. Reset Color Reset your monitor │...
... Preset Modes Input Color Format Reset Color RGB YCbCr E2422HS Dell 24 Monitor Brightness / Contrast Auto Adjust Input Source Color Display Audio Menu Personalize Others Preset Modes Input Color Format Reset Color RGB YCbCr *When VGA input is selected. E2422H/E2422HN Dell 24 Monitor Brightness / Contrast Auto Adjust Input Source Color Display Menu Personalize Others Aspect Ratio Horizontal Position Vertical Position Sharpness Pixel Clock Phase Response Time Reset Display 16:9 50 Normal Operating your monitor color settings to adjust image. Reset Color Reset your monitor │...

Users Guide
Page 45
... Monitor Brightness / Contrast Volume 50 Auto Adjust Speaker On Input Source Reset Audio Off Color Display Audio Menu Personalize Others Volume Speaker Use the buttons to restore default audio settings. Allows you to adjust the settings of the OSD, such as the languages of the OSD, the amount of time, the menu remains on screen, and so on. Menu Select this option to adjust the volume. E2422H/E2422HN Dell 24 Monitor Brightness / Contrast Auto Adjust Input Source Color Display Menu Personalize Others Language Transparency Timer Lock Reset Menu English 20 20 s Disable...
... Monitor Brightness / Contrast Volume 50 Auto Adjust Speaker On Input Source Reset Audio Off Color Display Audio Menu Personalize Others Volume Speaker Use the buttons to restore default audio settings. Allows you to adjust the settings of the OSD, such as the languages of the OSD, the amount of time, the menu remains on screen, and so on. Menu Select this option to adjust the volume. E2422H/E2422HN Dell 24 Monitor Brightness / Contrast Auto Adjust Input Source Color Display Menu Personalize Others Language Transparency Timer Lock Reset Menu English 20 20 s Disable...

Users Guide
Page 47
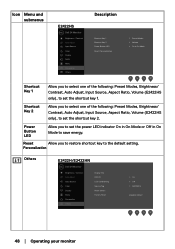
... default menu settings. E2422H/E2422HN Dell 24 Monitor Brightness / Contrast Auto Adjust Input Source Color Display Menu Personalize Others Shortcut Key 1 Shortcut Key 2 Power Button LED Reset Personalization Preset Modes Brightness / Contrast On in On Mode Operating your monitor │ 47 Icon Menu and submenus E2422HS Dell 24 Monitor Brightness / Contrast Auto Adjust Input Source Color Display Audio Menu Personalize Others Description Language Transparency Timer Lock Reset Menu Menu Buttons Power Button Menu + Power Buttons Disable • Menu Buttons: All Menu/function buttons...
... default menu settings. E2422H/E2422HN Dell 24 Monitor Brightness / Contrast Auto Adjust Input Source Color Display Menu Personalize Others Shortcut Key 1 Shortcut Key 2 Power Button LED Reset Personalization Preset Modes Brightness / Contrast On in On Mode Operating your monitor │ 47 Icon Menu and submenus E2422HS Dell 24 Monitor Brightness / Contrast Auto Adjust Input Source Color Display Audio Menu Personalize Others Description Language Transparency Timer Lock Reset Menu Menu Buttons Power Button Menu + Power Buttons Disable • Menu Buttons: All Menu/function buttons...
Users Guide
Page 48
... Ratio, Volume (E2422HS only), to set the shortcut key 1. Reset Allow you to select one of the following : Preset Modes, Brightness/ Contrast, Auto Adjust, Input Source, Aspect Ratio, Volume (E2422HS only), to set the shortcut key 2. Icon Menu and submenus E2422HS Dell 24 Monitor Brightness / Contrast Auto Adjust Input Source Color Display Audio Menu Personalize Others Description Shortcut Key 1 Shortcut Key 2 Power Button LED Reset Personalization Preset Modes Volume On in On Mode to save energy. Shortcut Key 2 Allow you to restore shortcut key to the default setting.
... Ratio, Volume (E2422HS only), to set the shortcut key 1. Reset Allow you to select one of the following : Preset Modes, Brightness/ Contrast, Auto Adjust, Input Source, Aspect Ratio, Volume (E2422HS only), to set the shortcut key 2. Icon Menu and submenus E2422HS Dell 24 Monitor Brightness / Contrast Auto Adjust Input Source Color Display Audio Menu Personalize Others Description Shortcut Key 1 Shortcut Key 2 Power Button LED Reset Personalization Preset Modes Volume On in On Mode to save energy. Shortcut Key 2 Allow you to restore shortcut key to the default setting.
Users Guide
Page 50
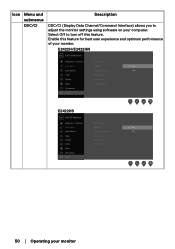
...Channel/Command Interface) allows you to turn off this feature for best user experience and optimum performance of your computer. Enable this feature. E2422H/E2422HN Dell 24 Monitor Brightness / Contrast Display Info Auto Adjust DDC/CI On Input Source LCD Conditioning Off Color Service Tag Display Reset Others Menu Factory Reset Personalize Others E2422HS Dell 24 Monitor Brightness / Contrast Display Info Auto Adjust DDC/CI On Input Source LCD Conditioning Off Color Display Audio Service Tag Reset Others Factory Reset Menu Personalize Others 50 │...
...Channel/Command Interface) allows you to turn off this feature for best user experience and optimum performance of your computer. Enable this feature. E2422H/E2422HN Dell 24 Monitor Brightness / Contrast Display Info Auto Adjust DDC/CI On Input Source LCD Conditioning Off Color Service Tag Display Reset Others Menu Factory Reset Personalize Others E2422HS Dell 24 Monitor Brightness / Contrast Display Info Auto Adjust DDC/CI On Input Source LCD Conditioning Off Color Display Audio Service Tag Reset Others Factory Reset Menu Personalize Others 50 │...
Users Guide
Page 54
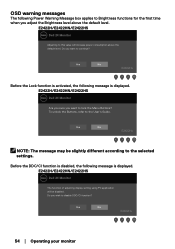
... message may be disabled. OSD warning messages The following Power Warning Message box applies to Brightness functions for the first time when you adjust the Brightness level above the default level. E2422H/E2422HN/E2422HS Dell 24 Monitor Adjusting to this value will be slightly different according to the selected settings. E2422H/E2422HN/E2422HS Dell 24 Monitor The function of adjusting display setting using PC application will increase power consumption above the default level.
... message may be disabled. OSD warning messages The following Power Warning Message box applies to Brightness functions for the first time when you adjust the Brightness level above the default level. E2422H/E2422HN/E2422HS Dell 24 Monitor Adjusting to this value will be slightly different according to the selected settings. E2422H/E2422HN/E2422HS Dell 24 Monitor The function of adjusting display setting using PC application will increase power consumption above the default level.

Users Guide
Page 56
... click Screen Resolution. 3. Click the drop-down menu of the following steps: In Windows 7: 1. In Windows 8 or Windows 8.1: 1. Click Advanced Display Settings. 3. After installing the drivers for your graphics card. 2. Select the Desktop tile to switch to update your monitor In Windows 10: 1. Click Apply. Go to https://www.dell.com/support, enter your service tag, and download the latest driver for your monitor E2422H/E2422HN/E2422HS Setting display resolution to 1920 x 1080 For best performance, set the display resolution...
... click Screen Resolution. 3. Click the drop-down menu of the following steps: In Windows 7: 1. In Windows 8 or Windows 8.1: 1. Click Advanced Display Settings. 3. After installing the drivers for your graphics card. 2. Select the Desktop tile to switch to update your monitor In Windows 10: 1. Click Apply. Go to https://www.dell.com/support, enter your service tag, and download the latest driver for your monitor E2422H/E2422HN/E2422HS Setting display resolution to 1920 x 1080 For best performance, set the display resolution...
Users Guide
Page 57
....NVIDIA.com. 6. Click Advanced Settings. 4. In Windows 8 or Windows 8.1: 1. Identify your graphics adapter, attempt to set the resolution to 1920 x 1080 again. In Windows 10: 1. Refer to the graphic card provider website for your monitor │ 57 Refer to the graphic card provider website for updated driver. Select the Desktop tile to switch to the graphic card provider website for updated driver. Click Change Display Settings. 4. Refer to classic...
....NVIDIA.com. 6. Click Advanced Settings. 4. In Windows 8 or Windows 8.1: 1. Identify your graphics adapter, attempt to set the resolution to 1920 x 1080 again. In Windows 10: 1. Refer to the graphic card provider website for your monitor │ 57 Refer to the graphic card provider website for updated driver. Select the Desktop tile to switch to the graphic card provider website for updated driver. Click Change Display Settings. 4. Refer to classic...

Users Guide
Page 62
... power button is pressed. • Ensure that the correct input source is selected via the Input Source menu. • Increase brightness and contrast controls using the OSD. • Perform monitor self-test feature check. • Check for bent or broken pins in the video cable connector. • Run the built-in diagnostics. • Ensure that the correct input source is selected via the Input Source menu. • Eliminate video extension cables. • Reset the monitor to Factory Settings (Factory Reset). • Change...
... power button is pressed. • Ensure that the correct input source is selected via the Input Source menu. • Increase brightness and contrast controls using the OSD. • Perform monitor self-test feature check. • Check for bent or broken pins in the video cable connector. • Run the built-in diagnostics. • Ensure that the correct input source is selected via the Input Source menu. • Eliminate video extension cables. • Reset the monitor to Factory Settings (Factory Reset). • Change...

Users Guide
Page 63
... Synchronization problems Safety related issues • Reset the monitor to Factory Settings (Factory Reset). • Perform monitor self-test feature check to determine if the scrambled screen appears in self-test mode. • Check for bent or broken pins in the video cable connector. • Restart the computer in the video cable connector. Troubleshooting │ 63 a long period of screen idle time. Wrong color • Try different Preset Modes in Windows Power Options or Mac...
... Synchronization problems Safety related issues • Reset the monitor to Factory Settings (Factory Reset). • Perform monitor self-test feature check to determine if the scrambled screen appears in self-test mode. • Check for bent or broken pins in the video cable connector. • Restart the computer in the video cable connector. Troubleshooting │ 63 a long period of screen idle time. Wrong color • Try different Preset Modes in Windows Power Options or Mac...

Users Guide
Page 64
... input signal when user controls are pressed The picture does not fill the entire screen • Turn off the monitor, unplug the power cord, plug it back, and then turn on the bottom of DVDs, the monitor may display in full screen. • Run the built-in diagnostics. 64 │ Troubleshooting Disconnect and reconnect the video cable if necessary. • Reset the computer or video player. • Due to unlock. • Check...
... input signal when user controls are pressed The picture does not fill the entire screen • Turn off the monitor, unplug the power cord, plug it back, and then turn on the bottom of DVDs, the monitor may display in full screen. • Run the built-in diagnostics. 64 │ Troubleshooting Disconnect and reconnect the video cable if necessary. • Reset the computer or video player. • Due to unlock. • Check...


