User Guide
Page 23
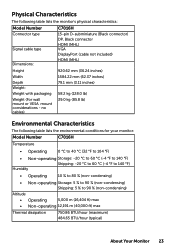
Physical Characteristics The following table lists the environmental conditions for your monitor: Model Number C7016H Temperature • Operating 0 °C to 40 °C (32 °F to 104 °F) • Non-operating Storage: -20 °C to 60 &#...128.0 lb) 39.0 kg (85.8 lb) Environmental Characteristics The following table lists the monitor's physical characteristics: Model Number Connector type Signal cable type Dimensions: C7016H 15-pin D-subminiature (Black connector) DP, Black connector HDMI (MHL) VGA DisplayPort (cable not included) HDMI (MHL) Height Width Depth Weight:...
Physical Characteristics The following table lists the environmental conditions for your monitor: Model Number C7016H Temperature • Operating 0 °C to 40 °C (32 °F to 104 °F) • Non-operating Storage: -20 °C to 60 &#...128.0 lb) 39.0 kg (85.8 lb) Environmental Characteristics The following table lists the monitor's physical characteristics: Model Number Connector type Signal cable type Dimensions: C7016H 15-pin D-subminiature (Black connector) DP, Black connector HDMI (MHL) VGA DisplayPort (cable not included) HDMI (MHL) Height Width Depth Weight:...
User Guide
Page 28
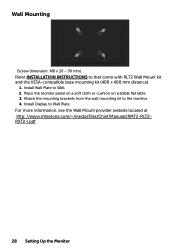
Refer INSTALLATION INSTRUCTIONS to the monitor. 4. Attach the mounting brackets from the wall mounting kit to that come with RLT2 Wall Mount kit and the VESA-compatible base mounting kit (400 x 400 mm distance). 1. For more information, see the Wall Mount provider website located at http: //www.milestone.com/~/media/Files/Chief/Manuals/RMT2-RLT2RXT2-I.pdf 28 Setting Up the Monitor Place the monitor panel on a soft cloth or cushion on a stable flat table 3. Wall Mounting (Screw dimension: M8 x 20 ~ 50 mm). Install Wall Plate to Wall Plate. Install Display to Wall. 2.
Refer INSTALLATION INSTRUCTIONS to the monitor. 4. Attach the mounting brackets from the wall mounting kit to that come with RLT2 Wall Mount kit and the VESA-compatible base mounting kit (400 x 400 mm distance). 1. For more information, see the Wall Mount provider website located at http: //www.milestone.com/~/media/Files/Chief/Manuals/RMT2-RLT2RXT2-I.pdf 28 Setting Up the Monitor Place the monitor panel on a soft cloth or cushion on a stable flat table 3. Wall Mounting (Screw dimension: M8 x 20 ~ 50 mm). Install Wall Plate to Wall Plate. Install Display to Wall. 2.