
User's Guide
Page 5
...Paper 75 10 Installing Printer Drivers on Windows® Computers . . . . . 79 Identifying Printer Driver Pre-install Status 79 Changing the firewall settings before installing your printer 79 Inserting the Software and Documentation Disc 79 Direct Connection Setup 80 Network Connection Setup 82 Network Printer Setup on a Local Network 82 Network Printer...Default Queue 106 Specifying the Printing Options 107 Uninstalling the Printer Driver 107 Operation on SUSE Linux Enterprise Desktop 10 108 Setup Overview 108 Installing the Printer Driver 108 Setting Up the Queue 108 Setting the ...
...Paper 75 10 Installing Printer Drivers on Windows® Computers . . . . . 79 Identifying Printer Driver Pre-install Status 79 Changing the firewall settings before installing your printer 79 Inserting the Software and Documentation Disc 79 Direct Connection Setup 80 Network Connection Setup 82 Network Printer Setup on a Local Network 82 Network Printer...Default Queue 106 Specifying the Printing Options 107 Uninstalling the Printer Driver 107 Operation on SUSE Linux Enterprise Desktop 10 108 Setup Overview 108 Installing the Printer Driver 108 Setting Up the Queue 108 Setting the ...

User's Guide
Page 9
...Defaults 227 When Using the Operator Panel 227 17 Print Media Guidelines 229 Paper 229 Paper Characteristics 229 Recommended Paper 230 Unacceptable Paper 230 Selecting Paper 230 Selecting Pre-Printed Media and Letterheads 231 Selecting Pre-Punched Paper 231 Envelopes 231 Labels 232 Storing Print Media 233 Identifying Print Media ... Media Dimensions 235 Loading Print Media in Tray1 and the Optional 550-Sheet Feeder 235 Loading Letterhead (Pre-Printed and Pre-Punched Paper 235 Loading Print Media in the MPF 237 Loading an Envelope in the MPF 239 Envelope #10, Monarch, or DL 239 ...
...Defaults 227 When Using the Operator Panel 227 17 Print Media Guidelines 229 Paper 229 Paper Characteristics 229 Recommended Paper 230 Unacceptable Paper 230 Selecting Paper 230 Selecting Pre-Printed Media and Letterheads 231 Selecting Pre-Punched Paper 231 Envelopes 231 Labels 232 Storing Print Media 233 Identifying Print Media ... Media Dimensions 235 Loading Print Media in Tray1 and the Optional 550-Sheet Feeder 235 Loading Letterhead (Pre-Printed and Pre-Punched Paper 235 Loading Print Media in the MPF 237 Loading an Envelope in the MPF 239 Envelope #10, Monarch, or DL 239 ...

User's Guide
Page 10
... Avoiding Paper Jams 243 Sending a Job to Print 243 Canceling a Print Job 244 Canceling a Job From the Operator Panel 244 Canceling a Job From a Computer Running Windows 244 Duplex Printing 245 Duplex Printing With Duplex Unit (Dell C3760dn Color Laser Printer Only) . . 245 Duplex Printing Without Duplex Unit (Dell C3760n Color Laser Printer Only) . 245 Using Booklet Print (Dell C3760n and Dell C3760dn Models...
... Avoiding Paper Jams 243 Sending a Job to Print 243 Canceling a Print Job 244 Canceling a Job From the Operator Panel 244 Canceling a Job From a Computer Running Windows 244 Duplex Printing 245 Duplex Printing With Duplex Unit (Dell C3760dn Color Laser Printer Only) . . 245 Duplex Printing Without Duplex Unit (Dell C3760n Color Laser Printer Only) . 245 Using Booklet Print (Dell C3760n and Dell C3760dn Models...
User's Guide
Page 14
...the Waste Toner Box 332 Installing a Waste Toner Box 333 Cleaning Inside the Printer 334 Cleaning the CTD Sensor 334 Cleaning the Raster Optical Scanner (ROS) Window 338 Adjusting Color Registration 342 Printing the Color Registration Chart 342 Determining Values 342 Entering Values 344 27 Removing Options 347 Removing... Wireless Adapter 351 Removing the Optional Hard Disk 353 28 Clearing Jams 355 Avoiding Jams 355 Identifying the Location of Paper Jams 356 Clearing Paper Jams From the MPF 356 If error code: 050-112 appears 356 If error code: 050-129 appears 358 Clearing...
...the Waste Toner Box 332 Installing a Waste Toner Box 333 Cleaning Inside the Printer 334 Cleaning the CTD Sensor 334 Cleaning the Raster Optical Scanner (ROS) Window 338 Adjusting Color Registration 342 Printing the Color Registration Chart 342 Determining Values 342 Entering Values 344 27 Removing Options 347 Removing... Wireless Adapter 351 Removing the Optional Hard Disk 353 28 Clearing Jams 355 Avoiding Jams 355 Identifying the Location of Paper Jams 356 Clearing Paper Jams From the MPF 356 If error code: 050-112 appears 356 If error code: 050-129 appears 358 Clearing...
User's Guide
Page 15
Troubleshooting 369 29 Troubleshooting Guide 371 Basic Printer Problems 371 Display Problems 371 Printing Problems 371 Print Quality Problems 372... is blank 376 Streaks appear on the output 377 Part or the entire output is black 378 Pitched color dots 378 Vertical blanks 379 Ghosting 380 Light-induced fatigue 381 Fog 382 Bead-Carry-Out (BCO 382... 383 Banding 383 Auger mark 384 Wrinkled/Stained paper 385 Damage on the leading edge of paper 385 Jam/Alignment Problems 386 The top and side margins are incorrect 386 Color registration is out of alignment 386 Images are skewed...
Troubleshooting 369 29 Troubleshooting Guide 371 Basic Printer Problems 371 Display Problems 371 Printing Problems 371 Print Quality Problems 372... is blank 376 Streaks appear on the output 377 Part or the entire output is black 378 Pitched color dots 378 Vertical blanks 379 Ghosting 380 Light-induced fatigue 381 Fog 382 Bead-Carry-Out (BCO 382... 383 Banding 383 Auger mark 384 Wrinkled/Stained paper 385 Damage on the leading edge of paper 385 Jam/Alignment Problems 386 The top and side margins are incorrect 386 Color registration is out of alignment 386 Images are skewed...

User's Guide
Page 19
...of Novell, Inc., in the United States and/or other than its own. in the United States and/or other countries. XML Paper Specification (XPS): This product may incorporate intellectual property owned by the Independent JPEG Group. All rights reserved. WARNING: A WARNING indicates... from EMC Corporation. and other countries; The terms and conditions upon which Microsoft is subject to hardware or loss of Dell Inc.; The printer software uses some of these materials in any proprietary interest in the U.S. Reproduction of the codes defined by Microsoft Corporation....
...of Novell, Inc., in the United States and/or other than its own. in the United States and/or other countries. XML Paper Specification (XPS): This product may incorporate intellectual property owned by the Independent JPEG Group. All rights reserved. WARNING: A WARNING indicates... from EMC Corporation. and other countries; The terms and conditions upon which Microsoft is subject to hardware or loss of Dell Inc.; The printer software uses some of these materials in any proprietary interest in the U.S. Reproduction of the codes defined by Microsoft Corporation....

User's Guide
Page 27
... containing multiple pages on both sides of a sheet of paper by setting from a USB memory without the duplex unit. You can print two or more pages on a single sheet of paper. Duplex Printing (Duplex Print) Multiple Up in the printer memory or hard disk, so you to print files directly... from the printer driver. When printing confidential jobs, use the number pad to temporarily store your print...
... containing multiple pages on both sides of a sheet of paper by setting from a USB memory without the duplex unit. You can print two or more pages on a single sheet of paper. Duplex Printing (Duplex Print) Multiple Up in the printer memory or hard disk, so you to print files directly... from the printer driver. When printing confidential jobs, use the number pad to temporarily store your print...

User's Guide
Page 35
Setting up the Printer (Printer Setup) 5 Preparing Printer Hardware 35 6 Installing Optional Accessories 37 7 Connecting Your Printer 65 8 Setting the IP Address 71 9 Loading Paper 75 10 Installing Printer Drivers on Windows® Computers 79 11 Installing Printer Drivers on Macintosh Computers 99 12 Installing Printer Drivers on Linux Computers (CUPS 105 33
Setting up the Printer (Printer Setup) 5 Preparing Printer Hardware 35 6 Installing Optional Accessories 37 7 Connecting Your Printer 65 8 Setting the IP Address 71 9 Loading Paper 75 10 Installing Printer Drivers on Windows® Computers 79 11 Installing Printer Drivers on Macintosh Computers 99 12 Installing Printer Drivers on Linux Computers (CUPS 105 33

User's Guide
Page 45
... feeder, using a coin or similar object. 8 Insert tray1 into the printer, and push until it stops. 9 Re-connect all cables into the back of the printer. WARNING: Two people are required to the printer by tightening the two screws provided with the holes at the bottom of... the printer, and turn on the printer. Gently lower the printer onto the optional 550-sheet feeder. NOTE: The printer will automatically detect the attached tray but will not detect the paper...
... feeder, using a coin or similar object. 8 Insert tray1 into the printer, and push until it stops. 9 Re-connect all cables into the back of the printer. WARNING: Two people are required to the printer by tightening the two screws provided with the holes at the bottom of... the printer, and turn on the printer. Gently lower the printer onto the optional 550-sheet feeder. NOTE: The printer will automatically detect the attached tray but will not detect the paper...
User's Guide
Page 46
...Printers. 2 Right-click the printer icon of the Dell C3760n/C3760dn Color Laser Printer, and then select Printer properties. 3 Click the Options tab, and then select Get Information from Printer. 4 Click Apply, and then click OK. 5 Close the Devices and Printers dialog box. 1 Click Start → Devices and Printers. 2 Right-click the printer icon of the Dell C3760n/C3760dn Color Laser Printer, and then select Printer... optional 550-sheet feeder is installed correctly. 10 Print the printer settings report to confirm that the selected paper type is highlighted, and then press the (Menu) button....
...Printers. 2 Right-click the printer icon of the Dell C3760n/C3760dn Color Laser Printer, and then select Printer properties. 3 Click the Options tab, and then select Get Information from Printer. 4 Click Apply, and then click OK. 5 Close the Devices and Printers dialog box. 1 Click Start → Devices and Printers. 2 Right-click the printer icon of the Dell C3760n/C3760dn Color Laser Printer, and then select Printer... optional 550-sheet feeder is installed correctly. 10 Print the printer settings report to confirm that the selected paper type is highlighted, and then press the (Menu) button....
User's Guide
Page 47
... Configuration in the Items list box. 2 Select Tray2 in the Paper Tray Configuration drop-down menu in Change Setting for Windows Server 2012) → Devices and Printers. 2 Right-click the printer icon of the Dell C3760n/C3760dn Color Laser Printer, and then select Printer properties. 3 Click the Configuration tab, and then select Bi-Directional Setup. 4 Select Get Information from...
... Configuration in the Items list box. 2 Select Tray2 in the Paper Tray Configuration drop-down menu in Change Setting for Windows Server 2012) → Devices and Printers. 2 Right-click the printer icon of the Dell C3760n/C3760dn Color Laser Printer, and then select Printer properties. 3 Click the Configuration tab, and then select Bi-Directional Setup. 4 Select Get Information from...

User's Guide
Page 48
...the Items list box. 3 Select Tray2 in the Paper Tray Configuration drop-down menu in Setting for Windows Server 2012) → Devices and Printers. 2 Right-click the printer icon of the Dell C3760n/C3760dn Color Laser Printer, and then select Printer properties. 3 Click the Device Setting tab, and... menu. 4 Click Apply, and then click OK. 5 Close the Devices and Printers dialog box. 1 Click Start → Devices and Printers. 2 Right-click the printer icon of the Dell C3760n/C3760dn Color Laser Printer, and then select Properties. 3 Click the Configuration tab, and then select Bi-Directional...
...the Items list box. 3 Select Tray2 in the Paper Tray Configuration drop-down menu in Setting for Windows Server 2012) → Devices and Printers. 2 Right-click the printer icon of the Dell C3760n/C3760dn Color Laser Printer, and then select Printer properties. 3 Click the Device Setting tab, and... menu. 4 Click Apply, and then click OK. 5 Close the Devices and Printers dialog box. 1 Click Start → Devices and Printers. 2 Right-click the printer icon of the Dell C3760n/C3760dn Color Laser Printer, and then select Properties. 3 Click the Configuration tab, and then select Bi-Directional...
User's Guide
Page 77
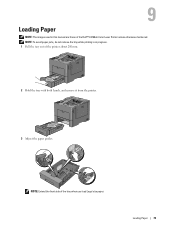
NOTE: Extend the front side of the Dell™ C3760dn Color Laser Printer unless otherwise mentioned. Loading Paper 75 9 Loading Paper NOTE: The images used in progress. 1 Pull the tray out of the printer about 200 mm. 2 Hold the tray with both hands, and remove it from the printer. 3 Adjust the paper guides. NOTE: To avoid paper jams, do not remove the tray while printing is in this manual are those of the tray when you load Legal size paper.
NOTE: Extend the front side of the Dell™ C3760dn Color Laser Printer unless otherwise mentioned. Loading Paper 75 9 Loading Paper NOTE: The images used in progress. 1 Pull the tray out of the printer about 200 mm. 2 Hold the tray with both hands, and remove it from the printer. 3 Adjust the paper guides. NOTE: To avoid paper jams, do not remove the tray while printing is in this manual are those of the tray when you load Legal size paper.

User's Guide
Page 78
...sliding it until it rests lightly against the edges of the stack on a level surface. 5 Load the print media into the printer. NOTE: If the front side of the paper. 7 After confirming that the guides are securely adjusted, insert the tray into the tray with the recommended print side facing up.... Straighten the edges of the paper. Overfilling the tray may cause paper jams. 6 Align the width guides against the edge of the tray is extended, the tray protrudes when it is inserted into...
...sliding it until it rests lightly against the edges of the stack on a level surface. 5 Load the print media into the printer. NOTE: If the front side of the paper. 7 After confirming that the guides are securely adjusted, insert the tray into the tray with the recommended print side facing up.... Straighten the edges of the paper. Overfilling the tray may cause paper jams. 6 Align the width guides against the edge of the tray is extended, the tray protrudes when it is inserted into...

User's Guide
Page 79
Loading Paper 77 8 On the operator panel, press the or button until the desired paper size is highlighted, and then press the (Set) button. 9 Press the or button until the desired paper type is highlighted, and then press the (Set) button.
Loading Paper 77 8 On the operator panel, press the or button until the desired paper size is highlighted, and then press the (Set) button. 9 Press the or button until the desired paper type is highlighted, and then press the (Set) button.

User's Guide
Page 82
...installation software does not automatically proceed to install Service Pack 2 or later, and then the Windows Platform Update (KB971644). For installing XML Paper Specification (XPS) printer driver NOTE: XPS driver is the drive letter of the screen, and then click Search → Type Run in step 1. 8...install. 5 Click Finish to the next page automatically. If the User Account Control dialog box appears, click Continue. 80 Installing Printer Drivers on the following zip file to your desired location. The Plug and Play installation starts and the installation software proceeds to ...
...installation software does not automatically proceed to install Service Pack 2 or later, and then the Windows Platform Update (KB971644). For installing XML Paper Specification (XPS) printer driver NOTE: XPS driver is the drive letter of the screen, and then click Search → Type Run in step 1. 8...install. 5 Click Finish to the next page automatically. If the User Account Control dialog box appears, click Continue. 80 Installing Printer Drivers on the following zip file to your desired location. The Plug and Play installation starts and the installation software proceeds to ...

User's Guide
Page 85
a Enter the printer name. For installing XML Paper Specification (XPS) printer driver NOTE: XPS driver is supported on the computer, click Continue; NOTE: If you are an administrator on the following zip file to install, and ... the network, and then enter a share name that I want to access the printer, select Share this printer with other computers on Windows® Computers 83 d If you want other users on the network to restrict color printing, select the appropriate Dell™ ColorTrack option. Installation starts. 13 As the driver installation is completed, click...
a Enter the printer name. For installing XML Paper Specification (XPS) printer driver NOTE: XPS driver is supported on the computer, click Continue; NOTE: If you are an administrator on the following zip file to install, and ... the network, and then enter a share name that I want to access the printer, select Share this printer with other computers on Windows® Computers 83 d If you want other users on the network to restrict color printing, select the appropriate Dell™ ColorTrack option. Installation starts. 13 As the driver installation is completed, click...

User's Guide
Page 127
...You must log in as paper usage, the types of jobs being printed, limit to use the color mode, and the maximum number of the key operator in as an administrator to use this feature. Printer Information Use the Printer Information menu to visit the Dell Support website. E-Mail Alert... Use the E-Mail Alert menu to lock the Dell Printer Configuration Web Tool with...
...You must log in as paper usage, the types of jobs being printed, limit to use the color mode, and the maximum number of the key operator in as an administrator to use this feature. Printer Information Use the Printer Information menu to visit the Dell Support website. E-Mail Alert... Use the E-Mail Alert menu to lock the Dell Printer Configuration Web Tool with...

User's Guide
Page 132
...trays, and covers. Printer Status Use the Printer Status menu to be replaced soon. Indicates that the drum cartridge and/or waste toner box needs to check the status of consumables, hardware, and specifications of paper in the tray. 130 Dell™ Printer Configuration Web Tool Indicates ...that there is unknown. Indicates that there is some paper in the tray but the quantity is no paper in the Printer Status menu. The following pages are displayed in...
...trays, and covers. Printer Status Use the Printer Status menu to be replaced soon. Indicates that the drum cartridge and/or waste toner box needs to check the status of consumables, hardware, and specifications of paper in the tray. 130 Dell™ Printer Configuration Web Tool Indicates ...that there is unknown. Indicates that there is some paper in the tray but the quantity is no paper in the Printer Status menu. The following pages are displayed in...

User's Guide
Page 133
... the memory capacity. These pages show the details of the paper tray. Output Tray Cover Printer Type Printing Speed Status Capacity Status OK Full Closed Open Indicates that the cover is closed. Printer Events Purpose: When faults occur, such as the hardware configuration...(revision level). *1 This item is available only when the optional hard disk drive is open . Color Laser is not available. Express Service Code Displays Dell express service code. Printer Revision Levels Firmware Version Displays the revision date (revision level). Displays the details of the...
... the memory capacity. These pages show the details of the paper tray. Output Tray Cover Printer Type Printing Speed Status Capacity Status OK Full Closed Open Indicates that the cover is closed. Printer Events Purpose: When faults occur, such as the hardware configuration...(revision level). *1 This item is available only when the optional hard disk drive is open . Color Laser is not available. Express Service Code Displays Dell express service code. Printer Revision Levels Firmware Version Displays the revision date (revision level). Displays the details of the...


