User's Guide
Page 14
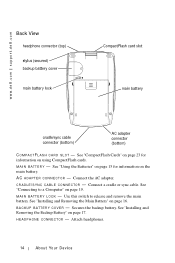
See "Using the Batteries" on page 15 for information on using CompactFlash cards. Connect the AC adapter. See "Installing and Removing the Main Battery" on page 17. H E A D P H O N E C O N N E C T O R - www.dell.com | support.dell.com Back View headphone connector (top) stylus (secured) backup battery cover main battery lock CompactFlash card slot main battery cradle/sync cable connector...
See "Using the Batteries" on page 15 for information on using CompactFlash cards. Connect the AC adapter. See "Installing and Removing the Main Battery" on page 17. H E A D P H O N E C O N N E C T O R - www.dell.com | support.dell.com Back View headphone connector (top) stylus (secured) backup battery cover main battery lock CompactFlash card slot main battery cradle/sync cable connector...

User's Guide
Page 17
... with the positive side (+) facing up. 5 Slide the cover on and ensure that the device is flush with the back of the device. www.dell.com | support.dell.com Installing and Removing the Backup Battery NOTICE: Do not remove the backup battery unless the AC adapter is connected or the main battery is installed.
... with the positive side (+) facing up. 5 Slide the cover on and ensure that the device is flush with the back of the device. www.dell.com | support.dell.com Installing and Removing the Backup Battery NOTICE: Do not remove the backup battery unless the AC adapter is connected or the main battery is installed.

User's Guide
Page 18
Charging the Main Battery Use one of the following options to charge the main battery: • Connect the AC adapter directly to the device and to an electrical outlet. • Connect the AC adapter to the cradle, and insert the device into the backup battery release. 2 Slide the release to the left and ...remove the cover. 3 With your finger tip, gently press the right side of the battery to tilt up the left side of the stylus into the cradle. www.dell.com | support.dell...
Charging the Main Battery Use one of the following options to charge the main battery: • Connect the AC adapter directly to the device and to an electrical outlet. • Connect the AC adapter to the cradle, and insert the device into the backup battery release. 2 Slide the release to the left and ...remove the cover. 3 With your finger tip, gently press the right side of the battery to tilt up the left side of the stylus into the cradle. www.dell.com | support.dell...
User's Guide
Page 20
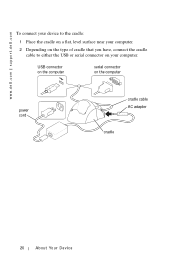
USB connector on the computer serial connector on your computer. 2 Depending on the type of cradle that you have, connect the cradle cable to either the USB or serial connector on the computer power cord cradle cable AC adapter cradle 20 A b ou t Yo u r D ev ic e www.dell.com | support.dell.com To connect your device to the cradle: 1 Place the cradle on a flat, level surface near your computer.
USB connector on the computer serial connector on your computer. 2 Depending on the type of cradle that you have, connect the cradle cable to either the USB or serial connector on the computer power cord cradle cable AC adapter cradle 20 A b ou t Yo u r D ev ic e www.dell.com | support.dell.com To connect your device to the cradle: 1 Place the cradle on a flat, level surface near your computer.
User's Guide
Page 21
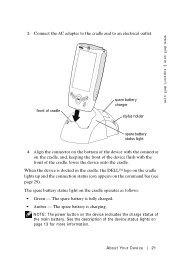
... front of the device flush with the front of the cradle, lower the device onto the cradle. www.dell.com | support.dell.com front of cradle spare battery charger stylus holder spare battery status light 4 Align the connector on the ...battery. When the device is fully charged. • Amber - The spare battery is docked in the cradle, the DELL™ logo on the cradle lights up and the connection status icon appears on the command bar (see page 29)....on page 13 for more information. The spare battery is charging. 3 Connect the AC adapter to the cradle and to an electrical outlet.
... front of the device flush with the front of the cradle, lower the device onto the cradle. www.dell.com | support.dell.com front of cradle spare battery charger stylus holder spare battery status light 4 Align the connector on the ...battery. When the device is fully charged. • Amber - The spare battery is docked in the cradle, the DELL™ logo on the cradle lights up and the connection status icon appears on the command bar (see page 29)....on page 13 for more information. The spare battery is charging. 3 Connect the AC adapter to the cradle and to an electrical outlet.
User's Guide
Page 22
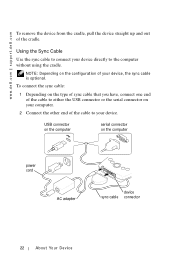
... connector on the computer serial connector on the configuration of the cradle. NOTE: Depending on the computer power cord AC adapter device sync cable connector 22 A b ou t Yo u r D ev ic e www.dell.com | support.dell.com To remove the device from the cradle, pull the device straight up and out of your device. Using...
... connector on the computer serial connector on the configuration of the cradle. NOTE: Depending on the computer power cord AC adapter device sync cable connector 22 A b ou t Yo u r D ev ic e www.dell.com | support.dell.com To remove the device from the cradle, pull the device straight up and out of your device. Using...

User's Guide
Page 116
www.dell.com | support.dell.com Power Supply Battery type: Main Backup AC adapter: Supply voltage Frequency Current consumption Output voltage Output current Environmental Temperature range: operating storage Thermal gradient: operating storage Relative humidity (maximum): operating storage Altitude (maximum): ...
www.dell.com | support.dell.com Power Supply Battery type: Main Backup AC adapter: Supply voltage Frequency Current consumption Output voltage Output current Environmental Temperature range: operating storage Thermal gradient: operating storage Relative humidity (maximum): operating storage Altitude (maximum): ...
System Information Guide
Page 7
...also, do not place your device in a closed-in wall unit or on a bed, sofa, or rug. • Place the AC adapter in to the extension power cable does not exceed the ampere rating of the extension cable. • Do not push objects into openings of... floor, when you use the AC adapter inside a carrying case. System Information Guide 5 Do not cover the AC adapter with your AC adapter, ensure that will reduce cooling; Always follow installation instructions closely. • If you are a trained service technician. www.dell.com | support.euro.dell.com CAUTION: Safety Instructions Use ...
...also, do not place your device in a closed-in wall unit or on a bed, sofa, or rug. • Place the AC adapter in to the extension power cable does not exceed the ampere rating of the extension cable. • Do not push objects into openings of... floor, when you use the AC adapter inside a carrying case. System Information Guide 5 Do not cover the AC adapter with your AC adapter, ensure that will reduce cooling; Always follow installation instructions closely. • If you are a trained service technician. www.dell.com | support.euro.dell.com CAUTION: Safety Instructions Use ...
System Information Guide
Page 8
.... Do not use your device includes a modem, the cable used with the modem should be manufactured with water. Use care when handling the adapter during or immediately after their continuous operation. • Before you clean your device. Do not use liquid or aerosol cleaners, which may become ... American wire gauge (AWG) and an FCC-compliant RJ-11 modular plug. • Cards may contain flammable substances. 6 System Information Guide www.dell.com | support.euro.dell.com CAUTION: Safety Instructions (continued) • The AC adapter may become very warm during normal operation.
.... Do not use your device includes a modem, the cable used with the modem should be manufactured with water. Use care when handling the adapter during or immediately after their continuous operation. • Before you clean your device. Do not use liquid or aerosol cleaners, which may become ... American wire gauge (AWG) and an FCC-compliant RJ-11 modular plug. • Cards may contain flammable substances. 6 System Information Guide www.dell.com | support.euro.dell.com CAUTION: Safety Instructions (continued) • The AC adapter may become very warm during normal operation.
System Information Guide
Page 9
.... • Before you to ensure that the cable is inserted into properly grounded power sources. www.dell.com | support.euro.dell.com CAUTION: Safety Instructions (continued) Power • Use only the Dell-provided AC adapter approved for use with the AC adapter power cable. • Be sure that nothing rests on . Use of the power strip. If...
.... • Before you to ensure that the cable is inserted into properly grounded power sources. www.dell.com | support.euro.dell.com CAUTION: Safety Instructions (continued) Power • Use only the Dell-provided AC adapter approved for use with the AC adapter power cable. • Be sure that nothing rests on . Use of the power strip. If...
System Information Guide
Page 16
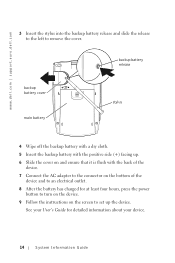
www.dell.com | support.euro.dell.com 3 Insert the stylus into the backup battery release and slide the release to the left to set up the device. See your User's Guide ... battery with the positive side (+) facing up. 6 Slide the cover on and ensure that it is flush with the back of the device. 7 Connect the AC adapter to the connector on the screen to remove the cover.
www.dell.com | support.euro.dell.com 3 Insert the stylus into the backup battery release and slide the release to the left to set up the device. See your User's Guide ... battery with the positive side (+) facing up. 6 Slide the cover on and ensure that it is flush with the back of the device. 7 Connect the AC adapter to the connector on the screen to remove the cover.
System Information Guide
Page 18
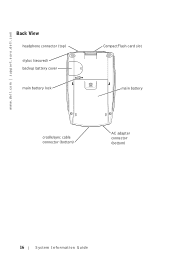
www.dell.com | support.euro.dell.com Back View headphone connector (top) stylus (secured) backup battery cover main battery lock CompactFlash card slot main battery cradle/sync cable connector (bottom) AC adapter connector (bottom) 16 System Information Guide
www.dell.com | support.euro.dell.com Back View headphone connector (top) stylus (secured) backup battery cover main battery lock CompactFlash card slot main battery cradle/sync cable connector (bottom) AC adapter connector (bottom) 16 System Information Guide