
Comprehensive Specifications
Page 4
Computer Model Alienware M17x-R2 Dimensions Height (Front to Back) Width Depth Weight with 9-cell battery (starting at) 51.31 mm to 53.59 mm (2.02 inches to 1333 MHz Processor address bus width 32 bits Processor data width 64 bits ...
Computer Model Alienware M17x-R2 Dimensions Height (Front to Back) Width Depth Weight with 9-cell battery (starting at) 51.31 mm to 53.59 mm (2.02 inches to 1333 MHz Processor address bus width 32 bits Processor data width 64 bits ...

Comprehensive Specifications
Page 7
... 240 W AC adapter. Display Operating angle Pixel pitch WXGA+ WUXGA Controls Touch pad X/Y position resolution (graphics table mode) Width Height Battery Type Height Width Depth Weight Voltage 0° (closed) to 140° 0.2550 mm 0.19125 mm brightness can be controlled through keyboard... (11.52 inches) 52.3 mm (2.06 inches) 0.52 kg (1.14 lb) 11.1 VDC Battery Operating time Life span (approximate) Temperature range Operating Storage Coin-cell battery Battery operating time varies depending on operating conditions and can be significantly reduced under certain power-intensive conditions. ...
... 240 W AC adapter. Display Operating angle Pixel pitch WXGA+ WUXGA Controls Touch pad X/Y position resolution (graphics table mode) Width Height Battery Type Height Width Depth Weight Voltage 0° (closed) to 140° 0.2550 mm 0.19125 mm brightness can be controlled through keyboard... (11.52 inches) 52.3 mm (2.06 inches) 0.52 kg (1.14 lb) 11.1 VDC Battery Operating time Life span (approximate) Temperature range Operating Storage Coin-cell battery Battery operating time varies depending on operating conditions and can be significantly reduced under certain power-intensive conditions. ...
Mobile Manual
Page 3
... Displays 24 Using Removable Media and Cards 25 Using the Optical Drive 25 Using the Integrated Camera 26 Using the Wireless Control 26 Battery Pack 26 Power Management 26 Alienware Command Center 27 Stealth Mode 27 Free Fall Sensor 28 Configuring the BIOS 28 CHAPTER 4: INSTALLING ADDITIONAL OR REPLACEMENT COMPONENTS 33 Before...
... Displays 24 Using Removable Media and Cards 25 Using the Optical Drive 25 Using the Integrated Camera 26 Using the Wireless Control 26 Battery Pack 26 Power Management 26 Alienware Command Center 27 Stealth Mode 27 Free Fall Sensor 28 Configuring the BIOS 28 CHAPTER 4: INSTALLING ADDITIONAL OR REPLACEMENT COMPONENTS 33 Before...

Mobile Manual
Page 14
Combines with the right speaker to provide high quality stereo sound. 1 1 AC adapter connector - Front View Features Back View Features 1 2 3 1 Left speaker - Combines with the left speaker to provide high quality stereo sound. 2 Consumer IR port - Connects to power the computer and charge the battery. 14 CHAPTER 2: GETTING TO KNOW YOUR LAPTOP Connects to the AC adapter to devices using infrared. 3 Right speaker -
Combines with the right speaker to provide high quality stereo sound. 1 1 AC adapter connector - Front View Features Back View Features 1 2 3 1 Left speaker - Combines with the left speaker to provide high quality stereo sound. 2 Consumer IR port - Connects to power the computer and charge the battery. 14 CHAPTER 2: GETTING TO KNOW YOUR LAPTOP Connects to the AC adapter to devices using infrared. 3 Right speaker -
Mobile Manual
Page 20
...of your Microsoft Windows operating system. 20 CHAPTER 2: GETTING TO KNOW YOUR LAPTOP The color of Microsoft® Windows® operating system. The battery is in the Control Panel of the hinge cover. The color indicating the power status can program this button, see the Power Options in .... For the exact location, see "Computer Base and Keyboard Features" on standby and hibernate mode, see Power Options in standby mode. The battery charge is in the Control Panel of the AlienHead rim indicates the power status. On AC adapter: Blue or custom AC-color Blue or custom...
...of your Microsoft Windows operating system. 20 CHAPTER 2: GETTING TO KNOW YOUR LAPTOP The color of Microsoft® Windows® operating system. The battery is in the Control Panel of the hinge cover. The color indicating the power status can program this button, see the Power Options in .... For the exact location, see "Computer Base and Keyboard Features" on standby and hibernate mode, see Power Options in standby mode. The battery charge is in the Control Panel of the AlienHead rim indicates the power status. On AC adapter: Blue or custom AC-color Blue or custom...

Mobile Manual
Page 21
The key is used together with the key described below: FI - Check Battery Status and Battery Charge Disable/Enable Press to switch between the various external display options available either simultaneously or separately. Increase Display Brightness Press to increase the...keys may have no associated tasks. Display Mode Press to enable or disable the mute function. Camera on /off Press to switch between the Battery Status Meter, Battery Charge Disable feature, and Battery Charge Enable feature. F11 - F5 - F4 - When the touch pad function is connected. F2 -
The key is used together with the key described below: FI - Check Battery Status and Battery Charge Disable/Enable Press to switch between the various external display options available either simultaneously or separately. Increase Display Brightness Press to increase the...keys may have no associated tasks. Display Mode Press to enable or disable the mute function. Camera on /off Press to switch between the Battery Status Meter, Battery Charge Disable feature, and Battery Charge Enable feature. F11 - F5 - F4 - When the touch pad function is connected. F2 -
Mobile Manual
Page 26
..., power management settings, and features used. Gently touching it again returns your wireless radios to create, edit, and share videos. The battery meter lights on your computer by adapting processor speed to your radios off. In addition, you can use Windows Movie Maker to their ... of the power management concept from your operating system. Power Management Understanding Power Consumption In order to fully utilize the power of your battery, it and saves power during periods of inactivity. • Power Saver - Using the Wireless Control The wireless control allows you to...
..., power management settings, and features used. Gently touching it again returns your wireless radios to create, edit, and share videos. The battery meter lights on your computer by adapting processor speed to your radios off. In addition, you can use Windows Movie Maker to their ... of the power management concept from your operating system. Power Management Understanding Power Consumption In order to fully utilize the power of your battery, it and saves power during periods of inactivity. • Power Saver - Using the Wireless Control The wireless control allows you to...
Mobile Manual
Page 27
...the energy consumption and noise level of the display backlight. For the exact location of Stealth mode may require a reboot depending on battery power. Switching into the Command Center allowing you access to build a library of the keyboard. For the exact location of the keyboard... Stealth mode by gently touching the touch control located near the top of system management, optimization, and customization tools. You can access Alienware Command Center by gently touching the touch control located near the top of the control, see "Computer Base and Keyboard Features" on ...
...the energy consumption and noise level of the display backlight. For the exact location of Stealth mode may require a reboot depending on battery power. Switching into the Command Center allowing you access to build a library of the keyboard. For the exact location of the keyboard... Stealth mode by gently touching the touch control located near the top of system management, optimization, and customization tools. You can access Alienware Command Center by gently touching the touch control located near the top of the control, see "Computer Base and Keyboard Features" on ...
Mobile Manual
Page 35
...safety guidelines to help protect your computer from potential damage and to help prevent damage to the system board, you must remove the battery from the battery bay before you disconnect a cable, pull on its connector or on its pull-tab, not on your computer and then unplug ...to ground the system board. if you disconnect the cable. CAUTION: To help to ensure your computer (see the Regulatory Compliance Homepage at www.dell.com/regulatory_compliance. For additional safety best practices information, see "Turning Off Your Computer" on page 36). 7. Hold a card by your computer and...
...safety guidelines to help protect your computer from potential damage and to help prevent damage to the system board, you must remove the battery from the battery bay before you disconnect a cable, pull on its connector or on its pull-tab, not on your computer and then unplug ...to ground the system board. if you disconnect the cable. CAUTION: To help to ensure your computer (see the Regulatory Compliance Homepage at www.dell.com/regulatory_compliance. For additional safety best practices information, see "Turning Off Your Computer" on page 36). 7. Hold a card by your computer and...
Mobile Manual
Page 36
..." on page 34. 2. Do not use only the battery designed for other Alienware or Dell laptops. The battery pack will pop up. 6. Turn the laptop over. 4. Slide the battery latch to the laptop, use batteries designed for this particular Alienware laptop. Shut down before changing the battery pack. Align the three battery pack tabs with the slots in the...
..." on page 34. 2. Do not use only the battery designed for other Alienware or Dell laptops. The battery pack will pop up. 6. Turn the laptop over. 4. Slide the battery latch to the laptop, use batteries designed for this particular Alienware laptop. Shut down before changing the battery pack. Align the three battery pack tabs with the slots in the...
Mobile Manual
Page 37
The table below illustrates all the possible ways system memory can be configured. Remove the battery pack (see "Replacing the Battery Pack" on page 34. 2. Follow the instructions in "Before You Begin" on page 36). 3. Slide the compartment door towards the front of the computer and ...
The table below illustrates all the possible ways system memory can be configured. Remove the battery pack (see "Replacing the Battery Pack" on page 34. 2. Follow the instructions in "Before You Begin" on page 36). 3. Slide the compartment door towards the front of the computer and ...

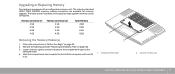
Mobile Manual
Page 39
Follow the instructions in "Before You Begin" on page 36). 3. Loosen the two captive screws that secure the compartment door to the computer base. 4. Removing the Hard Drive(s) 1. Remove the battery pack (see "Replacing the Battery Pack" on page 34. 2. Slide the compartment door towards the front of the computer and then lift it up. 1 2 1 compartment door 2 captive screws (2) CHAPTER 4: INSTALLING ADDITIONAL OR REPLACEMENT COMPONENTS 39 Upgrading or Replacing the Hard Drive(s) Your laptop is equipped with two hard drive sockets.
Follow the instructions in "Before You Begin" on page 36). 3. Loosen the two captive screws that secure the compartment door to the computer base. 4. Removing the Hard Drive(s) 1. Remove the battery pack (see "Replacing the Battery Pack" on page 34. 2. Slide the compartment door towards the front of the computer and then lift it up. 1 2 1 compartment door 2 captive screws (2) CHAPTER 4: INSTALLING ADDITIONAL OR REPLACEMENT COMPONENTS 39 Upgrading or Replacing the Hard Drive(s) Your laptop is equipped with two hard drive sockets.

Mobile Manual
Page 56
... configuration ordered and the manufacturing variability. Computer Model Alienware M17x-R2 Dimensions Height (Front to 2.11 inches) 405.89 mm (15.98 inches) 321.31 mm (12.65 inches) 5.3 kg (11.8 lb) NOTE: The weight of your laptop will vary depending on computers with 9-cell battery (starting at) 51.31 mm to 53.59...
... configuration ordered and the manufacturing variability. Computer Model Alienware M17x-R2 Dimensions Height (Front to 2.11 inches) 405.89 mm (15.98 inches) 321.31 mm (12.65 inches) 5.3 kg (11.8 lb) NOTE: The weight of your laptop will vary depending on computers with 9-cell battery (starting at) 51.31 mm to 53.59...

Mobile Manual
Page 58
...mm (1.63 inches) 292.7 mm (11.52 inches) 0.52 kg (1.14 lb) 11.1 VDC Battery Operating time Life span (approximate) Temperature range Operating Storage Coin-cell battery Battery operating time varies depending on operating conditions and can be significantly reduced under certain power-intensive conditions. 300 ...60°C (-4° to 140°F) CR-2032 58 CHAPTER 7: BASIC SPECIFICATIONS Europe; Display Type Keyboard (Backlit) Layouts Camera Pixel Battery Type Depth Height Width Weight Voltage • 17.0 inch, dual-CCFL, WXGA+ (1440 x 900) • 17.0 inch, RGBLED, WUXGA (1920 x 1200...
...mm (1.63 inches) 292.7 mm (11.52 inches) 0.52 kg (1.14 lb) 11.1 VDC Battery Operating time Life span (approximate) Temperature range Operating Storage Coin-cell battery Battery operating time varies depending on operating conditions and can be significantly reduced under certain power-intensive conditions. 300 ...60°C (-4° to 140°F) CR-2032 58 CHAPTER 7: BASIC SPECIFICATIONS Europe; Display Type Keyboard (Backlit) Layouts Camera Pixel Battery Type Depth Height Width Weight Voltage • 17.0 inch, dual-CCFL, WXGA+ (1440 x 900) • 17.0 inch, RGBLED, WUXGA (1920 x 1200...

Mobile Manual
Page 60
... APPENDIX A: GENERAL AND ELECTRICAL SAFETY PRECAUTIONS Your computer protects itself against most irregularities in the power source. When You Should Contact Alienware • The battery, power cable or connector is damaged. • Your computer has had liquid spilled into it. • Your computer was dropped or the case was damaged. &#...
... APPENDIX A: GENERAL AND ELECTRICAL SAFETY PRECAUTIONS Your computer protects itself against most irregularities in the power source. When You Should Contact Alienware • The battery, power cable or connector is damaged. • Your computer has had liquid spilled into it. • Your computer was dropped or the case was damaged. &#...
Service Manual
Page 3
...BEFORE YOU BEGIN 6 Recommended Tools 7 Turning Off Your Computer 7 Before Working Inside Your Computer 8 CHAPTER 2: BATTERY PACK 9 Removing the Battery Pack 11 Replacing the Battery Pack 11 CHAPTER 3: COMPARTMENT DOOR 12 Removing the Compartment Door 14 Replacing the Compartment Door 14 CHAPTER 4: HARD...the Processor Thermal Fan 22 Replacing the Processor Thermal Fan 22 CONTENTS CHAPTER 6: COIN-CELL BATTERY 23 Removing the Coin-Cell Battery 25 Replacing the Coin-Cell Battery 25 CHAPTER 7: MEMORY MODULE(S 26 Removing the Memory Module(s 28 Replacing the Memory Module(s ...
...BEFORE YOU BEGIN 6 Recommended Tools 7 Turning Off Your Computer 7 Before Working Inside Your Computer 8 CHAPTER 2: BATTERY PACK 9 Removing the Battery Pack 11 Replacing the Battery Pack 11 CHAPTER 3: COMPARTMENT DOOR 12 Removing the Compartment Door 14 Replacing the Compartment Door 14 CHAPTER 4: HARD...the Processor Thermal Fan 22 Replacing the Processor Thermal Fan 22 CONTENTS CHAPTER 6: COIN-CELL BATTERY 23 Removing the Coin-Cell Battery 25 Replacing the Coin-Cell Battery 25 CHAPTER 7: MEMORY MODULE(S 26 Removing the Memory Module(s 28 Replacing the Memory Module(s ...

Service Manual
Page 5
CHAPTER 22: SYSTEM BOARD 98 Removing the System Board 100 Replacing the System Board 102 CHAPTER 23: SPEAKERS 103 Removing the Speakers 105 Replacing the Speakers 105 CHAPTER 24: CONSUMER IR BOARD 106 Removing the Consumer IR Board 108 Replacing the Consumer IR Board 108 CHAPTER 25: BATTERY LATCH ASSEMBLY 109 Removing the Battery Latch Assembly 111 Replacing the Battery Latch Assembly 111 CHAPTER 26: BIOS 112 Configuring the BIOS 113 Flashing the BIOS 118 CONTENTS 05 /05
CHAPTER 22: SYSTEM BOARD 98 Removing the System Board 100 Replacing the System Board 102 CHAPTER 23: SPEAKERS 103 Removing the Speakers 105 Replacing the Speakers 105 CHAPTER 24: CONSUMER IR BOARD 106 Removing the Consumer IR Board 108 Replacing the Consumer IR Board 108 CHAPTER 25: BATTERY LATCH ASSEMBLY 109 Removing the Battery Latch Assembly 111 Replacing the Battery Latch Assembly 111 CHAPTER 26: BIOS 112 Configuring the BIOS 113 Flashing the BIOS 118 CONTENTS 05 /05
Service Manual
Page 8
... the procedures in this section, follow the safety instructions that both connectors are disconnecting this particular Dell computer. For additional safety best practices information, see "Removing the Battery Pack" on a card. Hold a component such as a processor by its edges, not by...following safety guidelines to help to avoid bending any installed cards from their electrical outlets. Remove the battery (see the Regulatory Compliance Homepage at www.dell.com/regulatory_compliance. Before Working Inside Your Computer Use the following steps before you disconnect a cable, pull...
... the procedures in this section, follow the safety instructions that both connectors are disconnecting this particular Dell computer. For additional safety best practices information, see "Removing the Battery Pack" on a card. Hold a component such as a processor by its edges, not by...following safety guidelines to help to avoid bending any installed cards from their electrical outlets. Remove the battery (see the Regulatory Compliance Homepage at www.dell.com/regulatory_compliance. Before Working Inside Your Computer Use the following steps before you disconnect a cable, pull...
Service Manual
Page 10
... computer, read the safety information that shipped with your computer. CAUTION: To help prevent damage to the system board, remove the main battery (see the Regulatory Compliance Homepage at www.dell.com/regulatory_compliance. WARNING: Before performing these procedures, turn off the computer, disconnect the AC adapter from the electrical outlet and the... touching an unpainted metal surface (such as a connector on page 11) before working inside the computer. For additional safety best practices information, see "Removing the Battery Pack" on the back of the computer). CHAPTER...
... computer, read the safety information that shipped with your computer. CAUTION: To help prevent damage to the system board, remove the main battery (see the Regulatory Compliance Homepage at www.dell.com/regulatory_compliance. WARNING: Before performing these procedures, turn off the computer, disconnect the AC adapter from the electrical outlet and the... touching an unpainted metal surface (such as a connector on page 11) before working inside the computer. For additional safety best practices information, see "Removing the Battery Pack" on the back of the computer). CHAPTER...
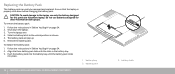
Service Manual
Page 11
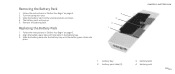
... to the unlock position as shown. 4. Replacing the Battery Pack 1. Slide the battery pack into the battery bay until the battery pack clicks into place. 4 3 2 1 CHAPTER 2: BATTERY PACK 1 battery bay 2 battery pack tabs (3) 3 battery latch 4 battery pack 011 /011 Remove the battery pack. Follow the instructions in "Before You Begin" on page 6. 2. Follow the instructions in "Before You Begin" on...
... to the unlock position as shown. 4. Replacing the Battery Pack 1. Slide the battery pack into the battery bay until the battery pack clicks into place. 4 3 2 1 CHAPTER 2: BATTERY PACK 1 battery bay 2 battery pack tabs (3) 3 battery latch 4 battery pack 011 /011 Remove the battery pack. Follow the instructions in "Before You Begin" on page 6. 2. Follow the instructions in "Before You Begin" on...

