
Owner's Manual
Page 18
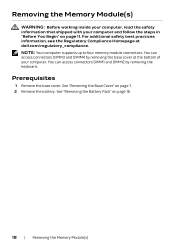
NOTE: Your computer supports up to four memory module connectors. You can access connectors DIMM3 and DIMM4 by removing the keyboard. For additional safety best practices information, see the ... page 11. Prerequisites 1 Remove the base cover. You can access connectors DIMM1 and DIMM2 by removing the base cover at dell.com/regulatory_compliance. See "Removing the Base Cover" on page 16. 18 | Removing the Memory Module(s) See "Removing the Battery Pack" on page 7. 2 Remove the battery. Removing the Memory Module(s) WARNING: Before...
NOTE: Your computer supports up to four memory module connectors. You can access connectors DIMM3 and DIMM4 by removing the keyboard. For additional safety best practices information, see the ... page 11. Prerequisites 1 Remove the base cover. You can access connectors DIMM1 and DIMM2 by removing the base cover at dell.com/regulatory_compliance. See "Removing the Base Cover" on page 16. 18 | Removing the Memory Module(s) See "Removing the Battery Pack" on page 7. 2 Remove the battery. Removing the Memory Module(s) WARNING: Before...
Owner's Manual
Page 20
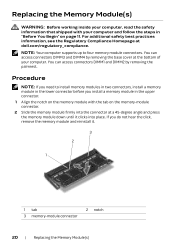
... at a 45-degree angle and press the memory module down until it . 3 2 1 1 tab 3 memory-module connector 2 notch 20 | Replacing the Memory Module(s) NOTE: Your computer supports up to install memory modules in two connectors, install a memory module in the upper connector. 1 Align the notch on the memory module with your computer... computer, read the safety information that shipped with the tab on page 11. For additional safety best practices information, see the Regulatory Compliance Homepage at dell.com/regulatory_compliance.
... at a 45-degree angle and press the memory module down until it . 3 2 1 1 tab 3 memory-module connector 2 notch 20 | Replacing the Memory Module(s) NOTE: Your computer supports up to install memory modules in two connectors, install a memory module in the upper connector. 1 Align the notch on the memory module with your computer... computer, read the safety information that shipped with the tab on page 11. For additional safety best practices information, see the Regulatory Compliance Homepage at dell.com/regulatory_compliance.

Owner's Manual
Page 27
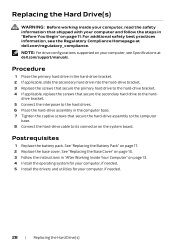
NOTE: Your computer supports up to three drives. 5 Remove the screws that secure the hard drive(s) to the hard-drive bracket and slide the hard drive(s) out of the hard-drive bracket. 1 3 1 hard drive 3 screws (4) 2 2 interposer Removing the Hard Drive(s) | 27 4 Disconnect the interposer from the hard drives.
NOTE: Your computer supports up to three drives. 5 Remove the screws that secure the hard drive(s) to the hard-drive bracket and slide the hard drive(s) out of the hard-drive bracket. 1 3 1 hard drive 3 screws (4) 2 2 interposer Removing the Hard Drive(s) | 27 4 Disconnect the interposer from the hard drives.
Owner's Manual
Page 28
For additional safety best practices information, see Specifications at dell.com/regulatory_compliance. Postrequisites 1 Replace the battery pack. NOTE: For drive configurations supported on page 17. 2 Replace the base cover. See "Replacing the Battery Pack" on your computer, if needed . 5 ...Install the drivers and utilities for your computer, see the Regulatory Compliance Homepage at dell.com/support/manuals. drive bracket. 5 Connect the interposer to the hard drives. 6 Place the hard-drive assembly in the hard-drive bracket. 2 If...
For additional safety best practices information, see Specifications at dell.com/regulatory_compliance. Postrequisites 1 Replace the battery pack. NOTE: For drive configurations supported on page 17. 2 Replace the base cover. See "Replacing the Battery Pack" on your computer, if needed . 5 ...Install the drivers and utilities for your computer, see the Regulatory Compliance Homepage at dell.com/support/manuals. drive bracket. 5 Connect the interposer to the hard drives. 6 Place the hard-drive assembly in the hard-drive bracket. 2 If...

Owner's Manual
Page 105
... 25. 6 Remove the optical drive. See "Removing the Hard Drive(s)" on page 14. 3 Remove the fans cover. NOTE: Dell does not guarantee compatibility or provide support for wireless Mini-Cards from the Media-Card Reader. 2 Remove the base cover. Prerequisites 1 Remove any installed card or blank from... sources other than Dell. See "Removing the Optical Drive" on page 22. 7 Follow the instructions from step 1 to step 6 in "Before You Begin" on page 11. Removing the Wireless Mini-Card | 105 Your computer has one half Mini-Card slot which supports a Wireless Local Area Network ...
... 25. 6 Remove the optical drive. See "Removing the Hard Drive(s)" on page 14. 3 Remove the fans cover. NOTE: Dell does not guarantee compatibility or provide support for wireless Mini-Cards from the Media-Card Reader. 2 Remove the base cover. Prerequisites 1 Remove any installed card or blank from... sources other than Dell. See "Removing the Optical Drive" on page 22. 7 Follow the instructions from step 1 to step 6 in "Before You Begin" on page 11. Removing the Wireless Mini-Card | 105 Your computer has one half Mini-Card slot which supports a Wireless Local Area Network ...

Owner's Manual
Page 107
The following table provides the antenna cable color scheme for the wireless Mini-Card supported by your computer and follow the steps in "Before You Begin" on page 11. Connectors on the system-board connector. If you use excessive force, .... CAUTION: The connectors are keyed to the wireless Mini-Card, never place cables under the wireless Mini-Card. 2 Insert the wireless Mini-Card connector at dell.com/regulatory_compliance. Replacing the Wireless Mini-Card WARNING: Before working inside your computer, read the safety information that secure the wireless Mini-Card to the...
The following table provides the antenna cable color scheme for the wireless Mini-Card supported by your computer and follow the steps in "Before You Begin" on page 11. Connectors on the system-board connector. If you use excessive force, .... CAUTION: The connectors are keyed to the wireless Mini-Card, never place cables under the wireless Mini-Card. 2 Insert the wireless Mini-Card connector at dell.com/regulatory_compliance. Replacing the Wireless Mini-Card WARNING: Before working inside your computer, read the safety information that secure the wireless Mini-Card to the...
Owner's Manual
Page 112
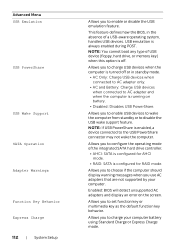
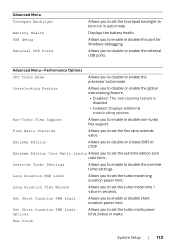
...-aware operating system, handles USB devices. Allows you to choose if the computer should display warning messages when you use AC adapters that are not supported by your computer battery using Standard Charge or Express Charge mode. This feature defines how the BIOS, in standby mode. • AC Only: Charge ... POST. Allows you to set function key or multimedia key as the default function key behavior. Advanced Menu USB Emulation USB PowerShare USB Wake Support SATA Operation Adapter Warnings Function Key Behavior Express Charge 112 | System Setup Allows you to disable the USB wake...
...-aware operating system, handles USB devices. Allows you to choose if the computer should display warning messages when you use AC adapters that are not supported by your computer battery using Standard Charge or Express Charge mode. This feature defines how the BIOS, in standby mode. • AC Only: Charge ... POST. Allows you to set function key or multimedia key as the default function key behavior. Advanced Menu USB Emulation USB PowerShare USB Wake Support SATA Operation Adapter Warnings Function Key Behavior Express Charge 112 | System Setup Allows you to disable the USB wake...
Owner's Manual
Page 113
... on or in auto mode. Displays the battery health. Overclocking Feature Allows you to enable or disable this port for Windows debugging. Non-Turbo Flex Support Allows you to disable or enable the external USB ports. Allows you to enable or disable non-turbo flex... support. Bus Clock System Setup | 113 Extreme Edition Allows you to enable or disable the override turbo settings. Advanced Menu Touchpad Backlight Battery Health USB debug ...
... on or in auto mode. Displays the battery health. Overclocking Feature Allows you to enable or disable this port for Windows debugging. Non-Turbo Flex Support Allows you to disable or enable the external USB ports. Allows you to enable or disable non-turbo flex... support. Bus Clock System Setup | 113 Extreme Edition Allows you to enable or disable the override turbo settings. Advanced Menu Touchpad Backlight Battery Health USB debug ...
Owner's Manual
Page 119
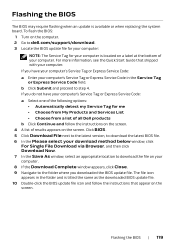
...system board. Flashing the BIOS | 119 To flash the BIOS: 1 Turn on the computer. 2 Go to step 4. b Click Submit and proceed to dell.com/support/download. 3 Locate the BIOS update file for your computer: NOTE: The Service Tag for me • Choose from My Products and Services List •...; Choose from a list of all Dell products b Click Continue and follow the instructions that shipped with your computer. If you have your computer...
...system board. Flashing the BIOS | 119 To flash the BIOS: 1 Turn on the computer. 2 Go to step 4. b Click Submit and proceed to dell.com/support/download. 3 Locate the BIOS update file for your computer: NOTE: The Service Tag for me • Choose from My Products and Services List •...; Choose from a list of all Dell products b Click Continue and follow the instructions that shipped with your computer. If you have your computer...
Quick Start Guide
Page 1
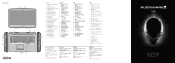
... P19E001 Alienware 18 R1 18 Quick Start Guide USB 3.0 端口(2 个) 21. Wireless-status light 8 8 9. HDMI 23 10 23. Security-cable slot 24 12 13 14 More Information For the latest information, FAQs, and solutions to most common issues, see dell.com/Alienware For sales, technical support, or customer service issues, see dell.com...
... P19E001 Alienware 18 R1 18 Quick Start Guide USB 3.0 端口(2 个) 21. Wireless-status light 8 8 9. HDMI 23 10 23. Security-cable slot 24 12 13 14 More Information For the latest information, FAQs, and solutions to most common issues, see dell.com/Alienware For sales, technical support, or customer service issues, see dell.com...


