
Service Manual
Page 6
Removing the battery 62 Prerequisites...62 Procedure...62 Replacing the battery 65 Procedure...65 Post-requisites 65 Removing the I/O board 66 Prerequisites...66 Procedure...66 Replacing the I/O board 68 Procedure...68 Post-requisites 68 Removing the speakers 69 Prerequisites...69 Procedure...69 Replacing the speakers 72 Procedure...72 Post-requisites 72 Removing the front AlienFX LED boards 73 Prerequisites...73 Procedure...73 Replacing the front AlienFX LED board 75 Procedure...75 Post-requisites 75
Removing the battery 62 Prerequisites...62 Procedure...62 Replacing the battery 65 Procedure...65 Post-requisites 65 Removing the I/O board 66 Prerequisites...66 Procedure...66 Replacing the I/O board 68 Procedure...68 Post-requisites 68 Removing the speakers 69 Prerequisites...69 Procedure...69 Replacing the speakers 72 Procedure...72 Post-requisites 72 Removing the front AlienFX LED boards 73 Prerequisites...73 Procedure...73 Replacing the front AlienFX LED board 75 Procedure...75 Post-requisites 75

Service Manual
Page 7
Removing the processor fan 76 Prerequisites...76 Procedure...76 Replacing the processor fan 78 Procedure...78 Post-requisites 78 Removing the system board 79 Prerequisites...79 Procedure...79 Replacing the system board 83 Procedure...83 Post-requisites 83 Removing the heat sink 84 Prerequisites...84 Procedure...84 Replacing the heat sink 86 Procedure...86 Post-requisites 86 Removing the coin-cell battery 87 Prerequisites...87 Procedure...87 Replacing the coin-cell battery 89 Procedure...89 Post-requisites 89
Removing the processor fan 76 Prerequisites...76 Procedure...76 Replacing the processor fan 78 Procedure...78 Post-requisites 78 Removing the system board 79 Prerequisites...79 Procedure...79 Replacing the system board 83 Procedure...83 Post-requisites 83 Removing the heat sink 84 Prerequisites...84 Procedure...84 Replacing the heat sink 86 Procedure...86 Post-requisites 86 Removing the coin-cell battery 87 Prerequisites...87 Procedure...87 Replacing the coin-cell battery 89 Procedure...89 Post-requisites 89

Service Manual
Page 18
5 Disconnect the battery cable from the system board. 1 battery cable 6 Turn the computer over. 7 Press and hold the power button for 5 seconds to ground the system board. 18
5 Disconnect the battery cable from the system board. 1 battery cable 6 Turn the computer over. 7 Press and hold the power button for 5 seconds to ground the system board. 18

Service Manual
Page 19
Procedure 1 Connect the battery cable to the system board. 2 Slide the tabs on the base panel into the slots on the computer base and snap the base panel into ... the safety information that secure the base panel to the computer base. 19 For more safety best practices, see the Regulatory Compliance home page at dell.com/regulatory_compliance.
Procedure 1 Connect the battery cable to the system board. 2 Slide the tabs on the base panel into the slots on the computer base and snap the base panel into ... the safety information that secure the base panel to the computer base. 19 For more safety best practices, see the Regulatory Compliance home page at dell.com/regulatory_compliance.

Service Manual
Page 62
Prerequisites 1 Remove the base panel. 2 Follow the procedure from the routing guides on the battery. 62 Procedure 1 Disconnect the speaker cable and front AlienFX LED cable from the system board. 2 Remove the speaker cable from step 1 to step 9...and follow the instructions in After Working Inside Your Computer. For more safety best practices, see the Regulatory Compliance home page at dell.com/regulatory_compliance. Removing the battery WARNING: Before working inside your computer, read the safety information that shipped with your computer, follow the steps in Before Working ...
Prerequisites 1 Remove the base panel. 2 Follow the procedure from the routing guides on the battery. 62 Procedure 1 Disconnect the speaker cable and front AlienFX LED cable from the system board. 2 Remove the speaker cable from step 1 to step 9...and follow the instructions in After Working Inside Your Computer. For more safety best practices, see the Regulatory Compliance home page at dell.com/regulatory_compliance. Removing the battery WARNING: Before working inside your computer, read the safety information that shipped with your computer, follow the steps in Before Working ...

Service Manual
Page 63
3 Note the front AlienFX LED cable routing and peel off the cable from the battery. 1 system board 3 front AlienFX LED cable 2 speaker cable 4 Remove the battery cable from the slot on the computer base. 5 Remove the screws that secure the battery to the computer base. 63
3 Note the front AlienFX LED cable routing and peel off the cable from the battery. 1 system board 3 front AlienFX LED cable 2 speaker cable 4 Remove the battery cable from the slot on the computer base. 5 Remove the screws that secure the battery to the computer base. 63

Service Manual
Page 64
6 Lift the battery off the computer base. 1 battery cable 3 screws (6) 2 battery 64
6 Lift the battery off the computer base. 1 battery cable 3 screws (6) 2 battery 64

Service Manual
Page 65
... steps in Before Working Inside Your Computer. Post-requisites 1 Follow the procedure from step 5 to the system board. Procedure 1 Align the screw holes on the battery. 6 Connect the speaker cable and front AlienFX LED cable to step 11 in After Working Inside Your Computer. After working inside your computer and follow... the instructions in "Replacing the palm rest". 2 Replace the base panel. 65 For more safety best practices, see the Regulatory Compliance home page at dell.com/regulatory_compliance.
... steps in Before Working Inside Your Computer. Post-requisites 1 Follow the procedure from step 5 to the system board. Procedure 1 Align the screw holes on the battery. 6 Connect the speaker cable and front AlienFX LED cable to step 11 in After Working Inside Your Computer. After working inside your computer and follow... the instructions in "Replacing the palm rest". 2 Replace the base panel. 65 For more safety best practices, see the Regulatory Compliance home page at dell.com/regulatory_compliance.

Service Manual
Page 70
2 Note the front AlienFX LED cable routing and peel off the cable from the battery. 1 connector 2 front AlienFX LED cable 3 Disconnect the speaker cable from the system board. 4 Remove the speaker cable from the routing guides on the battery and computer base. 70
2 Note the front AlienFX LED cable routing and peel off the cable from the battery. 1 connector 2 front AlienFX LED cable 3 Disconnect the speaker cable from the system board. 4 Remove the speaker cable from the routing guides on the battery and computer base. 70

Service Manual
Page 72
...safety best practices, see the Regulatory Compliance home page at dell.com/regulatory_compliance. Procedure 1 Using the alignment posts, place the speakers on the computer base. 2 Route the speaker cable through the routing guides on the computer base and battery. 3 Route the front AlienFX LED cable through the ...routing guides on the battery. 4 Connect the speaker cable and front AlienFX LED cable to step 11 in "Replacing the palm rest...
...safety best practices, see the Regulatory Compliance home page at dell.com/regulatory_compliance. Procedure 1 Using the alignment posts, place the speakers on the computer base. 2 Route the speaker cable through the routing guides on the computer base and battery. 3 Route the front AlienFX LED cable through the ...routing guides on the battery. 4 Connect the speaker cable and front AlienFX LED cable to step 11 in "Replacing the palm rest...
Service Manual
Page 87
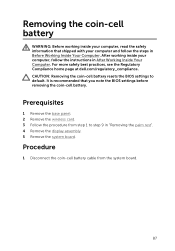
... Before working inside your computer, read the safety information that you note the BIOS settings before removing the coin-cell battery. It is recommended that shipped with your computer and follow the instructions in Before Working Inside Your Computer. For more... safety best practices, see the Regulatory Compliance home page at dell.com/regulatory_compliance. CAUTION: Removing the coin-cell battery resets the BIOS settings to step 9 in "Removing the palm rest". 4 Remove the display assembly. 5 Remove the ...
... Before working inside your computer, read the safety information that you note the BIOS settings before removing the coin-cell battery. It is recommended that shipped with your computer and follow the instructions in Before Working Inside Your Computer. For more... safety best practices, see the Regulatory Compliance home page at dell.com/regulatory_compliance. CAUTION: Removing the coin-cell battery resets the BIOS settings to step 9 in "Removing the palm rest". 4 Remove the display assembly. 5 Remove the ...

Service Manual
Page 88
2 Peel the coin-cell battery off the system board. 1 coin-cell battery cable 2 coin-cell battery 88
2 Peel the coin-cell battery off the system board. 1 coin-cell battery cable 2 coin-cell battery 88

Service Manual
Page 89
...palm rest". 4 Replace the wireless card. 5 Replace the base panel. 89 Procedure 1 Adhere the coin-cell battery to the system board. 2 Connect the coin-cell battery cable to step 11 in After Working Inside Your Computer. For more safety best practices, see the Regulatory Compliance... home page at dell.com/regulatory_compliance. Replacing the coin-cell battery WARNING: Before working inside your computer, read the safety information that shipped with your computer, follow the steps...
...palm rest". 4 Replace the wireless card. 5 Replace the base panel. 89 Procedure 1 Adhere the coin-cell battery to the system board. 2 Connect the coin-cell battery cable to step 11 in After Working Inside Your Computer. For more safety best practices, see the Regulatory Compliance... home page at dell.com/regulatory_compliance. Replacing the coin-cell battery WARNING: Before working inside your computer, read the safety information that shipped with your computer, follow the steps...

Service Manual
Page 113
... follow the steps in Before Working Inside Your Computer. For more safety best practices, see the Regulatory Compliance home page at dell.com/regulatory_compliance. Procedure After performing the prerequisites, we are left with your computer and follow the instructions in "Removing the palm ...rest". 4 Remove the display assembly. 5 Remove the power-adapter port. 6 Remove the battery. 7 Remove the speakers. 8 Remove the I/O board. 9 Remove the subwoofer. Removing the computer base WARNING: Before working inside your computer, ...
... follow the steps in Before Working Inside Your Computer. For more safety best practices, see the Regulatory Compliance home page at dell.com/regulatory_compliance. Procedure After performing the prerequisites, we are left with your computer and follow the instructions in "Removing the palm ...rest". 4 Remove the display assembly. 5 Remove the power-adapter port. 6 Remove the battery. 7 Remove the speakers. 8 Remove the I/O board. 9 Remove the subwoofer. Removing the computer base WARNING: Before working inside your computer, ...

Service Manual
Page 115
...Replace the wireless card. 9 Replace the base panel. 115 Post-requisites 1 Replace the subwoofer. 2 Replace the I/O board. 3 Replace the speakers. 4 Replace the battery. 5 Replace the power-adapter port. 6 Replace the display assembly. 7 Follow the procedure from step 5 to step 11 in Before Working Inside Your Computer. Procedure... Place the computer base on a flat surface. For more safety best practices, see the Regulatory Compliance home page at dell.com/regulatory_compliance. After working inside your computer and follow the instructions in After Working Inside Your Computer.
...Replace the wireless card. 9 Replace the base panel. 115 Post-requisites 1 Replace the subwoofer. 2 Replace the I/O board. 3 Replace the speakers. 4 Replace the battery. 5 Replace the power-adapter port. 6 Replace the display assembly. 7 Follow the procedure from step 5 to step 11 in Before Working Inside Your Computer. Procedure... Place the computer base on a flat surface. For more safety best practices, see the Regulatory Compliance home page at dell.com/regulatory_compliance. After working inside your computer and follow the instructions in After Working Inside Your Computer.
Service Manual
Page 138
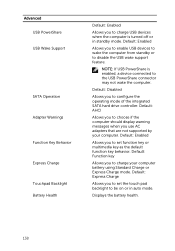
...key as the default function key behavior. Default: Enabled Allows you use AC adapters that are not supported by your computer battery using Standard Charge or Express Charge mode. Advanced USB PowerShare USB Wake Support SATA Operation Adapter Warnings Function Key Behavior Express Charge Touchpad... Backlight Battery Health Default: Enabled Allows you to enable USB devices to wake the computer from standby or to disable the USB wake support...
...key as the default function key behavior. Default: Enabled Allows you use AC adapters that are not supported by your computer battery using Standard Charge or Express Charge mode. Advanced USB PowerShare USB Wake Support SATA Operation Adapter Warnings Function Key Behavior Express Charge Touchpad... Backlight Battery Health Default: Enabled Allows you to enable USB devices to wake the computer from standby or to disable the USB wake support...

