
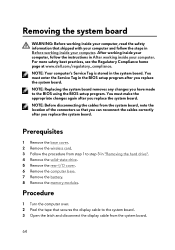
Handling swollen Lithium-ion batteries
Page 1
...not try to work with your Dell computer. Always purchase genuine batteries from https://www.dell.com or otherwise directly from the system and operate the system only on when the power button is pressed, the battery is the lithium-ion polymer battery. Dell, EMC, and other computers ...with your computer. or its subsidiaries. Do not use of the battery. ● Do not bend the battery. ● Do not use lithium-ion batteries. Inherent to lithium-ion polymer battery technology is designed...
...not try to work with your Dell computer. Always purchase genuine batteries from https://www.dell.com or otherwise directly from the system and operate the system only on when the power button is pressed, the battery is the lithium-ion polymer battery. Dell, EMC, and other computers ...with your computer. or its subsidiaries. Do not use of the battery. ● Do not bend the battery. ● Do not use lithium-ion batteries. Inherent to lithium-ion polymer battery technology is designed...

Handling swollen Lithium-ion batteries
Page 2
Lithium-ion batteries can swell for various reasons such as age, number of the issue, see Dell Laptop Battery - For more information on how to improve the performance and lifespan of the laptop battery and to minimize the possibility of occurrence of charge cycles, or exposure to high heat. Frequently Asked Questions. 2
Lithium-ion batteries can swell for various reasons such as age, number of the issue, see Dell Laptop Battery - For more information on how to improve the performance and lifespan of the laptop battery and to minimize the possibility of occurrence of charge cycles, or exposure to high heat. Frequently Asked Questions. 2
Service Manual
Page 5
Replacing the computer base 43 Procedure 43 Post-requisites 43 Removing the coin-cell battery 44 Prerequisites 44 Procedure 44 Replacing the coin-cell battery 46 Procedure 46 Post-requisites 46 Removing the battery 47 Prerequisites 47 Procedure 47 Replacing the battery 49 Procedure 49 Post-requisites 49 Removing the touch pad 50 Prerequisites 50 Procedure 50 Replacing the touch pad 53 Procedure 53 Post-requisites 53 Removing the keyboard 54 Prerequisites 54 Procedure 54 5
Replacing the computer base 43 Procedure 43 Post-requisites 43 Removing the coin-cell battery 44 Prerequisites 44 Procedure 44 Replacing the coin-cell battery 46 Procedure 46 Post-requisites 46 Removing the battery 47 Prerequisites 47 Procedure 47 Replacing the battery 49 Procedure 49 Post-requisites 49 Removing the touch pad 50 Prerequisites 50 Procedure 50 Replacing the touch pad 53 Procedure 53 Post-requisites 53 Removing the keyboard 54 Prerequisites 54 Procedure 54 5
Service Manual
Page 13
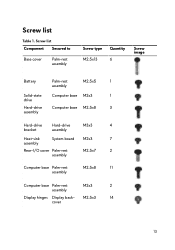
M2.5x3 14 cover 13 Screw list Table 1. Screw list Component Secured to Base cover Palm-rest assembly Screw type Quantity M2.5x13 6 Screw image Battery Palm-rest assembly M2.5x5 1 Solid-state Computer base M2x3 1 drive Hard-drive Computer base M2.5x8 3 assembly Hard-drive Hard-drive M3x3 4 bracket assembly Heat-sink System board M2x3 7 assembly Rear-I/O cover Palm-rest assembly M2.5x7 2 Computer base Palm-rest assembly M2.5x8 11 Computer base Palm-rest M2x3 2 assembly Display hinges Display back-
M2.5x3 14 cover 13 Screw list Table 1. Screw list Component Secured to Base cover Palm-rest assembly Screw type Quantity M2.5x13 6 Screw image Battery Palm-rest assembly M2.5x5 1 Solid-state Computer base M2x3 1 drive Hard-drive Computer base M2.5x8 3 assembly Hard-drive Hard-drive M3x3 4 bracket assembly Heat-sink System board M2x3 7 assembly Rear-I/O cover Palm-rest assembly M2.5x7 2 Computer base Palm-rest assembly M2.5x8 11 Computer base Palm-rest M2x3 2 assembly Display hinges Display back-
Service Manual
Page 18
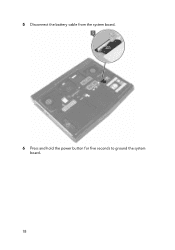
5 Disconnect the battery cable from the system board. 6 Press and hold the power button for five seconds to ground the system board. 18
5 Disconnect the battery cable from the system board. 6 Press and hold the power button for five seconds to ground the system board. 18
Service Manual
Page 19
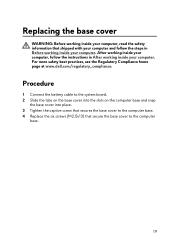
... computer, follow the steps in After working inside your computer. For more safety best practices, see the Regulatory Compliance home page at www.dell.com/regulatory_compliance. Replacing the base cover WARNING: Before working inside your computer, read the safety information that secure the base cover to the ...computer base. 19 Procedure 1 Connect the battery cable to the system board. 2 Slide the tabs on the base cover into the slots on the computer base and snap the base cover...
... computer, follow the steps in After working inside your computer. For more safety best practices, see the Regulatory Compliance home page at www.dell.com/regulatory_compliance. Replacing the base cover WARNING: Before working inside your computer, read the safety information that secure the base cover to the ...computer base. 19 Procedure 1 Connect the battery cable to the system board. 2 Slide the tabs on the base cover into the slots on the computer base and snap the base cover...
Service Manual
Page 44
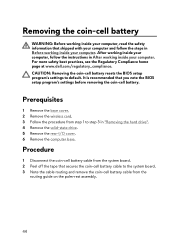
... you note the BIOS setup program's settings before removing the coin-cell battery. For more safety best practices, see the Regulatory Compliance home page at www.dell.com/regulatory_compliance. Procedure 1 Disconnect the coin-cell battery cable from the system board. 2 Peel off the tape that secures ...the coin-cell battery cable to the system board. 3 Note the cable routing and remove the coin-cell battery cable from step 1 to ...
... you note the BIOS setup program's settings before removing the coin-cell battery. For more safety best practices, see the Regulatory Compliance home page at www.dell.com/regulatory_compliance. Procedure 1 Disconnect the coin-cell battery cable from the system board. 2 Peel off the tape that secures ...the coin-cell battery cable to the system board. 3 Note the cable routing and remove the coin-cell battery cable from step 1 to ...

Service Manual
Page 45
4 Gently peel off the coin-cell battery along with its cable off the palm-rest assembly. 45
4 Gently peel off the coin-cell battery along with its cable off the palm-rest assembly. 45
Service Manual
Page 46
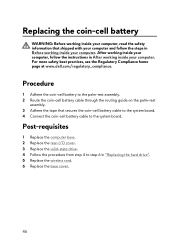
... the hard drive". 5 Replace the wireless card. 6 Replace the base cover. 46 For more safety best practices, see the Regulatory Compliance home page at www.dell.com/regulatory_compliance. Replacing the coin-cell battery WARNING: Before working inside your computer, read the safety information that secures the coin-cell...
... the hard drive". 5 Replace the wireless card. 6 Replace the base cover. 46 For more safety best practices, see the Regulatory Compliance home page at www.dell.com/regulatory_compliance. Replacing the coin-cell battery WARNING: Before working inside your computer, read the safety information that secures the coin-cell...
Service Manual
Page 47
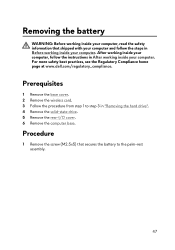
For more safety best practices, see the Regulatory Compliance home page at www.dell.com/regulatory_compliance. Removing the battery WARNING: Before working inside your computer, read the safety information that secures the battery to step 3 in Before working inside your computer. Procedure 1 Remove the screw (M2.5x5) that shipped with your computer and follow...
For more safety best practices, see the Regulatory Compliance home page at www.dell.com/regulatory_compliance. Removing the battery WARNING: Before working inside your computer, read the safety information that secures the battery to step 3 in Before working inside your computer. Procedure 1 Remove the screw (M2.5x5) that shipped with your computer and follow...
Service Manual
Page 48
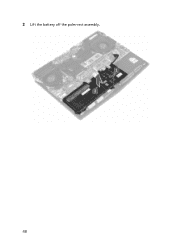
2 Lift the battery off the palm-rest assembly. 48
2 Lift the battery off the palm-rest assembly. 48
Service Manual
Page 49
... the palm-rest assembly. Procedure 1 Align the screw hole on the palm-rest assembly. 2 Replace the screw (M2.5x5) that secures the battery to step 6 in After working inside your computer. After working inside your computer, follow the steps in Before working inside your computer. For more... safety best practices, see the Regulatory Compliance home page at www.dell.com/regulatory_compliance. Replacing the battery WARNING: Before working inside your computer, read the safety information that shipped with the screw hole on the...
... the palm-rest assembly. Procedure 1 Align the screw hole on the palm-rest assembly. 2 Replace the screw (M2.5x5) that secures the battery to step 6 in After working inside your computer. After working inside your computer, follow the steps in Before working inside your computer. For more... safety best practices, see the Regulatory Compliance home page at www.dell.com/regulatory_compliance. Replacing the battery WARNING: Before working inside your computer, read the safety information that shipped with the screw hole on the...
Service Manual
Page 50
For more safety best practices, see the Regulatory Compliance home page at www.dell.com/regulatory_compliance. Prerequisites 1 Remove the base cover. 2 Remove the wireless card. 3 Follow the procedure from the touch pad. 3 Remove the five screws (M2x3) that shipped ... touch-pad bracket to step 3 in "Removing the hard drive". 4 Remove the solid-state drive. 5 Remove the rear-I/O cover. 6 Remove the computer base. 7 Remove the battery.
For more safety best practices, see the Regulatory Compliance home page at www.dell.com/regulatory_compliance. Prerequisites 1 Remove the base cover. 2 Remove the wireless card. 3 Follow the procedure from the touch pad. 3 Remove the five screws (M2x3) that shipped ... touch-pad bracket to step 3 in "Removing the hard drive". 4 Remove the solid-state drive. 5 Remove the rear-I/O cover. 6 Remove the computer base. 7 Remove the battery.
Service Manual
Page 53
Post-requisites 1 Replace the battery. 2 Replace the computer base. 3 Replace the rear-I/O cover. 4 Replace the wireless card. 5 Replace the solid-state drive. 6 Follow the procedure from step 4 to secure the ... your computer and follow the instructions in After working inside your computer. For more safety best practices, see the Regulatory Compliance home page at www.dell.com/regulatory_compliance. Replacing the touch pad WARNING: Before working inside your computer, read the safety information that secure the touch-pad bracket to the palm...
Post-requisites 1 Replace the battery. 2 Replace the computer base. 3 Replace the rear-I/O cover. 4 Replace the wireless card. 5 Replace the solid-state drive. 6 Follow the procedure from step 4 to secure the ... your computer and follow the instructions in After working inside your computer. For more safety best practices, see the Regulatory Compliance home page at www.dell.com/regulatory_compliance. Replacing the touch pad WARNING: Before working inside your computer, read the safety information that secure the touch-pad bracket to the palm...
Service Manual
Page 54
For more safety best practices, see the Regulatory Compliance home page at www.dell.com/regulatory_compliance. Procedure 1 Remove the 15 screws (M2x3) that shipped with your computer and follow the instructions in After working inside your computer. Prerequisites 1 Remove the ...step 3 in "Removing the hard drive". 4 Remove the solid-state drive. 5 Remove the rear-I/O cover. 6 Remove the computer base. 7 Remove the battery. 8 Remove the memory modules. 9 Follow the procedure from step 1 to the palmrest assembly. 54 Removing the keyboard WARNING: Before working inside your computer, read...
For more safety best practices, see the Regulatory Compliance home page at www.dell.com/regulatory_compliance. Procedure 1 Remove the 15 screws (M2x3) that shipped with your computer and follow the instructions in After working inside your computer. Prerequisites 1 Remove the ...step 3 in "Removing the hard drive". 4 Remove the solid-state drive. 5 Remove the rear-I/O cover. 6 Remove the computer base. 7 Remove the battery. 8 Remove the memory modules. 9 Follow the procedure from step 1 to the palmrest assembly. 54 Removing the keyboard WARNING: Before working inside your computer, read...
Service Manual
Page 57
... safety best practices, see the Regulatory Compliance home page at www.dell.com/regulatory_compliance. Post-requisites 1 Replace the power-button board. 2 Follow the procedure from step 2 to step 16 in "Replacing the system board". 3 Replace the memory modules. 4 Replace the battery. 5 Replace the computer base. 6 Replace the rear-I/O cover. 7 Replace the solid...
... safety best practices, see the Regulatory Compliance home page at www.dell.com/regulatory_compliance. Post-requisites 1 Replace the power-button board. 2 Follow the procedure from step 2 to step 16 in "Replacing the system board". 3 Replace the memory modules. 4 Replace the battery. 5 Replace the computer base. 6 Replace the rear-I/O cover. 7 Replace the solid...
Service Manual
Page 61
... your computer and follow the instructions in After working inside your computer. For more safety best practices, see the Regulatory Compliance home page at www.dell.com/regulatory_compliance. After working inside your computer, follow the steps in "Removing the hard drive". 4 Remove the solid-state drive. 5 Remove the rear-I/O cover. 6 Remove...
... your computer and follow the instructions in After working inside your computer. For more safety best practices, see the Regulatory Compliance home page at www.dell.com/regulatory_compliance. After working inside your computer, follow the steps in "Removing the hard drive". 4 Remove the solid-state drive. 5 Remove the rear-I/O cover. 6 Remove...
Service Manual
Page 63
For more safety best practices, see the Regulatory Compliance home page at www.dell.com/regulatory_compliance. After working inside your computer, follow the steps in Before working inside your computer. Post-requisites 1 Replace the battery. 2 Replace the computer base. 3 Replace the rear-I/O cover. 4 Replace the solid-state drive. 5 Follow the procedure from step...
For more safety best practices, see the Regulatory Compliance home page at www.dell.com/regulatory_compliance. After working inside your computer, follow the steps in Before working inside your computer. Post-requisites 1 Replace the battery. 2 Replace the computer base. 3 Replace the rear-I/O cover. 4 Replace the solid-state drive. 5 Follow the procedure from step...
Service Manual
Page 64
... Tag is stored in "Removing the hard drive". 4 Remove the solid-state drive. 5 Remove the rear-I/O cover. 6 Remove the computer base. 7 Remove the battery. 8 Remove the memory modules. Prerequisites 1 Remove the base cover. 2 Remove the wireless card. 3 Follow the procedure from step 1 to step 3 in the ...display cable to the BIOS using the BIOS setup program. For more safety best practices, see the Regulatory Compliance home page at www.dell.com/regulatory_compliance. NOTE: Before disconnecting the cables from the system board. 64 You must make the appropriate changes again after you have...
... Tag is stored in "Removing the hard drive". 4 Remove the solid-state drive. 5 Remove the rear-I/O cover. 6 Remove the computer base. 7 Remove the battery. 8 Remove the memory modules. Prerequisites 1 Remove the base cover. 2 Remove the wireless card. 3 Follow the procedure from step 1 to step 3 in the ...display cable to the BIOS using the BIOS setup program. For more safety best practices, see the Regulatory Compliance home page at www.dell.com/regulatory_compliance. NOTE: Before disconnecting the cables from the system board. 64 You must make the appropriate changes again after you have...
Service Manual
Page 65
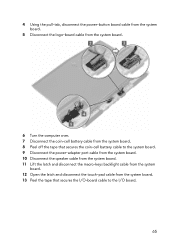
... board. 5 Disconnect the logo-board cable from the system board. 6 Turn the computer over. 7 Disconnect the coin-cell battery cable from the system board. 8 Peel off the tape that secures the coin-cell battery cable to the system board. 9 Disconnect the power-adapter port cable from the system board. 10 Disconnect the...
... board. 5 Disconnect the logo-board cable from the system board. 6 Turn the computer over. 7 Disconnect the coin-cell battery cable from the system board. 8 Peel off the tape that secures the coin-cell battery cable to the system board. 9 Disconnect the power-adapter port cable from the system board. 10 Disconnect the...


