Owner's Manual
Page 2
...; operating systems are registered trademarks of your computer. Microsoft and Windows are not applicable. Other trademarks and trade names may be used in this text: Dell, the DELL logo, Inspiron, Dell TravelLite, Dell Precision, Dimension, OptiPlex, PowerConnect, PowerEdge, PowerVault, PowerApp, DellNet, and Latitude are trademarks of the EMC Corporation. Information in this document to change without...
...; operating systems are registered trademarks of your computer. Microsoft and Windows are not applicable. Other trademarks and trade names may be used in this text: Dell, the DELL logo, Inspiron, Dell TravelLite, Dell Precision, Dimension, OptiPlex, PowerConnect, PowerEdge, PowerVault, PowerApp, DellNet, and Latitude are trademarks of the EMC Corporation. Information in this document to change without...

Owner's Manual
Page 4
... or DVD Tray 42 Display Functions 42 Radios (Including Wireless Networking and Bluetooth® Wireless Technology 42 Power Management 43 Speaker Functions 43 Microsoft® Windows® Logo Key Functions 43 Touch Pad 44 Customizing the Touch Pad 45 Touch Pad or Mouse Problems 45 External Keyboard Problems 45 Unexpected Characters...
... or DVD Tray 42 Display Functions 42 Radios (Including Wireless Networking and Bluetooth® Wireless Technology 42 Power Management 43 Speaker Functions 43 Microsoft® Windows® Logo Key Functions 43 Touch Pad 44 Customizing the Touch Pad 45 Touch Pad or Mouse Problems 45 External Keyboard Problems 45 Unexpected Characters...

Owner's Manual
Page 5
... Setup Wizard 58 Network Problems 58 Connecting to a Wireless Local Area Network 58 Determining Your Network Type 58 Connecting to a Wireless Network in Microsoft® Windows® XP . . . . . 59 7 Solving Problems Finding Solutions 63 Accessing Help 65 Error Messages 65 Contents 5
... Setup Wizard 58 Network Problems 58 Connecting to a Wireless Local Area Network 58 Determining Your Network Type 58 Connecting to a Wireless Network in Microsoft® Windows® XP . . . . . 59 7 Solving Problems Finding Solutions 63 Accessing Help 65 Error Messages 65 Contents 5
Owner's Manual
Page 6
... Drivers 73 What Is a Driver 73 Identifying Drivers 74 Reinstalling Drivers and Utilities 74 Manually Reinstalling Drivers for Windows XP 75 Restoring Your Operating System 75 Using Microsoft Windows XP System Restore 75 Using Dell PC Restore by Symantec 77 Resolving Software and Hardware Incompatibilities 78 8 Adding and Replacing Parts Adding Memory 81...
... Drivers 73 What Is a Driver 73 Identifying Drivers 74 Reinstalling Drivers and Utilities 74 Manually Reinstalling Drivers for Windows XP 75 Restoring Your Operating System 75 Using Microsoft Windows XP System Restore 75 Using Dell PC Restore by Symantec 77 Resolving Software and Hardware Incompatibilities 78 8 Adding and Replacing Parts Adding Memory 81...
Owner's Manual
Page 9
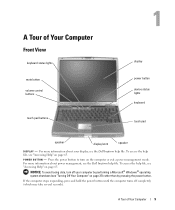
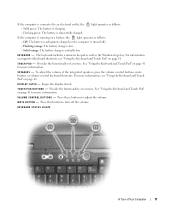
...page 65. If the computer stops responding, press and hold the power button until the computer turns off your display, see the Dell Inspiron help file, see "Accessing Help" on page 27) rather than by pressing the power button. For more information about power management, see... the help file. A Tour of Your Computer 9 To access the help file. For more information about your computer by performing a Microsoft® Windows® operating system shutdown (see "Turning Off Your Computer" on page 65. A Tour of Your Computer Front View keyboard status lights mute button ...
...page 65. If the computer stops responding, press and hold the power button until the computer turns off your display, see the Dell Inspiron help file, see "Accessing Help" on page 27) rather than by pressing the power button. For more information about power management, see... the help file. A Tour of Your Computer 9 To access the help file. For more information about your computer by performing a Microsoft® Windows® operating system shutdown (see "Turning Off Your Computer" on page 65. A Tour of Your Computer Front View keyboard status lights mute button ...
Owner's Manual
Page 11
... is running on page 41. K E Y B O A R D - For information on supported keyboard shortcuts, see "Using the Keyboard and Touch Pad" on a battery, the light operates as the Windows logo key. To adjust the volume of a mouse. See "Using the Keyboard and Touch Pad" on page 41. M U T E B U T T O N -
... is running on page 41. K E Y B O A R D - For information on supported keyboard shortcuts, see "Using the Keyboard and Touch Pad" on a battery, the light operates as the Windows logo key. To adjust the volume of a mouse. See "Using the Keyboard and Touch Pad" on page 41. M U T E B U T T O N -

Owner's Manual
Page 21
... a different ISP: 1 Save and close any open files, and exit any open programs. 2 Double-click the MSN Explorer or AOL icon on the Microsoft® Windows® desktop. 3 Follow the instructions on the screen to complete the setup. With a DSL connection, you can access the Internet and use your phone on...
... a different ISP: 1 Save and close any open files, and exit any open programs. 2 Double-click the MSN Explorer or AOL icon on the Microsoft® Windows® desktop. 3 Follow the instructions on the screen to complete the setup. With a DSL connection, you can access the Internet and use your phone on...

Owner's Manual
Page 22
.... Contact your ISP to complete the setup. Modem and Internet Connection Problems NOTICE: Connect the modem to a different telephone wall jack. www.dell.com | support.dell.com 4 In the next window, click the appropriate option: • If you do not have an ISP and want to connect to the Internet?, and then click...
.... Contact your ISP to complete the setup. Modem and Internet Connection Problems NOTICE: Connect the modem to a different telephone wall jack. www.dell.com | support.dell.com 4 In the next window, click the appropriate option: • If you do not have an ISP and want to connect to the Internet?, and then click...

Owner's Manual
Page 23
...Click Printers and Other Hardware, click Phone and Modem Options, click the Dialing Rules tab, and then click Edit.... 3 In the Edit Location window, ensure that came with your printer. If Work Offline has a check mark next to it, click the check mark to remove it is ... Connect the printer to your telephone directory. 4 Click Apply and click OK. 5 Close the Phone and Modems Options window. 6 Close the Control Panel window. VERIFY THAT THE MODEM IS COMMUNICATING WITH WINDOWS - 1 Click the Start button and click Control Panel. 2 Click Printers and Other Hardware and click Phone and Modem...
...Click Printers and Other Hardware, click Phone and Modem Options, click the Dialing Rules tab, and then click Edit.... 3 In the Edit Location window, ensure that came with your printer. If Work Offline has a check mark next to it, click the check mark to remove it is ... Connect the printer to your telephone directory. 4 Click Apply and click OK. 5 Close the Phone and Modems Options window. 6 Close the Control Panel window. VERIFY THAT THE MODEM IS COMMUNICATING WITH WINDOWS - 1 Click the Start button and click Control Panel. 2 Click Printers and Other Hardware and click Phone and Modem...

Owner's Manual
Page 24
... the documentation that came with your printer. 24 Setting Up Your Computer Attach the cable to the parallel connector on the computer. www.dell.com | support.dell.com Connecting a Parallel Printer 1 Complete the operating system setup, if you have not already done so. 2 Shut down the computer ...(see "Turning Off Your Computer" on the printer and snap the two clips into the two notches. If the Add New Hardware Wizard window appears, ...
... the documentation that came with your printer. 24 Setting Up Your Computer Attach the cable to the parallel connector on the computer. www.dell.com | support.dell.com Connecting a Parallel Printer 1 Complete the operating system setup, if you have not already done so. 2 Shut down the computer ...(see "Turning Off Your Computer" on the printer and snap the two clips into the two notches. If the Add New Hardware Wizard window appears, ...

Owner's Manual
Page 25
... Ports tab. If the printer model is LPT1 (Printer Port). R E I N S T A L L T H E P R I N T E R D R I C A L O U T L E T - See the documentation that the Print to the USB connectors on page 74. VERIFY THAT WINDOWS® RECOGNIZES THE PRINTER 1 Click the Start button. 2 Click Control Panel. 3 Click Printers and Other Hardware. 4 Click View installed printers or fax printers. The USB...
... Ports tab. If the printer model is LPT1 (Printer Port). R E I N S T A L L T H E P R I N T E R D R I C A L O U T L E T - See the documentation that the Print to the USB connectors on page 74. VERIFY THAT WINDOWS® RECOGNIZES THE PRINTER 1 Click the Start button. 2 Click Control Panel. 3 Click Printers and Other Hardware. 4 Click View installed printers or fax printers. The USB...

Owner's Manual
Page 26
www.dell.com | support.dell.com Setting Up the Docking Device to Connect to a Network NOTE: A network adapter is complete. Carefully read the device warranty when choosing a surge protector. A device ... and power strips equipped with the cost of different devices. NOTICE: Do not install a network adapter or a network adapter/modem combination PC Card until the Windows operating system setup on setting up a docking device, refer to maintain AC voltage at a fairly constant level. 26 Setting Up Your Computer
www.dell.com | support.dell.com Setting Up the Docking Device to Connect to a Network NOTE: A network adapter is complete. Carefully read the device warranty when choosing a surge protector. A device ... and power strips equipped with the cost of different devices. NOTICE: Do not install a network adapter or a network adapter/modem combination PC Card until the Windows operating system setup on setting up a docking device, refer to maintain AC voltage at a fairly constant level. 26 Setting Up Your Computer

Owner's Manual
Page 27
NOTE: As an alternative to turning off your computer by performing a Microsoft® Windows® operating system shutdown, as a printer, to the hard drive may result in data loss or file damage. Connect other devices, such as described next, .... 1 Save and close any open files, exit any open programs, click the Start button, and then click Turn Off Computer. 2 In the Turn off computer window, click Turn off after the shutdown process finishes. UPS devices contain a battery that the device is available. The computer turns off . Uninterruptible Power Supplies NOTICE...
NOTE: As an alternative to turning off your computer by performing a Microsoft® Windows® operating system shutdown, as a printer, to the hard drive may result in data loss or file damage. Connect other devices, such as described next, .... 1 Save and close any open files, exit any open programs, click the Start button, and then click Turn Off Computer. 2 In the Turn off computer window, click Turn off after the shutdown process finishes. UPS devices contain a battery that the device is available. The computer turns off . Uninterruptible Power Supplies NOTICE...

Owner's Manual
Page 30
...Dell QuickSet Battery Meter, Microsoft® Windows® Power Meter window and icon, the battery charge gauge and health gauge, and the low-battery warning provide information on battery power. The computer is running on the battery charge. For more information on the Power Meter tab, see the Dell Inspiron...to temperatures above 65°C (149°F). www.dell.com | support.dell.com CAUTION: Misuse of the battery may leak and cause personal injury or equipment damage. Microsoft® Windows® Power Meter The Windows Power Meter indicates the remaining battery charge. To ...
...Dell QuickSet Battery Meter, Microsoft® Windows® Power Meter window and icon, the battery charge gauge and health gauge, and the low-battery warning provide information on battery power. The computer is running on the battery charge. For more information on the Power Meter tab, see the Dell Inspiron...to temperatures above 65°C (149°F). www.dell.com | support.dell.com CAUTION: Misuse of the battery may leak and cause personal injury or equipment damage. Microsoft® Windows® Power Meter The Windows Power Meter indicates the remaining battery charge. To ...

Owner's Manual
Page 39
Using Batteries and Module Bay Devices 39 Windows XP automatically recognizes the new device. 7 If necessary, enter your password to remove the device from the module bay. 6 Insert the new device into the bay, push the device until you feel a click, and push the device latch release in so that it is flush with the computer. device latch release 5 Pull the device by the latch release to unlock your computer.
Using Batteries and Module Bay Devices 39 Windows XP automatically recognizes the new device. 7 If necessary, enter your password to remove the device from the module bay. 6 Insert the new device into the bay, push the device until you feel a click, and push the device latch release in so that it is flush with the computer. device latch release 5 Pull the device by the latch release to unlock your computer.
Owner's Manual
Page 42
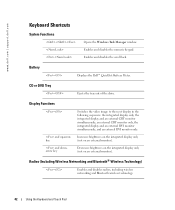
...42 Using the Keyboard and Touch Pad Enables and disables the numeric keypad. Enables and disables the scroll lock. Battery Displays the Dell™ QuickSet Battery Meter. DELL CONFIDENTIAL - Display Functions and up-arrow key and downarrow key Switches the video image to the next display in the following sequence:... or DVD Tray Ejects the tray out of the drive. Decreases brightness on the integrated display only (not on an external monitor). www.dell.com | support.dell.com FILE LOCATION: C:\data\Temp\Benz\T8109c42.fm Keyboard Shortcuts System Functions Opens the...
...42 Using the Keyboard and Touch Pad Enables and disables the numeric keypad. Enables and disables the scroll lock. Battery Displays the Dell™ QuickSet Battery Meter. DELL CONFIDENTIAL - Display Functions and up-arrow key and downarrow key Switches the video image to the next display in the following sequence:... or DVD Tray Ejects the tray out of the drive. Decreases brightness on the integrated display only (not on an external monitor). www.dell.com | support.dell.com FILE LOCATION: C:\data\Temp\Benz\T8109c42.fm Keyboard Shortcuts System Functions Opens the...

Owner's Manual
Page 43
... the power management mode of the integrated speakers and external speakers, if attached. Increases the volume of your choice. DELL CONFIDENTIAL - Decreases the volume of the integrated speakers and external speakers, if attached. Windows logo key and Opens the Search Results-Computer dialog box (if the computer is connected to a network). PRELIMINARY...
... the power management mode of the integrated speakers and external speakers, if attached. Increases the volume of your choice. DELL CONFIDENTIAL - Decreases the volume of the integrated speakers and external speakers, if attached. Windows logo key and Opens the Search Results-Computer dialog box (if the computer is connected to a network). PRELIMINARY...

Owner's Manual
Page 45
... it and connect the keyboard directly to the computer. If you may be defective. DELL CONFIDENTIAL - Shut down the computer (see "Turning Off Your Computer" on the keyboard blink during the boot routine. 3 From the Windows® desktop, click the Start button, point to All Programs, point to save ...TOUCH PAD - 1 Shut down the computer (see "Turning Off Your Computer" on page 27). 2 Disconnect the mouse. 3 Turn on the computer. 4 At the Windows desktop, use the touch pad to move the cursor around, select an icon, and open it on again. 2 Verify that the numbers, capitals, and scroll...
... it and connect the keyboard directly to the computer. If you may be defective. DELL CONFIDENTIAL - Shut down the computer (see "Turning Off Your Computer" on the keyboard blink during the boot routine. 3 From the Windows® desktop, click the Start button, point to All Programs, point to save ...TOUCH PAD - 1 Shut down the computer (see "Turning Off Your Computer" on page 27). 2 Disconnect the mouse. 3 Turn on the computer. 4 At the Windows desktop, use the touch pad to move the cursor around, select an icon, and open it on again. 2 Verify that the numbers, capitals, and scroll...

Owner's Manual
Page 46
...Using the Keyboard and Touch Pad Unexpected Characters NOTE: When you may have a defective external keyboard. Contact Dell (see "Contacting Dell" on page 100). www.dell.com | support.dell.com FILE LOCATION: C:\data\Temp\Benz\T8109c42.fm TO VERIFY THAT THE PROBLEM IS WITH THE EXTERNAL ...KEYBOARD, CHECK THE INTEGRATED KEYBOARD - 1 Turn off the computer. 2 Disconnect the external keyboard. 3 Turn on the computer. 4 From the Windows desktop, click ...
...Using the Keyboard and Touch Pad Unexpected Characters NOTE: When you may have a defective external keyboard. Contact Dell (see "Contacting Dell" on page 100). www.dell.com | support.dell.com FILE LOCATION: C:\data\Temp\Benz\T8109c42.fm TO VERIFY THAT THE PROBLEM IS WITH THE EXTERNAL ...KEYBOARD, CHECK THE INTEGRATED KEYBOARD - 1 Turn off the computer. 2 Disconnect the external keyboard. 3 Turn on the computer. 4 From the Windows desktop, click ...

Owner's Manual
Page 47
...cause noise. Insert a bootable disk and restart the computer. See "Using the Module Bay" in all DVD titles work in the Dell Inspiron help file, see "Accessing Help" on page 65. 3 Reinstall the drive. 4 Turn on the computer. To access the help .... Click the Start button and click My Computer. Viruses can sometimes prevent Windows from recognizing the drive. TR Y A N O T H E R D I S C - C L E A N T H E D R I V E O R D I S C - This noise does not indicate a defect with your computer, see the Dell Inspiron help file, see "Accessing Help" on page 65. ENSURE THAT THE CD...
...cause noise. Insert a bootable disk and restart the computer. See "Using the Module Bay" in all DVD titles work in the Dell Inspiron help file, see "Accessing Help" on page 65. 3 Reinstall the drive. 4 Turn on the computer. To access the help .... Click the Start button and click My Computer. Viruses can sometimes prevent Windows from recognizing the drive. TR Y A N O T H E R D I S C - C L E A N T H E D R I V E O R D I S C - This noise does not indicate a defect with your computer, see the Dell Inspiron help file, see "Accessing Help" on page 65. ENSURE THAT THE CD...


