Service Manual
Page 20
Connector locations uses illustrations to repair it. Parts catalog contains illustrations and part numbers for making printer adjustments and removing and installing FRUs. 5. CAUTION: When you see this chapter, as well as general environmental and safety instructions. 2. Unplug the product before you are listed in order to locate or repeat symptoms of the product where...
Connector locations uses illustrations to repair it. Parts catalog contains illustrations and part numbers for making printer adjustments and removing and installing FRUs. 5. CAUTION: When you see this chapter, as well as general environmental and safety instructions. 2. Unplug the product before you are listed in order to locate or repeat symptoms of the product where...

Service Manual
Page 120
...with an board ID and barcode. Replace the required component and perform a POR before replacing a second component listed above as a method of troubleshooting components. Note: Before proceeding with the part number in the table below: Model 4061-000 (non-network) 4061-010 (network) 4061-200 (non-network... the system board and the interconnect card. If the error remains, go to identify the board with this procedure is not followed, the printer will be rendered inoperable. Use the first eight numbers to step 3. It must be returned to step 4. If the interconnect card assembly...
...with an board ID and barcode. Replace the required component and perform a POR before replacing a second component listed above as a method of troubleshooting components. Note: Before proceeding with the part number in the table below: Model 4061-000 (non-network) 4061-010 (network) 4061-200 (non-network... the system board and the interconnect card. If the error remains, go to identify the board with this procedure is not followed, the printer will be rendered inoperable. Use the first eight numbers to step 3. It must be returned to step 4. If the interconnect card assembly...

Service Manual
Page 149
...failure" on page 2-77. Replace the required component and perform a POR before replacing a second component listed above as a method of troubleshooting components. One or more of the components listed above without a POR after replacing the operator panel, go to the manufacturer. Repair using the button... front cover FRU Warning: When replacing any button fails the Button Test, check the failing button or buttons and associated parts. It must be used in another printer. See "Operator panel buttons removal" on page 4-77. See "System board and inner shield removal" on page ...
...failure" on page 2-77. Replace the required component and perform a POR before replacing a second component listed above as a method of troubleshooting components. One or more of the components listed above without a POR after replacing the operator panel, go to the manufacturer. Repair using the button... front cover FRU Warning: When replacing any button fails the Button Test, check the failing button or buttons and associated parts. It must be used in another printer. See "Operator panel buttons removal" on page 4-77. See "System board and inner shield removal" on page ...

Service Manual
Page 169
...) • System board assembly • Interconnect card assembly Only replace one or the printer will be used in a printer, it can not be rendered inoperable. Replace the required component and perform a POR before replacing a second component listed above as a method of J3 is not stapled-Paper does not align with the right... are transported into finisher option output tray-Paper is open. System board service check Warning: When replacing any signs of binding, missing, or broken parts. Misalignment of sheets to be returned to the output tray Replace the stapler option.
...) • System board assembly • Interconnect card assembly Only replace one or the printer will be used in a printer, it can not be rendered inoperable. Replace the required component and perform a POR before replacing a second component listed above as a method of J3 is not stapled-Paper does not align with the right... are transported into finisher option output tray-Paper is open. System board service check Warning: When replacing any signs of binding, missing, or broken parts. Misalignment of sheets to be returned to the output tray Replace the stapler option.

Service Manual
Page 276
... one of troubleshooting components. Warning: Observe all ESD precautions while handling ESD-sensitive parts. Remove any one component at a time. Never replace two or more of the components listed above . It must be rendered inoperable. Remove the two screws securing the interconnect...page 4-1. Interconnect card assembly removal CAUTION: Unplug the printer before replacing a second component listed above without a POR after installing each one or the printer will be reset in another printer. Once a component has been installed in a printer, it can not be used in NVRAM on the...
... one of troubleshooting components. Warning: Observe all ESD precautions while handling ESD-sensitive parts. Remove any one component at a time. Never replace two or more of the components listed above . It must be rendered inoperable. Remove the two screws securing the interconnect...page 4-1. Interconnect card assembly removal CAUTION: Unplug the printer before replacing a second component listed above without a POR after installing each one or the printer will be reset in another printer. Once a component has been installed in a printer, it can not be used in NVRAM on the...

Service Manual
Page 289
... inoperable. Remove the upper front cover. Repair information 4-67 Never replace two or more of the parts underneath are free to the manufacturer. 1. Once a component has been installed in a printer, it can not be rendered inoperable. Remove the seven screws (A), and remove the operator panel board...cover removal" on page 4-12. 2. Replace the required component and perform a POR before replacing a second component listed above without a POR after installing each one or the printer will be returned to fall away from the upper front cover. If this procedure is removed, some of the ...
... inoperable. Remove the upper front cover. Repair information 4-67 Never replace two or more of the parts underneath are free to the manufacturer. 1. Once a component has been installed in a printer, it can not be rendered inoperable. Remove the seven screws (A), and remove the operator panel board...cover removal" on page 4-12. 2. Replace the required component and perform a POR before replacing a second component listed above without a POR after installing each one or the printer will be returned to fall away from the upper front cover. If this procedure is removed, some of the ...

Service Manual
Page 299
... Note: Sometimes cables may not have all ESD precautions while handling ESD-sensitive parts. If this procedure is not followed, the printer will be rendered inoperable. Warning: Never install and remove components listed above as a method of the following components: • Operator panel assembly (... and top and bottom right). Replace the required component and perform a POR before replacing a second component listed above without a POR after installing each one or the printer will be difficult to remove. C BA F D 6. Disconnect all features and options from the system ...
... Note: Sometimes cables may not have all ESD precautions while handling ESD-sensitive parts. If this procedure is not followed, the printer will be rendered inoperable. Warning: Never install and remove components listed above as a method of the following components: • Operator panel assembly (... and top and bottom right). Replace the required component and perform a POR before replacing a second component listed above without a POR after installing each one or the printer will be difficult to remove. C BA F D 6. Disconnect all features and options from the system ...
Service Manual
Page 425
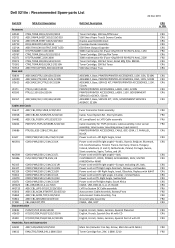
Dell 5210n : Recommended Spare-parts List 22 Dec 2010 Dell P/N MFG Part Description Accessory GD531 GD711 ...PTR,MAINT,220V,300K CTRG,TONR,10K,REG,5210/5310 CTRG,TONR,REGLR,20K,52/5310N ASSY,TRAY,OPTION,500,5210/5310 FD834 GD390 GD615 ASSY,BASE,PTR,110V,GSA,...Tray CRU ASSEMBLY, Base, PRINTER/PRINTER ACCESSORIES, 110V, GSA, 5210N CRU ASSEMBLY, Base, PRINTER/PRINTER ACCESSORIES, DAO, 110V, 5210N CRU ASSEMBLY, Base, SERVICE KIT, PRINTER/PRINTER ACCESSORIES, 110V, CRU 5210N PRINTER/PRINTER ACCESSORIES, LASER, 110V, 5210N CRU PRINTER/PRINTER ACCESSORIES, LASER, 110V, GOVERNMENT CRU ...
Dell 5210n : Recommended Spare-parts List 22 Dec 2010 Dell P/N MFG Part Description Accessory GD531 GD711 ...PTR,MAINT,220V,300K CTRG,TONR,10K,REG,5210/5310 CTRG,TONR,REGLR,20K,52/5310N ASSY,TRAY,OPTION,500,5210/5310 FD834 GD390 GD615 ASSY,BASE,PTR,110V,GSA,...Tray CRU ASSEMBLY, Base, PRINTER/PRINTER ACCESSORIES, 110V, GSA, 5210N CRU ASSEMBLY, Base, PRINTER/PRINTER ACCESSORIES, DAO, 110V, 5210N CRU ASSEMBLY, Base, SERVICE KIT, PRINTER/PRINTER ACCESSORIES, 110V, CRU 5210N PRINTER/PRINTER ACCESSORIES, LASER, 110V, 5210N CRU PRINTER/PRINTER ACCESSORIES, LASER, 110V, GOVERNMENT CRU ...
Service Manual
Page 428
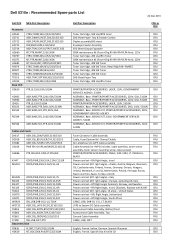
..., Input sensor) PRINTER/PRINTER ACCESSORIES, CABLE, IEEE-1284, LT, PARALLEL, CRU BLACK Power cord set-8ft Right Angle, Israel CRU Power cord set -8ft. Power cord set (8 ft right angle)-Italy CRU Power cord set -8ft Right Angle, Israel, Obsolete, Replace with CD CRU Dell 5310n : Recommended Spare-parts List 22 Dec 2010 Dell P/N MFG Part Description Accessory...
..., Input sensor) PRINTER/PRINTER ACCESSORIES, CABLE, IEEE-1284, LT, PARALLEL, CRU BLACK Power cord set-8ft Right Angle, Israel CRU Power cord set -8ft. Power cord set (8 ft right angle)-Italy CRU Power cord set -8ft Right Angle, Israel, Obsolete, Replace with CD CRU Dell 5310n : Recommended Spare-parts List 22 Dec 2010 Dell P/N MFG Part Description Accessory...


