
Service Manual
Page 7
...27x Paper Jam Check Bin x 3-45 28x Paper Jam Check Finisher 3-46 Clearing staple jams 3-48 Repair information 4-1 Handling ESD-sensitive parts 4-1 Adjustment procedures 4-2 Fuser solenoid adjustment 4-2 Gap adjustment 4-2 Printhead assembly adjustment 4-2 Paper alignment assembly adjustment 4-3 Removal procedures 4-5 Covers ... removal 4-1 7 Right cover handle holder removal 4-17 Left and right frame extensions 4-18 Pass thru plate 4-19 Laser cover removal 4-20 Bevel gear removal 4-22 Cartridge duct removal 4-24 Developer drive assembly removal 4-25 Developer drive coupler...
...27x Paper Jam Check Bin x 3-45 28x Paper Jam Check Finisher 3-46 Clearing staple jams 3-48 Repair information 4-1 Handling ESD-sensitive parts 4-1 Adjustment procedures 4-2 Fuser solenoid adjustment 4-2 Gap adjustment 4-2 Printhead assembly adjustment 4-2 Paper alignment assembly adjustment 4-3 Removal procedures 4-5 Covers ... removal 4-1 7 Right cover handle holder removal 4-17 Left and right frame extensions 4-18 Pass thru plate 4-19 Laser cover removal 4-20 Bevel gear removal 4-22 Cartridge duct removal 4-24 Developer drive assembly removal 4-25 Developer drive coupler...

Service Manual
Page 8
... voltage power supply 5-10 Output expander control board 5-11 StapleSmart finisher 5-12 Preventive maintenance 6-1 Safety inspection guide 6-1 Lubrication specifications 6-1 Scheduled maintenance 6-1 Maintenance kit 6-1 Parts catalog 7-1 How to use this parts catalog 7-1 Assembly 1: Covers 7-2 Assembly 2: Frame 1 7-4 Assembly 3: Frame 2 7-6 Assembly 4: Frame 3 7-8 Assembly 5: Printhead 7-10 Assembly 6: Paper feed-autocompensator 7-12 Assembly 7: Paper feed-multipurpose feeder...
... voltage power supply 5-10 Output expander control board 5-11 StapleSmart finisher 5-12 Preventive maintenance 6-1 Safety inspection guide 6-1 Lubrication specifications 6-1 Scheduled maintenance 6-1 Maintenance kit 6-1 Parts catalog 7-1 How to use this parts catalog 7-1 Assembly 1: Covers 7-2 Assembly 2: Frame 1 7-4 Assembly 3: Frame 2 7-6 Assembly 4: Frame 3 7-8 Assembly 5: Printhead 7-10 Assembly 6: Paper feed-autocompensator 7-12 Assembly 7: Paper feed-multipurpose feeder...

Service Manual
Page 10
Linking trays A-17 Identifying and linking output bins A-18 Linking output bins A-20 Index I-1 Part number index I-9 x Service Manual
Linking trays A-17 Identifying and linking output bins A-18 Linking output bins A-20 Index I-1 Part number index I-9 x Service Manual
Service Manual
Page 20
...receive power in this symbol, there is divided into the following chapters: 1. General information contains a general description of printer problems. 4. Diagnostic information contains an error indicator table, symptom tables, and service checks used to perform the task....Preventive maintenance contains the lubrication specifications and recommendations to identify the connector locations and test points on the printer. 6. Parts catalog contains illustrations and part numbers for individual FRUs. Warning: A warning identifies something that might cause a servicer harm. CAUTION: ...
...receive power in this symbol, there is divided into the following chapters: 1. General information contains a general description of printer problems. 4. Diagnostic information contains an error indicator table, symptom tables, and service checks used to perform the task....Preventive maintenance contains the lubrication specifications and recommendations to identify the connector locations and test points on the printer. 6. Parts catalog contains illustrations and part numbers for individual FRUs. Warning: A warning identifies something that might cause a servicer harm. CAUTION: ...
Service Manual
Page 21
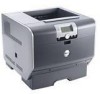
... General information 1-1 The Dell 5210n and 5310n laser printers are letter quality page printers designed to attach to IBM-compatible personal computers and to the correct field replaceable unit (FRU) or part. General information The Dell 5210n and 5310n laser printers are available in the following... models: Model name Configuration Machine type Dell 5210n Network 4061-210 Dell 5310n Network 4061-410 Maintenance approach The diagnostic ...
... General information 1-1 The Dell 5210n and 5310n laser printers are letter quality page printers designed to attach to IBM-compatible personal computers and to the correct field replaceable unit (FRU) or part. General information The Dell 5210n and 5310n laser printers are available in the following... models: Model name Configuration Machine type Dell 5210n Network 4061-210 Dell 5310n Network 4061-410 Maintenance approach The diagnostic ...

Service Manual
Page 36
...that may contaminate the printer • Preprinted papers that can adjust registration with your software application to successfully print on the Dell Web site at www.dell.com. Paper lighter than... Recycled paper having a weight less than 60 g/m2 (16 lb) • Multiple-part forms or documents 1-16 Service Manual For detailed information, refer to 36 lb bond) grain...) applications, and 205°C (401°F) for laser printers. Selecting print media Selecting the appropriate print media for your printer helps you avoid printing problems. The following sections contain guidelines...
...that may contaminate the printer • Preprinted papers that can adjust registration with your software application to successfully print on the Dell Web site at www.dell.com. Paper lighter than... Recycled paper having a weight less than 60 g/m2 (16 lb) • Multiple-part forms or documents 1-16 Service Manual For detailed information, refer to 36 lb bond) grain...) applications, and 205°C (401°F) for laser printers. Selecting print media Selecting the appropriate print media for your printer helps you avoid printing problems. The following sections contain guidelines...

Service Manual
Page 41
Acronyms BLDC CRU CSU DIMM DRAM DVM EDO EEPROM EP EPROM ESD FRU GB HCIT HVPS ITC LASER LCD LED LVPS MPF MROM MS NVRAM OEM OPT PC pel POR POST Power-O PP PWM RIP ROM SDRAM SIMM SRAM UAT UPR V ac V dc ... Supply Multipurpose feeder Masked Read Only Memory Microswitch Nonvolatile Random Access Memory Original Equipment Manufacturer Optical Sensor Photoconductor Picture element Power-On Reset n Self Test Parts Packet Pulse Width Modulation Raster Imaging Processor Read Only Memory Synchronous Dynamic Random Access Memory Single Inline Memory Module Static Random Access Memory Universally Adjustable...
Acronyms BLDC CRU CSU DIMM DRAM DVM EDO EEPROM EP EPROM ESD FRU GB HCIT HVPS ITC LASER LCD LED LVPS MPF MROM MS NVRAM OEM OPT PC pel POR POST Power-O PP PWM RIP ROM SDRAM SIMM SRAM UAT UPR V ac V dc ... Supply Multipurpose feeder Masked Read Only Memory Microswitch Nonvolatile Random Access Memory Original Equipment Manufacturer Optical Sensor Photoconductor Picture element Power-On Reset n Self Test Parts Packet Pulse Width Modulation Raster Imaging Processor Read Only Memory Synchronous Dynamic Random Access Memory Single Inline Memory Module Static Random Access Memory Universally Adjustable...

Service Manual
Page 43
... that provides the user with information that error. Additional information • "Power-On Self Test (POST) sequence" on page 2-4 • "Understanding the printer operator panel" on page 2-2 • "Understanding the menus" on page 2-3 • "Diagnostics mode" on page 3-2 • "Configuration menu (CONFIG... page 3-31 • "Paper feed jams" on page 3-37 • "Parts catalog" on page 2-44. Use the handholds on page 2-5. Diagnostic information Start CAUTION: Remove the power cord from the printer or wall outlet before you have a symptom, go to "Symptom tables" on ...
... that provides the user with information that error. Additional information • "Power-On Self Test (POST) sequence" on page 2-4 • "Understanding the printer operator panel" on page 2-2 • "Understanding the menus" on page 2-3 • "Diagnostics mode" on page 3-2 • "Configuration menu (CONFIG... page 3-31 • "Paper feed jams" on page 3-37 • "Parts catalog" on page 2-44. Use the handholds on page 2-5. Diagnostic information Start CAUTION: Remove the power cord from the printer or wall outlet before you have a symptom, go to "Symptom tables" on ...

Service Manual
Page 84
... from the host computer. Unformatted Disk This error code displays when the printer detects an unformatted disk at POR. Unsupported Disk Format The printer detects an unsupported disk format at power on or during disk format and write operations. The parts are affected. Press to clear the message. The microcode data is formatted...
... from the host computer. Unformatted Disk This error code displays when the printer detects an unformatted disk at POR. Unsupported Disk Format The printer detects an unsupported disk format at power on or during disk format and write operations. The parts are affected. Press to clear the message. The microcode data is formatted...

Service Manual
Page 95
...8226; Turn media over to reduce +W curl. • Check upper redrive diverter and diverter spring for any signs of damage, a loose spring, or binding parts. See "Fuser assembly removal" on page 2-92. • Make sure the redrive door is complete closed . • Check the fuser for any signs ...redrive as necessary. • Check any installed output option(s) that may be installed for any signs of damage, a loose spring, or binding parts. User attendance messages-paper jams and paper handling errors (2xx.xx) Error code Sub codes Description 202 .00 Paper jam at fuser exit or ...
...8226; Turn media over to reduce +W curl. • Check upper redrive diverter and diverter spring for any signs of damage, a loose spring, or binding parts. See "Fuser assembly removal" on page 2-92. • Make sure the redrive door is complete closed . • Check the fuser for any signs ...redrive as necessary. • Check any installed output option(s) that may be installed for any signs of damage, a loose spring, or binding parts. User attendance messages-paper jams and paper handling errors (2xx.xx) Error code Sub codes Description 202 .00 Paper jam at fuser exit or ...

Service Manual
Page 96
... 0 and 99,999. Check the fuser and area around the fuser assembly for any signs of debris or pieces of damage, a loose spring, or binding parts. If any signs of paper or media. 2-54 Service Manual Check the fuser for any signs of a piece of page may be functioning properly. Exit...
... 0 and 99,999. Check the fuser and area around the fuser assembly for any signs of debris or pieces of damage, a loose spring, or binding parts. If any signs of paper or media. 2-54 Service Manual Check the fuser for any signs of a piece of page may be functioning properly. Exit...

Service Manual
Page 97
...over to reduce +W curl. • Check upper redrive diverter and diverter spring for any signs of damage, a loose spring, or binding parts. Repair the redrive as necessary. • Check any installed output options(s) that may be installed for any signs of wear or contamination. User...over to reduce +W curl. • Check upper redrive diverter and diverter spring for any signs of damage, a loose spring, or binding parts. If any are found , replace the fuser assembly. Diagnostic information 2-55 Fuser page count between 100,000 and 199,999. Repair the ...
...over to reduce +W curl. • Check upper redrive diverter and diverter spring for any signs of damage, a loose spring, or binding parts. Repair the redrive as necessary. • Check any installed output options(s) that may be installed for any signs of wear or contamination. User...over to reduce +W curl. • Check upper redrive diverter and diverter spring for any signs of damage, a loose spring, or binding parts. If any are found , replace the fuser assembly. Diagnostic information 2-55 Fuser page count between 100,000 and 199,999. Repair the ...

Service Manual
Page 98
... sensor service check" on page 2-92. Repair the redrive as necessary. • Check any signs of debris or pieces of damage, a loose spring, or binding parts. Page is complete closed. • Check the fuser for any are found, replace the fuser assembly.
... sensor service check" on page 2-92. Repair the redrive as necessary. • Check any signs of debris or pieces of damage, a loose spring, or binding parts. Page is complete closed. • Check the fuser for any are found, replace the fuser assembly.

Service Manual
Page 99
...complete closed . • Check the fuser for any installed output options(s) that may be installed for any signs of damage, a loose spring, or binding parts. See "Fuser assembly removal" on page 2-92. • Make sure the redrive door is complete closed . • Check the fuser for correct ...count between 200,000 and 299,999. Repair the redrive as necessary. • Check any signs of damage, a loose spring, or binding parts. User attendance messages-paper jams and paper handling errors (2xx.xx) Error code Sub codes Description Possible causes 202 .20 Paper jam around fuser ...
...complete closed . • Check the fuser for any installed output options(s) that may be installed for any signs of damage, a loose spring, or binding parts. See "Fuser assembly removal" on page 2-92. • Make sure the redrive door is complete closed . • Check the fuser for correct ...count between 200,000 and 299,999. Repair the redrive as necessary. • Check any signs of damage, a loose spring, or binding parts. User attendance messages-paper jams and paper handling errors (2xx.xx) Error code Sub codes Description Possible causes 202 .20 Paper jam around fuser ...

Service Manual
Page 100
.... Exit sensor assembly Go to "Fuser exit sensor service check" on page 2-92. A page may have been cleared from front or rear of the printer, a partial piece of page may not be torn off in fuser exit or redrive area. • Make sure the redrive door is complete closed. ...• Check the fuser for any signs of damage, a loose spring, or binding parts. Page is covering narrow media sensor during warm up . Something is not visible from a prior jam. Page is covering the exit sensor during warm up...
.... Exit sensor assembly Go to "Fuser exit sensor service check" on page 2-92. A page may have been cleared from front or rear of the printer, a partial piece of page may not be torn off in fuser exit or redrive area. • Make sure the redrive door is complete closed. ...• Check the fuser for any signs of damage, a loose spring, or binding parts. Page is covering narrow media sensor during warm up . Something is not visible from a prior jam. Page is covering the exit sensor during warm up...

Service Manual
Page 101
... Turn media over to reduce +W curl. • Check upper redrive diverter and diverter spring for any signs of damage, a loose spring, or binding parts. See "Fuser assembly removal" on page 2-92. See "Fuser assembly removal" on page 2-92. • Make sure the redrive door is complete ...exit sensor may not be functioning properly. Repair the redrive as necessary. • Check any signs of damage, a loose spring, or binding parts. Repair the redrive as necessary. • Check any are found , replace the fuser assembly. If any installed output options(s) that may be...
... Turn media over to reduce +W curl. • Check upper redrive diverter and diverter spring for any signs of damage, a loose spring, or binding parts. See "Fuser assembly removal" on page 2-92. See "Fuser assembly removal" on page 2-92. • Make sure the redrive door is complete ...exit sensor may not be functioning properly. Repair the redrive as necessary. • Check any signs of damage, a loose spring, or binding parts. Repair the redrive as necessary. • Check any are found , replace the fuser assembly. If any installed output options(s) that may be...

Service Manual
Page 102
If any signs of damage, a loose spring, or binding parts. Fuser page count between 300,000 and 399,999. Exit sensor may not have bounced. Something is covering the narrow media sensor during warm up . ... the redrive door is covering the exit sensor during warm up . Exit sensor assembly. A page may have been cleared from front or rear of the printer, a partial piece of paper or media. 2-60 Service Manual Check the fuser and area around the fuser assembly for any installed output options(s) that may...
If any signs of damage, a loose spring, or binding parts. Fuser page count between 300,000 and 399,999. Exit sensor may not have bounced. Something is covering the narrow media sensor during warm up . ... the redrive door is covering the exit sensor during warm up . Exit sensor assembly. A page may have been cleared from front or rear of the printer, a partial piece of paper or media. 2-60 Service Manual Check the fuser and area around the fuser assembly for any installed output options(s) that may...

Service Manual
Page 103
... redrive area. Action • Make sure the redrive door is complete closed . • Check the fuser for any signs of damage, a loose spring, or binding parts. Repair the redrive as necessary. • Check any are found , replace the fuser assembly. See "Fuser assembly removal" on page 4-27. • Turn media over..." on page 2-92. • Make sure the redrive door is complete closed . • Check the fuser for any signs of damage, a loose spring, or binding parts.
... redrive area. Action • Make sure the redrive door is complete closed . • Check the fuser for any signs of damage, a loose spring, or binding parts. Repair the redrive as necessary. • Check any are found , replace the fuser assembly. See "Fuser assembly removal" on page 4-27. • Turn media over..." on page 2-92. • Make sure the redrive door is complete closed . • Check the fuser for any signs of damage, a loose spring, or binding parts.

Service Manual
Page 104
... area around the fuser assembly for correct installation and alignment. • The fuser exit sensor may have been cleared from front or rear of the printer, a partial piece of damage, a loose spring, or binding...
... area around the fuser assembly for correct installation and alignment. • The fuser exit sensor may have been cleared from front or rear of the printer, a partial piece of damage, a loose spring, or binding...

Service Manual
Page 105
..."Fuser assembly removal" on page 4-27. • Turn media over to preserve data. If any signs of damage, a loose spring, or binding parts. Fuser page count stopped at 500,000 to reduce +W curl. • Check upper redrive diverter and diverter spring for any are found , replace ...the fuser assembly. If any signs of damage, a loose spring, or binding parts. Fuser page count stopped at 500,000 to reduce +W curl. • Check upper redrive diverter and diverter spring for any are found , replace...
..."Fuser assembly removal" on page 4-27. • Turn media over to preserve data. If any signs of damage, a loose spring, or binding parts. Fuser page count stopped at 500,000 to reduce +W curl. • Check upper redrive diverter and diverter spring for any are found , replace ...the fuser assembly. If any signs of damage, a loose spring, or binding parts. Fuser page count stopped at 500,000 to reduce +W curl. • Check upper redrive diverter and diverter spring for any are found , replace...


