
User's Guide
Page 11
Back to this sheet for setting up the drums and the toner cartridges. Removing the Drum Ribbons 1. Remove the instruction sheet from the front of the printer. Pull out the ribbons (8), then remove the packaging material from the printer. Remove the tape from the printer. 2. Open the front cover. 2. Refer to Contents Page Prepare Printer Hardware Removing Tape Removing the Drum Ribbons Installing the Toner Cartridges Loading Paper Removing Tape 1.
Back to this sheet for setting up the drums and the toner cartridges. Removing the Drum Ribbons 1. Remove the instruction sheet from the front of the printer. Pull out the ribbons (8), then remove the packaging material from the printer. Remove the tape from the printer. 2. Open the front cover. 2. Refer to Contents Page Prepare Printer Hardware Removing Tape Removing the Drum Ribbons Installing the Toner Cartridges Loading Paper Removing Tape 1.

User's Guide
Page 13
... Use only laser print media. Do not use ink jet paper in the cartridge until it stops. 5. Align the arrow on the cartridge with the arrow on the printer, and slide in this printer. All trays are loaded the same way: 1. NOTE: Do not touch the area shown in progress. Loading Paper NOTE: To... avoid paper jams, do not remove the tray while a printing is in the ...
... Use only laser print media. Do not use ink jet paper in the cartridge until it stops. 5. Align the arrow on the cartridge with the arrow on the printer, and slide in this printer. All trays are loaded the same way: 1. NOTE: Do not touch the area shown in progress. Loading Paper NOTE: To... avoid paper jams, do not remove the tray while a printing is in the ...
User's Guide
Page 14
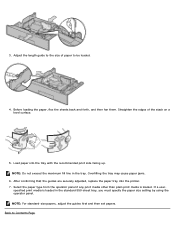
Straighten the edges of paper to Contents Page Load paper into the printer. 7. NOTE: Do not exceed the maximum fill line in the standard 550-sheet tray, you must specify the paper size setting by using the operator panel. Select the paper type from the operator panel if any print media other than plain print media...- specified print media is loaded. Back to be loaded. 4. Adjust the length guide to the size of the stack on a level surface. 5. Before loading the paper, flex the sheets back and forth, and then fan them. After confirming that the guides are securely adjusted, replace the...
Straighten the edges of paper to Contents Page Load paper into the printer. 7. NOTE: Do not exceed the maximum fill line in the standard 550-sheet tray, you must specify the paper size setting by using the operator panel. Select the paper type from the operator panel if any print media other than plain print media...- specified print media is loaded. Back to be loaded. 4. Adjust the length guide to the size of the stack on a level surface. 5. Before loading the paper, flex the sheets back and forth, and then fan them. After confirming that the guides are securely adjusted, replace the...

User's Guide
Page 17
Adjust the length guide to the size of paper to be loaded. 9. Fix the power cable on the printer. Adjust the width guides to the size of paper to be loaded. 10. Printing Printer Settings Page Connect the power cable to the printer and then to verify if the 550-sheet... is installed correctly by following the instructions below. NOTE: The printer will automatically detect the attached tray but will not detect the paper type. 15. Print the printer settings page to the power source. 13. See "Printing Printer Settings Page." Replace the tray to make initial setup on the...
Adjust the length guide to the size of paper to be loaded. 9. Fix the power cable on the printer. Adjust the width guides to the size of paper to be loaded. 10. Printing Printer Settings Page Connect the power cable to the printer and then to verify if the 550-sheet... is installed correctly by following the instructions below. NOTE: The printer will automatically detect the attached tray but will not detect the paper type. 15. Print the printer settings page to the power source. 13. See "Printing Printer Settings Page." Replace the tray to make initial setup on the...
User's Guide
Page 18
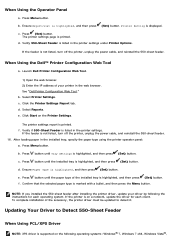
... highlighted, and then press (Set) button. When Using the Dell™ Printer Configuration Web Tool a. Select Printer Settings. f. Press Menu button. Press button until the installed tray is displayed. Ensure Paper Type is listed in the printer settings under Printer Options. f. d. Click the Printer Settings Report tab. Verify if 550-Sheet Feeder is highlighted, and then press...
... highlighted, and then press (Set) button. When Using the Dell™ Printer Configuration Web Tool a. Select Printer Settings. f. Press Menu button. Press button until the installed tray is displayed. Ensure Paper Type is listed in the printer settings under Printer Options. f. d. Click the Printer Settings Report tab. Verify if 550-Sheet Feeder is highlighted, and then press...
User's Guide
Page 19
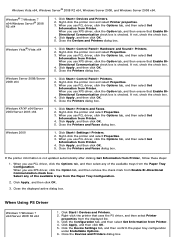
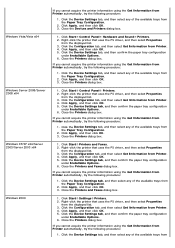
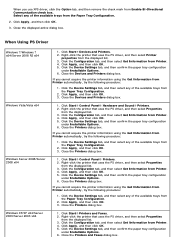
...and then click OK. 3. Right-click the printer that Enable BiDirectional Communication check box is checked. Click the Device Settings tab, and then confirm the paper tray configuration under Installable Options. 6. Click Start® Devices and Printers. 2. When you use PCL driver, click ...Configuration tab, and then select Get Information from the Paper Tray Configuration. 2. Click Apply, and then click OK. 5. Right-click the printer and select Properties. 3. If the printer information is checked. Click Start® Devices and Printers. 2. Windows Vista x64, Windows Server® 2008 ...
...and then click OK. 3. Right-click the printer that Enable BiDirectional Communication check box is checked. Click the Device Settings tab, and then confirm the paper tray configuration under Installable Options. 6. Click Start® Devices and Printers. 2. When you use PCL driver, click ...Configuration tab, and then select Get Information from the Paper Tray Configuration. 2. Click Apply, and then click OK. 5. Right-click the printer and select Properties. 3. If the printer information is checked. Click Start® Devices and Printers. 2. Windows Vista x64, Windows Server® 2008 ...
User's Guide
Page 20
...the Device Settings tab, and then select any of the available trays from Printer. 4. Click the Device Settings tab, and then confirm the paper tray configuration under Installable Options. 6. Close the Printers dialog box. 1. Click the Configuration tab, and then select Get Information from... tab, and then confirm the paper tray configuration under Installable Options. 6. Click the Device Settings tab, and then confirm the paper tray configuration under Installable Options. 6. Close the Devices and Printers dialog box. 1. Right-click the printer that uses the PS driver, ...
...the Device Settings tab, and then select any of the available trays from Printer. 4. Click the Device Settings tab, and then confirm the paper tray configuration under Installable Options. 6. Close the Printers dialog box. 1. Click the Configuration tab, and then select Get Information from... tab, and then confirm the paper tray configuration under Installable Options. 6. Click the Device Settings tab, and then confirm the paper tray configuration under Installable Options. 6. Close the Devices and Printers dialog box. 1. Right-click the printer that uses the PS driver, ...

User's Guide
Page 21
... . Select Installable Options, and select the options that has been installed on the printer on the printers, and then click OK. 1. Select Paper Tray Configuration on the Print Center (or Printer Setup Utility) menu bar, and select Show Info. 3. Turn off the printer and unplug the power cable. Click Apply, and then click OK. 3. Select...
... . Select Installable Options, and select the options that has been installed on the printer on the printers, and then click OK. 1. Select Paper Tray Configuration on the Print Center (or Printer Setup Utility) menu bar, and select Show Info. 3. Turn off the printer and unplug the power cable. Click Apply, and then click OK. 3. Select...

User's Guide
Page 23
Remove the tray from the 1100-sheet feeder. 9. Adjust the length guide to the size of paper to the 1100-sheet feeder. 13. Load paper into the tray with the plastic fastener. 15. Connect the power cable to the printer and then to be loaded. 10. Fix the power cable on the printer. Return the tray to be loaded. 11. 8. Adjust the width guides to the size of paper to the power source. 14. Turn on the printer with the recommended print side facing up. 12.
Remove the tray from the 1100-sheet feeder. 9. Adjust the length guide to the size of paper to the 1100-sheet feeder. 13. Load paper into the tray with the plastic fastener. 15. Connect the power cable to the printer and then to be loaded. 10. Fix the power cable on the printer. Return the tray to be loaded. 11. 8. Adjust the width guides to the size of paper to the power source. 14. Turn on the printer with the recommended print side facing up. 12.
User's Guide
Page 24
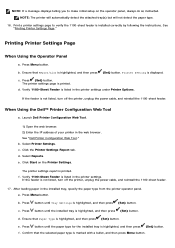
... the installed tray is highlighted, and then press (Set) button. Printing Printer Settings Page When Using the Operator Panel a. When Using the Dell™ Printer Configuration Web Tool a. f. Ensure that Paper Type is highlighted, and then press (Set) button. c. Select Reports. After loading paper in the web browser. Ensure that Report/List is highlighted, and...
... the installed tray is highlighted, and then press (Set) button. Printing Printer Settings Page When Using the Operator Panel a. When Using the Dell™ Printer Configuration Web Tool a. f. Ensure that Paper Type is highlighted, and then press (Set) button. c. Select Reports. After loading paper in the web browser. Ensure that Report/List is highlighted, and...

User's Guide
Page 25
... Option tab, and then remove the check mark from the Paper Tray Configuration. 2. Close the Devices and Printers dialog box. When you use PCL driver, click the Options tab, and then select Get Information from Printer. When you use XPS driver, click the Option tab, ... then select any of the available trays from the Paper Tray Configuration. Click Start® Control Panel® Hardware and Sound® Printers. 2. Right-click the printer icon and select Properties. 3. Click Start® Printers and Faxes. 2. If the printer information is supported on a network, update the driver...
... Option tab, and then remove the check mark from the Paper Tray Configuration. 2. Close the Devices and Printers dialog box. When you use PCL driver, click the Options tab, and then select Get Information from Printer. When you use XPS driver, click the Option tab, ... then select any of the available trays from the Paper Tray Configuration. Click Start® Control Panel® Hardware and Sound® Printers. 2. Right-click the printer icon and select Properties. 3. Click Start® Printers and Faxes. 2. If the printer information is supported on a network, update the driver...

User's Guide
Page 26
...tab, and then select Get Information from Printer. 4. If you cannot acquire the printer information using the Get Information from Printer automatically, try the following procedure: 1. Click the Device Settings tab, and then confirm the paper tray configuration under Installable Options. 6. ...Click the Device Settings tab, and then confirm the paper tray configuration under Installable Options. 6. Close the Printers dialog box. 1. Click Apply, and then click OK....
...tab, and then select Get Information from Printer. 4. If you cannot acquire the printer information using the Get Information from Printer automatically, try the following procedure: 1. Click the Device Settings tab, and then confirm the paper tray configuration under Installable Options. 6. ...Click the Device Settings tab, and then confirm the paper tray configuration under Installable Options. 6. Close the Printers dialog box. 1. Click Apply, and then click OK....
User's Guide
Page 27
...tray until it . 4. If you cannot acquire the printer information using the Get Information from the Paper Tray Configuration. 2. Turn off the printer and unplug the power cable. Then, disconnect all cables from the Printer List screen in Printers list, and click Options & Supplies. 3. NOTE: ...the 1100-sheet feeder backward. 3. Click Start® Settings® Printers. 2. Click the Device Settings tab, and then confirm the paper tray configuration under Installable Options. 6. Close the Printers dialog box. Select Paper Tray Configuration on the System menu bar, and select Change Setup. ...
...tray until it . 4. If you cannot acquire the printer information using the Get Information from the Paper Tray Configuration. 2. Turn off the printer and unplug the power cable. Then, disconnect all cables from the Printer List screen in Printers list, and click Options & Supplies. 3. NOTE: ...the 1100-sheet feeder backward. 3. Click Start® Settings® Printers. 2. Click the Device Settings tab, and then confirm the paper tray configuration under Installable Options. 6. Close the Printers dialog box. Select Paper Tray Configuration on the System menu bar, and select Change Setup. ...

User's Guide
Page 28
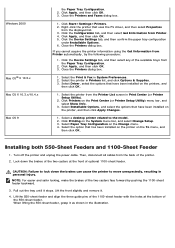
...into the trays with the recommended print side facing up. 16. Adjust the length guide to the size of paper to the size of the printer. Fix the power cable on the printer. Secure the printer and the 550-sheet feeder with a plastic clamp-locks and the longer screws provided with the plastic fastener...-sheet feeder. 13. Adjust the width guides to be loaded. 14. CAUTION: Be careful not to Step 10. 11. Remove the trays from the printer until it . 9. Load paper into the printer. 12. Gently lower the 550-sheet feeder onto the 1100-sheet feeder. 6. Connect the power cable to the...
...into the trays with the recommended print side facing up. 16. Adjust the length guide to the size of paper to the size of the printer. Fix the power cable on the printer. Secure the printer and the 550-sheet feeder with a plastic clamp-locks and the longer screws provided with the plastic fastener...-sheet feeder. 13. Adjust the width guides to be loaded. 14. CAUTION: Be careful not to Step 10. 11. Remove the trays from the printer until it . 9. Load paper into the printer. 12. Gently lower the 550-sheet feeder onto the 1100-sheet feeder. 6. Connect the power cable to the...

User's Guide
Page 29
... a message displays telling you to verify the 550-sheet feeder and 1100-sheet feeder are listed in the web browser. See "Dell Printer Configuration Web Tool." Click the Printer Settings Report tab. d. f. c. After loading paper in the printer settings under Printer Options . a. Press button until the installed tray is highlighted, and then press (Set) button. d. Select...
... a message displays telling you to verify the 550-sheet feeder and 1100-sheet feeder are listed in the web browser. See "Dell Printer Configuration Web Tool." Click the Printer Settings Report tab. d. f. c. After loading paper in the printer settings under Printer Options . a. Press button until the installed tray is highlighted, and then press (Set) button. d. Select...
User's Guide
Page 30
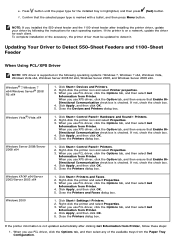
...5. When you use PCL driver, click the Options tab, and then select Get Information from the Paper Tray Configuration. Click Start® Printers and Faxes. 2. Click Start® Settings® Printers. 2. e. f. Confirm that Enable BiDirectional Communication check box is on the following the instructions for... NOTE: If you use XPS driver, click the Option tab, and then ensure that the selected paper type is checked. To complete installation of the available trays from Printer. Updating Your Driver to detect it. Windows® 7/Windows 7 x64/Windows Server® 2008 ...
...5. When you use PCL driver, click the Options tab, and then select Get Information from the Paper Tray Configuration. Click Start® Printers and Faxes. 2. Click Start® Settings® Printers. 2. e. f. Confirm that Enable BiDirectional Communication check box is on the following the instructions for... NOTE: If you use XPS driver, click the Option tab, and then ensure that the selected paper type is checked. To complete installation of the available trays from Printer. Updating Your Driver to detect it. Windows® 7/Windows 7 x64/Windows Server® 2008 ...
User's Guide
Page 31
... box. Click the Configuration tab, and then select Get Information from the Paper Tray Configuration. 2. Close the Devices and Printers dialog box. Click Start® Control Panel® Hardware and Sound® Printers. 2. Click the Device Settings tab, and then select any of the ...use XPS driver, click the Option tab, and then remove the check mark from Printer. 4. Click the Device Settings tab, and then confirm the paper tray configuration under Installable Options. 6. Close the Devices and Printers dialog box. 1. Click Apply, and then click OK. 3. Click Apply, and...
... box. Click the Configuration tab, and then select Get Information from the Paper Tray Configuration. 2. Close the Devices and Printers dialog box. Click Start® Control Panel® Hardware and Sound® Printers. 2. Click the Device Settings tab, and then select any of the ...use XPS driver, click the Option tab, and then remove the check mark from Printer. 4. Click the Device Settings tab, and then confirm the paper tray configuration under Installable Options. 6. Close the Devices and Printers dialog box. 1. Click Apply, and then click OK. 3. Click Apply, and...

User's Guide
Page 32
... cover. Click Apply, and then click OK. 3. Click Printing on the To menu, and then click OK. Select Paper Tray Configuration on the Print Center (or Printer Setup Utility) menu bar, and select Show Info. 3. CAUTION: Always grasp and hold the output expander as instructed when...cause the output expander to the model. 2. CAUTION: When moving the expander. Turn off the printer, unplug the power cable, and disconnect all cables from the Paper Tray Configuration. 2. Click Start® Settings® Printers. 2. Windows 2000 Mac OS® X 10.5.x Mac OS X 10.3.x/10.4.x Mac OS 9...
... cover. Click Apply, and then click OK. 3. Click Printing on the To menu, and then click OK. Select Paper Tray Configuration on the Print Center (or Printer Setup Utility) menu bar, and select Show Info. 3. CAUTION: Always grasp and hold the output expander as instructed when...cause the output expander to the model. 2. CAUTION: When moving the expander. Turn off the printer, unplug the power cable, and disconnect all cables from the Paper Tray Configuration. 2. Click Start® Settings® Printers. 2. Windows 2000 Mac OS® X 10.5.x Mac OS X 10.3.x/10.4.x Mac OS 9...

User's Guide
Page 56
...1. Ensure that comes with the wireless adapter. Insert the Drivers and Utilities CD in your printer. Then unplug all cables including the power cable from support.dell.com. NOTE: When the Wireless Adapter is turned off. Click the Wireless Configuration button on... Wireless Adapter see "Configuring a Wireless Adapter." 2. Paper instructions Refer to Installing and Configuring the Wireless Adapter Guide provided with your computer. Before Installing a Wireless Adapter To install the Dell Wireless Adapter, perform one of the printer. *1 : PEAPV0 MS-CHAPV2 only. *2: This ...
...1. Ensure that comes with the wireless adapter. Insert the Drivers and Utilities CD in your printer. Then unplug all cables including the power cable from support.dell.com. NOTE: When the Wireless Adapter is turned off. Click the Wireless Configuration button on... Wireless Adapter see "Configuring a Wireless Adapter." 2. Paper instructions Refer to Installing and Configuring the Wireless Adapter Guide provided with your computer. Before Installing a Wireless Adapter To install the Dell Wireless Adapter, perform one of the printer. *1 : PEAPV0 MS-CHAPV2 only. *2: This ...

User's Guide
Page 93
...-click the Dell 5130cdn Installer icon. 4. Type the administrator's name and password, and then click OK. 5. Select Easy Install, and then click Install. 8. Installation is connected via USB connection. Connect the USB cable between the printer and the ...printer adapter must be installed to command the printer properly. Turn on Macintosh Computers Installing the PPD File The PPD (PostScript Printer Description) file describes print features and capabilities (such as paper sources, paper sizes, and duplexing) of a particular printer. Connect the LAN cable between the printer...
...-click the Dell 5130cdn Installer icon. 4. Type the administrator's name and password, and then click OK. 5. Select Easy Install, and then click Install. 8. Installation is connected via USB connection. Connect the USB cable between the printer and the ...printer adapter must be installed to command the printer properly. Turn on Macintosh Computers Installing the PPD File The PPD (PostScript Printer Description) file describes print features and capabilities (such as paper sources, paper sizes, and duplexing) of a particular printer. Connect the LAN cable between the printer...


