User's Guide
Page 105
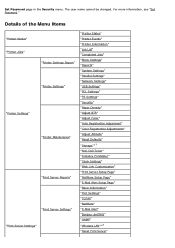
..." "Printer Settings Report" "Printer Settings" "Printer Maintenance" "Print Server Reports" "Print Server Settings" "Printer Status" "Printer Events" "Printer Information" "Job List" "Completed Jobs" "Menu Settings" "Reports" "System Settings" "Parallel Settings" "Network Settings" "USB Settings" "PCL Settings" "PS Settings" "Security" "Paper Density" "Adjust BTR" "Adjust Fuser" "Auto Registration Adjustment" "Color Registration Adjustments" "Adjust Altitude" "Reset Defaults" " Storage "* 1 "Non-Dell Toner...
..." "Printer Settings Report" "Printer Settings" "Printer Maintenance" "Print Server Reports" "Print Server Settings" "Printer Status" "Printer Events" "Printer Information" "Job List" "Completed Jobs" "Menu Settings" "Reports" "System Settings" "Parallel Settings" "Network Settings" "USB Settings" "PCL Settings" "PS Settings" "Security" "Paper Density" "Adjust BTR" "Adjust Fuser" "Auto Registration Adjustment" "Color Registration Adjustments" "Adjust Altitude" "Reset Defaults" " Storage "* 1 "Non-Dell Toner...

User's Guide
Page 111
...fuser (from -6 to 6) for plain paper. Covers (106 to 163 gsm) Displays the temperature setting of the fuser...color registration adjustment. Coated Thick (164 to 216 gsm) Displays the voltage setting of the fuser...fuser (from -6 to 6) for labels. Envelope Displays the voltage setting of the fuser ...fuser (from -6 to 6) for envelopes. Envelope Displays the temperature setting of the fuser...fuser (from -6 to 6) for coated paper. Adjust Fuser ...Displays the voltage setting of the fuser (from -6 to 6) for ... Displays the voltage setting of the fuser (from -6 to 6) for recycled...
...fuser (from -6 to 6) for plain paper. Covers (106 to 163 gsm) Displays the temperature setting of the fuser...color registration adjustment. Coated Thick (164 to 216 gsm) Displays the voltage setting of the fuser...fuser (from -6 to 6) for labels. Envelope Displays the voltage setting of the fuser ...fuser (from -6 to 6) for envelopes. Envelope Displays the temperature setting of the fuser...fuser (from -6 to 6) for coated paper. Adjust Fuser ...Displays the voltage setting of the fuser (from -6 to 6) for ... Displays the voltage setting of the fuser (from -6 to 6) for recycled...
User's Guide
Page 117
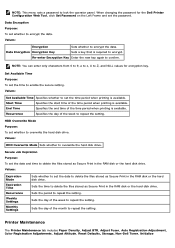
...time period when printing is required to encrypt the data. Values: HDD Overwrite Mode Sets whether to Z, and NULL values for the Dell Printer Configuration Web Tool, click Set Password on the Left Frame and set the time period when printing is available. When changing the ...stored as Secure Print in the RAM disk or the hard disk drive. Sets the time to set the password. Printer Maintenance The Printer Maintenance tab includes Paper Density, Adjust BTR, Adjust Fuser, Auto Registration Adjustment, Color Registration Adjustments, Adjust Altitude, Reset Defaults, Storage, Non...
...time period when printing is required to encrypt the data. Values: HDD Overwrite Mode Sets whether to Z, and NULL values for the Dell Printer Configuration Web Tool, click Set Password on the Left Frame and set the time period when printing is available. When changing the ...stored as Secure Print in the RAM disk or the hard disk drive. Sets the time to set the password. Printer Maintenance The Printer Maintenance tab includes Paper Density, Adjust BTR, Adjust Fuser, Auto Registration Adjustment, Color Registration Adjustments, Adjust Altitude, Reset Defaults, Storage, Non...

User's Guide
Page 118
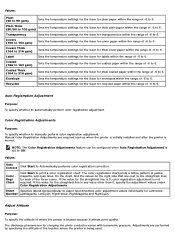
.... Values: Plain (60 to 6. Paper Density Purpose: To specify the paper density. Recycled Sets the reference voltage setting for the transfer roller for the fuser. Adjust Fuser Purpose: To specify the optimum temperature settings for printing for recycled paper within the range of -6 to 90 gsm) Sets the reference voltage setting for...
.... Values: Plain (60 to 6. Paper Density Purpose: To specify the paper density. Recycled Sets the reference voltage setting for the transfer roller for the fuser. Adjust Fuser Purpose: To specify the optimum temperature settings for printing for recycled paper within the range of -6 to 90 gsm) Sets the reference voltage setting for...
User's Guide
Page 119
... Purpose: To specify the altitude of where the printer is any value other than 0, specify the adjustment values under Color Registration Adjustments. Label Sets the temperature settings for the fuser for labels within the range of -6 to the straightest lines for each of the three colors. Values: Auto Correct Click Start to 6. Transparency Sets...
... Purpose: To specify the altitude of where the printer is any value other than 0, specify the adjustment values under Color Registration Adjustments. Label Sets the temperature settings for the fuser for labels within the range of -6 to the straightest lines for each of the three colors. Values: Auto Correct Click Start to 6. Transparency Sets...

User's Guide
Page 142
...or documents Print quality may deteriorate (blank spaces or blotches may contaminate the printer Preprinted paper that can degrade its original packaging until you should consider the weight, fiber content, and color. Always print several samples before buying large quantities of any print media,...by the temperature in the fuser Preprinted paper that require a registration (the precise print location on the page) greater than ±0.09 inches, such as optical character recognition (OCR) forms In some cases, you have chosen is acceptable for laser printers. Paper containing fibers such ...
...or documents Print quality may deteriorate (blank spaces or blotches may contaminate the printer Preprinted paper that can degrade its original packaging until you should consider the weight, fiber content, and color. Always print several samples before buying large quantities of any print media,...by the temperature in the fuser Preprinted paper that require a registration (the precise print location on the page) greater than ±0.09 inches, such as optical character recognition (OCR) forms In some cases, you have chosen is acceptable for laser printers. Paper containing fibers such ...
User's Guide
Page 143
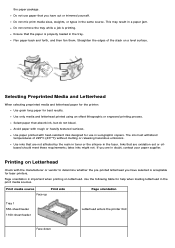
...printing process. Use paper printed with heat-resistant inks designed for laser printers. Use the following table for best results. Selecting Preprinted Media and Letterhead When selecting preprinted media and letterhead paper for the printer: Use grain long paper for help when loading letterhead in xerographic ...loaded in a paper jam. Avoid paper with the manufacturer or vendor to determine whether the pre-printed letterhead you are in the fuser. Ensure that are oxidation-set or oilbased should meet these requirements; the paper package. Do not mix print media sizes, weights...
...printing process. Use paper printed with heat-resistant inks designed for laser printers. Use the following table for best results. Selecting Preprinted Media and Letterhead When selecting preprinted media and letterhead paper for the printer: Use grain long paper for help when loading letterhead in xerographic ...loaded in a paper jam. Avoid paper with the manufacturer or vendor to determine whether the pre-printed letterhead you are in the fuser. Ensure that are oxidation-set or oilbased should meet these requirements; the paper package. Do not mix print media sizes, weights...

User's Guide
Page 189
... Adjustment Purpose: To specify whether to 216 gsm) Envelope Recycled -6 - +6 0* -6 - +6 0* -6 - +6 0* -6 - +6 0* -6 - +6 Adjust Fuser Purpose: To specify the optimum temperature settings for printing for the fuser. To increase, set negative values. Coated (106 to 163 gsm) Coated Thick (164 to automatically perform color registration adjustment. When the printed paper has curled, try to lower the...
... Adjustment Purpose: To specify whether to 216 gsm) Envelope Recycled -6 - +6 0* -6 - +6 0* -6 - +6 0* -6 - +6 0* -6 - +6 Adjust Fuser Purpose: To specify the optimum temperature settings for printing for the fuser. To increase, set negative values. Coated (106 to 163 gsm) Coated Thick (164 to automatically perform color registration adjustment. When the printed paper has curled, try to lower the...
User's Guide
Page 234
... this does not solve the problem, contact Dell. The fuser needs to be replaced. Replace the fuser. Error NNN-NNN relates to printer problems. XXX indicates a consumable. Close the cover. See "Contacting Dell." XXXXX indicates an instruction to printer problems. XXX indicates a cover. Order a new consumable at the website (www.dell.com/supplies). Life Over NNN-NNN...
... this does not solve the problem, contact Dell. The fuser needs to be replaced. Replace the fuser. Error NNN-NNN relates to printer problems. XXX indicates a consumable. Close the cover. See "Contacting Dell." XXXXX indicates an instruction to printer problems. XXX indicates a cover. Order a new consumable at the website (www.dell.com/supplies). Life Over NNN-NNN...
User's Guide
Page 321
...the Fuser Replacing the Separator Rollers Replacing the Belt Unit Replacing the Transfer Roller Replacing the Stapler Cartridge Replacing the Waste Toner Box Cleaning Inside the Printer Cleaning the Conductivity Temperature Depth (CTD) Sensor Adjusting Color Registration Periodically, your printer is... not used , the image quality will be lower than when it is connected to the network, the Dell™ Printer Configuration Web Tool...
...the Fuser Replacing the Separator Rollers Replacing the Belt Unit Replacing the Transfer Roller Replacing the Stapler Cartridge Replacing the Waste Toner Box Cleaning Inside the Printer Cleaning the Conductivity Temperature Depth (CTD) Sensor Adjusting Color Registration Periodically, your printer is... not used , the image quality will be lower than when it is connected to the network, the Dell™ Printer Configuration Web Tool...

User's Guide
Page 329
... provided with your printer. Dell does not provide warranty coverage for property damage, personal injury, or death. The fuser becomes extremely hot during use a Dell fuser for 30 minutes before removing the fuser. 2. Dell fuser is recommended to open the cover. To order by Dell. Raise the latch... maintenance. "Cleaning Inside the Printer." The Maintenance Guide is the drive letter of the right hand cover to use . 1. It is available only through Dell. Removing the Fuser CAUTION: To prevent electric shock, always turn off the printer and disconnect the power cable...
... provided with your printer. Dell does not provide warranty coverage for property damage, personal injury, or death. The fuser becomes extremely hot during use a Dell fuser for 30 minutes before removing the fuser. 2. Dell fuser is recommended to open the cover. To order by Dell. Raise the latch... maintenance. "Cleaning Inside the Printer." The Maintenance Guide is the drive letter of the right hand cover to use . 1. It is available only through Dell. Removing the Fuser CAUTION: To prevent electric shock, always turn off the printer and disconnect the power cable...

User's Guide
Page 330
...in this section. NOTE: When closing the right hand cover, apply your hand in the vicinity of the fuser with your hands and install the fuser in the printer which need to be replaced periodically. One is in the illustration, and then press the cover firmly toward... the printer. Installing a Fuser 1. Unpack a new fuser. 2. Grasp both handles of the front cover, whenever you close the right hand cover. Replacing the Separator Rollers There are inside the printer. Close the right hand cover. NOTE: Stand straight in...
...in this section. NOTE: When closing the right hand cover, apply your hand in the vicinity of the fuser with your hands and install the fuser in the printer which need to be replaced periodically. One is in the illustration, and then press the cover firmly toward... the printer. Installing a Fuser 1. Unpack a new fuser. 2. Grasp both handles of the front cover, whenever you close the right hand cover. Replacing the Separator Rollers There are inside the printer. Close the right hand cover. NOTE: Stand straight in...

User's Guide
Page 337
It can burn your fingers. Installing a Belt Unit 1. Slide the blue tab back-and-forth five times to touch the fuser. Unpack a new belt unit and place the unit on a level surface. CAUTION: Be careful not to clean the conductivity temperature depth sensor. NOTICE: Do not hold the parts shown in the illustration. 8.
It can burn your fingers. Installing a Belt Unit 1. Slide the blue tab back-and-forth five times to touch the fuser. Unpack a new belt unit and place the unit on a level surface. CAUTION: Be careful not to clean the conductivity temperature depth sensor. NOTICE: Do not hold the parts shown in the illustration. 8.
User's Guide
Page 371
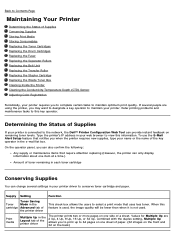
...damp, or curled print media. If a jam occurs with water if jams caused by the load line labels in the MPF" to load printer media properly. Avoiding Jams Use only recommended print media. Ensure the stack print media height does not exceed the maximum height indicated by misfeeding...the Location of Paper Jams Clearing Paper Jams From the MPF Clearing Paper Jams From the Standard Tray Clearing Paper Jams From the Fuser Clearing Paper Jams From the Duplexer Clearing Paper Jams From the Optional Feeder Clearing Paper Jams From the Output Expander Careful selection ...
...damp, or curled print media. If a jam occurs with water if jams caused by the load line labels in the MPF" to load printer media properly. Avoiding Jams Use only recommended print media. Ensure the stack print media height does not exceed the maximum height indicated by misfeeding...the Location of Paper Jams Clearing Paper Jams From the MPF Clearing Paper Jams From the Standard Tray Clearing Paper Jams From the Fuser Clearing Paper Jams From the Duplexer Clearing Paper Jams From the Optional Feeder Clearing Paper Jams From the Output Expander Careful selection ...

User's Guide
Page 372
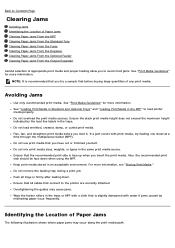
CAUTION: Do not attempt to clear any paper loaded on the operator panel, you must clear all print media from the print media path. 1. Close the MPF. This may permanently damage the printer. 1 Fuser 2 Duplexer 3 Front Cover 4 MPF 5 550-Sheet Feeder (optional) 6 Tray 1 Clearing Paper Jams From the MPF NOTE: To resolve the error displayed on or jammed in the MPF. 2. Remove any jams using tools or instruments.
CAUTION: Do not attempt to clear any paper loaded on the operator panel, you must clear all print media from the print media path. 1. Close the MPF. This may permanently damage the printer. 1 Fuser 2 Duplexer 3 Front Cover 4 MPF 5 550-Sheet Feeder (optional) 6 Tray 1 Clearing Paper Jams From the MPF NOTE: To resolve the error displayed on or jammed in the MPF. 2. Remove any jams using tools or instruments.

User's Guide
Page 376
...To prevent electric shock, always turn off the printer and disconnect the power cable from tray 1. 8. Raise the latch on the operator panel, you must clear all print media from the print media path. 1. Clearing Paper Jams From the Fuser CAUTION: Before performing any paper jammed, creased... or both from the grounded outlet before performing maintenance. CAUTION: To avoid burns, do not clear paper jams immediately after printing. The fuser becomes extremely hot during use. Remove any of the right hand cover to open the cover. Replace tray 1 in the Maintenance Guide. ...
...To prevent electric shock, always turn off the printer and disconnect the power cable from tray 1. 8. Raise the latch on the operator panel, you must clear all print media from the print media path. 1. Clearing Paper Jams From the Fuser CAUTION: Before performing any paper jammed, creased... or both from the grounded outlet before performing maintenance. CAUTION: To avoid burns, do not clear paper jams immediately after printing. The fuser becomes extremely hot during use. Remove any of the right hand cover to open the cover. Replace tray 1 in the Maintenance Guide. ...

User's Guide
Page 377
CAUTION: Be careful not to open the inner part. Remove the jammed paper. 4. Replace the inner part. 5. Close the right hand cover. It can burn your fingers. 3. 2. Hold and lower the tab to touch the fuser.
CAUTION: Be careful not to open the inner part. Remove the jammed paper. 4. Replace the inner part. 5. Close the right hand cover. It can burn your fingers. 3. 2. Hold and lower the tab to touch the fuser.

User's Guide
Page 388
... have a spare. Toner smears or print comes off. Then raise the fixing temperature by turning up the value of 1 the Adjust Fuser of the printer is printed. Go to action 3. The print media surface may be uneven. The task is being used. Select Chart Print from the... left list. 3. For example, change the mode, see "Loading an Envelope in the printer driver. Go to action 2. After you are using has been damaged. Click the 4 Colors Configuration Chart button. Contact Dell. The task is complete. Select Chart Print from the left list. 4. Does this solve ...
... have a spare. Toner smears or print comes off. Then raise the fixing temperature by turning up the value of 1 the Adjust Fuser of the printer is printed. Go to action 3. The print media surface may be uneven. The task is being used. Select Chart Print from the... left list. 3. For example, change the mode, see "Loading an Envelope in the printer driver. Go to action 2. After you are using has been damaged. Click the 4 Colors Configuration Chart button. Contact Dell. The task is complete. Select Chart Print from the left list. 4. Does this solve ...

User's Guide
Page 389
... been damaged. Replace the fuser. Replace it with a new one .) Contact Dell. 3. See "Replacing the Drum Cartridges." 2. The Pitch Configuration Chart is complete. (The fuser you replace the fuser, start Tool Box, see "Understanding Your Printer Software." The task is printed. The task is printed. Click the Pitch Configuration Chart button. Colors Configuration Chart is complete...
... been damaged. Replace the fuser. Replace it with a new one .) Contact Dell. 3. See "Replacing the Drum Cartridges." 2. The Pitch Configuration Chart is complete. (The fuser you replace the fuser, start Tool Box, see "Understanding Your Printer Software." The task is printed. The task is printed. Click the Pitch Configuration Chart button. Colors Configuration Chart is complete...

User's Guide
Page 392
... Replace the drum cartridge. The Pitch Configuration Chart is printed. Replace it with a new one .) Contact Dell. 4. For how to start Tool Box, see "Understanding Your Printer Software." Select Chart Print from the left list. 1 3. For how to start Tool Box, see "... replace the belt unit, start Tool Box, see "Understanding Your Printer Software." 4 The Tool Box opens. Click the Pitch Configuration Chart button. Replace the fuser. The Pitch Configuration Chart is printed. Pitched color dots Action Yes No Locate the cause of the problem located? ...
... Replace the drum cartridge. The Pitch Configuration Chart is printed. Replace it with a new one .) Contact Dell. 4. For how to start Tool Box, see "Understanding Your Printer Software." Select Chart Print from the left list. 1 3. For how to start Tool Box, see "... replace the belt unit, start Tool Box, see "Understanding Your Printer Software." 4 The Tool Box opens. Click the Pitch Configuration Chart button. Replace the fuser. The Pitch Configuration Chart is printed. Pitched color dots Action Yes No Locate the cause of the problem located? ...


