User Guide
Page 21
... plain paper. Covers Displays the voltage settings of the transfer roller for labels. Label Displays the voltage settings of the transfer roller for envelopes. Coated Thick Displays the voltage settings of the transfer roller for cover. Envelope Displays the voltage settings of the... fuser for coated thick paper. Transparency Displays the temperature settings of the transfer roller for coated thick paper. Coated Thick Displays the temperature settings of the transfer roller for plain paper. Coated Displays the voltage settings of the fuser for transparencies...
... plain paper. Covers Displays the voltage settings of the transfer roller for labels. Label Displays the voltage settings of the transfer roller for envelopes. Coated Thick Displays the voltage settings of the transfer roller for cover. Envelope Displays the voltage settings of the... fuser for coated thick paper. Transparency Displays the temperature settings of the transfer roller for coated thick paper. Coated Thick Displays the temperature settings of the transfer roller for plain paper. Coated Displays the voltage settings of the fuser for transparencies...
User Guide
Page 27
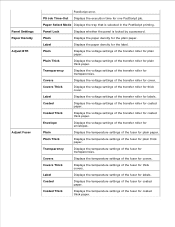
...transfer roller. Panel Lock Specifies whether to limit access to confirm. Re-enter Password Type the new password again to the menus. Values: Paper Density Purpose: To specify the paper density. New Password Sets a password to limit access to the menus. Printer Maintenance Printer... Maintenance tab includes Paper Density, Adjust BTR, Adjust Fuser, Auto Registration Adjustment, Color Registration Adjustments, Clean Developer, Reset Defaults, Clear Storage, Format HDD, Non-Dell Toner, Initialize PrintMeter, and Web Link ...
...transfer roller. Panel Lock Specifies whether to limit access to confirm. Re-enter Password Type the new password again to the menus. Values: Paper Density Purpose: To specify the paper density. New Password Sets a password to limit access to the menus. Printer Maintenance Printer... Maintenance tab includes Paper Density, Adjust BTR, Adjust Fuser, Auto Registration Adjustment, Color Registration Adjustments, Clean Developer, Reset Defaults, Clear Storage, Format HDD, Non-Dell Toner, Initialize PrintMeter, and Web Link ...
User Guide
Page 28
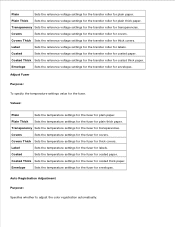
... Registration Adjustment Purpose: Specifies whether to adjust the color registration automatically. Covers Sets the reference voltage settings for the transfer roller for labels. Label Sets the reference voltage settings for the transfer roller for covers. Covers Sets the temperature settings for ... Sets the reference voltage settings for the transfer roller for covers. Envelope Sets the reference voltage settings for the transfer roller for thick covers. Covers Thick Sets the reference voltage settings for the transfer roller for envelopes. Values: Plain Sets the temperature...
... Registration Adjustment Purpose: Specifies whether to adjust the color registration automatically. Covers Sets the reference voltage settings for the transfer roller for labels. Label Sets the reference voltage settings for the transfer roller for covers. Covers Sets the temperature settings for ... Sets the reference voltage settings for the transfer roller for covers. Envelope Sets the reference voltage settings for the transfer roller for thick covers. Covers Thick Sets the reference voltage settings for the transfer roller for envelopes. Values: Plain Sets the temperature...
User Guide
Page 59
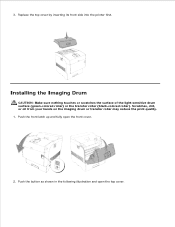
Replace the top cover by inserting its front side into the printer first. Push the button as shown in the following illustration and open the front cover. 2. Push the front latch up and fully open the top cover. Installing the Imaging Drum CAUTION: Make sure nothing touches or scratches the surface of the light-sensitive drum surface (green-colored roller) or the transfer roller (black-colored roller). 3. Scratches, dirt, or oil from your hands on the imaging drum or transfer roller may reduce the print quality. 1.
Replace the top cover by inserting its front side into the printer first. Push the button as shown in the following illustration and open the front cover. 2. Push the front latch up and fully open the top cover. Installing the Imaging Drum CAUTION: Make sure nothing touches or scratches the surface of the light-sensitive drum surface (green-colored roller) or the transfer roller (black-colored roller). 3. Scratches, dirt, or oil from your hands on the imaging drum or transfer roller may reduce the print quality. 1.

User Guide
Page 61
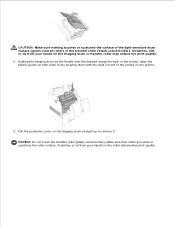
Make sure that nothing touches or scratches the roller surface. Close the front cover. Close the top cover. 7. Pull the protective cover on the roller deteriorates print quality. 6. NOTICE: Do not allow the surface covered with a protective sheet to remove it. Scratches or oil from your hands on the imaging drum straight up to come into the printer without correctly aligning the rollers with anything. 5. NOTICE: Do not touch the transfer roller (black-colored roller). NOTICE: Lowering the cartridge into contact with the slots can damage the cartridge.
Make sure that nothing touches or scratches the roller surface. Close the front cover. Close the top cover. 7. Pull the protective cover on the roller deteriorates print quality. 6. NOTICE: Do not allow the surface covered with a protective sheet to remove it. Scratches or oil from your hands on the imaging drum straight up to come into the printer without correctly aligning the rollers with anything. 5. NOTICE: Do not touch the transfer roller (black-colored roller). NOTICE: Lowering the cartridge into contact with the slots can damage the cartridge.
User Guide
Page 147
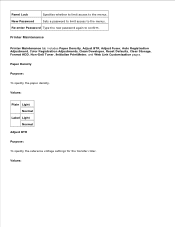
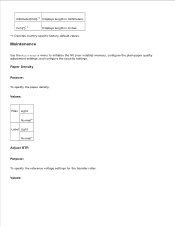
Values: inch(")* 1 Displays length in millimeters. Paper Density Purpose: To specify the paper density. Values: Plain Light Normal* Label Light Normal* Adjust BTR Purpose: To specify the reference voltage settings for the transfer roller. Maintenance Use the Maintenance menu to initialize the NV (non-volatile) memory, configure the plain paper quality adjustment settings, and configure the security settings. millimeter(mm)*1 Displays length in inches. *1 Denotes country-specific factory default values.
Values: inch(")* 1 Displays length in millimeters. Paper Density Purpose: To specify the paper density. Values: Plain Light Normal* Label Light Normal* Adjust BTR Purpose: To specify the reference voltage settings for the transfer roller. Maintenance Use the Maintenance menu to initialize the NV (non-volatile) memory, configure the plain paper quality adjustment settings, and configure the security settings. millimeter(mm)*1 Displays length in inches. *1 Denotes country-specific factory default values.

User Guide
Page 225
... for 10 seconds, and then turn on . The electrical outlet is on the printer. Troubleshooting Guide Basic Printer Problems Printing Problems Print Quality Problems Wireless Adapter Problem Other Problem Contacting Service Troubleshooting Guide Installing Printer Drivers Basic Printer Problems Some printer problems can be easy to install the Fuser Basic toner cleaning instructions The section... any switch or breaker. This often fixes the problem. How to replace the Imaging Drum How to install the Toner Cartridge How to install the Transfer Roller How to resolve.
... for 10 seconds, and then turn on . The electrical outlet is on the printer. Troubleshooting Guide Basic Printer Problems Printing Problems Print Quality Problems Wireless Adapter Problem Other Problem Contacting Service Troubleshooting Guide Installing Printer Drivers Basic Printer Problems Some printer problems can be easy to install the Fuser Basic toner cleaning instructions The section... any switch or breaker. This often fixes the problem. How to replace the Imaging Drum How to install the Toner Cartridge How to install the Transfer Roller How to resolve.
User Guide
Page 227
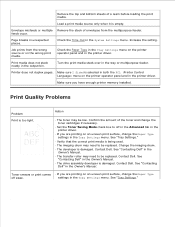
.... · The imaging drum may need to be replaced. Action · The toner may be replaced. Contact Dell. See "Contacting Dell" in the printer driver. Contact Dell. Contact Dell. settings in the output bin. Print media does not stack neatly in the Tray Settings menu. Make sure you...Verify that the correct print media is selected in both the PCL (Printer Control Language) menu on the printer operator panel and in the Owner's Manual. · The transfer roller may need to be low. See "Contacting Dell" in the Tray Settings menu. Envelope misfeeds or multiple Remove the ...
.... · The imaging drum may need to be replaced. Action · The toner may be replaced. Contact Dell. See "Contacting Dell" in the printer driver. Contact Dell. Contact Dell. settings in the output bin. Print media does not stack neatly in the Tray Settings menu. Make sure you...Verify that the correct print media is selected in both the PCL (Printer Control Language) menu on the printer operator panel and in the Owner's Manual. · The transfer roller may need to be low. See "Contacting Dell" in the Tray Settings menu. Envelope misfeeds or multiple Remove the ...
User Guide
Page 281
...or oil from your hands on the imaging drum or transfer roller may reduce the print quality. 2. Holding the imaging drum by the handle with the flat part facing the back of the printer, align the plastic guides on the printer. 3. Make sure that nothing touches or scratches the ...surface of the arrows on both sides of the imaging drum with the slots in front of the light-sensitive drum surface (green-colored roller) or the transfer roller (black-colored roller). Scratches or...
...or oil from your hands on the imaging drum or transfer roller may reduce the print quality. 2. Holding the imaging drum by the handle with the flat part facing the back of the printer, align the plastic guides on the printer. 3. Make sure that nothing touches or scratches the ...surface of the arrows on both sides of the imaging drum with the slots in front of the light-sensitive drum surface (green-colored roller) or the transfer roller (black-colored roller). Scratches or...
User Guide
Page 285
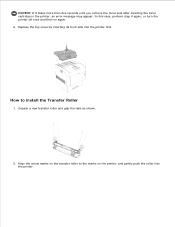
Unpack a new transfer roller and grip the tabs as shown. 2. NOTICE: If it takes more than five seconds until you remove the toner seal after inserting the toner cartridge in the printer, an error message may appear. How to the marks on the printer, and gently push the roller into the printer first. Align the arrow marks on again. 6. Replace the top cover by inserting its front side into the printer. In this case, perform step 4 again, or turn the printer off once and then on the transfer roller to install the Transfer Roller 1.
Unpack a new transfer roller and grip the tabs as shown. 2. NOTICE: If it takes more than five seconds until you remove the toner seal after inserting the toner cartridge in the printer, an error message may appear. How to the marks on the printer, and gently push the roller into the printer first. Align the arrow marks on again. 6. Replace the top cover by inserting its front side into the printer. In this case, perform step 4 again, or turn the printer off once and then on the transfer roller to install the Transfer Roller 1.
User Guide
Page 286
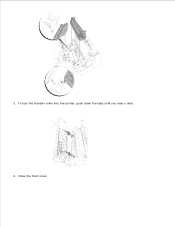
To lock the transfer roller into the printer, push down the tabs until you hear a click. 4. Close the front cover. 3.
To lock the transfer roller into the printer, push down the tabs until you hear a click. 4. Close the front cover. 3.
User Guide
Page 290
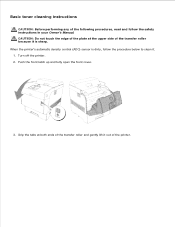
Push the front latch up and fully open the front cover. 3. Turn off the printer. 2. CAUTION: Do not touch the edge of the plate at both ends of the transfer roller and gently lift it out of the printer. Basic toner cleaning instructions CAUTION: Before performing any of the following procedures, read and follow the procedure below to clean it. 1. When the printer's automatic density control (ADC) sensor is sharp. Grip the tabs at the upper side of the transfer roller because it is dirty, follow the safety instructions in your Owner's Manual.
Push the front latch up and fully open the front cover. 3. Turn off the printer. 2. CAUTION: Do not touch the edge of the plate at both ends of the transfer roller and gently lift it out of the printer. Basic toner cleaning instructions CAUTION: Before performing any of the following procedures, read and follow the procedure below to clean it. 1. When the printer's automatic density control (ADC) sensor is sharp. Grip the tabs at the upper side of the transfer roller because it is dirty, follow the safety instructions in your Owner's Manual.

User Guide
Page 291
CAUTION: Do not touch inside the printer with a clean dry cloth or cotton swab. Some parts may be hot. Allow time for the printer to cool before attempting to remove parts in contact with the automatic density control (ADC) sensor window. NOTE: Do not allow anything hard to clean the window. 5. Grip the tabs as shown. Replace the transfer roller. Gently wipe the automatic density control (ADC) sensor window with your hands. Do not use excessive force to come in this area. 4.
CAUTION: Do not touch inside the printer with a clean dry cloth or cotton swab. Some parts may be hot. Allow time for the printer to cool before attempting to remove parts in contact with the automatic density control (ADC) sensor window. NOTE: Do not allow anything hard to clean the window. 5. Grip the tabs as shown. Replace the transfer roller. Gently wipe the automatic density control (ADC) sensor window with your hands. Do not use excessive force to come in this area. 4.
User Guide
Page 292
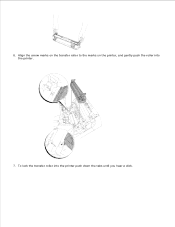
To lock the transfer roller into the printer. 7. 5. 6. Align the arrow marks on the transfer roller to the marks on the printer, and gently push the roller into the printer push down the tabs until you hear a click.
To lock the transfer roller into the printer. 7. 5. 6. Align the arrow marks on the transfer roller to the marks on the printer, and gently push the roller into the printer push down the tabs until you hear a click.
User Guide
Page 295
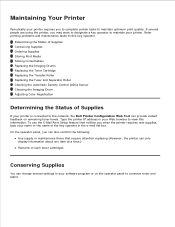
... Imaging Drums Replacing the Toner Cartridge Replacing the Transfer Roller Replacing the Fuser and Separator Roller Cleaning the Automatic Density Control (ADC) Sensor Cleaning the Imaging Drum Adjusting Color Registration Determining the Status of Supplies If your printer is connected to conserve toner and paper. To...your software program or on the operator panel to the network, the Dell Printer Configuration Web Tool can change several people are using the printer, you to complete certain tasks to maintain your printer. On the operator panel, you can also confirm the following: Any...
... Imaging Drums Replacing the Toner Cartridge Replacing the Transfer Roller Replacing the Fuser and Separator Roller Cleaning the Automatic Density Control (ADC) Sensor Cleaning the Imaging Drum Adjusting Color Registration Determining the Status of Supplies If your printer is connected to conserve toner and paper. To...your software program or on the operator panel to the network, the Dell Printer Configuration Web Tool can change several people are using the printer, you to complete certain tasks to maintain your printer. On the operator panel, you can also confirm the following: Any...
User Guide
Page 299
... cool before attempting to remove it. NOTICE: Do not touch the transfer roller (black-colored roller). Make sure that nothing touches or scratches the surface of the light-sensitive drum surface (green-colored roller) or the transfer roller (black-colored roller). CAUTION: Do not touch inside the printer with the slots in this area. Scratches or oil from the imaging drum...
... cool before attempting to remove it. NOTICE: Do not touch the transfer roller (black-colored roller). Make sure that nothing touches or scratches the surface of the light-sensitive drum surface (green-colored roller) or the transfer roller (black-colored roller). CAUTION: Do not touch inside the printer with the slots in this area. Scratches or oil from the imaging drum...
User Guide
Page 304
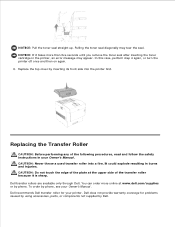
... seal after inserting the toner cartridge in burns and injuries. Dell recommends Dell transfer roller for problems caused by using accessories, parts, or components not supplied by inserting its front side into a fire. Dell does not provide warranty coverage for your printer. Replace the top cover by Dell. Pulling the toner seal diagonally may appear. NOTICE: If...
... seal after inserting the toner cartridge in burns and injuries. Dell recommends Dell transfer roller for problems caused by using accessories, parts, or components not supplied by inserting its front side into a fire. Dell does not provide warranty coverage for your printer. Replace the top cover by Dell. Pulling the toner seal diagonally may appear. NOTICE: If...
User Guide
Page 305
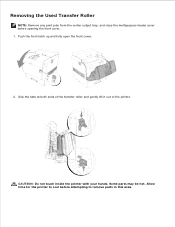
CAUTION: Do not touch inside the printer with your hands. Push the front latch up and fully open the front cover. 2. Some parts may be hot. Allow time for the printer to remove parts in this area. 1. Grip the tabs at both ends of the transfer roller and gently lift it out of the printer. Removing the Used Transfer Roller NOTE: Remove any print jobs from the center output tray, and close the multipurpose feeder cover before attempting to cool before opening the front cover. 1.
CAUTION: Do not touch inside the printer with your hands. Push the front latch up and fully open the front cover. 2. Some parts may be hot. Allow time for the printer to remove parts in this area. 1. Grip the tabs at both ends of the transfer roller and gently lift it out of the printer. Removing the Used Transfer Roller NOTE: Remove any print jobs from the center output tray, and close the multipurpose feeder cover before attempting to cool before opening the front cover. 1.
User Guide
Page 306
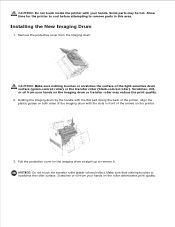
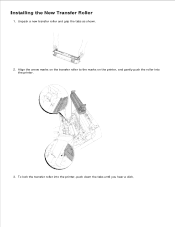
To lock the transfer roller into the printer. 3. Unpack a new transfer roller and grip the tabs as shown. 2. Align the arrow marks on the transfer roller to the marks on the printer, and gently push the roller into the printer, push down the tabs until you hear a click. Installing the New Transfer Roller 1.
To lock the transfer roller into the printer. 3. Unpack a new transfer roller and grip the tabs as shown. 2. Align the arrow marks on the transfer roller to the marks on the printer, and gently push the roller into the printer, push down the tabs until you hear a click. Installing the New Transfer Roller 1.
User Guide
Page 313
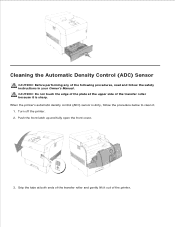
Turn off the printer. 2. Push the front latch up and fully open the front cover. 3. Grip the tabs at the upper side of the transfer roller because it is dirty, follow the procedure below to clean it out of the following procedures, read and follow the safety instructions in your Owner's Manual . When the printer's automatic density control (ADC) sensor is sharp. Cleaning the Automatic Density Control (ADC) Sensor CAUTION: Before performing any of the printer. CAUTION: Do not touch the edge of the plate at both ends of the transfer roller and gently lift it . 1.
Turn off the printer. 2. Push the front latch up and fully open the front cover. 3. Grip the tabs at the upper side of the transfer roller because it is dirty, follow the procedure below to clean it out of the following procedures, read and follow the safety instructions in your Owner's Manual . When the printer's automatic density control (ADC) sensor is sharp. Cleaning the Automatic Density Control (ADC) Sensor CAUTION: Before performing any of the printer. CAUTION: Do not touch the edge of the plate at both ends of the transfer roller and gently lift it . 1.


