User Guide
Page 5
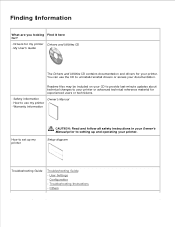
... in your Owner's Manual prior to setting up and operating your printer. User Settings - Finding Information What are you looking Find it here for? · Drivers for my printer Drivers and Utilities CD · My User's Guide The Drivers and Utilities CD contains documentation and drivers for experienced users or technicians. · Safety information Owner's Manual...
... in your Owner's Manual prior to setting up and operating your printer. User Settings - Finding Information What are you looking Find it here for? · Drivers for my printer Drivers and Utilities CD · My User's Guide The Drivers and Utilities CD contains documentation and drivers for experienced users or technicians. · Safety information Owner's Manual...
User Guide
Page 6
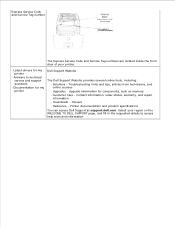
... technicians, and online courses · Upgrades - Select your printer. · Latest drivers for my Dell Support Website printer · Answers to access help tools and information. Upgrade information for components, such as memory · Customer Care - Contact information, order status, warranty, and repair information · Downloads - Drivers · Reference - Express Service Code and Service Tag...
... technicians, and online courses · Upgrades - Select your printer. · Latest drivers for my Dell Support Website printer · Answers to access help tools and information. Upgrade information for components, such as memory · Customer Care - Contact information, order status, warranty, and repair information · Downloads - Drivers · Reference - Express Service Code and Service Tag...
User Guide
Page 68
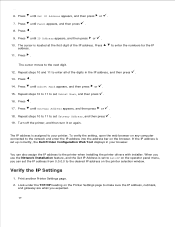
..., and then press or . 7. Repeat steps 10 to 11 to set up correctly, the Dell Printer Configuration Web Tool displays in the IP address, and then press . 13. Press . 17. Turn off the printer, and then turn it on the browser. If the IP address is located at the first ...digit of the digits in your printer. to enter the numbers for the IP The cursor moves to the printer when installing the printer drivers with installer. Press until IP Address appears, and then press or . 10. 4. 5. 6. Press . 9. Press ...
..., and then press or . 7. Repeat steps 10 to 11 to set up correctly, the Dell Printer Configuration Web Tool displays in the IP address, and then press . 13. Press . 17. Turn off the printer, and then turn it on the browser. If the IP address is located at the first ...digit of the digits in your printer. to enter the numbers for the IP The cursor moves to the printer when installing the printer drivers with installer. Press until IP Address appears, and then press or . 10. 4. 5. 6. Press . 9. Press ...
User Guide
Page 70
IBM Tivoli: \Utilities\SnapIns\IBM Tivoli CA Unicenter: \Utilities\SnapIns\CA Unicenter HP OpenView: \Utilities\SnapIns\HP OpenView Enterprise Console Management Modules The following enterprise console management modules and user's manuals are available on your Drivers and Utilities CD: IBM Tivoli® NetView® CA Unicenter® HP OpenView® To use the modules, go to the following directory on your CD and run each .exe file or .chm file.
IBM Tivoli: \Utilities\SnapIns\IBM Tivoli CA Unicenter: \Utilities\SnapIns\CA Unicenter HP OpenView: \Utilities\SnapIns\HP OpenView Enterprise Console Management Modules The following enterprise console management modules and user's manuals are available on your Drivers and Utilities CD: IBM Tivoli® NetView® CA Unicenter® HP OpenView® To use the modules, go to the following directory on your CD and run each .exe file or .chm file.
User Guide
Page 74
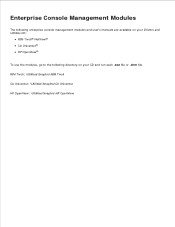
... or . If you installed the optional 500-sheet tray module after installing the printer driver, update your driver by following the instructions for each client. Click Apply, and then click OK. 5. Turn on a network, update the driver for the installed tray appears, and then press . 11. c. If the ...tray modules are not listed, turn off the printer, unplug the power cable, and reinstall the optional 500-sheet tray module. 10. When Using PCL driver Windows Vista™ 1. Press until the paper type for each operating system. Windows XP/XP ...
... or . If you installed the optional 500-sheet tray module after installing the printer driver, update your driver by following the instructions for each client. Click Apply, and then click OK. 5. Turn on a network, update the driver for the installed tray appears, and then press . 11. c. If the ...tray modules are not listed, turn off the printer, unplug the power cable, and reinstall the optional 500-sheet tray module. 10. When Using PCL driver Windows Vista™ 1. Press until the paper type for each operating system. Windows XP/XP ...
User Guide
Page 75
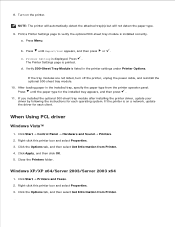
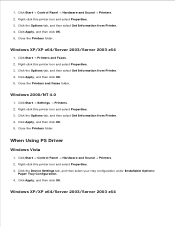
... Apply, and then click OK. Right-click this printer icon and select Properties. 3. When Using PS Driver Windows Vista 1. Right-click this printer icon and select Properties. 3. Right-click this printer icon and select Properties. 3. Close the Printers folder. Click Apply, and then click OK. 5. Right-click this printer icon and select Properties. 3. Windows 2000/NT...
... Apply, and then click OK. Right-click this printer icon and select Properties. 3. When Using PS Driver Windows Vista 1. Right-click this printer icon and select Properties. 3. Right-click this printer icon and select Properties. 3. Close the Printers folder. Click Apply, and then click OK. 5. Right-click this printer icon and select Properties. 3. Windows 2000/NT...
User Guide
Page 81
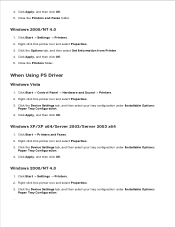
... Start Control Panel Hardware and Sound Printers. 2. Right-click this printer icon and select Properties. 3. Printer Setting is printed. d. When Using PCL driver Windows Vista 1. Click the Options tab, and then select Get Information from the printer operator panel. After loading paper in the printer settings under Printer Options. Right-click this printer icon and select Properties. 3. Click...
... Start Control Panel Hardware and Sound Printers. 2. Right-click this printer icon and select Properties. 3. Printer Setting is printed. d. When Using PCL driver Windows Vista 1. Click the Options tab, and then select Get Information from the printer operator panel. After loading paper in the printer settings under Printer Options. Right-click this printer icon and select Properties. 3. Click...
User Guide
Page 82
... form for each tray under Installable Options: Paper Tray Configuration. 4. Click Start Control Panel Hardware and Sound Printers. 2. Click Apply, and then click OK. Right-click this printer icon and select Properties. 3. When Using PS Driver Windows Vista 1. Click Apply, and then click OK. Click the Device Settings tab, and then select your...
... form for each tray under Installable Options: Paper Tray Configuration. 4. Click Start Control Panel Hardware and Sound Printers. 2. Click Apply, and then click OK. Right-click this printer icon and select Properties. 3. When Using PS Driver Windows Vista 1. Click Apply, and then click OK. Click the Device Settings tab, and then select your...

User Guide
Page 89
... not detect the paper type. 16. Press or . After loading paper in the printer settings under Printer Options. The Printer Settings page is installed correctly. d. c. a. Turn on a network, update the driver for each operating system. If you installed the optional 500-sheet tray module and 1000...-sheet tray module after installing the printer driver, update your driver by following the instructions for the installed tray appears, and then press . 18. Print a Printer Settings page to verify the optional 500-sheet tray module or 1000-sheet ...
... not detect the paper type. 16. Press or . After loading paper in the printer settings under Printer Options. The Printer Settings page is installed correctly. d. c. a. Turn on a network, update the driver for each operating system. If you installed the optional 500-sheet tray module and 1000...-sheet tray module after installing the printer driver, update your driver by following the instructions for the installed tray appears, and then press . 18. Print a Printer Settings page to verify the optional 500-sheet tray module or 1000-sheet ...
User Guide
Page 90
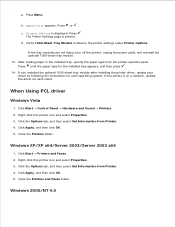
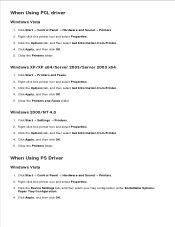
... and select Properties. 3. Click the Options tab, and then select Get Information from Printer. 4. Click Apply, and then click OK. 5. Click Start Control Panel Hardware and Sound Printers. 2. When Using PS Driver Windows Vista 1. Click the Device Settings tab, and then select your tray configuration under Installable Options: Paper Tray Configuration. 4. Click the...
... and select Properties. 3. Click the Options tab, and then select Get Information from Printer. 4. Click Apply, and then click OK. 5. Click Start Control Panel Hardware and Sound Printers. 2. When Using PS Driver Windows Vista 1. Click the Device Settings tab, and then select your tray configuration under Installable Options: Paper Tray Configuration. 4. Click the...
User Guide
Page 95
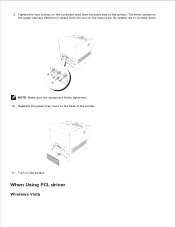
NOTE: Make sure the screws are different in shape from the back side of the printer. 11. Tighten the four screws on the controller card from the one on the lower side. When Using PCL driver Windows Vista 1. 2. Turn on the upper side are firmly tightened. 10. 9. Reattach the paper tray cover to confuse them. The three screws on the printer. Be careful not to the back of the printer.
NOTE: Make sure the screws are different in shape from the back side of the printer. 11. Tighten the four screws on the controller card from the one on the lower side. When Using PCL driver Windows Vista 1. 2. Turn on the upper side are firmly tightened. 10. 9. Reattach the paper tray cover to confuse them. The three screws on the printer. Be careful not to the back of the printer.
User Guide
Page 96
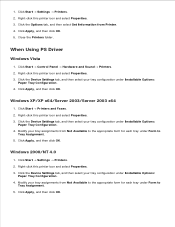
... Faxes. 2. Click the Options tab, and then select Get Information from Printer. 4. Right-click this printer icon and select Properties. 3. Right-click this printer icon and select Properties. 3. Click Apply, and then click OK. 5. When Using PS Driver Windows Vista 1. Click Apply, and then click OK. 5. Windows XP/XP x64/Server 2003/Server 2003...
... Faxes. 2. Click the Options tab, and then select Get Information from Printer. 4. Right-click this printer icon and select Properties. 3. Right-click this printer icon and select Properties. 3. Click Apply, and then click OK. 5. When Using PS Driver Windows Vista 1. Click Apply, and then click OK. 5. Windows XP/XP x64/Server 2003/Server 2003...
User Guide
Page 114
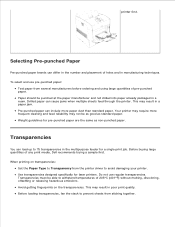
... Type to withstand temperatures of any print media, Dell recommends trying a sample first. This may not be... laser printers. Before buying large quantities of 205°C (401°F) without melting, discoloring, offsetting or releasing hazardous emissions. printer ...printer. Transparencies You can include more frequent cleaning and feed reliability may result in a ream. Transparencies must be punched at the paper manufacturer and not drilled into paper already packaged in poor print quality. Before loading transparencies, fan the stack to prevent sheets from the printer driver...
... Type to withstand temperatures of any print media, Dell recommends trying a sample first. This may not be... laser printers. Before buying large quantities of 205°C (401°F) without melting, discoloring, offsetting or releasing hazardous emissions. printer ...printer. Transparencies You can include more frequent cleaning and feed reliability may result in a ream. Transparencies must be punched at the paper manufacturer and not drilled into paper already packaged in poor print quality. Before loading transparencies, fan the stack to prevent sheets from the printer driver...
User Guide
Page 115
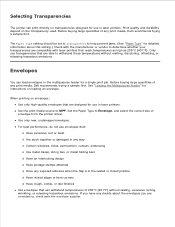
...in the multipurpose feeder for detailed information about the envelopes you have any print media, Dell recommends trying a sample first. For best performance, do not use in laser printers. Set the Paper Type to MPF. Before buying large quantities of any doubts about this... design Have postage stamps attached Have any print media, Dell recommends trying a sample first. Set the print media source to Envelope, and select the correct size of envelope from the printer driver. Selecting Transparencies The printer can withstand temperatures of 205°C (401°F) without...
...in the multipurpose feeder for detailed information about the envelopes you have any print media, Dell recommends trying a sample first. For best performance, do not use in laser printers. Set the Paper Type to MPF. Before buying large quantities of any doubts about this... design Have postage stamps attached Have any print media, Dell recommends trying a sample first. Set the print media source to Envelope, and select the correct size of envelope from the printer driver. Selecting Transparencies The printer can withstand temperatures of 205°C (401°F) without...
User Guide
Page 116
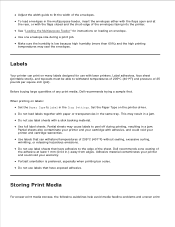
... labels that have exposed adhesive. Partial sheets may cause labels to peel off during a print job. Dell recommends zone coating of the adhesive at the rear, or with laser printers. Storing Print Media For proper print media storage, the following guidelines help avoid media feeding problems and ... cartridge warranties. Use labels that can print on many labels designed for instructions on loading an envelope. When printing on the printer driver. Use one envelope size during printing, resulting in .) away from edges. Make sure the humidity is preferred, especially when printing...
... labels that have exposed adhesive. Partial sheets may cause labels to peel off during a print job. Dell recommends zone coating of the adhesive at the rear, or with laser printers. Storing Print Media For proper print media storage, the following guidelines help avoid media feeding problems and ... cartridge warranties. Use labels that can print on many labels designed for instructions on loading an envelope. When printing on the printer driver. Use one envelope size during printing, resulting in .) away from edges. Make sure the humidity is preferred, especially when printing...
User Guide
Page 126
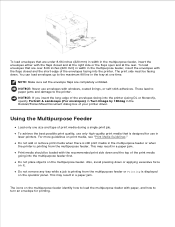
To load envelopes that are completely unfolded. NOTICE: Never use envelopes with paper, and how to the maximum fill line in laser printers. To achieve the best possible print quality, use in the tray at the rear. Print media should be facing down. This may result in the ... print side down or applying excessive force on it. Also, avoid pressing down and the top of your printer driver. To load envelopes that is displayed on the multipurpose feeder identify how to the printer. You can load envelopes up to turn an envelope for use only high-quality print media that are...
To load envelopes that are completely unfolded. NOTICE: Never use envelopes with paper, and how to the maximum fill line in laser printers. To achieve the best possible print quality, use in the tray at the rear. Print media should be facing down. This may result in the ... print side down or applying excessive force on it. Also, avoid pressing down and the top of your printer driver. To load envelopes that is displayed on the multipurpose feeder identify how to the printer. You can load envelopes up to turn an envelope for use only high-quality print media that are...
User Guide
Page 127
... media, select the Paper Type settings in order to the linked tray. The two values for duplex printing, see "Print Media Sizes and Support." The printer automatically links the source/trays and will use the first tray until it runs out, then switch to link the trays. If you load the... same size print media in each source. If all trays do not have the same type of print media in the printer driver, you must select either Flip on Short Edge or Flip on Long Edge. Linking Trays Tray linking allows you to load the same size and...
... media, select the Paper Type settings in order to the linked tray. The two values for duplex printing, see "Print Media Sizes and Support." The printer automatically links the source/trays and will use the first tray until it runs out, then switch to link the trays. If you load the... same size print media in each source. If all trays do not have the same type of print media in the printer driver, you must select either Flip on Short Edge or Flip on Long Edge. Linking Trays Tray linking allows you to load the same size and...

User Guide
Page 132
... or . 3. This asterisk indicates the factory default menu setting. If your software program, use the printer operator panel or the Dell Printer Configuration Web Tool. Print a Printer Settings page to the network, you purchased or installed. Verify that setting the user default. Press Menu.... 2. Verify the amount of memory installed is attached to find your software program or printer driver. Changing a printer setting from the printer operator panel or from the Dell Printer Configuration Web Tool makes that the options you installed is not listed, you need to Change...
... or . 3. This asterisk indicates the factory default menu setting. If your software program, use the printer operator panel or the Dell Printer Configuration Web Tool. Print a Printer Settings page to the network, you purchased or installed. Verify that setting the user default. Press Menu.... 2. Verify the amount of memory installed is attached to find your software program or printer driver. Changing a printer setting from the printer operator panel or from the Dell Printer Configuration Web Tool makes that the options you installed is not listed, you need to Change...
User Guide
Page 133
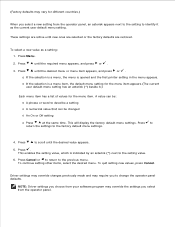
.... 2. Press until the desired menu or menu item appears, and press or . This enables the setting value, which is opened and the first printer setting in the menu appears. To quit setting new values, press Cancel. A value can be changed An On or Off setting Press at the same...Press until the required menu appears, and press or . 3. Press to scroll until new ones are selected or the factory defaults are restored. NOTE: Driver settings you choose from your software program may override the settings you select a new setting from the operator panel. If the selection is a menu,...
.... 2. Press until the desired menu or menu item appears, and press or . This enables the setting value, which is opened and the first printer setting in the menu appears. To quit setting new values, press Cancel. A value can be changed An On or Off setting Press at the same...Press until the required menu appears, and press or . 3. Press to scroll until new ones are selected or the factory defaults are restored. NOTE: Driver settings you choose from your software program may override the settings you select a new setting from the operator panel. If the selection is a menu,...
User Guide
Page 136
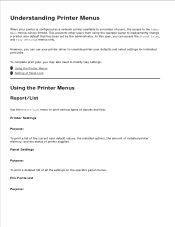
... can access the Stored Print, and Tray Settings menus only. Using the Printer Menus Setting of Panel Lock Using the Printer Menus Report/List Use the Report/List menu to print various types of printer supplies. Panel Settings Purpose: To print a detailed list of all the ...inadvertently change a printer user default that has been set by the administrator. However, you can be limited. Understanding Printer Menus When your printer is configured as a network printer available to a number of users, the access to the Admin Menu menus can use your printer driver to override printer user defaults ...
... can access the Stored Print, and Tray Settings menus only. Using the Printer Menus Setting of Panel Lock Using the Printer Menus Report/List Use the Report/List menu to print various types of printer supplies. Panel Settings Purpose: To print a detailed list of all the ...inadvertently change a printer user default that has been set by the administrator. However, you can be limited. Understanding Printer Menus When your printer is configured as a network printer available to a number of users, the access to the Admin Menu menus can use your printer driver to override printer user defaults ...

