User Guide
Page 3
Contents 1 Your Dell Projector 6 About Your Projector 7 2 Connecting Your Projector 8 Connecting to a Computer 9 Connecting a Computer with an M1 to D-sub/USB Cable 9 Connecting a Computer with a D-sub to D-sub Cable 10 Connecting to a DVD Player 11 ... a Composite Cable . 13 Connecting a DVD Player with a BNC to VGA cable 13 Professional Installation Options: Installation for Driving Automatic Screen 14 Installation for wired RS232 remote control: Connection with PC 15 Connection with Commercial RS232...
Contents 1 Your Dell Projector 6 About Your Projector 7 2 Connecting Your Projector 8 Connecting to a Computer 9 Connecting a Computer with an M1 to D-sub/USB Cable 9 Connecting a Computer with a D-sub to D-sub Cable 10 Connecting to a DVD Player 11 ... a Composite Cable . 13 Connecting a DVD Player with a BNC to VGA cable 13 Professional Installation Options: Installation for Driving Automatic Screen 14 Installation for wired RS232 remote control: Connection with PC 15 Connection with Commercial RS232...
User Guide
Page 4
... 17 Adjusting the Projected Image 18 Raising the Projector Height 18 Lowering the Projector Height 18 Adjusting the Projector Zoom and Focus 19 Adjusting Projection Image Size 20 Using the Control Panel 21 Using the Remote Control 23 Using the On-Screen Display 26 Image Settings 26 Audio Menu 28 Management Menu 29 Language Menu 31...
... 17 Adjusting the Projected Image 18 Raising the Projector Height 18 Lowering the Projector Height 18 Adjusting the Projector Zoom and Focus 19 Adjusting Projection Image Size 20 Using the Control Panel 21 Using the Remote Control 23 Using the On-Screen Display 26 Image Settings 26 Audio Menu 28 Management Menu 29 Language Menu 31...

User Guide
Page 6
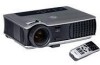
www.dell.com | support.dell.com 1 Your Dell Projector Your projector comes with all the items, and contact Dell if anything is missing. Ensure that you have all the items shown below. Package Contents 1.8 m power cord (3.0 m in Americas) 1.8 m M1 to D-sub/USB cable 2.0 m S-video cable 1.8 m Composite Video cable 1.8 m RCA to Audio cable 1.8 m mini pin to mini pin cable 1.8 m M1-A to HDTV cable Remote control 6 Your Dell Projector
www.dell.com | support.dell.com 1 Your Dell Projector Your projector comes with all the items, and contact Dell if anything is missing. Ensure that you have all the items shown below. Package Contents 1.8 m power cord (3.0 m in Americas) 1.8 m M1 to D-sub/USB cable 2.0 m S-video cable 1.8 m Composite Video cable 1.8 m RCA to Audio cable 1.8 m mini pin to mini pin cable 1.8 m M1-A to HDTV cable Remote control 6 Your Dell Projector
User Guide
Page 7
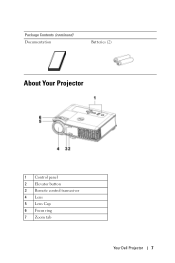
Package Contents (continued) Documentation Batteries (2) About Your Projector 1 Control panel 2 Elevator button 3 Remote control transceiver 4 Lens 5 Lens Cap 6 Focus ring 7 Zoom tab Your Dell Projector 7
Package Contents (continued) Documentation Batteries (2) About Your Projector 1 Control panel 2 Elevator button 3 Remote control transceiver 4 Lens 5 Lens Cap 6 Focus ring 7 Zoom tab Your Dell Projector 7
User Guide
Page 15
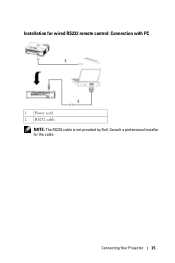
Installation for the cable. Consult a professional installer for wired RS232 remote control: Connection with PC 1 Power cord 2 RS232 cable NOTE: The RS232 cable is not provided by Dell. Connecting Your Projector 15
Installation for the cable. Consult a professional installer for wired RS232 remote control: Connection with PC 1 Power cord 2 RS232 cable NOTE: The RS232 cable is not provided by Dell. Connecting Your Projector 15
User Guide
Page 17
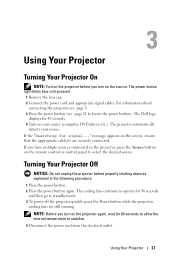
...(s) are still running. NOTE: Before you turn on the projector again, wait for 30 seconds. 4 Turn on the remote control or control panel to standby mode. 3 To power off the projector quickly, press the Power button while the projectors cooling fans are securely connected. The power button light blinks...from the electrical outlet. Turning Your Projector Off NOTICE: Do not unplug the projector before you turn on the source. For information about connecting the projector, see page 8. 3 Press the power button (see page 21 to operate for signal..." The Dell logo displays for 60 seconds to...
...(s) are still running. NOTE: Before you turn on the projector again, wait for 30 seconds. 4 Turn on the remote control or control panel to standby mode. 3 To power off the projector quickly, press the Power button while the projectors cooling fans are securely connected. The power button light blinks...from the electrical outlet. Turning Your Projector Off NOTICE: Do not unplug the projector before you turn on the source. For information about connecting the projector, see page 8. 3 Press the power button (see page 21 to operate for signal..." The Dell logo displays for 60 seconds to...

User Guide
Page 23
Aim the remote control at the screen, press and hold the laser button to decrease the volume. Using Your Projector 23 Mouse right click. Press to activate the laser light. Press to adjust the OSD setting. Press to increase the volume. Press to mute or un-mute the projector speaker. Using the Remote Control 1 Power 2 3 Laser 4 Volume 5 Mute 6 Volume 7 Right click Turn the projector on and off. For more information, see page 17.
Aim the remote control at the screen, press and hold the laser button to decrease the volume. Using Your Projector 23 Mouse right click. Press to activate the laser light. Press to adjust the OSD setting. Press to increase the volume. Press to mute or un-mute the projector speaker. Using the Remote Control 1 Power 2 3 Laser 4 Volume 5 Mute 6 Volume 7 Right click Turn the projector on and off. For more information, see page 17.

User Guide
Page 25
Using Your Projector 25 Initiate the Learning Mode on the remote for switching the RF transmission channel by pressing Prgm button. 25 PIP Swap Press the PIP Swap button to swap between the foreground and background. 1 Laser Warning 2 Program button The remote control is equipped with a Class II laser that emits laser radiation. To reduce the risk of injury, do not look directly into the laser light, and do not point the laser light into anyone's eyes.
Using Your Projector 25 Initiate the Learning Mode on the remote for switching the RF transmission channel by pressing Prgm button. 25 PIP Swap Press the PIP Swap button to swap between the foreground and background. 1 Laser Warning 2 Program button The remote control is equipped with a Class II laser that emits laser radiation. To reduce the risk of injury, do not look directly into the laser light, and do not point the laser light into anyone's eyes.
User Guide
Page 26
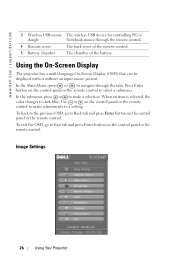
...dell.com | support.dell.com 3 Wireless USB mouse The wireless USB device for controlling PC or dongle Notebook mouse through the tabs. In the submenu, press or to make adjustments to Back tab and press Enter button on the control panel or the remote control. Using the On-Screen Display The projector... go to make a selection. Press Enter button on the control panel or the remote control to Exit tab and press Enter button on the control panel or the remote control. Image Settings 26 Using Your Projector Use or on the control panel or the remote control to dark blue.
...dell.com | support.dell.com 3 Wireless USB mouse The wireless USB device for controlling PC or dongle Notebook mouse through the tabs. In the submenu, press or to make adjustments to Back tab and press Enter button on the control panel or the remote control. Using the On-Screen Display The projector... go to make a selection. Press Enter button on the control panel or the remote control to Exit tab and press Enter button on the control panel or the remote control. Image Settings 26 Using Your Projector Use or on the control panel or the remote control to dark blue.
User Guide
Page 34
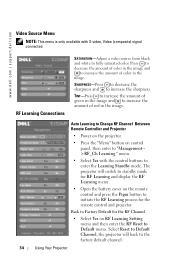
... Connections SATURATION-Adjust a video source from black and white to increase the sharpness. Auto Learning to Change RF Channel Between Remote Controller and Projector • Power on the projector. • Press the "Menu" button on RF Learning Setting menu and then enter the RF Reset to Default menu.... increase the amount of red in the image. The projector will back to the factory default channel. 34 Using Your Projector www.dell.com | support.dell.com Video Source Menu NOTE: This menu is only available with the control buttons to enter the Learning Standby mode. TINT-Press...
... Connections SATURATION-Adjust a video source from black and white to increase the sharpness. Auto Learning to Change RF Channel Between Remote Controller and Projector • Power on the projector. • Press the "Menu" button on RF Learning Setting menu and then enter the RF Reset to Default menu.... increase the amount of red in the image. The projector will back to the factory default channel. 34 Using Your Projector www.dell.com | support.dell.com Video Source Menu NOTE: This menu is only available with the control buttons to enter the Learning Standby mode. TINT-Press...
User Guide
Page 35
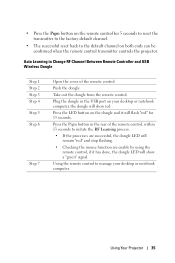
...show red . Press the Prgm button in the USB port on both ends can be confirmed when the remote control transmitter controls the projector. Push the dongle. Using the remote control to manage your desktop or notebook computer, the dongle will flash "red" for 5 seconds to reset... computer. Take out the dongle from the remote control. Using Your Projector 35 Auto Learning to Change RF Channel Between Remote Controller and USB Wireless Dongle Step 1 Step 2 Step 3 Step 4 Step 5 Step 6 Step 7 Open the cover of the remote control, within 13 seconds to initate the RF Learning...
...show red . Press the Prgm button in the USB port on both ends can be confirmed when the remote control transmitter controls the projector. Push the dongle. Using the remote control to manage your desktop or notebook computer, the dongle will flash "red" for 5 seconds to reset... computer. Take out the dongle from the remote control. Using Your Projector 35 Auto Learning to Change RF Channel Between Remote Controller and USB Wireless Dongle Step 1 Step 2 Step 3 Step 4 Step 5 Step 6 Step 7 Open the cover of the remote control, within 13 seconds to initate the RF Learning...
User Guide
Page 44
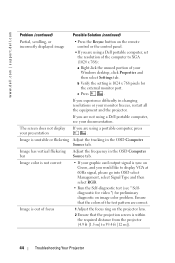
...x 768): a Right-lick the unused portion of the computer to 39.4 ft [12 m]). 44 Troubleshooting Your Projector If you are not using a Dell portable computer, see " Selfdiagnostic for video ") for the external monitor port. Ensure that the projection screen is ... . The screen does not display your documentation. www.dell.com | support.dell.com Problem (continued) Possible Solution (continued) Partial, scrolling, or incorrectly displayed image • Press the Resync button on the remote control or the control panel. • If you are using a portable computer...
...x 768): a Right-lick the unused portion of the computer to 39.4 ft [12 m]). 44 Troubleshooting Your Projector If you are not using a Dell portable computer, see " Selfdiagnostic for video ") for the external monitor port. Ensure that the projection screen is ... . The screen does not display your documentation. www.dell.com | support.dell.com Problem (continued) Possible Solution (continued) Partial, scrolling, or incorrectly displayed image • Press the Resync button on the remote control or the control panel. • If you are using a portable computer...
User Guide
Page 45
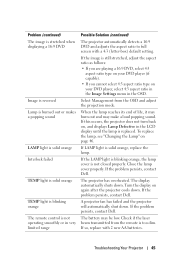
...orange TEMP light is blinking orange The remote control is not operating smoothly or in the OSD. Select Management from the remote is replaced. If the problem persists, contact Dell. The display automatically shuts down . If the problem persists, contact Dell. When the lamp reaches its end of... type on your DVD player, select 4:3 aspect ratio in the Image Settings menu in very limited range Possible Solution (continued) The projector automatically detects a 16:9 DVD and adjusts the aspect ratio to full screen with 2 new AA batteries. The battery may make a loud popping...
...orange TEMP light is blinking orange The remote control is not operating smoothly or in the OSD. Select Management from the remote is replaced. If the problem persists, contact Dell. The display automatically shuts down . If the problem persists, contact Dell. When the lamp reaches its end of... type on your DVD player, select 4:3 aspect ratio in the Image Settings menu in very limited range Possible Solution (continued) The projector automatically detects a 16:9 DVD and adjusts the aspect ratio to full screen with 2 new AA batteries. The battery may make a loud popping...
User Guide
Page 50
... approximately 50% of the lamp's rated brightness level. The lamp life specified for Dell's projectors refers to the typical time under high temperatures and abrupt powering-off may include dusty environments, under non-stressful operating conditions for wired remote projector control from PC 300-watt user-replaceable 1700-hour lamp (up to 2200 hours in...
... approximately 50% of the lamp's rated brightness level. The lamp life specified for Dell's projectors refers to the typical time under high temperatures and abrupt powering-off may include dusty environments, under non-stressful operating conditions for wired remote projector control from PC 300-watt user-replaceable 1700-hour lamp (up to 2200 hours in...

User Guide
Page 55
... are referred to as luma and chroma and are using an SVGA computers, connecting VGA to a remote control, or a projector control panel, that has buttons and controls that deletes resolution lines from a display or projection display or projection device. To project an 800x600 image...frequencies of the original image. Component video is 4/3 times the height. The amount of light emitting from the image to 1280x1024 SXGA resolution. The resulting image is measured by 3). provide better results. A standard for measuring light output, used for digital component....
... are referred to as luma and chroma and are using an SVGA computers, connecting VGA to a remote control, or a projector control panel, that has buttons and controls that deletes resolution lines from a display or projection display or projection device. To project an 800x600 image...frequencies of the original image. Component video is 4/3 times the height. The amount of light emitting from the image to 1280x1024 SXGA resolution. The resulting image is measured by 3). provide better results. A standard for measuring light output, used for digital component....
User Guide
Page 57
... the optics. Their whites are backwards. The United States broadcast standard for video and broadcasting. Power Zoom- Red, Green, Blue- SXGA- Maximum Distance- The distance from the projector's control panel and also the remote control. These lamps typically have a "half-life" of the three colors. That is useable (bright enough) in a darkened room. PAL- A European...
... the optics. Their whites are backwards. The United States broadcast standard for video and broadcasting. Power Zoom- Red, Green, Blue- SXGA- Maximum Distance- The distance from the projector's control panel and also the remote control. These lamps typically have a "half-life" of the three colors. That is useable (bright enough) in a darkened room. PAL- A European...
User Guide
Page 60
...input connector 8 VGA input connector 8 VGA output connector 8 Video input connector 8 Contacting Dell 54 Control Panel 21 D Dell Contacting 54 M Main Unit 7 Control panel 7 Elevator button 7 Focus ring 7 Lens 7 Lens Cap 7 Remote control transceiver 7 Zoom tab 7 O On-Screen Display Audio Menu 28 Computer Source Menu 33...Setting Menu 31 60 Index Video Source Menu 34 P Phone numbers 54 Powering On/Off the Projector Powering Off the Projector 17 Powering On the Projector 17 R Remote Control 23 S Specifications Audio 49 Brightness 48 Color Wheel Speed 48 Compatibility Modes 52 Contrast Ratio ...
...input connector 8 VGA input connector 8 VGA output connector 8 Video input connector 8 Contacting Dell 54 Control Panel 21 D Dell Contacting 54 M Main Unit 7 Control panel 7 Elevator button 7 Focus ring 7 Lens 7 Lens Cap 7 Remote control transceiver 7 Zoom tab 7 O On-Screen Display Audio Menu 28 Computer Source Menu 33...Setting Menu 31 60 Index Video Source Menu 34 P Phone numbers 54 Powering On/Off the Projector Powering Off the Projector 17 Powering On the Projector 17 R Remote Control 23 S Specifications Audio 49 Brightness 48 Color Wheel Speed 48 Compatibility Modes 52 Contrast Ratio ...


