
User Guide
Page 4
Connection With Commercial RS232 Control Box 20 3 Using Your Projector 21 Turning Your Projector On 21 Turning Your Projector Off 21 Adjusting the Projected Image 22 Raising the Projector Height 22 Lowering the Projector Height 22 Adjusting the Projector Zoom and Focus 23 Adjusting Projection Image Size 24 Using the Control Panel 25 Using the Remote Control...-ADJUST 33 INPUT SELECT 34 PICTURE (in PC Mode 35 PICTURE (in Video Mode 36 DISPLAY (in PC Mode 37 DISPLAY (in Video Mode 39 LAMP 40 SET UP 40 INFORMATION 43 4 Contents
Connection With Commercial RS232 Control Box 20 3 Using Your Projector 21 Turning Your Projector On 21 Turning Your Projector Off 21 Adjusting the Projected Image 22 Raising the Projector Height 22 Lowering the Projector Height 22 Adjusting the Projector Zoom and Focus 23 Adjusting Projection Image Size 24 Using the Control Panel 25 Using the Remote Control...-ADJUST 33 INPUT SELECT 34 PICTURE (in PC Mode 35 PICTURE (in Video Mode 36 DISPLAY (in PC Mode 37 DISPLAY (in Video Mode 39 LAMP 40 SET UP 40 INFORMATION 43 4 Contents
User Guide
Page 5
OTHERS 43 Managing the Projector From Web Management . . . . 50 Configuring the Network Setting 50 Accessing Web Management 50 Managing Properties 51 4 Troubleshooting Your Projector 63 Guiding Signals 67 Changing the Lamp 69 5 Specifications 71 6 Contacting Dell 76 7 Appendix: Glossary 77 Contents 5
OTHERS 43 Managing the Projector From Web Management . . . . 50 Configuring the Network Setting 50 Accessing Web Management 50 Managing Properties 51 4 Troubleshooting Your Projector 63 Guiding Signals 67 Changing the Lamp 69 5 Specifications 71 6 Contacting Dell 76 7 Appendix: Glossary 77 Contents 5
User Guide
Page 7
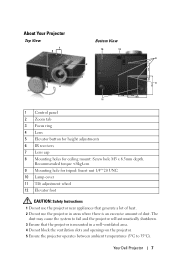
Recommended torque About Your Projector Top View 1 6 Bottom View 10 12 8 2 3 9 5 4 7 11 1 Control panel 2 Zoom tab 3 Focus ring 4 Lens 5 Elevator button for height adjustments 6 IR receivers 7 Lens cap 8 Mounting holes for ceiling mount: Screw hole M3 x 6.5mm depth.
Recommended torque About Your Projector Top View 1 6 Bottom View 10 12 8 2 3 9 5 4 7 11 1 Control panel 2 Zoom tab 3 Focus ring 4 Lens 5 Elevator button for height adjustments 6 IR receivers 7 Lens cap 8 Mounting holes for ceiling mount: Screw hole M3 x 6.5mm depth.
User Guide
Page 26
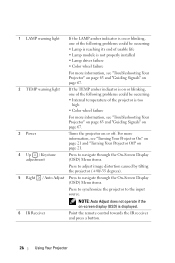
..., one of the following problems could be occurring: • Lamp is reaching its end of usable life • Lamp module is not properly installed • Lamp driver failure • Color wheel failure For more information, see "Turning Your Projector On" on page 21 and "Turning Your Projector Off" on page 21. 4 Up / Keystone adjustment Press...
..., one of the following problems could be occurring: • Lamp is reaching its end of usable life • Lamp module is not properly installed • Lamp driver failure • Color wheel failure For more information, see "Turning Your Projector On" on page 21 and "Turning Your Projector Off" on page 21. 4 Up / Keystone adjustment Press...

User Guide
Page 40
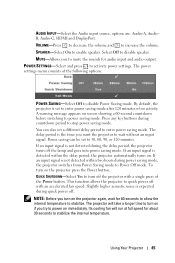
..., Alert Volume, and Network. 40 Using Your Projector ECO Mode operates at full power level. Normal mode operates at a lower power level which may provide longer lamp life, quieter operation, and dimmer luminance output on the screen. LAMP Using the Lamp menu, you to select between Normal and ECO ...mode. SET UP The Set Up menu allows you can adjust the display settings of your projector. LAMP HOUR RESET-Select Yes to reset the lamp timer. LAMP HOUR-Displays the operating hours since...
..., Alert Volume, and Network. 40 Using Your Projector ECO Mode operates at full power level. Normal mode operates at a lower power level which may provide longer lamp life, quieter operation, and dimmer luminance output on the screen. LAMP Using the Lamp menu, you to select between Normal and ECO ...mode. SET UP The Set Up menu allows you can adjust the display settings of your projector. LAMP HOUR RESET-Select Yes to reset the lamp timer. LAMP HOUR-Displays the operating hours since...
User Guide
Page 45
...minutes. The delay period is not detected during countdown period to enable speaker. The projector will run at full speed for 60 seconds to allow the internal temperature to quick power off the lamp and goes into power saving mode. The power settings menu consists of the Power button.... To turn on immediately. This function allows the projector to stabilize. Press any key buttons during the delay period, ...
...minutes. The delay period is not detected during countdown period to enable speaker. The projector will run at full speed for 60 seconds to allow the internal temperature to quick power off the lamp and goes into power saving mode. The power settings menu consists of the Power button.... To turn on immediately. This function allows the projector to stabilize. Press any key buttons during the delay period, ...
User Guide
Page 53
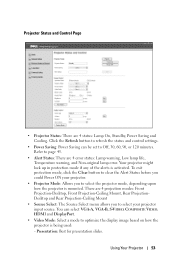
...clear the Alert Status before you to Off, 30, 60, 90, or 120 minutes. Projector Status and Control Page • Projector Status: There are 4 error status: Lamp warning, Low lamp life, Temperature warning, and Non-original lamp error. There are 4 projection modes: Front Projection-Desktop, Front Projection-Ceiling Mount, Rear...Ceiling Mount • Source Select: The Source Select menu allows you to page 45. • Alert Status: There are 4 status: Lamp On, Standby, Power Saving and Cooling. Refer to select your projector. • Projector Mode: Allows you could Power ON your...
...clear the Alert Status before you to Off, 30, 60, 90, or 120 minutes. Projector Status and Control Page • Projector Status: There are 4 error status: Lamp warning, Low lamp life, Temperature warning, and Non-original lamp error. There are 4 projection modes: Front Projection-Desktop, Front Projection-Ceiling Mount, Rear...Ceiling Mount • Source Select: The Source Select menu allows you to page 45. • Alert Status: There are 4 status: Lamp On, Standby, Power Saving and Cooling. Refer to select your projector. • Projector Mode: Allows you could Power ON your...
User Guide
Page 63
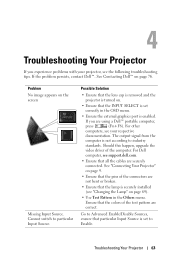
... in the OSD menu. • Ensure the external graphics port is securely installed (see your projector, see support.dell.com. • Ensure that the lamp is enabled. Troubleshooting Your Projector 63 If the problem persists, contact Dell™. See Contacting Dell™ on the screen Missing Input Source. Possible Solution • Ensure that the lens cap...
... in the OSD menu. • Ensure the external graphics port is securely installed (see your projector, see support.dell.com. • Ensure that the lamp is enabled. Troubleshooting Your Projector 63 If the problem persists, contact Dell™. See Contacting Dell™ on the screen Missing Input Source. Possible Solution • Ensure that the lens cap...
User Guide
Page 65
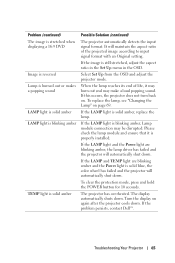
... detects the input signal format. If the LAMP and TEMP light are blinking amber, the lamp driver has failed and the projector will automatically shut down . To clear the protection mode, press and hold the POWER button for 10 seconds. If the problem persists, contact Dell™. Problem (continued) The image is stretched when...
... detects the input signal format. If the LAMP and TEMP light are blinking amber, the lamp driver has failed and the projector will automatically shut down . To clear the protection mode, press and hold the POWER button for 10 seconds. If the problem persists, contact Dell™. Problem (continued) The image is stretched when...
User Guide
Page 67
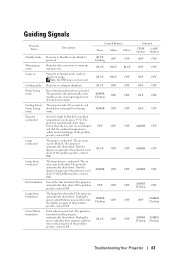
... to shutdown. Power Saving mode has been activated. If the problem persists, contact Dell. Turn the display on again after the projector cools down before Power Saving mode Projector overheated Lamp overheated Lamp driver overheated Fan breakdown Lamp driver breakdown Color Wheel breakdown Projector in two hours. One of the fans has failed. If this problem persists...
... to shutdown. Power Saving mode has been activated. If the problem persists, contact Dell. Turn the display on again after the projector cools down before Power Saving mode Projector overheated Lamp overheated Lamp driver overheated Fan breakdown Lamp driver breakdown Color Wheel breakdown Projector in two hours. One of the fans has failed. If this problem persists...
User Guide
Page 68
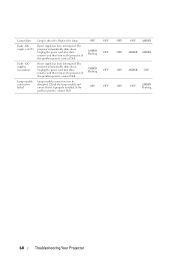
... then turn on the projector. Unplug the power cord after three minutes and then turn on the projector. If this problem persists, contact Dell. Check the lamp module and ensure that it is defective. If this problem persists, contact Dell. Power supply has been interrupted. Lamp failure Fault - The projector automatically shuts down . Lamp module connection may be...
... then turn on the projector. Unplug the power cord after three minutes and then turn on the projector. If this problem persists, contact Dell. Check the lamp module and ensure that it is defective. If this problem persists, contact Dell. Power supply has been interrupted. Lamp failure Fault - The projector automatically shuts down . Lamp module connection may be...
User Guide
Page 69
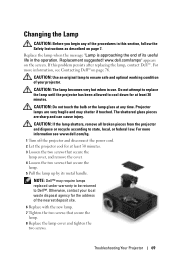
... end of the procedures in use. www.dell.com/lamps" appears on page 76. CAUTION: The lamp becomes very hot when in this problem persists after replacing the lamp, contact Dell™. Projector lamps are sharp and can cause injury. CAUTION: If the lamp shatters, remove all broken pieces from the projector and dispose or recycle according to cool...
... end of the procedures in use. www.dell.com/lamps" appears on page 76. CAUTION: The lamp becomes very hot when in this problem persists after replacing the lamp, contact Dell™. Projector lamps are sharp and can cause injury. CAUTION: If the lamp shatters, remove all broken pieces from the projector and dispose or recycle according to cool...

User Guide
Page 70
FOR LAMP SPECIFIC DISPOSAL INFORMATION CHECK WWW.LAMPRECYCLE.ORG. 70 Troubleshooting Your Projector CAUTION: Lamp Disposal (for Lamp Reset in the OSD Lamp tab (see Lamp menu on page 40). FOR MORE INFORMATION, GO TO WWW.DELL.COM/HG OR CONTACT THE ELECTRONIC INDUSTRIES ALLIANCE AT WWW.EIAE.ORG. When a new lamp module has been changed, the projector will automatically detect and reset the lamp hours. 9 Reset the lamp usage time by selecting "Yes" for the US only) LAMP(S) INSIDE THIS PRODUCT CONTAIN MERCURY AND MUST BE RECYCLED OR DISPOSED OF ACCORDING TO LOCAL, STATE OR FEDERAL LAWS.
FOR LAMP SPECIFIC DISPOSAL INFORMATION CHECK WWW.LAMPRECYCLE.ORG. 70 Troubleshooting Your Projector CAUTION: Lamp Disposal (for Lamp Reset in the OSD Lamp tab (see Lamp menu on page 40). FOR MORE INFORMATION, GO TO WWW.DELL.COM/HG OR CONTACT THE ELECTRONIC INDUSTRIES ALLIANCE AT WWW.EIAE.ORG. When a new lamp module has been changed, the projector will automatically detect and reset the lamp hours. 9 Reset the lamp usage time by selecting "Yes" for the US only) LAMP(S) INSIDE THIS PRODUCT CONTAIN MERCURY AND MUST BE RECYCLED OR DISPOSED OF ACCORDING TO LOCAL, STATE OR FEDERAL LAWS.
User Guide
Page 73
... the rated lumens for driving automatic screen. relay output for the specified lamp. Lamp life is not guaranteed in a lamp's shortened operating life span or possible lamp failure. The actual operating life span of a projector lamp will most likely result in any projector is a measure of projector through network. 12V output: One 12V DC / 200mA max. Specifications 73...
... the rated lumens for driving automatic screen. relay output for the specified lamp. Lamp life is not guaranteed in a lamp's shortened operating life span or possible lamp failure. The actual operating life span of a projector lamp will most likely result in any projector is a measure of projector through network. 12V output: One 12V DC / 200mA max. Specifications 73...
User Guide
Page 80
... Focus 23 Focus ring 23 Zoom tab 23 Audio Input 45 Audio Settings 44 Audio-B 9 Audio-C 9 audio-C 9 C Capture Screen 44 Changing the Lamp 69 Closed Caption 48 Connecting the Projector Composite video cable 15 Connecting a Computer Using a DisplayPort cable 13 Connecting a Computer with a RS232 cable 12 Connecting with a Component Cable 16 Connecting...
... Focus 23 Focus ring 23 Zoom tab 23 Audio Input 45 Audio Settings 44 Audio-B 9 Audio-C 9 audio-C 9 C Capture Screen 44 Changing the Lamp 69 Closed Caption 48 Connecting the Projector Composite video cable 15 Connecting a Computer Using a DisplayPort cable 13 Connecting a Computer with a RS232 cable 12 Connecting with a Component Cable 16 Connecting...
User Guide
Page 81
... Dell contacting 76 H HDMI 9 M Main Unit 7 Control panel 7 Elevator button 7 Focus ring 7 IR receiver 7 Lens 7 Zoom tab 7 Menu Position 43 Menu Settings 43 Menu Timeout 44 Menu Transparency 44 Mute 45 O On-Screen Display 33 Auto-Adjust 35 Display (in PC Mode) 37 Display (in Video Mode) 39 Input Select 34 Lamp... 40 Main Menu 33 Others 43 Picture (in PC Mode) 35 Picture (in Video Mode) 36 Set Up 40 P Password 46 phone numbers 76 Power Saving 45 Power Settings 45 Powering On/Off the Projector Powering Off the Projector 21 Powering On the Projector 21 Q Quick Shutdown 45...
... Dell contacting 76 H HDMI 9 M Main Unit 7 Control panel 7 Elevator button 7 Focus ring 7 IR receiver 7 Lens 7 Zoom tab 7 Menu Position 43 Menu Settings 43 Menu Timeout 44 Menu Transparency 44 Mute 45 O On-Screen Display 33 Auto-Adjust 35 Display (in PC Mode) 37 Display (in Video Mode) 39 Input Select 34 Lamp... 40 Main Menu 33 Others 43 Picture (in PC Mode) 35 Picture (in Video Mode) 36 Set Up 40 P Password 46 phone numbers 76 Power Saving 45 Power Settings 45 Powering On/Off the Projector Powering Off the Projector 21 Powering On the Projector 21 Q Quick Shutdown 45...


