
User Guide
Page 1
... 2006 Rev. has determined that this document to refer to change without the written permission of Dell Inc. Dell™ 3007WFP-HC Flat Panel Monitor User's Guide About Your Monitor Front View Back View Side View Bottom View Monitor Specifications Dell Soundbar (Optional) Specifications Caring for energy efficiency. Reproduction in any proprietary interest in this document is a registered...
... 2006 Rev. has determined that this document to refer to change without the written permission of Dell Inc. Dell™ 3007WFP-HC Flat Panel Monitor User's Guide About Your Monitor Front View Back View Side View Bottom View Monitor Specifications Dell Soundbar (Optional) Specifications Caring for energy efficiency. Reproduction in any proprietary interest in this document is a registered...

User Guide
Page 2
Power button (with power light indicator) Back View Increase Brightness button 3. Decrease Brightness button 2. Back to Contents Page About Your Monitor Dell™ 3007WFP-HC Flat Panel Monitor User's Guide Front View Back View Bottom View Side View Card Reader Specificatoins Monitor Specifications Dell Soundbar (Optional) Specifications Caring for Your Monitor Front View 1.
Power button (with power light indicator) Back View Increase Brightness button 3. Decrease Brightness button 2. Back to Contents Page About Your Monitor Dell™ 3007WFP-HC Flat Panel Monitor User's Guide Front View Back View Bottom View Side View Card Reader Specificatoins Monitor Specifications Dell Soundbar (Optional) Specifications Caring for Your Monitor Front View 1.

User Guide
Page 3
... , press the button to mount the monitor. 4. Connect for technical support. 7. DVI connector - Once this cable is connected you need to contact Dell for the Soundbar (optional) 3. Regulatory rating label - monitor to secure your monitor to the computer and USB upstream 5. USB...2. port on the side and bottom of the monitor. You can use this label if you can only use the 4. Dell Soundbar mounting brackets - Service tag label- Attach the optional Dell Soundbar. 2. Cable management hole - Dell Soundbar power connector - Connect your USB devices. Connect...
... , press the button to mount the monitor. 4. Connect for technical support. 7. DVI connector - Once this cable is connected you need to contact Dell for the Soundbar (optional) 3. Regulatory rating label - monitor to secure your monitor to the computer and USB upstream 5. USB...2. port on the side and bottom of the monitor. You can use this label if you can only use the 4. Dell Soundbar mounting brackets - Service tag label- Attach the optional Dell Soundbar. 2. Cable management hole - Dell Soundbar power connector - Connect your USB devices. Connect...

User Guide
Page 4
... OFF mode can only be achieved by the computer, the monitor automatically resumes functioning. As an ENERGY STAR® Partner, DELL has determined that this automatic power saving feature: VESA Modes Horizontal Sync Vertical Sync Video Power Indicator Power Consumption Normal operation( with Dell Soundbar and USB active) Active Active Active Blue 147 W (maximum...
... OFF mode can only be achieved by the computer, the monitor automatically resumes functioning. As an ENERGY STAR® Partner, DELL has determined that this automatic power saving feature: VESA Modes Horizontal Sync Vertical Sync Video Power Indicator Power Consumption Normal operation( with Dell Soundbar and USB active) Active Active Active Blue 147 W (maximum...

User Guide
Page 8
... On/Off Volume Control 3.0 m ± 0.1 m AWG26 black cable attached to enclosure, with care as some detergents leave a milky film on your monitor, wipe it off yourmonitor when not in use a dynamically changing screen saver and power off with water. SPL Total Power Output Headphone Jack Output Power...to 90%(noncondensing) 3,657.6m (12,000 ft) max 12,192 m (40,000 ft) max 501.92 BTU/hour (maximum) 399.5 BTU/hour (typical) Dell Soundbar (Optional) Specifications System Frequency Response 95 Hz to clean the plastics. l Use a slightly-dampened, warm cloth to 20 kHz @ 10 dB below avg.
... On/Off Volume Control 3.0 m ± 0.1 m AWG26 black cable attached to enclosure, with care as some detergents leave a milky film on your monitor, wipe it off yourmonitor when not in use a dynamically changing screen saver and power off with water. SPL Total Power Output Headphone Jack Output Power...to 90%(noncondensing) 3,657.6m (12,000 ft) max 12,192 m (40,000 ft) max 501.92 BTU/hour (maximum) 399.5 BTU/hour (typical) Dell Soundbar (Optional) Specifications System Frequency Response 95 Hz to clean the plastics. l Use a slightly-dampened, warm cloth to 20 kHz @ 10 dB below avg.
User Guide
Page 20
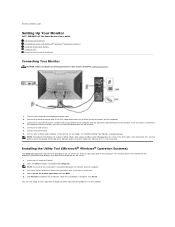
... on the computer. Back to Contents Page Setting Up Your Monitor Dell™ 3007WFP-HC Flat Panel Monitor User's Guide Connecting Your Monitor Installing the Utility Tool (Microsoft® Windows® Operation Systems) Using the Front Panel Buttons Using the OSD Using the Dell Soundbar (Optional) Connecting Your Monitor CAUTION: Before you begin any USB devices. 5. Connect the...
... on the computer. Back to Contents Page Setting Up Your Monitor Dell™ 3007WFP-HC Flat Panel Monitor User's Guide Connecting Your Monitor Installing the Utility Tool (Microsoft® Windows® Operation Systems) Using the Front Panel Buttons Using the OSD Using the Dell Soundbar (Optional) Connecting Your Monitor CAUTION: Before you begin any USB devices. 5. Connect the...

User Guide
Page 22
.... 1. Attach mechanism 2. Attach the Soundbar by aligning the two slots on the Soundbar with any other device. 1. Power indicator 4. Located on the Soundbar are a: Rotary volume and on the bottom of the monitor. 4. Slide the Soundbar to the left until it snaps in to Contents Page Using the Dell Soundbar (Optional) The Dell Soundbar is a four-speaker, two-channel...
.... 1. Attach mechanism 2. Attach the Soundbar by aligning the two slots on the Soundbar with any other device. 1. Power indicator 4. Located on the Soundbar are a: Rotary volume and on the bottom of the monitor. 4. Slide the Soundbar to the left until it snaps in to Contents Page Using the Dell Soundbar (Optional) The Dell Soundbar is a four-speaker, two-channel...

User Guide
Page 23
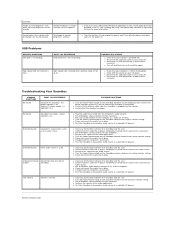
... the screen l Use the Power Management feature to Contents Page Solving Problems Dell™ 3007WFP-HC Flat Panel Monitor User's Guide General Problems Product Specific Problems USB Problems Troubleshooting Your Soundbar CAUTION: Before you might encounter. Image Retention (from a static image)... Brightness Problems Picture too dim or too bright l Perform monitor reset. l Start in other room. LCD Scratched Screen has scratches or smudges l Turn monitor off and clean the screen. l Check for Your Monitor. l Adjust brightness controls. l Ensure video cable connection to...
... the screen l Use the Power Management feature to Contents Page Solving Problems Dell™ 3007WFP-HC Flat Panel Monitor User's Guide General Problems Product Specific Problems USB Problems Troubleshooting Your Soundbar CAUTION: Before you might encounter. Image Retention (from a static image)... Brightness Problems Picture too dim or too bright l Perform monitor reset. l Start in other room. LCD Scratched Screen has scratches or smudges l Turn monitor off and clean the screen. l Check for Your Monitor. l Adjust brightness controls. l Ensure video cable connection to...
User Guide
Page 24
...i.e. 3007WFP-HC ) No Sound Soundbar has power - l Turn the Power/Volume knob on the front panel No change in plug is completely inserted into the jack of the audio application. l Clear any obstructions between the Soundbar and the user. l Turn the monitor off...lower volume setting. l Decrease the volume of the audio source. l Clear any obstructions between the Soundbar and the user. l Confirm that the monitor has power. l Test the Soundbar using a Microsoft® Windows® operation system, install application tool provided in plug is completely ...
...i.e. 3007WFP-HC ) No Sound Soundbar has power - l Turn the Power/Volume knob on the front panel No change in plug is completely inserted into the jack of the audio application. l Clear any obstructions between the Soundbar and the user. l Turn the monitor off...lower volume setting. l Decrease the volume of the audio source. l Clear any obstructions between the Soundbar and the user. l Confirm that the monitor has power. l Test the Soundbar using a Microsoft® Windows® operation system, install application tool provided in plug is completely ...


