
S2522HG Monitor Users Guide
Page 3
... instructions 6 About your monitor 7 Package contents 7 Product features 8 Identifying parts and controls 10 Front view 10 Side view 11 Back view 11 Bottom view 12 Monitor specifications 14 Resolution specifications 16 Supported video modes 16 Preset display modes 16 Electrical specifications 17 Physical characteristics 18 Environmental characteristics 19 Pin assignments 20 Plug and Play capability 22 Universal Serial Bus (USB) interface 22 USB 3.2 Gen1 (5 Gbps) upstream connector 22 USB 3.2 Gen1 (5 Gbps) downstream connector 23 USB ports 23 LCD monitor...
... instructions 6 About your monitor 7 Package contents 7 Product features 8 Identifying parts and controls 10 Front view 10 Side view 11 Back view 11 Bottom view 12 Monitor specifications 14 Resolution specifications 16 Supported video modes 16 Preset display modes 16 Electrical specifications 17 Physical characteristics 18 Environmental characteristics 19 Pin assignments 20 Plug and Play capability 22 Universal Serial Bus (USB) interface 22 USB 3.2 Gen1 (5 Gbps) upstream connector 22 USB 3.2 Gen1 (5 Gbps) downstream connector 23 USB ports 23 LCD monitor...

S2522HG Monitor Users Guide
Page 4
... the power cable 31 Connecting the HDMI cable and the power cable 31 Connecting the SuperSpeed USB 5 Gbps (USB 3.2 Gen1) cable and the power cable 32 Organizing your cables 33 Securing your monitor using Kensington lock (optional) . 33 Removing the monitor stand 34 VESA wall mounting (optional 35 Operating the monitor 36 Turning on the monitor 36 Using the joystick control 36 Using the rear-panel controls 37 Using the On-Screen Display (OSD) menu 38 Accessing the menu system 38 OSD warning message 49 Locking the rear-panel control buttons 52 Setting...
... the power cable 31 Connecting the HDMI cable and the power cable 31 Connecting the SuperSpeed USB 5 Gbps (USB 3.2 Gen1) cable and the power cable 32 Organizing your cables 33 Securing your monitor using Kensington lock (optional) . 33 Removing the monitor stand 34 VESA wall mounting (optional 35 Operating the monitor 36 Turning on the monitor 36 Using the joystick control 36 Using the rear-panel controls 37 Using the On-Screen Display (OSD) menu 38 Accessing the menu system 38 OSD warning message 49 Locking the rear-panel control buttons 52 Setting...
S2522HG Monitor Users Guide
Page 9
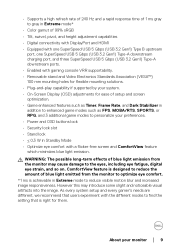
... mode* • Color gamut of 99% sRGB • Tilt, swivel, pivot, and height adjustment capabilities • Digital connectivity with DisplayPort and HDMI • Equipped with one SuperSpeed USB 5 Gbps (USB 3.2 Gen1) Type B upstream port, one SuperSpeed USB 5 Gbps (USB 3.2 Gen1) Type-A downstream charging port, and three SuperSpeed USB 5 Gbps (USB 3.2 Gen1) Type-A downstream ports. • Enabled with gaming console VRR supportability. • Removable stand and Video Electronics Standards Association (VESA™) 100 mm mounting...
... mode* • Color gamut of 99% sRGB • Tilt, swivel, pivot, and height adjustment capabilities • Digital connectivity with DisplayPort and HDMI • Equipped with one SuperSpeed USB 5 Gbps (USB 3.2 Gen1) Type B upstream port, one SuperSpeed USB 5 Gbps (USB 3.2 Gen1) Type-A downstream charging port, and three SuperSpeed USB 5 Gbps (USB 3.2 Gen1) Type-A downstream ports. • Enabled with gaming console VRR supportability. • Removable stand and Video Electronics Standards Association (VESA™) 100 mm mounting...
S2522HG Monitor Users Guide
Page 12
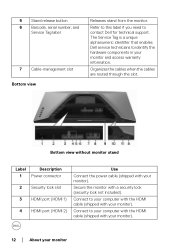
... enables Dell service technicians to your computer with the HDMI cable (shipped with your monitor). Bottom view without monitor stand Label 1 2 3 4 Description Power connector Security lock slot HDMI port (HDMI 1) HDMI port (HDMI 2) Use Connect the power cable (shipped with your monitor). 12 │ About your monitor and access warranty information. Connect to contact Dell for technical support. 5 Stand release button 6 Barcode, serial number, and Service Tag label 7 Cable-management slot Bottom view Releases stand from the monitor. Refer to this label if you need to...
... enables Dell service technicians to your computer with the HDMI cable (shipped with your monitor). Bottom view without monitor stand Label 1 2 3 4 Description Power connector Security lock slot HDMI port (HDMI 1) HDMI port (HDMI 2) Use Connect the power cable (shipped with your monitor). 12 │ About your monitor and access warranty information. Connect to contact Dell for technical support. 5 Stand release button 6 Barcode, serial number, and Service Tag label 7 Cable-management slot Bottom view Releases stand from the monitor. Refer to this label if you need to...

S2522HG Monitor Users Guide
Page 13
5 Stand lock feature Lock the stand to the monitor using the OSD menu. 10 SuperSpeed USB Connect to your USB 5 Gbps (USB 3.2 device. Gen1) Type-A downstream port with your monitor) to the USB-upstream port on the monitor and to your computer. 9 Downlights When the monitor setup is complete, tap the touch sensor at the bottom of the display to charge your computer to turn the downlights on your monitor. 8 SuperSpeed USB Connect your USB 3.2 Gen1 (5 Gbps...
5 Stand lock feature Lock the stand to the monitor using the OSD menu. 10 SuperSpeed USB Connect to your USB 5 Gbps (USB 3.2 device. Gen1) Type-A downstream port with your monitor) to the USB-upstream port on the monitor and to your computer. 9 Downlights When the monitor setup is complete, tap the touch sensor at the bottom of the display to charge your computer to turn the downlights on your monitor. 8 SuperSpeed USB Connect your USB 3.2 Gen1 (5 Gbps...
S2522HG Monitor Users Guide
Page 15
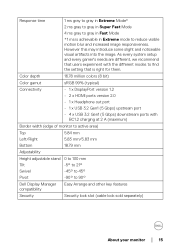
... 18.79 mm Adjustability Height adjustable stand 0 to 130 mm Til t -5° to 21° Swivel -45° to 45° Pivot -90° to 90° Dell Display Manager Easy Arrange and other key features compatibility Security Security lock slot (cable lock sold separately) About your monitor │ 15 Response time 1 ms gray to gray in Extreme Mode* 2 ms gray to...
... 18.79 mm Adjustability Height adjustable stand 0 to 130 mm Til t -5° to 21° Swivel -45° to 45° Pivot -90° to 90° Dell Display Manager Easy Arrange and other key features compatibility Security Security lock slot (cable lock sold separately) About your monitor │ 15 Response time 1 ms gray to gray in Extreme Mode* 2 ms gray to...
S2522HG Monitor Users Guide
Page 32
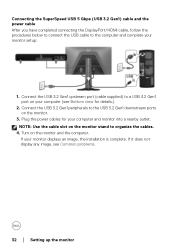
If your monitor setup: 1. If it does not display any image, see Bottom view for your computer (see Common problems. 32 │ Setting up the monitor Connect the USB 3.2 Gen1 upstream port (cable supplied) to a USB 3.2 Gen1 port on the monitor. 3. Turn on the monitor stand to organize the cables. 4. Connecting the SuperSpeed USB 5 Gbps (USB 3.2 Gen1) cable and the power cable After you have completed connecting the DisplayPort/HDMI cable, follow the procedures below to connect the USB cable to the computer...
If your monitor setup: 1. If it does not display any image, see Bottom view for your computer (see Common problems. 32 │ Setting up the monitor Connect the USB 3.2 Gen1 upstream port (cable supplied) to a USB 3.2 Gen1 port on the monitor. 3. Turn on the monitor stand to organize the cables. 4. Connecting the SuperSpeed USB 5 Gbps (USB 3.2 Gen1) cable and the power cable After you have completed connecting the DisplayPort/HDMI cable, follow the procedures below to connect the USB cable to the computer...
S2522HG Monitor Users Guide
Page 40
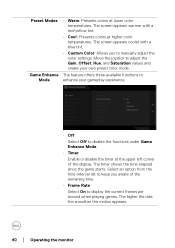
... │ Operating the monitor Game Enhance The feature offers three available functions to Mode enhance your own preset color mode. The screen appears warmer with a blue tint. • Custom Color: Allows you aware of the display. Preset Modes • Warm: Presents colors at the upper left corner of the remaining time. • Frame Rate Select On to manually adjust the color settings. Move the joystick to...
... │ Operating the monitor Game Enhance The feature offers three available functions to Mode enhance your own preset color mode. The screen appears warmer with a blue tint. • Custom Color: Allows you aware of the display. Preset Modes • Warm: Presents colors at the upper left corner of the remaining time. • Frame Rate Select On to manually adjust the color settings. Move the joystick to...

S2522HG Monitor Users Guide
Page 41
... adjustment is used to 100. NOTE: To set the monitor at the highest frame rate, both input lag and screen tearing are possible to increase the green shade of the video image. Hue This feature can shift the color of the video image to Fast, Super Fast, or Extreme. Game Enhance Mode AMD FreeSync Premium Response Time Dark Stabilizer • Display Alignment Activating the function may help...
... adjustment is used to 100. NOTE: To set the monitor at the highest frame rate, both input lag and screen tearing are possible to increase the green shade of the video image. Hue This feature can shift the color of the video image to Fast, Super Fast, or Extreme. Game Enhance Mode AMD FreeSync Premium Response Time Dark Stabilizer • Display Alignment Activating the function may help...

S2522HG Monitor Users Guide
Page 42
... and lightness on the monitor screen. 42 │ Operating the monitor Adjusts the brightness and the contrast of the video image. Adjusts the Brightness first, and then adjust the Contrast only if further adjustment is available only when you select FPS, MOBA/RTS, SPORTS, or RPG preset mode. Saturation Reset Game Brightness/ Contrast This feature can adjust the color saturation of the display. The Contrast function adjusts the degree of the video image. Resets all settings under the Game menu...
... and lightness on the monitor screen. 42 │ Operating the monitor Adjusts the brightness and the contrast of the video image. Adjusts the Brightness first, and then adjust the Contrast only if further adjustment is available only when you select FPS, MOBA/RTS, SPORTS, or RPG preset mode. Saturation Reset Game Brightness/ Contrast This feature can adjust the color saturation of the display. The Contrast function adjusts the degree of the video image. Resets all settings under the Game menu...

S2522HG Monitor Users Guide
Page 43
... the different video signals that may be connected to confirm the selection. Automatically scans for available input sources. DP HDMI 1 HDMI 2 Auto Select Reset Input Source Select the DP input when you are using the HDMI connector. Press the joystick button to confirm the selection. Select the HDMI 1 or HDMI 2 input when you are using the DisplayPort (DP) connector. Press the joystick button to confirm the selection. Resets all settings under the Input Source menu to the factory defaults.
... the different video signals that may be connected to confirm the selection. Automatically scans for available input sources. DP HDMI 1 HDMI 2 Auto Select Reset Input Source Select the DP input when you are using the HDMI connector. Press the joystick button to confirm the selection. Select the HDMI 1 or HDMI 2 input when you are using the DisplayPort (DP) connector. Press the joystick button to confirm the selection. Resets all settings under the Input Source menu to the factory defaults.
S2522HG Monitor Users Guide
Page 48
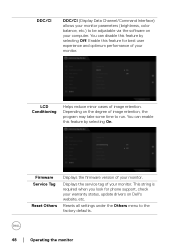
... factory defaults. 48 │ Operating the monitor Enable this feature for phone support, check your warranty status, update drivers on Dell's website, etc. LCD Conditioning Helps reduce minor cases of image retention, the program may take some time to run. Depending on the degree of image retention. Displays the service tag of your monitor. You can enable this feature by selecting On. Firmware Service Tag Reset Others Displays the firmware...
... factory defaults. 48 │ Operating the monitor Enable this feature for phone support, check your warranty status, update drivers on Dell's website, etc. LCD Conditioning Helps reduce minor cases of image retention, the program may take some time to run. Depending on the degree of image retention. Displays the service tag of your monitor. You can enable this feature by selecting On. Firmware Service Tag Reset Others Displays the firmware...

S2522HG Monitor Users Guide
Page 52
...: • Menu Buttons: Choose this option to lock all the OSD menu buttons except the Power button. • Power Button: Choose this option to lock the Power button only. • Menu + Power Buttons: Choose this option to lock all the buttons on the screen. 2. Locking the rear-panel control buttons You can lock the rear-panel control buttons to prevent access to unlock the button(s). 52 │ Operating the monitor Select the Unlock icon to the OSD menu and/or power button. To lock the button(s): 1. Press...
...: • Menu Buttons: Choose this option to lock all the OSD menu buttons except the Power button. • Power Button: Choose this option to lock the Power button only. • Menu + Power Buttons: Choose this option to lock all the buttons on the screen. 2. Locking the rear-panel control buttons You can lock the rear-panel control buttons to prevent access to unlock the button(s). 52 │ Operating the monitor Select the Unlock icon to the OSD menu and/or power button. To lock the button(s): 1. Press...

S2522HG Monitor Users Guide
Page 54
... Screen refresh rate and select 240 Hertz. 7. Tilt and swivel extensions With the stand attached to the monitor, you may need to update your graphics card website and download the latest graphic drivers. NOTE: The stand is not factory-installed. 54 │ Operating the monitor Using the tilt and vertical extension NOTE: The following procedures: If you purchased from any other source, follow the setup instructions that are included with your monitor...
... Screen refresh rate and select 240 Hertz. 7. Tilt and swivel extensions With the stand attached to the monitor, you may need to update your graphics card website and download the latest graphic drivers. NOTE: The stand is not factory-installed. 54 │ Operating the monitor Using the tilt and vertical extension NOTE: The following procedures: If you purchased from any other source, follow the setup instructions that are included with your monitor...

S2522HG Monitor Users Guide
Page 58
... you begin any of the computer. Turn on the connected input signal. 4. Turn off both your monitor and reconnect the video cable; Sel f-test Your monitor provides a self-test feature that allows you to check whether your monitor is working correctly. test operation, remove all digital cables from the back of the procedures in self-test mode, the power LED lights white (default color) and the downlights light blue (default color). NOTE: The message may slightly...
... you begin any of the computer. Turn on the connected input signal. 4. Turn off both your monitor and reconnect the video cable; Sel f-test Your monitor provides a self-test feature that allows you to check whether your monitor is working correctly. test operation, remove all digital cables from the back of the procedures in self-test mode, the power LED lights white (default color) and the downlights light blue (default color). NOTE: The message may slightly...

S2522HG Monitor Users Guide
Page 59
... displayed. 4. Troubleshooting │ 59 Repeat steps 5 and 6 until a menu appears on the surface of the screen). 2. To exit, toggle the joystick control again. Check the video card and computer. Press and hold Button 5 for four seconds until the screen displays green, blue, black, and white colors. Using the joystick control, highlight the Diagnostics option and press the joystick button to start the diagnostics. A gray screen is displayed. Observe if the screen has any screen...
... displayed. 4. Troubleshooting │ 59 Repeat steps 5 and 6 until a menu appears on the surface of the screen). 2. To exit, toggle the joystick control again. Check the video card and computer. Press and hold Button 5 for four seconds until the screen displays green, blue, black, and white colors. Using the joystick control, highlight the Diagnostics option and press the joystick button to start the diagnostics. A gray screen is displayed. Observe if the screen has any screen...

S2522HG Monitor Users Guide
Page 63
... Modes in the Game menu OSD depending on the application. • Adjust the Gain/Offset/Hue/ Saturation values under Custom Color in the Game menu OSD. • Change the Input Color Format to RGB or YCbCr/YPbPr in the Display settings OSD. • Run the built-in Windows Power Options or Mac Energy Saver setting. • Alternatively, use a dynamically changing screensaver. Troubleshooting │ 63 Wrong Color Picture color not good Image retention from a static image left on the monitor...
... Modes in the Game menu OSD depending on the application. • Adjust the Gain/Offset/Hue/ Saturation values under Custom Color in the Game menu OSD. • Change the Input Color Format to RGB or YCbCr/YPbPr in the Display settings OSD. • Run the built-in Windows Power Options or Mac Energy Saver setting. • Alternatively, use a dynamically changing screensaver. Troubleshooting │ 63 Wrong Color Picture color not good Image retention from a static image left on the monitor...

S2522HG Monitor Users Guide
Page 64
... video formats (aspect fill the height or ratio) of the screen in full screen. • Run the built-in the Display menu OSD. • Reset the monitor to unlock. Ensure the computer is not in the power saving mode by default) below the joystick button for 4 seconds to factory settings. Cannot adjust the OSD does not monitor with the appear on the buttons on the rear screen panel • Turn Off the monitor, unplug the power cord, plug...
... video formats (aspect fill the height or ratio) of the screen in full screen. • Run the built-in the Display menu OSD. • Reset the monitor to unlock. Ensure the computer is not in the power saving mode by default) below the joystick button for 4 seconds to factory settings. Cannot adjust the OSD does not monitor with the appear on the buttons on the rear screen panel • Turn Off the monitor, unplug the power cord, plug...

S2522HG Monitor Display Manager Users Guide
Page 1
Dell Display Manager User's Guide Overview Dell Display Manager (DDM) is a Microsoft Windows application used to manage a monitor or a group of automatic settings, energy management, window organization, image rotation, and other features on the desktop background to select Dell Display Manager from the desktop menu. Dell Display Manager User's Guide │ 1 Alternatively, you may launch DDM by right-clicking on select Dell monitors. It allows manual adjustment of the displayed image, assignment of monitors. Information about monitors connected to...
Dell Display Manager User's Guide Overview Dell Display Manager (DDM) is a Microsoft Windows application used to manage a monitor or a group of automatic settings, energy management, window organization, image rotation, and other features on the desktop background to select Dell Display Manager from the desktop menu. Dell Display Manager User's Guide │ 1 Alternatively, you may launch DDM by right-clicking on select Dell monitors. It allows manual adjustment of the displayed image, assignment of monitors. Information about monitors connected to...

S2522HG Monitor Display Manager Users Guide
Page 4
.... Organizing Windows with a specific application, and apply it can also configure the Game preset mode to be the same on the desktop. You first choose a pre-defined layout pattern which suits your application windows on each connected monitor, or it automatically. Assigning Preset Modes to Applications The Auto Mode tab allows you just need to set up your preferred arrangement. 4 │ Dell Display Manager User's Guide
.... Organizing Windows with a specific application, and apply it can also configure the Game preset mode to be the same on the desktop. You first choose a pre-defined layout pattern which suits your application windows on each connected monitor, or it automatically. Assigning Preset Modes to Applications The Auto Mode tab allows you just need to set up your preferred arrangement. 4 │ Dell Display Manager User's Guide


