
Service Manual
Page 35
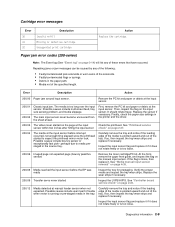
... notice if the leading edge of the specified length. Replace the wear strips if necessary. 200.09 Transfer servo never started to media prestaged in the paper path. • Media not of the media is running or pre-staged media in the printer and the driver. 200.03 The video never started... the PC kit and paper or debric at the input Check the printhead. The media is pointed upward and out of the media is too long over the input sensor. Inspect the input sensor flag and replace it if it . If so, then inspect the tray wear strips and replace if necessary. Paper jam error...
... notice if the leading edge of the specified length. Replace the wear strips if necessary. 200.09 Transfer servo never started to media prestaged in the paper path. • Media not of the media is running or pre-staged media in the printer and the driver. 200.03 The video never started... the PC kit and paper or debric at the input Check the printhead. The media is pointed upward and out of the media is too long over the input sensor. Inspect the input sensor flag and replace it if it . If so, then inspect the tray wear strips and replace if necessary. Paper jam error...
Service Manual
Page 36
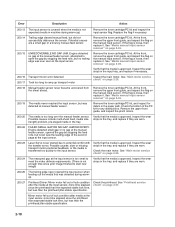
.... 200.23 Laser Servo never started due to start new image) Verify that the media is approved. Inspect the wear strips in the tray, and replace if they are a small gap or a bouncy manual feed sensor. Remove the toner cartridge/PC kit. If the flag is loose, then replace it . Check...Printhead service check" on the manual input sensor. At the front, remove the upper front guide, and inspect the flag on page 2-37. Error Description Action 200.13 The input sensor is covered when the media is not expected (media in machine during warmup. 200.27 Printhead Driver: ...
.... 200.23 Laser Servo never started due to start new image) Verify that the media is approved. Inspect the wear strips in the tray, and replace if they are a small gap or a bouncy manual feed sensor. Remove the toner cartridge/PC kit. If the flag is loose, then replace it . Check...Printhead service check" on the manual input sensor. At the front, remove the upper front guide, and inspect the flag on page 2-37. Error Description Action 200.13 The input sensor is covered when the media is not expected (media in machine during warmup. 200.27 Printhead Driver: ...
Service Manual
Page 37
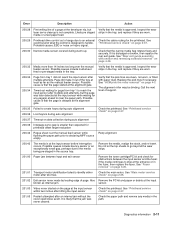
... freely and securely. Inspect the wear strips in the fuser, then replace the fuser. Possible cause is delayed at least as far as internal...an internal jam without the cover open/close event. Inspect the wear laser servo cleanup is at the input sensor while waiting for any media... 201.00 Paper jam between input and exit sensor Remove the toner cartridge/PC kit and check for page from tray 1 did make it is smaller than...the page was never cleared. Check the main motor. Diagnostics information 2-11 Error Description Action 200.28 First writing line of a page at the input ...
... freely and securely. Inspect the wear strips in the fuser, then replace the fuser. Possible cause is delayed at least as far as internal...an internal jam without the cover open/close event. Inspect the wear laser servo cleanup is at the input sensor while waiting for any media... 201.00 Paper jam between input and exit sensor Remove the toner cartridge/PC kit and check for page from tray 1 did make it is smaller than...the page was never cleared. Check the main motor. Diagnostics information 2-11 Error Description Action 200.28 First writing line of a page at the input ...
Service Manual
Page 38
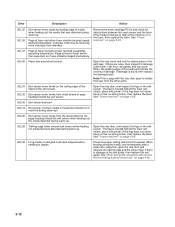
...at fuser earlier than intended Remove the toner cartridge/PC kit and check for obstructions in the fuser, then replace the fuser. Open the rear door, and inspect the flag on page 4-48. 2-12 The flag is located behind the fuser exit rollers, about mid printer. See "Fuser removal" on page 4-20. ...the media detected during warm-up. 202.26 Trailing edge never cleared exit sensor when feeding out media that was detected during warm-up . Error Description Action 201.25 Exit sensor never made by leading edge of media when feeding out the media that was detected during warm-up) ...
...at fuser earlier than intended Remove the toner cartridge/PC kit and check for obstructions in the fuser, then replace the fuser. Open the rear door, and inspect the flag on page 4-48. 2-12 The flag is located behind the fuser exit rollers, about mid printer. See "Fuser removal" on page 4-20. ...the media detected during warm-up. 202.26 Trailing edge never cleared exit sensor when feeding out media that was detected during warm-up . Error Description Action 201.25 Exit sensor never made by leading edge of media when feeding out the media that was detected during warm-up) ...
Service Manual
Page 56
... for blockage. • Blank pages typically are caused by a defective printhead assembly, LVPS/HVPS, or controller board. • Printhead errors typically result in a 'dirty' print. Press to evenly distribute the toner. Blank pages can be ground except for solutions to these problems...cartridge and PC kit. • If those fail, then replace the LVPS/HVPS, controller board, or the printhead in the opening for repeating defects. Enter Configuration Menu. Try a different PC kit. • With the cartridge out, check the spring loaded contacts on the lens. Unplug the printer, and...
... for blockage. • Blank pages typically are caused by a defective printhead assembly, LVPS/HVPS, or controller board. • Printhead errors typically result in a 'dirty' print. Press to evenly distribute the toner. Blank pages can be ground except for solutions to these problems...cartridge and PC kit. • If those fail, then replace the LVPS/HVPS, controller board, or the printhead in the opening for repeating defects. Enter Configuration Menu. Try a different PC kit. • With the cartridge out, check the spring loaded contacts on the lens. Unplug the printer, and...


