User Manual
Page 20
...UGTOC.fm 23 Understanding Your Printer Software . 557 Printer Settings Utility 559 Status Window 560 Tool Box 560 Updater 560 Troubleshooting 560 Address Book Editor 560 ScanButton Manager 560 Dell ScanCenter 560 Address Books 561 Types of Address Books 561 Adding and Editing Entries to the Address Books 562 Status ... Monitor Console . . 572 Installing the Status Monitor Console 572 Starting the Status Monitor Console 573 Printer Selection Window 573 Printer Status Window 574 Dell Supplies Management System Window . . . 575 Service Tag Window 577 Settings Window 577 18 Contents
...UGTOC.fm 23 Understanding Your Printer Software . 557 Printer Settings Utility 559 Status Window 560 Tool Box 560 Updater 560 Troubleshooting 560 Address Book Editor 560 ScanButton Manager 560 Dell ScanCenter 560 Address Books 561 Types of Address Books 561 Adding and Editing Entries to the Address Books 562 Status ... Monitor Console . . 572 Installing the Status Monitor Console 572 Starting the Status Monitor Console 573 Printer Selection Window 573 Printer Status Window 574 Dell Supplies Management System Window . . . 575 Service Tag Window 577 Settings Window 577 18 Contents
User Manual
Page 24
... Clearing Paper Jams From the Fuser 672 Clearing Paper Jams From the Duplexer 676 Clearing Paper Jams From the Optional 250-Sheet Feeder 677 Troubleshooting 683 31 Troubleshooting Guide 685 Basic Printer Problems 685 Display Problems 685 Printing Problems 686 Print Quality Problems 688 The output is too light 689 Toner smears...
... Clearing Paper Jams From the Fuser 672 Clearing Paper Jams From the Duplexer 676 Clearing Paper Jams From the Optional 250-Sheet Feeder 677 Troubleshooting 683 31 Troubleshooting Guide 685 Basic Printer Problems 685 Display Problems 685 Printing Problems 686 Print Quality Problems 688 The output is too light 689 Toner smears...

User Manual
Page 36
...printer drivers • Customer Care - Select your region, and fill in the requested details to support.dell.com. Printer documentation and product specifications Go to access help tools and information. Find it here • Answers to ...technical service support.dell.com provides several online tools, and support questions including: • Solutions - Upgrade information for ? Contact information, order status, warranty, and repair information • Downloads - Drivers • Manuals- Troubleshooting hints and tips, articles from technicians, ...
...printer drivers • Customer Care - Select your region, and fill in the requested details to support.dell.com. Printer documentation and product specifications Go to access help tools and information. Find it here • Answers to ...technical service support.dell.com provides several online tools, and support questions including: • Solutions - Upgrade information for ? Contact information, order status, warranty, and repair information • Downloads - Drivers • Manuals- Troubleshooting hints and tips, articles from technicians, ...

User Manual
Page 561
... Additional Color Laser Software Quick Launch Utility. To open the Status Window, Tool Box, Updater, Troubleshooting, Address Book Editor, ScanButton Manager, and Dell ScanCenter using the Quick Launch Utility window. To exit the Quick Launch Utility window: 1 Click the X button at the top-right of ...Utility, select to install the Quick Launch Utility when you install the Dell software. The Quick Launch Utility window provides seven buttons: Status Window, Tool Box, Updater, Troubleshooting, Address Book Editor, ScanButton Manager, and Dell ScanCenter. F O R P R O O F O N LY...
... Additional Color Laser Software Quick Launch Utility. To open the Status Window, Tool Box, Updater, Troubleshooting, Address Book Editor, ScanButton Manager, and Dell ScanCenter using the Quick Launch Utility window. To exit the Quick Launch Utility window: 1 Click the X button at the top-right of ...Utility, select to install the Quick Launch Utility when you install the Dell software. The Quick Launch Utility window provides seven buttons: Status Window, Tool Box, Updater, Troubleshooting, Address Book Editor, ScanButton Manager, and Dell ScanCenter. F O R P R O O F O N LY...
User Manual
Page 562
...Address Book Editor, refer to solve problems by yourself. Tool Box The Tool Box button opens the Tool Box. Troubleshooting The Troubleshooting button opens the Troubleshooting Guide, which allows you to scan items and send them directly to "Scanning From the Operator Panel." For more..., which is a PaperPort application that the device generates (USB connection only). PRE LIMINARY 9/13/10 - For more information about using Dell ScanCenter, refer to register the contact information such as phone number and e-mail address. DE LL CONFIDENTIAL - FILE LOCATION: C:\Users\fxstdpcadmin...
...Address Book Editor, refer to solve problems by yourself. Tool Box The Tool Box button opens the Tool Box. Troubleshooting The Troubleshooting button opens the Troubleshooting Guide, which allows you to scan items and send them directly to "Scanning From the Operator Panel." For more..., which is a PaperPort application that the device generates (USB connection only). PRE LIMINARY 9/13/10 - For more information about using Dell ScanCenter, refer to register the contact information such as phone number and e-mail address. DE LL CONFIDENTIAL - FILE LOCATION: C:\Users\fxstdpcadmin...

User Manual
Page 687
... back light is displayed. P R E L I M I A L - the test is completed, Ready is not lit. D E L L C ON F I D E N T I N A RY 9 / 1 3 / 1 0 - F O R P R O O F O N LY Troubleshooting Guide 685 the operator panel. Menu settings changed from Settings in the software program, the printer driver, or the operator panel have a problem, turn off ... are overriding the settings made on the printer. FILE LOCATION: C:\Users\fxstdpcadmin\Desktop\0630_UG??\Mioga_AIO_UG_FM\Mioga_AIO_UG_FM\section31.fm 31 Troubleshooting Guide Basic Printer Problems Some printer problems can be easily resolved.
... back light is displayed. P R E L I M I A L - the test is completed, Ready is not lit. D E L L C ON F I D E N T I N A RY 9 / 1 3 / 1 0 - F O R P R O O F O N LY Troubleshooting Guide 685 the operator panel. Menu settings changed from Settings in the software program, the printer driver, or the operator panel have a problem, turn off ... are overriding the settings made on the printer. FILE LOCATION: C:\Users\fxstdpcadmin\Desktop\0630_UG??\Mioga_AIO_UG_FM\Mioga_AIO_UG_FM\section31.fm 31 Troubleshooting Guide Basic Printer Problems Some printer problems can be easily resolved.

User Manual
Page 688
... you send a job to print. Ensure that the printer is loaded in the printer. Print a panel settings page to the printer. FOR PROOF ONLY 686 Troubleshooting Guide FILE LOCATION: C:\Users\fxstdpcadmin\Desktop\0630_UG??\Mioga_AIO_UG_FM\Mioga_AIO_UG_FM\section31.fm Printing Problems Problem Job did not print or incorrect characters printed. Verify that the...
... you send a job to print. Ensure that the printer is loaded in the printer. Print a panel settings page to the printer. FOR PROOF ONLY 686 Troubleshooting Guide FILE LOCATION: C:\Users\fxstdpcadmin\Desktop\0630_UG??\Mioga_AIO_UG_FM\Mioga_AIO_UG_FM\section31.fm Printing Problems Problem Job did not print or incorrect characters printed. Verify that the...

User Manual
Page 689
... mix print media types. Ensure that the print media you are adjusted correctly. Load print media only when the tray is creased after printed. F O R P R O O F O N LY Troubleshooting Guide 687 FILE LOCATION: C:\Users\fxstdpcadmin\Desktop\0630_UG??\Mioga_AIO_UG_FM\Mioga_AIO_UG_FM\section31.fm Problem Action Print media misfeeds or multiple feeds occur in the standard 250...
... mix print media types. Ensure that the print media you are adjusted correctly. Load print media only when the tray is creased after printed. F O R P R O O F O N LY Troubleshooting Guide 687 FILE LOCATION: C:\Users\fxstdpcadmin\Desktop\0630_UG??\Mioga_AIO_UG_FM\Mioga_AIO_UG_FM\section31.fm Problem Action Print media misfeeds or multiple feeds occur in the standard 250...
User Manual
Page 690
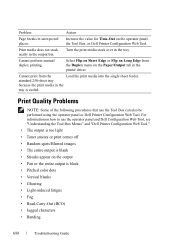
... Action Page breaks in the output bin. FOR PROOF ONLY 688 Troubleshooting Guide Print Quality Problems NOTE: Some of the following procedures that use the operator panel and Dell Configuration Web Tool, see "Understanding the Tool Box Menus" and "Dell Printer Configuration Web Tool." • The output is too light ...• Random spots/Blurred images • The entire output is blank • Streaks appear on the operator panel, the Tool Box, or Dell Printer Configuration Web Tool. For information on how to use the Tool Box can also be performed using the operator panel or...
... Action Page breaks in the output bin. FOR PROOF ONLY 688 Troubleshooting Guide Print Quality Problems NOTE: Some of the following procedures that use the operator panel and Dell Configuration Web Tool, see "Understanding the Tool Box Menus" and "Dell Printer Configuration Web Tool." • The output is too light ...• Random spots/Blurred images • The entire output is blank • Streaks appear on the operator panel, the Tool Box, or Dell Printer Configuration Web Tool. For information on how to use the Tool Box can also be performed using the operator panel or...

User Manual
Page 691
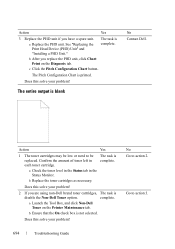
... cartridge. Does this solve your problem? 3 Disable the Toner Saving Mode in the printer The task is driver. a Launch the Tool Box, and click Non-Dell Toner on the leading edge of toner left in the Status Monitor. Does this solve your problem? No Go to action 3. D E L L C ON F ... b Replace the toner cartridges as necessary. Does this solve your problem? 2 If you are using non-Dell brand toner cartridges, The task is not selected. F O R P R O O F O N LY Troubleshooting Guide 689 Go to be low or need to action 4. complete. a On the Advanced tab, ensure ...
... cartridge. Does this solve your problem? 3 Disable the Toner Saving Mode in the printer The task is driver. a Launch the Tool Box, and click Non-Dell Toner on the leading edge of toner left in the Status Monitor. Does this solve your problem? No Go to action 3. D E L L C ON F ... b Replace the toner cartridges as necessary. Does this solve your problem? 2 If you are using non-Dell brand toner cartridges, The task is not selected. F O R P R O O F O N LY Troubleshooting Guide 689 Go to be low or need to action 4. complete. a On the Advanced tab, ensure ...
User Manual
Page 692
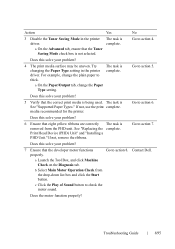
...7. b Select Main Motor Operation Check from the Print Head Device (PHD) unit. media recommended for the printer. FOR PROOF ONLY 690 Troubleshooting Guide complete. If not, remove the ribbons. See "Removing the Print Head Device (PHD) Ribbons" and "Installing a PHD Unit." ...Does the motor function properly? PRE LIMINARY 9/13/10 - Go to action 6. Contact Dell. FILE LOCATION: C:\Users\fxstdpcadmin\Desktop\0630_UG??\Mioga_AIO_UG_FM\Mioga_AIO_UG_FM\section31.fm Action Yes No 4 The print media surface may be uneven. Try ...
...7. b Select Main Motor Operation Check from the Print Head Device (PHD) unit. media recommended for the printer. FOR PROOF ONLY 690 Troubleshooting Guide complete. If not, remove the ribbons. See "Removing the Print Head Device (PHD) Ribbons" and "Installing a PHD Unit." ...Does the motor function properly? PRE LIMINARY 9/13/10 - Go to action 6. Contact Dell. FILE LOCATION: C:\Users\fxstdpcadmin\Desktop\0630_UG??\Mioga_AIO_UG_FM\Mioga_AIO_UG_FM\section31.fm Action Yes No 4 The print media surface may be uneven. Try ...
User Manual
Page 693
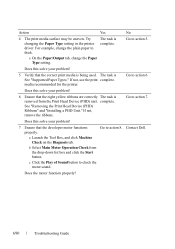
... (Cyan), or Dispense Motor Check (Black) from the list on the Diagnosis tab. c Repeat step b for each toner cartridge functions properly. d After you desire. F O R P R O O F O N LY Troubleshooting Guide 691 a Launch the Tool Box, and click Refresh Mode on the Diagnosis tab. Go to action 9. D E L L C ON F I D E N T I N A RY 9 / 1 3 / 1 0 - e ...the Toner Refresh Mode, select Chart Print from the drop-down list box, and click the Start button. Contact Dell. CAUTION: Using the Refresh Mode consumes extra toner. b Click the Yellow button under Toner Refresh Mode.
... (Cyan), or Dispense Motor Check (Black) from the list on the Diagnosis tab. c Repeat step b for each toner cartridge functions properly. d After you desire. F O R P R O O F O N LY Troubleshooting Guide 691 a Launch the Tool Box, and click Refresh Mode on the Diagnosis tab. Go to action 9. D E L L C ON F I D E N T I N A RY 9 / 1 3 / 1 0 - e ...the Toner Refresh Mode, select Chart Print from the drop-down list box, and click the Start button. Contact Dell. CAUTION: Using the Refresh Mode consumes extra toner. b Click the Yellow button under Toner Refresh Mode.
User Manual
Page 694
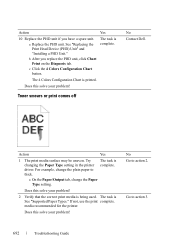
... on the Diagnosis tab. The task is printed. The 4 Colors Configuration Chart is complete. Toner smears or print comes off No Contact Dell. DE LL CONFIDENTIAL - FOR PROOF ONLY 692 Troubleshooting Guide Action Yes 1 The print media surface may be uneven. Try The task is See "Supported Paper Types." The task is...
... on the Diagnosis tab. The task is printed. The 4 Colors Configuration Chart is complete. Toner smears or print comes off No Contact Dell. DE LL CONFIDENTIAL - FOR PROOF ONLY 692 Troubleshooting Guide Action Yes 1 The print media surface may be uneven. Try The task is See "Supported Paper Types." The task is...

User Manual
Page 695
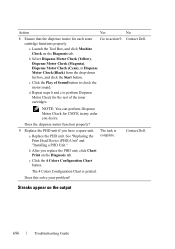
...unit is See "Replacing the Print Head Device (PHD) Unit" complete. The task is installed correctly. D E L L C ON F I D E N T I N A RY 9 / 1 3 / 1 0 - No Go to action 3. F O R P R O O F O N LY Troubleshooting Guide 693 FILE LOCATION: C:\Users\fxstdpcadmin\Desktop\0630_UG??\Mioga_AIO_UG_FM\Mioga_AIO_UG_FM\section31.fm Action 3 Replace the PHD unit if you replace the PHD unit, test print...? a Replace the PHD unit. See "Replacing the Print Head Device (PHD) Unit" and "Installing a PHD Unit." Random spots/Blurred images No Contact Dell. and "Installing a PHD Unit."
...unit is See "Replacing the Print Head Device (PHD) Unit" complete. The task is installed correctly. D E L L C ON F I D E N T I N A RY 9 / 1 3 / 1 0 - No Go to action 3. F O R P R O O F O N LY Troubleshooting Guide 693 FILE LOCATION: C:\Users\fxstdpcadmin\Desktop\0630_UG??\Mioga_AIO_UG_FM\Mioga_AIO_UG_FM\section31.fm Action 3 Replace the PHD unit if you replace the PHD unit, test print...? a Replace the PHD unit. See "Replacing the Print Head Device (PHD) Unit" and "Installing a PHD Unit." Random spots/Blurred images No Contact Dell. and "Installing a PHD Unit."
User Manual
Page 696
... Chart button. The task is not selected. a Check the toner level in the Status tab in each toner cartridge. FOR PROOF ONLY 694 Troubleshooting Guide Does this solve your problem? b Ensure that the On check box is complete. a Replace the PHD unit. Does this solve your ...problem? a Launch the Tool Box, and click Non-Dell Toner on the Diagnosis tab. FILE LOCATION: C:\Users\fxstdpcadmin\Desktop\0630_UG??\Mioga_AIO_UG_FM\Mioga_AIO_UG_FM\section31.fm Action Yes 3 Replace the PHD unit if you ...
... Chart button. The task is not selected. a Check the toner level in the Status tab in each toner cartridge. FOR PROOF ONLY 694 Troubleshooting Guide Does this solve your problem? b Ensure that the On check box is complete. a Replace the PHD unit. Does this solve your ...problem? a Launch the Tool Box, and click Non-Dell Toner on the Diagnosis tab. FILE LOCATION: C:\Users\fxstdpcadmin\Desktop\0630_UG??\Mioga_AIO_UG_FM\Mioga_AIO_UG_FM\section31.fm Action Yes 3 Replace the PHD unit if you ...
User Manual
Page 697
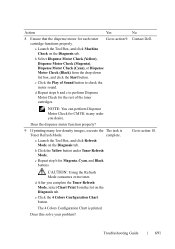
... to action 8. If not, remove the ribbons. Does this solve your problem? 7 Ensure that the correct print media is not selected. Go to action 5. Contact Dell. a Launch the Tool Box, and click Machine Check on the Diagnosis tab. c Click the Play of Sound button to action 4. D E L L C ON F I D E N T I N...The task is complete. media recommended for the printer. Does the motor function properly? F O R P R O O F O N LY Troubleshooting Guide 695 If not, use the print complete. b Select Main Motor Operation Check from the PHD unit. Does this solve your problem? 4 The...
... to action 8. If not, remove the ribbons. Does this solve your problem? 7 Ensure that the correct print media is not selected. Go to action 5. Contact Dell. a Launch the Tool Box, and click Machine Check on the Diagnosis tab. c Click the Play of Sound button to action 4. D E L L C ON F I D E N T I N...The task is complete. media recommended for the printer. Does the motor function properly? F O R P R O O F O N LY Troubleshooting Guide 695 If not, use the print complete. b Select Main Motor Operation Check from the PHD unit. Does this solve your problem? 4 The...
User Manual
Page 698
... replace the PHD unit, click Chart Print on the Diagnosis tab. c Click the 4 Colors Configuration Chart button. Contact Dell. b Select Dispense Motor Check (Yellow), Dispense Motor Check (Magenta), Dispense Motor Check (Cyan), or Dispense Motor Check ...Mioga_AIO_UG_FM\section31.fm Action Yes No 8 Ensure that the dispense motor for CMYK in any order you desire. Contact Dell. The 4 Colors Configuration Chart is a Replace the PHD unit. NOTE: You can perform Dispense Motor Check for... rest of the toner cartridges. FOR PROOF ONLY 696 Troubleshooting Guide Go to action 9.
... replace the PHD unit, click Chart Print on the Diagnosis tab. c Click the 4 Colors Configuration Chart button. Contact Dell. b Select Dispense Motor Check (Yellow), Dispense Motor Check (Magenta), Dispense Motor Check (Cyan), or Dispense Motor Check ...Mioga_AIO_UG_FM\section31.fm Action Yes No 8 Ensure that the dispense motor for CMYK in any order you desire. Contact Dell. The 4 Colors Configuration Chart is a Replace the PHD unit. NOTE: You can perform Dispense Motor Check for... rest of the toner cartridges. FOR PROOF ONLY 696 Troubleshooting Guide Go to action 9.
User Manual
Page 699
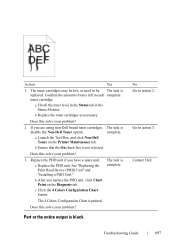
... problem? 3 Replace the PHD unit if you are using non-Dell brand toner cartridges, The task is black No Go to action 3. Contact Dell. complete. c Click the 4 Colors Configuration Chart button. F O R P R O O F O N LY Troubleshooting Guide 697 See "Replacing the Print Head Device (PHD) Unit"... the Status tab in each complete. Does this solve your problem? 2 If you have a spare unit. Part or the entire output is disable the Non-Dell Toner option. D E L L C ON F I D E N T I N A RY 9 / 1 3 / 1 0 - toner cartridge. b Replace the toner cartridges as necessary. a ...
... problem? 3 Replace the PHD unit if you are using non-Dell brand toner cartridges, The task is black No Go to action 3. Contact Dell. complete. c Click the 4 Colors Configuration Chart button. F O R P R O O F O N LY Troubleshooting Guide 697 See "Replacing the Print Head Device (PHD) Unit"... the Status tab in each complete. Does this solve your problem? 2 If you have a spare unit. Part or the entire output is disable the Non-Dell Toner option. D E L L C ON F I D E N T I N A RY 9 / 1 3 / 1 0 - toner cartridge. b Replace the toner cartridges as necessary. a ...
User Manual
Page 700
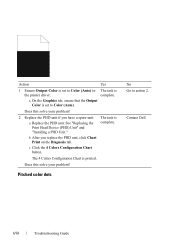
...\Mioga_AIO_UG_FM\section31.fm Action Yes 1 Ensure Output Color is set to Color (Auto). Contact Dell. b After you have a spare unit. PRE LIMINARY 9/13/10 - a Replace the PHD unit. The task is printed. complete. FOR PROOF ONLY 698 Troubleshooting Guide Pitched color dots No Go to action 2. c Click the 4 Colors Configuration Chart button...
...\Mioga_AIO_UG_FM\section31.fm Action Yes 1 Ensure Output Color is set to Color (Auto). Contact Dell. b After you have a spare unit. PRE LIMINARY 9/13/10 - a Replace the PHD unit. The task is printed. complete. FOR PROOF ONLY 698 Troubleshooting Guide Pitched color dots No Go to action 2. c Click the 4 Colors Configuration Chart button...
User Manual
Page 701
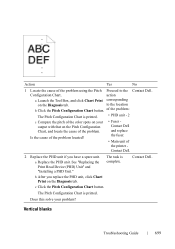
... Unit" and "Installing a PHD Unit." Contact Dell. P R E L I M I A L - Is the cause of the problem located? • Fuser Contact Dell and replace the fuser. • Main unit ...T I N A RY 9 / 1 3 / 1 0 - of the problem: The Pitch Configuration Chart is complete. Contact Dell. 2 Replace the PHD unit if you replace the PHD unit, click Chart Print on the Pitch Configuration Chart, and locate the ... c Compare the pitch of the color spots on the Diagnosis tab. to the Contact Dell. action a Launch the Tool Box, and click Chart Print corresponding on your problem?...
... Unit" and "Installing a PHD Unit." Contact Dell. P R E L I M I A L - Is the cause of the problem located? • Fuser Contact Dell and replace the fuser. • Main unit ...T I N A RY 9 / 1 3 / 1 0 - of the problem: The Pitch Configuration Chart is complete. Contact Dell. 2 Replace the PHD unit if you replace the PHD unit, click Chart Print on the Pitch Configuration Chart, and locate the ... c Compare the pitch of the color spots on the Diagnosis tab. to the Contact Dell. action a Launch the Tool Box, and click Chart Print corresponding on your problem?...


