User Manual
Page 12
... Exposure 326 2 Sided 326 Multiple-Up 328 Margin Top/Bottom 329 Margin Left/Right 330 Margin Middle 331 Changing the Default Settings 331 Setting the Power Saver Timer Option 332 19 Scanning 335 Scanning Overview 335 Scanning - With scanner driver 335 Scanning -
... Exposure 326 2 Sided 326 Multiple-Up 328 Margin Top/Bottom 329 Margin Left/Right 330 Margin Middle 331 Changing the Default Settings 331 Setting the Power Saver Timer Option 332 19 Scanning 335 Scanning Overview 335 Scanning - With scanner driver 335 Scanning -
User Manual
Page 21
... Adding Roles of Printer Services 601 Printer Setup 602 Installing a Printer Driver Using the Add Printer Wizard 602 27 Specifications 605 Operating System Compatibility 605 Power Supply 605 Dimensions 605 Memory 605 Page Description Language (PDL)/Emulation, Operating System, and Interface 606 Contents 19
... Adding Roles of Printer Services 601 Printer Setup 602 Installing a Printer Driver Using the Add Printer Wizard 602 27 Specifications 605 Operating System Compatibility 605 Power Supply 605 Dimensions 605 Memory 605 Page Description Language (PDL)/Emulation, Operating System, and Interface 606 Contents 19

User Manual
Page 42
DE LL CONFIDENTIAL - PRE LIMINARY 9/13/10 - FOR PROOF ONLY 40 About the Printer FILE LOCATION: C:\Users\fxstdpcadmin\Desktop\0630_UG??\Mioga_AIO_UG_FM\Mioga_AIO_UG_FM\section04.fm Front and Rear View Front View 1 Automatic Document Feeder 7 Duplexer (2155cdn only) (ADF) 2 Side Button 8 Optional 250-Sheet Feeder 3 Power Switch 4 Toner Access Cover (toner cartridges inside) 5 Fuser 9 Standard 250-Sheet Tray 10 Single Sheet Feeder (SSF) 11 Front Cover NOTE: You can open the front cover by pushing the side button (2).
DE LL CONFIDENTIAL - PRE LIMINARY 9/13/10 - FOR PROOF ONLY 40 About the Printer FILE LOCATION: C:\Users\fxstdpcadmin\Desktop\0630_UG??\Mioga_AIO_UG_FM\Mioga_AIO_UG_FM\section04.fm Front and Rear View Front View 1 Automatic Document Feeder 7 Duplexer (2155cdn only) (ADF) 2 Side Button 8 Optional 250-Sheet Feeder 3 Power Switch 4 Toner Access Cover (toner cartridges inside) 5 Fuser 9 Standard 250-Sheet Tray 10 Single Sheet Feeder (SSF) 11 Front Cover NOTE: You can open the front cover by pushing the side button (2).

User Manual
Page 43
D E L L C ON F I D E N T I N A RY 9 / 1 3 / 1 0 - F O R P R O O F O N LY About the Printer 41 Rear View 1 Automatic Document Feeder (ADF) 6 "Blue" Plug 2 Control Board Cover 7 Power Connector 3 Control Board 8 Ethernet Port 4 Phone Connector 9 Wireless Adapter Socket 5 Wall Jack Connector 10 USB Port Space Requirements Provide enough room to open the printer ...
D E L L C ON F I D E N T I N A RY 9 / 1 3 / 1 0 - F O R P R O O F O N LY About the Printer 41 Rear View 1 Automatic Document Feeder (ADF) 6 "Blue" Plug 2 Control Board Cover 7 Power Connector 3 Control Board 8 Ethernet Port 4 Phone Connector 9 Wireless Adapter Socket 5 Wall Jack Connector 10 USB Port Space Requirements Provide enough room to open the printer ...
User Manual
Page 59
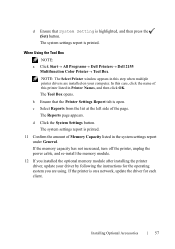
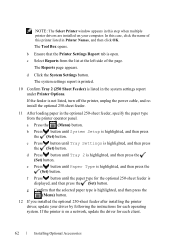
When Using the Tool Box NOTE: a Click Start All Programs Dell Printers Dell 2155 Multifunction Color Printer Tool Box. In this case, click the name of this step when multiple printer drivers are using. The Reports page ...appears. If the memory capacity has not increased, turn off the printer, unplug the power cable, and re-install the memory module. 12 If you...
When Using the Tool Box NOTE: a Click Start All Programs Dell Printers Dell 2155 Multifunction Color Printer Tool Box. In this case, click the name of this step when multiple printer drivers are using. The Reports page ...appears. If the memory capacity has not increased, turn off the printer, unplug the power cable, and re-install the memory module. 12 If you...

User Manual
Page 61
... the total amount of the printer about 200 mm. Installing Optional Accessories 59 CAUTION: Two people are required to turn off the printer, unplug the power cable, and disconnect all cables from the back of the printer before starting this task. 1 Ensure that the printer is turned off, and then disconnect...
... the total amount of the printer about 200 mm. Installing Optional Accessories 59 CAUTION: Two people are required to turn off the printer, unplug the power cable, and disconnect all cables from the back of the printer before starting this task. 1 Ensure that the printer is turned off, and then disconnect...
User Manual
Page 64
... Options. In this case, click the name of the page. b Ensure that the selected paper type is not listed, turn off the printer, unplug the power cable, and reinstall the optional 250-sheet feeder. 11 After loading paper in the optional 250-sheet feeder, specify the paper type from the list...
... Options. In this case, click the name of the page. b Ensure that the selected paper type is not listed, turn off the printer, unplug the power cable, and reinstall the optional 250-sheet feeder. 11 After loading paper in the optional 250-sheet feeder, specify the paper type from the list...
User Manual
Page 99
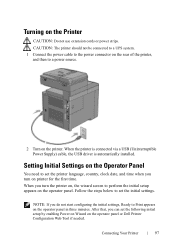
... you do not start configuring the initial settings, Ready to set the initial settings. When the printer is connected via a USB (Uninterruptible Power Supply) cable, the USB driver is automatically installed. Setting Initial Settings on the Operator Panel You need to Print appears on the operator ...panel or Dell Printer Configuration Web Tool if needed. When you can set the following initial setup by enabling Power on Wizard on the operator panel in three minutes. Connecting Your Printer 97 After that...
... you do not start configuring the initial settings, Ready to set the initial settings. When the printer is connected via a USB (Uninterruptible Power Supply) cable, the USB driver is automatically installed. Setting Initial Settings on the Operator Panel You need to Print appears on the operator ...panel or Dell Printer Configuration Web Tool if needed. When you can set the following initial setup by enabling Power on Wizard on the operator panel in three minutes. Connecting Your Printer 97 After that...

User Manual
Page 182
...Displays whether to enter Sleep mode after it finishes a job. Off indicates that is emitted when the operator panel input is disabled. 180 Dell Printer Configuration Web Tool Deep Sleep Displays the time taken by the printer to wake up from the computer. Auto Reset Displays the amount...is correct. Off indicates that stops abnormally. Sleep Displays the time taken by the printer to the defaults when no additional settings are made. Power Saver Time - Fault Time-Out Displays the amount of the tone that is emitted when the operator panel input is disabled. Control Panel ...
...Displays whether to enter Sleep mode after it finishes a job. Off indicates that is emitted when the operator panel input is disabled. 180 Dell Printer Configuration Web Tool Deep Sleep Displays the time taken by the printer to wake up from the computer. Auto Reset Displays the amount...is correct. Off indicates that stops abnormally. Sleep Displays the time taken by the printer to the defaults when no additional settings are made. Power Saver Time - Fault Time-Out Displays the amount of the tone that is emitted when the operator panel input is disabled. Control Panel ...

User Manual
Page 197
... Purpose: To configure the basic printer settings. Sets the volume of time the printer waits for data to arrive from the computer. Dell Printer Configuration Web Tool 195 Sleep Power Saver Time - Sets the amount of the tone that is emitted when the printer becomes ready, or disables the tone. Deep Sleep... Power Saver Wake Up OffHook Wake Up Auto Reset Fault Time-Out Job Time-Out Control Panel Tone Invalid Key Tone Machine Ready Tone Copy Completed ...
... Purpose: To configure the basic printer settings. Sets the volume of time the printer waits for data to arrive from the computer. Dell Printer Configuration Web Tool 195 Sleep Power Saver Time - Sets the amount of the tone that is emitted when the printer becomes ready, or disables the tone. Deep Sleep... Power Saver Wake Up OffHook Wake Up Auto Reset Fault Time-Out Job Time-Out Control Panel Tone Invalid Key Tone Machine Ready Tone Copy Completed ...

User Manual
Page 215
... module. When the print meter is initialized, the meter count is installed. Click the Start button to perform the initial setup for the printer. Power On Wizard Click the Start button to clear all files stored as Secure Print in the optional 512 MB memory module. printer. Reset Defaults System... Initialize PrintMeter Purpose: To initialize the print meter of the printer. Click the Start button to reset the Section and restart system parameters. Reset Defaults Power On Wizard Reset Defaults User Click the Start button to 0. Dell Printer Configuration Web Tool 213
... module. When the print meter is initialized, the meter count is installed. Click the Start button to perform the initial setup for the printer. Power On Wizard Click the Start button to clear all files stored as Secure Print in the optional 512 MB memory module. printer. Reset Defaults System... Initialize PrintMeter Purpose: To initialize the print meter of the printer. Click the Start button to reset the Section and restart system parameters. Reset Defaults Power On Wizard Reset Defaults User Click the Start button to 0. Dell Printer Configuration Web Tool 213

User Manual
Page 334
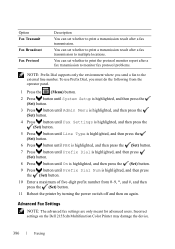
...mode when the printer is not used for a certain period of the Clear) button. (Menu) menu, press the (All Setting the Power Saver Timer Option You can specify from 1 to 30 minutes for the printer. FOR PROOF ONLY 332 Copying PRE LIMINARY 9/13/10 - ...C:\Users\fxstdpcadmin\Desktop\0630_UG??\Mioga_AIO_UG_FM\Mioga_AIO_UG_FM\section18.fm 3 Press button until Defaults Settings is highlighted, and then press the (Set) button. 4 Ensure that Power Saver Timer is highlighted, and then press the (Set) button. 6 Press button until the desired setting is highlighted or enter the value using the ...
...mode when the printer is not used for a certain period of the Clear) button. (Menu) menu, press the (All Setting the Power Saver Timer Option You can specify from 1 to 30 minutes for the printer. FOR PROOF ONLY 332 Copying PRE LIMINARY 9/13/10 - ...C:\Users\fxstdpcadmin\Desktop\0630_UG??\Mioga_AIO_UG_FM\Mioga_AIO_UG_FM\section18.fm 3 Press button until Defaults Settings is highlighted, and then press the (Set) button. 4 Ensure that Power Saver Timer is highlighted, and then press the (Set) button. 6 Press button until the desired setting is highlighted or enter the value using the ...

User Manual
Page 381
... or button until the desired time zone is entered. D E L L C ON F I D E N T I N A RY 9 / 1 3 / 1 0 - A pause must be necessary to reset the correct time and date if loss of power to delete the last digit or character. For example, enter the access code 9 and then press the (Redial/Pause) button before entering the telephone number...
... or button until the desired time zone is entered. D E L L C ON F I D E N T I N A RY 9 / 1 3 / 1 0 - A pause must be necessary to reset the correct time and date if loss of power to delete the last digit or character. For example, enter the access code 9 and then press the (Redial/Pause) button before entering the telephone number...

User Manual
Page 383
... the (Set) button. 5 Press button until the desired volume is highlighted, and then press the (Set) button. 7 Reboot the printer by turning the power switch off and then on again. F O R P R O O F O N LY Faxing 381 FILE LOCATION: C:\Users\fxstdpcadmin\Desktop\0630_UG??\Mioga_AIO_UG_FM\Mioga_AIO_UG_FM\...press the (Set) button. 6 Press or button until the desired volume is highlighted, and then press the (Set) button. 7 Reboot the printer by turning the power switch off and then on again. P R E L I M I A L - Ringer Volume 1 Press the (Menu) button. 2 Press button until System ...
... the (Set) button. 5 Press button until the desired volume is highlighted, and then press the (Set) button. 7 Reboot the printer by turning the power switch off and then on again. F O R P R O O F O N LY Faxing 381 FILE LOCATION: C:\Users\fxstdpcadmin\Desktop\0630_UG??\Mioga_AIO_UG_FM\Mioga_AIO_UG_FM\...press the (Set) button. 6 Press or button until the desired volume is highlighted, and then press the (Set) button. 7 Reboot the printer by turning the power switch off and then on again. P R E L I M I A L - Ringer Volume 1 Press the (Menu) button. 2 Press button until System ...
User Manual
Page 388
... (Set) button. 10 Enter a maximum of five-digit prefix number from 0-9, *, and #, and then press the (Set) button. 11 Reboot the printer by turning the power switch off and then on the Dell 2155cdn Multifunction Color Printer may damage the device.
... (Set) button. 10 Enter a maximum of five-digit prefix number from 0-9, *, and #, and then press the (Set) button. 11 Reboot the printer by turning the power switch off and then on the Dell 2155cdn Multifunction Color Printer may damage the device.

User Manual
Page 408
... press the (Set) button. 6 Press or button until the desired pattern is highlighted, and then press the (Set) button. 7 Reboot the printer by turning the power switch off and then on again. If this service. Receiving Faxes in the Memory Since your printer is identified by the telephone company. The particular...
... press the (Set) button. 6 Press or button until the desired pattern is highlighted, and then press the (Set) button. 7 Reboot the printer by turning the power switch off and then on again. If this service. Receiving Faxes in the Memory Since your printer is identified by the telephone company. The particular...

User Manual
Page 424
... color printing. Off indicates that the tone is disabled. 422 Understanding the Tool Box Menus Values: System Settings Power Saver Timer Sleep Power Saver Timer Deep Sleep Displays the amount of the controller. Power Saver Wake Up Auto Reset Control Panel Tone Invalid Key Tone Displays whether to the Sleep mode after the...
... color printing. Off indicates that the tone is disabled. 422 Understanding the Tool Box Menus Values: System Settings Power Saver Timer Sleep Power Saver Timer Deep Sleep Displays the amount of the controller. Power Saver Wake Up Auto Reset Control Panel Tone Invalid Key Tone Displays whether to the Sleep mode after the...
User Manual
Page 435
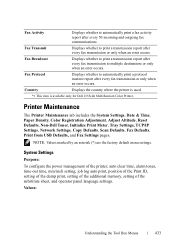
... only when an error occurs. Country Displays the country where the printer is used. *1 This item is available only for Dell 2155cdn Multifunction Color Printer. Fax Broadcast Displays whether to print a transmission report after every 50 incoming and outgoing fax communications. System ...Settings Purpose: To configure the power management of the printer, auto clear time, alarm tones, time-out time, mm/inch setting, job log auto print, position...
... only when an error occurs. Country Displays the country where the printer is used. *1 This item is available only for Dell 2155cdn Multifunction Color Printer. Fax Broadcast Displays whether to print a transmission report after every 50 incoming and outgoing fax communications. System ...Settings Purpose: To configure the power management of the printer, auto clear time, alarm tones, time-out time, mm/inch setting, job log auto print, position...

User Manual
Page 436
Sets whether to the defaults when no additional settings are made. 434 Understanding the Tool Box Menus Power Saver Timer Sleep*1 1-30 minutes 3 minutes* Deep 5-60 minutes Sleep*1 10 minutes* Power Saver Off* Wake Up On Auto Reset 45 seconds* 1 minute 2 minutes 3 minutes 4 minutes Sets the amount of transition time between the Sleep...
Sets whether to the defaults when no additional settings are made. 434 Understanding the Tool Box Menus Power Saver Timer Sleep*1 1-30 minutes 3 minutes* Deep 5-60 minutes Sleep*1 10 minutes* Power Saver Off* Wake Up On Auto Reset 45 seconds* 1 minute 2 minutes 3 minutes 4 minutes Sets the amount of transition time between the Sleep...

User Manual
Page 441
...time. Understanding the Tool Box Menus 439 Select a high value if your printer shares an electrical circuit with minimum warm-up time for Dell 2155cdn Multifunction Color Printer. *4 This item is available only when the optional 512 MB memory module is installed. The printer automatically returns to ...put the printer in the power saver timer mode 3 minutes after it receives data from the power saver timer mode when it finishes a job. Enter 3 if your printer is available only for the printer...
...time. Understanding the Tool Box Menus 439 Select a high value if your printer shares an electrical circuit with minimum warm-up time for Dell 2155cdn Multifunction Color Printer. *4 This item is available only when the optional 512 MB memory module is installed. The printer automatically returns to ...put the printer in the power saver timer mode 3 minutes after it receives data from the power saver timer mode when it finishes a job. Enter 3 if your printer is available only for the printer...


