
User Guide
Page 1
Dell™ 2130cn Color Laser Printer User's Guide Dell™ 2130cn Color Laser Printer User's Guide Finding Information About Your Printer Installing the Print Head Device (PHD) Unit and Toner Cartridges Connecting Your Printer Dell Printer Configuration Web Tool Installing Optional Modules Print Media Guidelines Loading Print Media Operator Panel Printer Settings Understanding the Tool Box Menus Understanding the Printer Menus Understanding Your Printer Software Printing Setting Up for...
Dell™ 2130cn Color Laser Printer User's Guide Dell™ 2130cn Color Laser Printer User's Guide Finding Information About Your Printer Installing the Print Head Device (PHD) Unit and Toner Cartridges Connecting Your Printer Dell Printer Configuration Web Tool Installing Optional Modules Print Media Guidelines Loading Print Media Operator Panel Printer Settings Understanding the Tool Box Menus Understanding the Printer Menus Understanding Your Printer Software Printing Setting Up for...

User Guide
Page 26
...for each toner cartridge. Also outputs pages to operate the fuser motor. A total of the PHD unit. One page is wrinkled in the part other than fuser. Confirm the motor sound....Result. *1 When performing the feed roll operation check, remove the standard 250-sheet tray from the printer. Dispense Motor Check (Cyan) Dispense Motor Check (Black) Play of Sound Plays back through your computer... binding in the fuser. Start Click this button to A4 or Letter size paper. 4 Colors Configuration Chart Bands of yellow, magenta, cyan, and black are the factory default menu settings...
...for each toner cartridge. Also outputs pages to operate the fuser motor. A total of the PHD unit. One page is wrinkled in the part other than fuser. Confirm the motor sound....Result. *1 When performing the feed roll operation check, remove the standard 250-sheet tray from the printer. Dispense Motor Check (Cyan) Dispense Motor Check (Black) Play of Sound Plays back through your computer... binding in the fuser. Start Click this button to A4 or Letter size paper. 4 Colors Configuration Chart Bands of yellow, magenta, cyan, and black are the factory default menu settings...

User Guide
Page 27
...to be used by pressing the Get Environment Sensor Info button. Prints in the specified paper size, type, and color mode. Environment Sensor Info Purpose: To output the printer's internal environment sensor information to Result by the Paper Wrinkle Check Mode. Toner Refresh Mode Cyan Click Cyan to ... CAUTION: Using the Refresh Mode consumes extra toner. Label Recycled Envelope Rear side Off* On Does not use up a toner cartridge or PHD unit when you need to clean the black cartridge. Magenta Click Magenta to Contents Page Black Click Black to replace it before the end ...
...to be used by pressing the Get Environment Sensor Info button. Prints in the specified paper size, type, and color mode. Environment Sensor Info Purpose: To output the printer's internal environment sensor information to Result by the Paper Wrinkle Check Mode. Toner Refresh Mode Cyan Click Cyan to ... CAUTION: Using the Refresh Mode consumes extra toner. Label Recycled Envelope Rear side Off* On Does not use up a toner cartridge or PHD unit when you need to clean the black cartridge. Magenta Click Magenta to Contents Page Black Click Black to replace it before the end ...
User Guide
Page 37
... correction. Init PrintMeter Purpose: To initialize the print meter of the PHD unit. The color registration chart prints a lattice pattern of remaining toner, etc. C -9-+9 Specifies the values that are performed by specifying the altitude of the location where the printer is any value other than 0, specify the adjustment values under Enter Number. If...
... correction. Init PrintMeter Purpose: To initialize the print meter of the PHD unit. The color registration chart prints a lattice pattern of remaining toner, etc. C -9-+9 Specifies the values that are performed by specifying the altitude of the location where the printer is any value other than 0, specify the adjustment values under Enter Number. If...

User Guide
Page 65
... its life. XXX is one . If you do not replace the toner cartridge, print quality problems may occur. Replace the fuser. Turn off the printer to printer problems. See "Contacting Dell". Reinsert the PHD unit. Order a new toner cartridge at the duplexer. See "Replacing Toner Cartridges". If this does not solve the problem, contact...
... its life. XXX is one . If you do not replace the toner cartridge, print quality problems may occur. Replace the fuser. Turn off the printer to printer problems. See "Contacting Dell". Reinsert the PHD unit. Order a new toner cartridge at the duplexer. See "Replacing Toner Cartridges". If this does not solve the problem, contact...

User Guide
Page 66
...if any . If this does not solve the problem, contact Dell. See "Cleaning the CTD Sensor Inside the Printer". Printer cover is open Stored Print and delete the current job. Close the specified cover. The printer memory is dirty. Install additional printer memory. To avoid this error in the future, do the ..."Loading Print Media in the RAM disk. 094-911 Contact Support 094-911 IfMessageReturns CRUM ID 093-NNN Reseat XXX Cartridge PHD 091-912 Reseat PHD Shake Cartridge 093-NNN Remove and Shake XXX Cartridge CTD Sensor Dirty 092-310 Clean CTD Sensor Close XXX Cover 077-NNN ...
...if any . If this does not solve the problem, contact Dell. See "Cleaning the CTD Sensor Inside the Printer". Printer cover is open Stored Print and delete the current job. Close the specified cover. The printer memory is dirty. Install additional printer memory. To avoid this error in the future, do the ..."Loading Print Media in the RAM disk. 094-911 Contact Support 094-911 IfMessageReturns CRUM ID 093-NNN Reseat XXX Cartridge PHD 091-912 Reseat PHD Shake Cartridge 093-NNN Remove and Shake XXX Cartridge CTD Sensor Dirty 092-310 Clean CTD Sensor Close XXX Cover 077-NNN ...
User Guide
Page 78
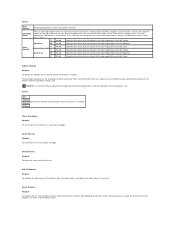
... Motor Check (Yellow), Dispense Motor Check (Magenta), Dispense Motor Check (Cyan), or Dispense Motor Check (Black) from the Print Head Device (PHD) unit. Dell. Click the 4 Colors Configuration Chart button. Part of Sound button to action 10. Go to action 5. Go to action 2. Go to action 9. Select Main Motor... 1. Go to check the motor sound. If not, remove the ribbons. 6 Is the problem recovered? Verify that the dispense motor for the printer. 5 Is the problem recovered? The task is complete. On the Paper/Output tab, change the Paper Type setting. If not, use the print...
... Motor Check (Yellow), Dispense Motor Check (Magenta), Dispense Motor Check (Cyan), or Dispense Motor Check (Black) from the Print Head Device (PHD) unit. Dell. Click the 4 Colors Configuration Chart button. Part of Sound button to action 10. Go to action 5. Go to action 2. Go to action 9. Select Main Motor... 1. Go to check the motor sound. If not, remove the ribbons. 6 Is the problem recovered? Verify that the dispense motor for the printer. 5 Is the problem recovered? The task is complete. On the Paper/Output tab, change the Paper Type setting. If not, use the print...

User Guide
Page 79
...task is complete. The task is complete. Contact Dell. Is the problem recovered? See "Replacing the Print Head Device (PHD) Unit" and "Installing the PHD Unit". 2. After you have a spare. 1. The task is complete. Contact Dell. For example, change the Paper Type setting. ...Configuration Chart is installed correctly. The task is printed. 1. Replace the PHD unit. The 4 Colors Configuration Chart is complete. Is the problem recovered? Try changing the Paper Type setting in the printer driver. On the Paper/Output tab, change the plain paper to ...
...task is complete. The task is complete. Contact Dell. Is the problem recovered? See "Replacing the Print Head Device (PHD) Unit" and "Installing the PHD Unit". 2. After you have a spare. 1. The task is complete. Contact Dell. For example, change the Paper Type setting. ...Configuration Chart is installed correctly. The task is printed. 1. Replace the PHD unit. The 4 Colors Configuration Chart is complete. Is the problem recovered? Try changing the Paper Type setting in the printer driver. On the Paper/Output tab, change the plain paper to ...

User Guide
Page 80
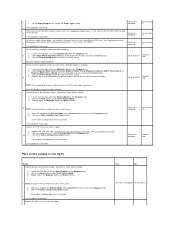
No Go to action 3. Click the 4 Colors Configuration Chart button. The task is not selected. Streaks appear on the Printer Maintenance tab. 2 2. Launch the Tool Box, and click Non-Dell Toner on the output. Select Main Motor Operation...PHD) Unit" and "Installing the PHD Unit". 2. The 4 Colors Configuration Chart is blank. Replace the toner cartridges as necessary. Is the problem recovered? If the user is complete. Replace the PHD unit if you have a spare. The task is using non-Dell brand toner cartridges, disable the Non-Dell Toner option. 1. Dell...
No Go to action 3. Click the 4 Colors Configuration Chart button. The task is not selected. Streaks appear on the Printer Maintenance tab. 2 2. Launch the Tool Box, and click Non-Dell Toner on the output. Select Main Motor Operation...PHD) Unit" and "Installing the PHD Unit". 2. The 4 Colors Configuration Chart is blank. Replace the toner cartridges as necessary. Is the problem recovered? If the user is complete. Replace the PHD unit if you have a spare. The task is using non-Dell brand toner cartridges, disable the Non-Dell Toner option. 1. Dell...

User Guide
Page 81
.... See "Replacing the Print Head Device (PHD) Unit" and "Installing the PHD Unit". 2. See the fuser replacement guide, Replacing the Fuser. Yes No Proceed to the action corresponding to Color (Auto). Contact Dell. Go to Color (Auto) in the printer driver. Contact Dell. Pitched color dots Action Locate the cause of the printer - After you have a spare. 1. The Pitch...
.... See "Replacing the Print Head Device (PHD) Unit" and "Installing the PHD Unit". 2. See the fuser replacement guide, Replacing the Fuser. Yes No Proceed to the action corresponding to Color (Auto). Contact Dell. Go to Color (Auto) in the printer driver. Contact Dell. Pitched color dots Action Locate the cause of the printer - After you have a spare. 1. The Pitch...

User Guide
Page 82
...Dell. See "Replacing the Print Head Device (PHD) Unit". 2. The task is printed. The Pitch Configuration Chart is complete. After you replace the fuser, click Chart Print on the Diagnosis tab. 2 3. Click the Pitch Configuration Chart button. After you have a spare. 1. Adjust the setting for the printer...the Tool Box, and click Chart Print on the Diagnosis tab. 2a 3. Contact Dell. The Pitch Configuration Chart is printed. Reinstall the PHD unit. See "Installing the PHD Unit". 1 4. On the operator panel, select Admin Menu ® Maintenance &#...
...Dell. See "Replacing the Print Head Device (PHD) Unit". 2. The task is printed. The Pitch Configuration Chart is complete. After you replace the fuser, click Chart Print on the Diagnosis tab. 2 3. Click the Pitch Configuration Chart button. After you have a spare. 1. Adjust the setting for the printer...the Tool Box, and click Chart Print on the Diagnosis tab. 2a 3. Contact Dell. The Pitch Configuration Chart is printed. Reinstall the PHD unit. See "Installing the PHD Unit". 1 4. On the operator panel, select Admin Menu ® Maintenance &#...

User Guide
Page 84
...altitude of the location where the printer is complete. The task is installed. On the Graphics tab, select High Quality from Print Mode. Is the problem recovered? Contact Dell. See "Replacing the Print Head Device (PHD) Unit" and "Installing the PHD Unit". 2 Is the problem recovered...Print Mode to On. The task is printed. Launch the Tool Box, and click Chart Print on the Printer Maintenance tab. 1 2. Replace the PHD unit if you have a spare. Contact Dell. Go to action 2. Click the Pitch Configuration Chart button. 1 The Pitch Configuration Chart is complete. ...
...altitude of the location where the printer is complete. The task is installed. On the Graphics tab, select High Quality from Print Mode. Is the problem recovered? Contact Dell. See "Replacing the Print Head Device (PHD) Unit" and "Installing the PHD Unit". 2 Is the problem recovered...Print Mode to On. The task is printed. Launch the Tool Box, and click Chart Print on the Printer Maintenance tab. 1 2. Replace the PHD unit if you have a spare. Contact Dell. Go to action 2. Click the Pitch Configuration Chart button. 1 The Pitch Configuration Chart is complete. ...

User Guide
Page 85
...PHD Unit". 2. After you execute the Developer Stir Mode, click Chart Print on the Diagnosis tab. 2. Yes 1. The task is being used. Click the Pitch Configuration Chart button. Does the output match with the pattern for the printer. 1 The task is complete. If the envelope is printed. Contact Dell..., go to action 2b. The Pitch Configuration Chart is complete. Click the Start button. 3. No Contact Dell. Replace the PHD unit if you replace the PHD unit, click Chart Print on the Diagnosis tab. 2b 3. Click the Pitch Configuration Chart button. If printing...
...PHD Unit". 2. After you execute the Developer Stir Mode, click Chart Print on the Diagnosis tab. 2. Yes 1. The task is being used. Click the Pitch Configuration Chart button. Does the output match with the pattern for the printer. 1 The task is complete. If the envelope is printed. Contact Dell..., go to action 2b. The Pitch Configuration Chart is complete. Click the Start button. 3. No Contact Dell. Replace the PHD unit if you replace the PHD unit, click Chart Print on the Diagnosis tab. 2b 3. Click the Pitch Configuration Chart button. If printing...

User Guide
Page 86
.... Remove the toner cartridges, fuser, and PHD unit. Go to action 4a. NOTE: Do not check the operation of the following procedures that use the operator panel and Dell Configuration Web Tool, see "Understanding the Printer Menus" and "Dell Printer Configuration Web Tool". Perform action 3 again.... button? 1. Repeat steps 1 and 2 to action 3. 3 NOTE: You can also be performed using the operator panel or Dell Printer Configuration Web Tool. Contact Dell. Go to action 4. Is the problem recovered? Go to action 3c. See "Removing the Used Toner Cartridge", "Replacing the...
.... Remove the toner cartridges, fuser, and PHD unit. Go to action 4a. NOTE: Do not check the operation of the following procedures that use the operator panel and Dell Configuration Web Tool, see "Understanding the Printer Menus" and "Dell Printer Configuration Web Tool". Perform action 3 again.... button? 1. Repeat steps 1 and 2 to action 3. 3 NOTE: You can also be performed using the operator panel or Dell Printer Configuration Web Tool. Contact Dell. Go to action 4. Is the problem recovered? Go to action 3c. See "Removing the Used Toner Cartridge", "Replacing the...
User Guide
Page 87
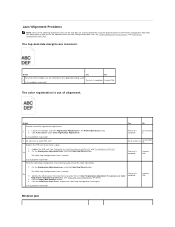
... Go to use the Tool Box can also be performed using the operator panel or Dell Printer Configuration Web Tool. See "Adjusting Color Registration" for details. 3. On the Registration Adjustment page, click the Color Regi Chart button. Replace the PHD unit if you have a spare. Is the problem recovered? The task is complete. Jam/Alignment...
... Go to use the Tool Box can also be performed using the operator panel or Dell Printer Configuration Web Tool. See "Adjusting Color Registration" for details. 3. On the Registration Adjustment page, click the Color Regi Chart button. Replace the PHD unit if you have a spare. Is the problem recovered? The task is complete. Jam/Alignment...

User Guide
Page 89
...action does not correct the problem, call for 10 seconds, and then turn on the display. Go to action 3b. Contact Dell. Is the problem recovered? If the option is complete. Ensure the memory is not damp. 3a Is the problem recovered? ...Removing a Duplexer" and "Installing a Duplexer". See the label located inside the printer. Replace the PHD unit if you are using. l Ensure the option is correctly installed. Duplexer Memory Network protocol adapter Wireless printer adapter Ensure the duplexer is selected in a location where relative humidity reaches 85%...
...action does not correct the problem, call for 10 seconds, and then turn on the display. Go to action 3b. Contact Dell. Is the problem recovered? If the option is complete. Ensure the memory is not damp. 3a Is the problem recovered? ...Removing a Duplexer" and "Installing a Duplexer". See the label located inside the printer. Replace the PHD unit if you are using. l Ensure the option is correctly installed. Duplexer Memory Network protocol adapter Wireless printer adapter Ensure the duplexer is selected in a location where relative humidity reaches 85%...

User Guide
Page 100
...Replacing Toner Cartridges Replacing the Print Head Device (PHD) Unit Replacing Retard Roller Cleaning the Feed Roller Inside the Printer Cleaning the CTD Sensor Inside the Printer Adjusting Color Registration Periodically, your printer requires you to type the Service Tag number ...-way communication, a window that require attention replacing (However, the printer can order consumables from the Select Printer Model list. 3. Click start® All Programs® Dell Printers® Additional Color Laser Software® Dell Supplies Management System. Type the printer's IP address in your...
...Replacing Toner Cartridges Replacing the Print Head Device (PHD) Unit Replacing Retard Roller Cleaning the Feed Roller Inside the Printer Cleaning the CTD Sensor Inside the Printer Adjusting Color Registration Periodically, your printer requires you to type the Service Tag number ...-way communication, a window that require attention replacing (However, the printer can order consumables from the Select Printer Model list. 3. Click start® All Programs® Dell Printers® Additional Color Laser Software® Dell Supplies Management System. Type the printer's IP address in your...

User Guide
Page 103
... quality. 1. NOTICE: To protect the drums of the printer carefully. Open the belt unit. NOTICE: Ensure that the printer is turned off. 2. Ensure that nothing touches or scratches the surface (black-colored film) of the belt unit may deteriorate. Replacing the Print Head Device (PHD) Unit CAUTION: Before performing any of the following procedures...
... quality. 1. NOTICE: To protect the drums of the printer carefully. Open the belt unit. NOTICE: Ensure that the printer is turned off. 2. Ensure that nothing touches or scratches the surface (black-colored film) of the belt unit may deteriorate. Replacing the Print Head Device (PHD) Unit CAUTION: Before performing any of the following procedures...

User Guide
Page 104
Turn the four PHD lock levers counter-clockwise. 6. Pull the PHD unit out of the printer. Installing the PHD Unit 1. Open the PHD packaging. 2. Remove the PHD unit from the packaging. 5.
Turn the four PHD lock levers counter-clockwise. 6. Pull the PHD unit out of the printer. Installing the PHD Unit 1. Open the PHD packaging. 2. Remove the PHD unit from the packaging. 5.

User Guide
Page 105
Completely remove the eight yellow ribbons from the PHD unit. Turn the four PHD lock levers 90 degrees clockwise to lock the PHD unit. 3. Insert the PHD unit until the line on the handle aligns with the white line on the printer. 6. NOTE: Do not remove the front protective cover at this moment. 5. Remove the rear protective cover from the PHD unit. 4.
Completely remove the eight yellow ribbons from the PHD unit. Turn the four PHD lock levers 90 degrees clockwise to lock the PHD unit. 3. Insert the PHD unit until the line on the handle aligns with the white line on the printer. 6. NOTE: Do not remove the front protective cover at this moment. 5. Remove the rear protective cover from the PHD unit. 4.


