User Guide
Page 7
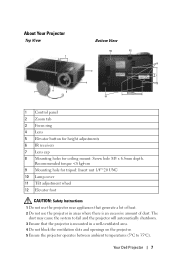
About Your Projector Top View Bottom View 1 6 10 12 8 2 14.00 82.15 7 5 4 3 11 9 24.00 79.00 110.00 1 Control panel 2 Zoom tab 3 Focus ring 4 Lens 5 Elevator button for height adjustments 6 IR receivers 7 Lens cap 8 Mounting holes for ceiling mount: Screw hole M3 x 6.5mm depth. Recommended torque
About Your Projector Top View Bottom View 1 6 10 12 8 2 14.00 82.15 7 5 4 3 11 9 24.00 79.00 110.00 1 Control panel 2 Zoom tab 3 Focus ring 4 Lens 5 Elevator button for height adjustments 6 IR receivers 7 Lens cap 8 Mounting holes for ceiling mount: Screw hole M3 x 6.5mm depth. Recommended torque
User Guide
Page 8
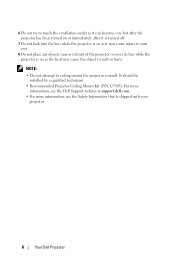
NOTE: • Do not attempt to melt or burn. It should be installed by a qualified technician. • Recommended Projector Ceiling Mount Kit (P/N: C3505). 6 Do not try to touch the ventilation outlet as it can become very hot after the projector has been turned on or immediately .... 7 Do not look into the lens while the projector is on as it may cause the object to ceiling mount the projector yourself. For more information, see the Dell Support website at support.dell.com. • For more information, see the Safety Information that is on as the heat may cause injury to...
NOTE: • Do not attempt to melt or burn. It should be installed by a qualified technician. • Recommended Projector Ceiling Mount Kit (P/N: C3505). 6 Do not try to touch the ventilation outlet as it can become very hot after the projector has been turned on or immediately .... 7 Do not look into the lens while the projector is on as it may cause the object to ceiling mount the projector yourself. For more information, see the Dell Support website at support.dell.com. • For more information, see the Safety Information that is on as the heat may cause injury to...

User Guide
Page 39
...caused by tilting the projector. V. The projector turns the image upside down . Default is the default option. • Front Projection-Ceiling Mount - Press on the control panel or press Enter button on the remote control to activate the Language menu. This is Off. The ...so that you can project from behind a translucent screen with a ceilingmounted projection. PROJECTOR MODE-Allows you to set the language for ceiling-mounted projection. • Rear Projection-Desktop - The projector reverses and turns the image upside down for the OSD. KEYSTONE-Manually adjust the ...
...caused by tilting the projector. V. The projector turns the image upside down . Default is the default option. • Front Projection-Ceiling Mount - Press on the control panel or press Enter button on the remote control to activate the Language menu. This is Off. The ...so that you can project from behind a translucent screen with a ceilingmounted projection. PROJECTOR MODE-Allows you to set the language for ceiling-mounted projection. • Rear Projection-Desktop - The projector reverses and turns the image upside down for the OSD. KEYSTONE-Manually adjust the ...
User Guide
Page 51
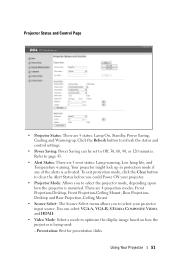
... to select the projector mode, depending upon how the projector is activated. There are 4 projection modes: Front Projection-Desktop, Front Projection-Ceiling Mount, Rear ProjectionDesktop and Rear Projection-Ceiling Mount • Source Select: The Source Select menu allows you to optimize the display image based on how the projector is being used... Page • Projector Status: There are 5 status: Lamp On, Standby, Power Saving, Cooling and Warming up in protection mode if any of the alerts is mounted.
... to select the projector mode, depending upon how the projector is activated. There are 4 projection modes: Front Projection-Desktop, Front Projection-Ceiling Mount, Rear ProjectionDesktop and Rear Projection-Ceiling Mount • Source Select: The Source Select menu allows you to optimize the display image based on how the projector is being used... Page • Projector Status: There are 5 status: Lamp On, Standby, Power Saving, Cooling and Warming up in protection mode if any of the alerts is mounted.
User Guide
Page 76
.... 76 Glossary A method of measuring the size of the two levels. A 9 ft high, 12 ft wide, screen has a diagonal of tilting, microscopic aluminum alloy mirrors mounted on a hidden yoke. DLP® - Digital Light Processing™ - Reflective display technology developed by Intel™ Corporation to ten times the common logarithm of the...
.... 76 Glossary A method of measuring the size of the two levels. A 9 ft high, 12 ft wide, screen has a diagonal of tilting, microscopic aluminum alloy mirrors mounted on a hidden yoke. DLP® - Digital Light Processing™ - Reflective display technology developed by Intel™ Corporation to ten times the common logarithm of the...


