User Guide
Page 7
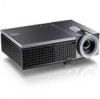
About Your Projector Top View Bottom View 1 6 10 12 8 2 14.00 82.15 7 5 4 3 11 9 24.00 79.00 110.00 1 Control panel 2 Zoom tab 3 Focus ring 4 Lens 5 Elevator button for height adjustments 6 IR receivers 7 Lens cap 8 Mounting holes for ceiling mount: Screw hole M3 x 6.5mm depth. Recommended torque
About Your Projector Top View Bottom View 1 6 10 12 8 2 14.00 82.15 7 5 4 3 11 9 24.00 79.00 110.00 1 Control panel 2 Zoom tab 3 Focus ring 4 Lens 5 Elevator button for height adjustments 6 IR receivers 7 Lens cap 8 Mounting holes for ceiling mount: Screw hole M3 x 6.5mm depth. Recommended torque
User Guide
Page 9
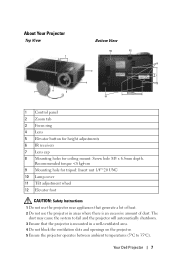
2 Connecting Your Projector 12 3 4 5 6 7 8 9 10 11 12 16 15 14 13 1 USB remote connector 2 HDMI connector 3 VGA-A output (monitor loop-through) 4 VGA-A input (D-sub) connector 5 VGA-B input (D-sub) ... connector 15 Audio-B left-channel input connector 16 Power cord connector CAUTION: Before you begin any of the procedures in this section, follow the Safety Instructions as described on page 7. Connecting Your Projector 9
2 Connecting Your Projector 12 3 4 5 6 7 8 9 10 11 12 16 15 14 13 1 USB remote connector 2 HDMI connector 3 VGA-A output (monitor loop-through) 4 VGA-A input (D-sub) connector 5 VGA-B input (D-sub) ... connector 15 Audio-B left-channel input connector 16 Power cord connector CAUTION: Before you begin any of the procedures in this section, follow the Safety Instructions as described on page 7. Connecting Your Projector 9
User Guide
Page 19
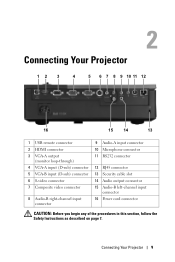
... on page 23 and "Using the Remote Control" on the remote control or control panel to the projector using the appropriate cable. The cooling fans continue to operate for instructions to connect your source to select the desired source. The Power button light blinks blue until pressed. ...1 Remove the lens cap. 2 Connect the power cord and appropriate signal cables. Change the input source of projector is set to VGA-A. NOTE:...
... on page 23 and "Using the Remote Control" on the remote control or control panel to the projector using the appropriate cable. The cooling fans continue to operate for instructions to connect your source to select the desired source. The Power button light blinks blue until pressed. ...1 Remove the lens cap. 2 Connect the power cord and appropriate signal cables. Change the input source of projector is set to VGA-A. NOTE:...
User Guide
Page 67
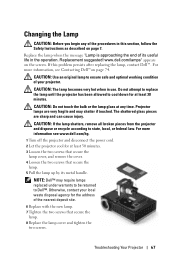
... all broken pieces from the projector and dispose or recycle according to Dell™. Troubleshooting Your Projector 67 www.dell.com/lamps" appears on page 74. For more information, see www.dell.com/hg. 1 Turn off the projector and disconnect the power cord. 2 Let the projector cool for at any of your... the operation. CAUTION: Do not touch the bulb or the lamp glass at least 30 minutes. If this section, follow the Safety Instructions as described on page 7. The shattered glass pieces are very fragile and may require lamps replaced under warranty to be returned to state,...
... all broken pieces from the projector and dispose or recycle according to Dell™. Troubleshooting Your Projector 67 www.dell.com/lamps" appears on page 74. For more information, see www.dell.com/hg. 1 Turn off the projector and disconnect the power cord. 2 Let the projector cool for at any of your... the operation. CAUTION: Do not touch the bulb or the lamp glass at least 30 minutes. If this section, follow the Safety Instructions as described on page 7. The shattered glass pieces are very fragile and may require lamps replaced under warranty to be returned to state,...


