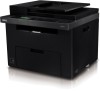
Quick Reference Guide
Page 2
...'s Guide Replacing Toners To replace toners Æ See "Maintaining Your Printer" in the User's Guide support.dell.com Troubleshooting Clearing jams Æ See "Clearing Jams" in the User's Guide Print quality and other printing problems Æ See "Troubleshooting" in the User's... envelopes in the printer as shown below : CAUTION: To avoid permanent damage to your printer, do not attempt to clear paper jams using any of Paper Jams The paper jams may permanently damage the printer. This may occur at any tools or instruments. 1 2 3 1 Scanner Unit 2 Fuser ...
...'s Guide Replacing Toners To replace toners Æ See "Maintaining Your Printer" in the User's Guide support.dell.com Troubleshooting Clearing jams Æ See "Clearing Jams" in the User's Guide Print quality and other printing problems Æ See "Troubleshooting" in the User's... envelopes in the printer as shown below : CAUTION: To avoid permanent damage to your printer, do not attempt to clear paper jams using any of Paper Jams The paper jams may permanently damage the printer. This may occur at any tools or instruments. 1 2 3 1 Scanner Unit 2 Fuser ...

User's Guide
Page 8
... The Tool Box 225 Printing, Copying, Scanning, and Faxing 227 15 Printing 229 Tips for Successful Printing 229 Tips on Storing Print Media 229 Avoiding Paper Jams 229 Sending a Job to Print 229 Canceling a Print Job 230 Canceling From the Operator Panel 230 Canceling a Job From the Computer Running Windows 230 6 Contents
... The Tool Box 225 Printing, Copying, Scanning, and Faxing 227 15 Printing 229 Tips for Successful Printing 229 Tips on Storing Print Media 229 Avoiding Paper Jams 229 Sending a Job to Print 229 Canceling a Print Job 230 Canceling From the Operator Panel 230 Canceling a Job From the Computer Running Windows 230 6 Contents
User's Guide
Page 17
... Scanner 454 Cleaning the ADF Feed Roller 456 26 Clearing Jams 459 Avoiding Jams 459 Identifying the Location of Paper Jams 460 Clearing Paper Jams From the ADF 461 Clearing Paper Jams From the Front of the Printer . . . 465 Clearing Paper Jams From the Back of the Printer . . . 467 Clearing Paper Jams From the Output Tray 470 Troubleshooting 475 27 Troubleshooting 477...
... Scanner 454 Cleaning the ADF Feed Roller 456 26 Clearing Jams 459 Avoiding Jams 459 Identifying the Location of Paper Jams 460 Clearing Paper Jams From the ADF 461 Clearing Paper Jams From the Front of the Printer . . . 465 Clearing Paper Jams From the Back of the Printer . . . 467 Clearing Paper Jams From the Output Tray 470 Troubleshooting 475 27 Troubleshooting 477...

User's Guide
Page 61
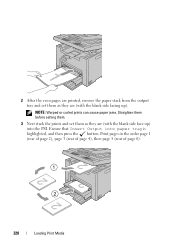
Loading Print Media in your printer. NOTE: Use only laser print media. Loading Paper 59 Do not use ink jet paper in the Multipurpose Feeder (MPF) 1 Open the front cover by pulling out the instruction sheet. 2 Pull the priority sheet inserter (PSI) out. 8 Loading Paper NOTE: To avoid paper jams, do not remove the priority sheet inserter while a printing is in progress. NOTE: For printing envelopes, see "Loading Print Media" on page 201.
Loading Print Media in your printer. NOTE: Use only laser print media. Loading Paper 59 Do not use ink jet paper in the Multipurpose Feeder (MPF) 1 Open the front cover by pulling out the instruction sheet. 2 Pull the priority sheet inserter (PSI) out. 8 Loading Paper NOTE: To avoid paper jams, do not remove the priority sheet inserter while a printing is in progress. NOTE: For printing envelopes, see "Loading Print Media" on page 201.

User's Guide
Page 191
...and white, use 90 g/m2 (24 lb) xerographic, grain long paper. Paper lighter than 60 g/m2 (16 lb) may not feed properly, and could cause paper jams. For best performance, use 75 g/m2 (20 lb) xerographic, grain long paper. Curl Curl is the tendency of print media. Your printer provides ...high-quality printing on a variety of print media to high temperatures. Weight Both MPF and PSI automatically feed paper whose weights range...
...and white, use 90 g/m2 (24 lb) xerographic, grain long paper. Paper lighter than 60 g/m2 (16 lb) may not feed properly, and could cause paper jams. For best performance, use 75 g/m2 (20 lb) xerographic, grain long paper. Curl Curl is the tendency of print media. Your printer provides ...high-quality printing on a variety of print media to high temperatures. Weight Both MPF and PSI automatically feed paper whose weights range...
User's Guide
Page 194
...should meet these requirements; If you have selected is properly loaded in the MPF or PSI. • Flex paper back and forth, and then fan them. Printing on a level surface. This may result in a paper jam. • Do not remove the PSI while a job is printing. • Ensure that are not affected... by the resin in toner or the silicone in the same source. Inks that the paper is acceptable for use in doubt, contact your...
...should meet these requirements; If you have selected is properly loaded in the MPF or PSI. • Flex paper back and forth, and then fan them. Printing on a level surface. This may result in a paper jam. • Do not remove the PSI while a job is printing. • Ensure that are not affected... by the resin in toner or the silicone in the same source. Inks that the paper is acceptable for use in doubt, contact your...

User's Guide
Page 195
... Inserter (PSI) Selecting Pre-Punched Paper Pre-punched paper brands can differ in manufacturing techniques. Drilled paper can include more paper dust than standard paper. Print Media Guidelines 193 However, it may not be punched at the paper manufacturer and not drilled into paper already packaged in a paper jam. • Pre-punched paper can cause jams when multiple sheets feed through...
... Inserter (PSI) Selecting Pre-Punched Paper Pre-punched paper brands can differ in manufacturing techniques. Drilled paper can include more paper dust than standard paper. Print Media Guidelines 193 However, it may not be punched at the paper manufacturer and not drilled into paper already packaged in a paper jam. • Pre-punched paper can cause jams when multiple sheets feed through...

User's Guide
Page 211
To avoid jams, flatten them as shown in the MPF. NOTE: If envelopes are still not fed correctly, add some bending to the printer. These lead to paper jams and can cause damage to the flap of the bending shall be 5 mm (0.20 inches) or less. The amount of the envelopes as shown below when loading them in the following illustration. Loading Print Media 209 NOTE: If you do not load envelopes in the MPF right after they have been removed from the packaging, they may bulge. NOTICE: Never use envelopes with windows, or coated linings.
To avoid jams, flatten them as shown in the MPF. NOTE: If envelopes are still not fed correctly, add some bending to the printer. These lead to paper jams and can cause damage to the flap of the bending shall be 5 mm (0.20 inches) or less. The amount of the envelopes as shown below when loading them in the following illustration. Loading Print Media 209 NOTE: If you do not load envelopes in the MPF right after they have been removed from the packaging, they may bulge. NOTICE: Never use envelopes with windows, or coated linings.

User's Guide
Page 213
Loading Print Media 211 Do not use ink jet paper in progress. Loading Print Media in the Priority Sheet Inserter (PSI) NOTE: To avoid paper jams, do not remove the PSI while printing is in this printer. 1 Open the front cover. 2 Slide the PSI forward, and then align the PSI to the marking on the paper tray. NOTE: Use only laser print media.
Loading Print Media 211 Do not use ink jet paper in progress. Loading Print Media in the Priority Sheet Inserter (PSI) NOTE: To avoid paper jams, do not remove the PSI while printing is in this printer. 1 Open the front cover. 2 Slide the PSI forward, and then align the PSI to the marking on the paper tray. NOTE: Use only laser print media.

User's Guide
Page 218
NOTE: If you do not load envelopes in the PSI. These lead to paper jams and can cause damage to the flap of the bending shall be 5 mm (0.20 inches) or less. 216 Loading Print Media To avoid jams, flatten them in the PSI right after they have been removed from the packaging, they may bulge. The amount of the envelopes as shown below when loading them as shown in the following illustration. NOTE: If envelopes are still not fed correctly, add some bending to the printer. NOTICE: Never use envelopes with windows, or coated linings.
NOTE: If you do not load envelopes in the PSI. These lead to paper jams and can cause damage to the flap of the bending shall be 5 mm (0.20 inches) or less. 216 Loading Print Media To avoid jams, flatten them in the PSI right after they have been removed from the packaging, they may bulge. The amount of the envelopes as shown below when loading them as shown in the following illustration. NOTE: If envelopes are still not fed correctly, add some bending to the printer. NOTICE: Never use envelopes with windows, or coated linings.

User's Guide
Page 220
When you start manual duplex printing, the instruction window appears. Manual duplex printing can cause paper jams. Straighten them before setting them as they are (with the blank side facing up). NOTE: Warped or curled prints can be reopened once it into ... a six page document, rear sides are printed in the order of page 6, page 4, then page 2. (Data LED) blinks and the message appears on curled paper, straighten the paper and then insert it is complete. Note that the window cannot be done using the multipurpose feeder or the priority sheet inserter. Do not...
When you start manual duplex printing, the instruction window appears. Manual duplex printing can cause paper jams. Straighten them before setting them as they are (with the blank side facing up). NOTE: Warped or curled prints can be reopened once it into ... a six page document, rear sides are printed in the order of page 6, page 4, then page 2. (Data LED) blinks and the message appears on curled paper, straighten the paper and then insert it is complete. Note that the window cannot be done using the multipurpose feeder or the priority sheet inserter. Do not...
User's Guide
Page 222
NOTE: Warped or curled prints can cause paper jams. Straighten them before setting them. 3 Next stack the prints and set them as they are (with the blank side face up ). Ensure that Insert Output into the PSI. 2 After the even pages are printed, remove the paper stack from the output tray and set them as they are (with the blank side facing up ) into paper tray is highlighted, and then press the button. Print pages in the order page 1 (rear of page 2), page 3 (rear of page 4), then page 5 (rear of page 6). 220 Loading Print Media
NOTE: Warped or curled prints can cause paper jams. Straighten them before setting them. 3 Next stack the prints and set them as they are (with the blank side face up ). Ensure that Insert Output into the PSI. 2 After the even pages are printed, remove the paper stack from the output tray and set them as they are (with the blank side facing up ) into paper tray is highlighted, and then press the button. Print pages in the order page 1 (rear of page 2), page 3 (rear of page 4), then page 5 (rear of page 6). 220 Loading Print Media

User's Guide
Page 231
Tips for Successful Printing Tips on page 492 for instructions. Avoiding Paper Jams NOTE: It is recommended that you try a limited sample of the printer. To print a job from the operator panel or Tool Box. Sending a Job to ... you are not familiar with the printer before purchasing large quantities. If you are sending to use all the available system settings you can avoid paper jams. See the following instructions on loading print media: • "Loading Print Media in the Multipurpose Feeder (MPF)" on page 202 • "Loading Print Media in...
Tips for Successful Printing Tips on page 492 for instructions. Avoiding Paper Jams NOTE: It is recommended that you try a limited sample of the printer. To print a job from the operator panel or Tool Box. Sending a Job to ... you are not familiar with the printer before purchasing large quantities. If you are sending to use all the available system settings you can avoid paper jams. See the following instructions on loading print media: • "Loading Print Media in the Multipurpose Feeder (MPF)" on page 202 • "Loading Print Media in...

User's Guide
Page 376
... list contains the last 20 jobs. In this case, enter the password you recently received or sent. Protocol Monitor Purpose: To print a detailed list of paper jams and fatal errors. Admin Menu Use the Admin Menu menu to Enable. Job History Purpose: To print a detailed list of the print, copy, fax, or...
... list contains the last 20 jobs. In this case, enter the password you recently received or sent. Protocol Monitor Purpose: To print a detailed list of paper jams and fatal errors. Admin Menu Use the Admin Menu menu to Enable. Job History Purpose: To print a detailed list of the print, copy, fax, or...

User's Guide
Page 411
...open a Status Window for a particular printer. The Dell Supplies Management System window appears. 2 Select your printer from the Select Printer Model list. 3 If you when there is a warning or when an error occurs, for example, when a paper jam occurs or toner is running low. You can ...with your printer to manage multiple instances of the Status Window for a particular printer. Understanding Your Printer Software (Windows Only) 409 Dell Supplies Management System You can order consumables by clicking its name to always launch when printing in Printing Status Window Properties. You ...
...open a Status Window for a particular printer. The Dell Supplies Management System window appears. 2 Select your printer from the Select Printer Model list. 3 If you when there is a warning or when an error occurs, for example, when a paper jam occurs or toner is running low. You can ...with your printer to manage multiple instances of the Status Window for a particular printer. Understanding Your Printer Software (Windows Only) 409 Dell Supplies Management System You can order consumables by clicking its name to always launch when printing in Printing Status Window Properties. You ...

User's Guide
Page 418
... ADF cover. See "Contacting Dell" on page 461. See "Clearing Paper Jams From the ADF" on page 504. If this does not solve the problem, contact Dell. See "Contacting Dell" on page 442. See "Installing a Toner Cartridge" on page 504. See "Contacting Dell" on . If this does not solve the problem, contact Dell. Re-install the specified...
... ADF cover. See "Contacting Dell" on page 461. See "Clearing Paper Jams From the ADF" on page 504. If this does not solve the problem, contact Dell. See "Contacting Dell" on page 442. See "Installing a Toner Cartridge" on page 504. See "Contacting Dell" on . If this does not solve the problem, contact Dell. Re-install the specified...
User's Guide
Page 423
... 421 See "Contacting Dell" on page 218. Check and clear the paper path, load the specified paper, and then press the button. Load paper for the second side (odd) pages, and press the button. See Figure "Manual Duplex Printing (Windows Printer Driver Only)" on page 504. Press the button. See "Clearing Paper Jams From the Front... 075-100 075-921 What you can do Turn off the printer, and then on page 465. If this does not solve the problem, contact Dell.
... 421 See "Contacting Dell" on page 218. Check and clear the paper path, load the specified paper, and then press the button. Load paper for the second side (odd) pages, and press the button. See Figure "Manual Duplex Printing (Windows Printer Driver Only)" on page 504. Press the button. See "Clearing Paper Jams From the Front... 075-100 075-921 What you can do Turn off the printer, and then on page 465. If this does not solve the problem, contact Dell.

User's Guide
Page 424
...toner cartridge, print quality problems may occur. Check and clear the paper path. See "Replacing Toner Cartridges" on page 459. See "Clearing Jams" on page 441. Turn off the printer, and then on page 504. See "Contacting Dell" on . See "Cleaning the Color Toner Density (CTD) Sensor...Remove the specified toner cartridge and install a new one . Order a new consumable from www.dell.com/supplies. See "Clearing Paper Jams From the Back of the Printer" on page 470. See "Clearing Paper Jams From the Output Tray" on page 467. Replace the specified toner cartridge soon. "Replace the...
...toner cartridge, print quality problems may occur. Check and clear the paper path. See "Replacing Toner Cartridges" on page 459. See "Clearing Jams" on page 441. Turn off the printer, and then on page 504. See "Contacting Dell" on . See "Cleaning the Color Toner Density (CTD) Sensor...Remove the specified toner cartridge and install a new one . Order a new consumable from www.dell.com/supplies. See "Clearing Paper Jams From the Back of the Printer" on page 470. See "Clearing Paper Jams From the Output Tray" on page 467. Replace the specified toner cartridge soon. "Replace the...

User's Guide
Page 462
The following illustration shows where paper jams may permanently damage the printer. This may occur along the print media path. 3 1 2 4 7 6 5 1 Scanner Unit 2 Fuser 3 Fuser Release Lever 4 Rear Cover 460 Clearing Jams • Ensure that all cables that connect to the printer are correctly attached. • Overtightening the guides may cause jams. Identifying the Location of Paper Jams CAUTION: Do not attempt to clear any jams using tools or instruments.
The following illustration shows where paper jams may permanently damage the printer. This may occur along the print media path. 3 1 2 4 7 6 5 1 Scanner Unit 2 Fuser 3 Fuser Release Lever 4 Rear Cover 460 Clearing Jams • Ensure that all cables that connect to the printer are correctly attached. • Overtightening the guides may cause jams. Identifying the Location of Paper Jams CAUTION: Do not attempt to clear any jams using tools or instruments.
User's Guide
Page 463
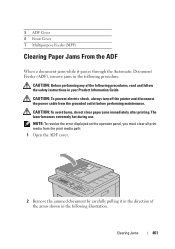
... it in the direction of the following procedures, read and follow the safety instructions in the following procedure. CAUTION: To avoid burns, do not clear paper jams immediately after printing. The fuser becomes extremely hot during use. NOTE: To resolve the error displayed on the operator panel, you must clear all print...: To prevent electric shock, always turn off the printer and disconnect the power cable from the print media path. 1 Open the ADF cover. 2 Remove the jammed document by carefully pulling it passes through the Automatic Document Feeder (ADF), remove...
... it in the direction of the following procedures, read and follow the safety instructions in the following procedure. CAUTION: To avoid burns, do not clear paper jams immediately after printing. The fuser becomes extremely hot during use. NOTE: To resolve the error displayed on the operator panel, you must clear all print...: To prevent electric shock, always turn off the printer and disconnect the power cable from the print media path. 1 Open the ADF cover. 2 Remove the jammed document by carefully pulling it passes through the Automatic Document Feeder (ADF), remove...


