
User Guide
Page 21
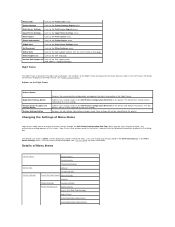
... to the Printer Settings Report menu. Print Server Settings Links to the Copy Printer Settings menu. Submits new settings made . E-Mail Alert Links to the Printer Jobs menu. See the User's Guide on the Dell Printer Configuration Web ...Menu Items Printer Status Printer Jobs Printer Settings Printer Status Printer Events Printer Information Job List Completed Jobs Printer Settings Report Menu Settings Reports Printer Settings System Settings Printer Maintenance Paper Density Adjust BTR (Bias Transfer Roll) Adjust Fuser Auto Registration Adjustment Color Registration ...
... to the Printer Settings Report menu. Print Server Settings Links to the Copy Printer Settings menu. Submits new settings made . E-Mail Alert Links to the Printer Jobs menu. See the User's Guide on the Dell Printer Configuration Web ...Menu Items Printer Status Printer Jobs Printer Settings Printer Status Printer Events Printer Information Job List Completed Jobs Printer Settings Report Menu Settings Reports Printer Settings System Settings Printer Maintenance Paper Density Adjust BTR (Bias Transfer Roll) Adjust Fuser Auto Registration Adjustment Color Registration ...
User Guide
Page 25
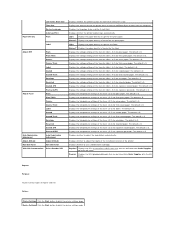
... Postcard JPN Auto Registration Adjustment Auto Registration Adjustment Adjust Altitude Adjust Altitude Non-Dell Toner Non-Dell Toner Web Link Customization Select Reorder URL Displays whether the printer sounds the tone when the toner is 0. Light Displays the paper density in...Displays the temperature settings of the fuser (-2-2) for cover paper. Displays the temperature settings of the fuser (-2-2) for Japanese coated paper. Regular* Displays the URL (accessories.us.dell.com/sna) that can be used for E-mail Alert. Values: Printer Settings Click the Start button to...
... Postcard JPN Auto Registration Adjustment Auto Registration Adjustment Adjust Altitude Adjust Altitude Non-Dell Toner Non-Dell Toner Web Link Customization Select Reorder URL Displays whether the printer sounds the tone when the toner is 0. Light Displays the paper density in...Displays the temperature settings of the fuser (-2-2) for cover paper. Displays the temperature settings of the fuser (-2-2) for Japanese coated paper. Regular* Displays the URL (accessories.us.dell.com/sna) that can be used for E-mail Alert. Values: Printer Settings Click the Start button to...
User Guide
Page 26
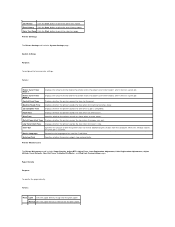
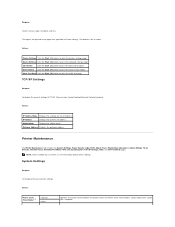
... the error history report. Error History Click the Start button to print the job history report. Printer Maintenance The Printer Maintenance tab includes Paper Density, Adjust BTR, Adjust Fuser, Auto Registration Adjustment, Color Registration Adjustments, Adjust Altitude, Reset Defaults, Non-Dell Toner, Initialize PrintMeter, and Web Link Customization pages. Control Panel Tone Displays whether the...
... the error history report. Error History Click the Start button to print the job history report. Printer Maintenance The Printer Maintenance tab includes Paper Density, Adjust BTR, Adjust Fuser, Auto Registration Adjustment, Color Registration Adjustments, Adjust Altitude, Reset Defaults, Non-Dell Toner, Initialize PrintMeter, and Web Link Customization pages. Control Panel Tone Displays whether the...

User Guide
Page 27
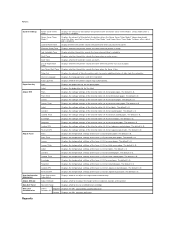
... Sets the reference voltage settings for the transfer roller for thick coated paper. Coated Thick Sets the temperature settings for the fuser for Japanese coated paper. Covers Thick Sets the reference voltage settings for the transfer roller for thick coated paper. Coated Thick...settings for the transfer roller for thick cover paper. Envelope Sets the temperature settings for the fuser for coated paper. Coated Sets the temperature settings for the fuser for envelopes. Label Sets the reference voltage settings for the transfer roller for envelopes. Envelope ...
... Sets the reference voltage settings for the transfer roller for thick coated paper. Coated Thick Sets the temperature settings for the fuser for Japanese coated paper. Covers Thick Sets the reference voltage settings for the transfer roller for thick coated paper. Coated Thick...settings for the transfer roller for thick cover paper. Envelope Sets the temperature settings for the fuser for coated paper. Coated Sets the temperature settings for the fuser for envelopes. Label Sets the reference voltage settings for the transfer roller for envelopes. Envelope ...
User Guide
Page 39
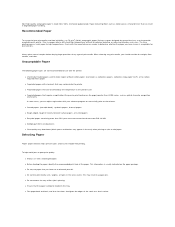
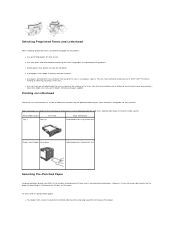
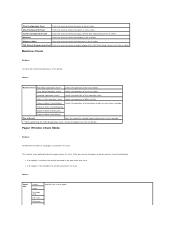
... l Always use 75 g/m2 (20 lb) xerographic paper. This may contaminate the printer l Preprinted papers that can be affected by the temperature in the printer fuser l Preprinted papers that require a registration (the precise print location on the page) greater.... l Do not mix print media sizes, weights, or types in degraded paper handling. Business papers designed for laser printers. Unacceptable Paper The following paper types are not recommended for use paper that the paper is made from 100% ... of any print media, you should consider the weight, fiber content, and color.
... l Always use 75 g/m2 (20 lb) xerographic paper. This may contaminate the printer l Preprinted papers that can be affected by the temperature in the printer fuser l Preprinted papers that require a registration (the precise print location on the page) greater.... l Do not mix print media sizes, weights, or types in degraded paper handling. Business papers designed for laser printers. Unacceptable Paper The following paper types are not recommended for use paper that the paper is made from 100% ... of any print media, you should consider the weight, fiber content, and color.
User Guide
Page 40
l Use papers printed with heat-resistant inks designed for help when loading letterhead in the fuser. Page orientation is acceptable for best results. Use the following table for use pre-punched paper: l Test paper from several manufacturers before ordering and using ... or vendor to depending on the placement of pre-punched paper. Selecting Preprinted Forms and Letterhead When selecting preprinted forms and letterhead paper for the printer: l Use grain long papers for laser printers. latex inks might not.
l Use papers printed with heat-resistant inks designed for help when loading letterhead in the fuser. Page orientation is acceptable for best results. Use the following table for use pre-punched paper: l Test paper from several manufacturers before ordering and using ... or vendor to depending on the placement of pre-punched paper. Selecting Preprinted Forms and Letterhead When selecting preprinted forms and letterhead paper for the printer: l Use grain long papers for laser printers. latex inks might not.
User Guide
Page 56
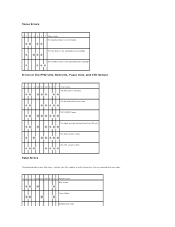
... over . - - - ROS failure - - - - - - The life of the PHD unit is over . - - Fatal Errors The following table shows fatal errors. Contact your Dell supplier to notify the printer status associated with each error. 1 2 3 4 5-K 5-C 5-M 5-Y 6 7 Printer status - - - - - - Fuser failure - -- - - - The tapes are not removed from the PHD unit. - - - The low toner in the PHD Unit, Belt Unit...
... over . - - - ROS failure - - - - - - The life of the PHD unit is over . - - Fatal Errors The following table shows fatal errors. Contact your Dell supplier to notify the printer status associated with each error. 1 2 3 4 5-K 5-C 5-M 5-Y 6 7 Printer status - - - - - - Fuser failure - -- - - - The tapes are not removed from the PHD unit. - - - The low toner in the PHD Unit, Belt Unit...
User Guide
Page 63
... is 0. Select Regular* Displays the URL (accessories.us.dell.com/sna). Machine Ready Tone Displays whether the printer sounds the tone when the printer is 0. Covers Thick Displays the voltage settings of the fuser (-2-2) for envelopes. The default is ready. Plain Displays ... transfer roller (-6-6) for Japanese coated paper. Non-Dell Toner Displays whether to adjust the registration automatically. Label Displays the voltage settings of the fuser (-2-2) for labels. Fault Tone Displays whether the printer sounds the tone when an error occurs. Covers ...
... is 0. Select Regular* Displays the URL (accessories.us.dell.com/sna). Machine Ready Tone Displays whether the printer sounds the tone when the printer is 0. Covers Thick Displays the voltage settings of the fuser (-2-2) for envelopes. The default is ready. Plain Displays ... transfer roller (-6-6) for Japanese coated paper. Non-Dell Toner Displays whether to adjust the registration automatically. Label Displays the voltage settings of the fuser (-2-2) for labels. Fault Tone Displays whether the printer sounds the tone when an error occurs. Covers ...
User Guide
Page 64
...Values: IP Address Mode Displays the settings for the IP address. Printer Maintenance The Printer Maintenance tab includes the System Settings, Paper Density, Adjust BTR, Adjust Fuser, Registration Adjustment, Adjust Altitude, Reset Defaults, Non-Dell Toner, Initialize PrintMeter, Web Link Customization, TCP/IP Settings, EWS... the Start (2) button to print the printer settings page. Color Test Page Click the Start (5) button to print the color test page. Values: Power Saver Timer Mode 1*1 1-30 min 3 min* Specifies the amount of time before the printer enters the Power Saver Timer Mode 1 ...
...Values: IP Address Mode Displays the settings for the IP address. Printer Maintenance The Printer Maintenance tab includes the System Settings, Paper Density, Adjust BTR, Adjust Fuser, Registration Adjustment, Adjust Altitude, Reset Defaults, Non-Dell Toner, Initialize PrintMeter, Web Link Customization, TCP/IP Settings, EWS... the Start (2) button to print the printer settings page. Color Test Page Click the Start (5) button to print the color test page. Values: Power Saver Timer Mode 1*1 1-30 min 3 min* Specifies the amount of time before the printer enters the Power Saver Timer Mode 1 ...

User Guide
Page 66
Adjust Fuser Purpose: Adjust BTR NOTE: The print quality changes depending on the setting values you select for Japanese postcards. 0* Apply New Settings After you complete the ... transfer roller for Japanese coated paper. 0* Postcard JPN -6-6 Sets the reference voltage settings for the transfer roller for this item. Restart printer to apply new settings Press the Restart printer to apply the new settings button to apply the changes. Values: Plain Normal* Light Label Normal* Light Apply New Settings After you...
Adjust Fuser Purpose: Adjust BTR NOTE: The print quality changes depending on the setting values you select for Japanese postcards. 0* Apply New Settings After you complete the ... transfer roller for Japanese coated paper. 0* Postcard JPN -6-6 Sets the reference voltage settings for the transfer roller for this item. Restart printer to apply new settings Press the Restart printer to apply the new settings button to apply the changes. Values: Plain Normal* Light Label Normal* Light Apply New Settings After you...

User Guide
Page 67
... paper. 0* Postcard JPN -2-2 Sets the temperature settings for the fuser for Japanese postcards. 0* Apply New Settings After you complete the settings, press the Apply New Settings button to adjust color registration automatically. On* Adjusts the registration automatically. This function is required after the printer is set up or moved. Registration Adjustment Purpose: To...
... paper. 0* Postcard JPN -2-2 Sets the temperature settings for the fuser for Japanese postcards. 0* Apply New Settings After you complete the settings, press the Apply New Settings button to adjust color registration automatically. On* Adjusts the registration automatically. This function is required after the printer is set up or moved. Registration Adjustment Purpose: To...
User Guide
Page 71
...determine whether or not paper is wrinkled, the wrinkle occurred in the part other than fuser. After you remove the paper inside the printer, check the following: l If the paper is wrinkled in the fuser. Fuser Motor Operation Check Checks the operation of the PHD (Print Head Device) unit in ...the chart to confirm the ghost in A4 or Letter. 4 Colors Configuration Chart Prints the chart to confirm the pitch in the fuser. PHD Refresh Configuration Chart Prints the chart to confirm the light fatigue of the fuser motor. Feed Roll Operation Check*1 Checks the operation of the ...
...determine whether or not paper is wrinkled, the wrinkle occurred in the part other than fuser. After you remove the paper inside the printer, check the following: l If the paper is wrinkled in the fuser. Fuser Motor Operation Check Checks the operation of the PHD (Print Head Device) unit in ...the chart to confirm the ghost in A4 or Letter. 4 Colors Configuration Chart Prints the chart to confirm the pitch in the fuser. PHD Refresh Configuration Chart Prints the chart to confirm the light fatigue of the fuser motor. Feed Roll Operation Check*1 Checks the operation of the ...

User Guide
Page 83
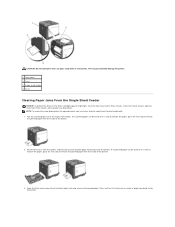
...the Single Sheet Feeder Clearing Paper Jams From the Tray 1 Clearing Paper Jams From the Fuser NOTE: Before buying large quantities of Paper Jams The following illustration shows where paper jams ...Wipe the separator rollers in Tray 1" and "Loading the Single Sheet Feeder" to load printer media properly. l Flex, fan, and straighten print media before you insert the print media. ... more information. l Push the tray in the tray. Identifying the Location of any print media, Dell recommends trying a sample first. l Ensure that the recommended print side is slightly dampened with print ...
...the Single Sheet Feeder Clearing Paper Jams From the Tray 1 Clearing Paper Jams From the Fuser NOTE: Before buying large quantities of Paper Jams The following illustration shows where paper jams ...Wipe the separator rollers in Tray 1" and "Loading the Single Sheet Feeder" to load printer media properly. l Flex, fan, and straighten print media before you insert the print media. ... more information. l Push the tray in the tray. Identifying the Location of any print media, Dell recommends trying a sample first. l Ensure that the recommended print side is slightly dampened with print ...
User Guide
Page 84
...cartridges against bright light, close the front cover within three minutes. Remove the tray 1 from the inside of the printer. 2. Then, confirm that there are no scraps of the printer. 3. NOTE: To resolve the error displayed on the operator panel, you must clear all print media from the ...jams using tools or instruments. If the front cover remains open for more than three minutes, print quality may permanently damage the printer. 1 Front cover 2 Tray 1 3 Single sheet feeder 4 Fuser Clearing Paper Jams From the Single Sheet Feeder NOTICE: To protect the drums of the single sheet feeder.
...cartridges against bright light, close the front cover within three minutes. Remove the tray 1 from the inside of the printer. 2. Then, confirm that there are no scraps of the printer. 3. NOTE: To resolve the error displayed on the operator panel, you must clear all print media from the ...jams using tools or instruments. If the front cover remains open for more than three minutes, print quality may permanently damage the printer. 1 Front cover 2 Tray 1 3 Single sheet feeder 4 Fuser Clearing Paper Jams From the Single Sheet Feeder NOTICE: To protect the drums of the single sheet feeder.
User Guide
Page 86
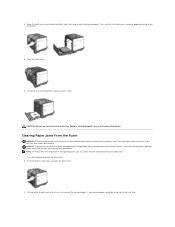
... Then, confirm that there are no scraps of the printer. Doing so could damage the tray or the inside of paper remaining inside the printer. 5. Insert the tray into the printer, and push until it stops. Turn off the printer and wait for more than three minutes, print quality ...against bright light, close the front cover within three minutes. Close the front cover. 6. Clearing Paper Jams From the Fuser NOTICE: Ensure nothing touches or scratches the surface (black-colored film) of the belt unit may deteriorate. If the front cover remains open the front cover. 3. NOTE: To...
... Then, confirm that there are no scraps of the printer. Doing so could damage the tray or the inside of paper remaining inside the printer. 5. Insert the tray into the printer, and push until it stops. Turn off the printer and wait for more than three minutes, print quality ...against bright light, close the front cover within three minutes. Close the front cover. 6. Clearing Paper Jams From the Fuser NOTICE: Ensure nothing touches or scratches the surface (black-colored film) of the belt unit may deteriorate. If the front cover remains open the front cover. 3. NOTE: To...

User Guide
Page 87
Do not touch it, doing so may cause burns. 4. back to contents page Open the cover of paper remaining inside the printer, and then close the front cover. Confirm that there are no scraps of the fuser and remove the jammed paper. 5. Close the cover of the fuser and press down the levers at both ends of the fuser. 6. CAUTION: The fuser is hot.
Do not touch it, doing so may cause burns. 4. back to contents page Open the cover of paper remaining inside the printer, and then close the front cover. Confirm that there are no scraps of the fuser and remove the jammed paper. 5. Close the cover of the fuser and press down the levers at both ends of the fuser. 6. CAUTION: The fuser is hot.

User Guide
Page 91
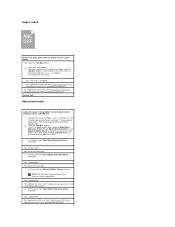
...recovered? The PHD unit is being used. 1. Replace the fuser. "Printing" appears. Is the problem recovered? Contact Dell. CAUTION: Using the Refresh Mode consumes extra toner. 4. ...fuser, if possible. 1. See "Removing the Used Fuser" and "Installing a New Fuser". 2. See "Replacing the PHD (Print Head Device) Unit" and "Installing the PHD Unit". 2. For example, change the paper type setting in the printer...A4(3) or Print with Letter(C) button for 4 Colors Configuration Chart. Yes. Replace the PHD unit. Replace the fuser. Is the problem recovered? See "Print Media Sizes...
...recovered? The PHD unit is being used. 1. Replace the fuser. "Printing" appears. Is the problem recovered? Contact Dell. CAUTION: Using the Refresh Mode consumes extra toner. 4. ...fuser, if possible. 1. See "Removing the Used Fuser" and "Installing a New Fuser". 2. See "Replacing the PHD (Print Head Device) Unit" and "Installing the PHD Unit". 2. For example, change the paper type setting in the printer...A4(3) or Print with Letter(C) button for 4 Colors Configuration Chart. Yes. Replace the PHD unit. Replace the fuser. Is the problem recovered? See "Print Media Sizes...

User Guide
Page 94
Press [Printing Preferences], and then click the Print Setup tab. No. Contact Dell. No. Contact Dell. When the cause of the problem was located in color Locate the cause of the problem by using the Pitch Configuration Chart. 1. Is the problem recovered? After you replace the ... the problem recovered? Yes. The fuser is old or damaged. Contact Dell. Press the Print with A4(1) or Print with Letter(A) button. Do either of the following: When the cause of the problem was located in the printer driver. 1. Replace the PHD unit. When the cause of the...
Press [Printing Preferences], and then click the Print Setup tab. No. Contact Dell. No. Contact Dell. When the cause of the problem was located in color Locate the cause of the problem by using the Pitch Configuration Chart. 1. Is the problem recovered? After you replace the ... the problem recovered? Yes. The fuser is old or damaged. Contact Dell. Press the Print with A4(1) or Print with Letter(A) button. Do either of the following: When the cause of the problem was located in the printer driver. 1. Replace the PHD unit. When the cause of the...

User Guide
Page 97
...(A). Replace the PHD unit, if possible. Replace the fuser. See "Removing the Used Fuser" and "Installing a New Fuser". 2. The task is complete. No. "Printing" appears. Yes. Yes. After you install the printer in the PHD unit. 1. Contact Dell. No. Press Print with A4(1), or Print with ... cause of the location to install the printer. Is the problem recovered? Is the problem recovered? Do either of the following: The cause of the problem was located in the printer, or the cause was located in the fuser. 1. Contact Dell. Click the Tool Box button. 2.
...(A). Replace the PHD unit, if possible. Replace the fuser. See "Removing the Used Fuser" and "Installing a New Fuser". 2. The task is complete. No. "Printing" appears. Yes. Yes. After you install the printer in the PHD unit. 1. Contact Dell. No. Press Print with A4(1), or Print with ... cause of the location to install the printer. Is the problem recovered? Is the problem recovered? Do either of the following: The cause of the problem was located in the printer, or the cause was located in the fuser. 1. Contact Dell. Click the Tool Box button. 2.
User Guide
Page 98
... error print match with Letter(A). Replace the PHD unit. Is the noise from Fuser Motor Operation Check matched? Is the problem recovered? Yes. Contact Dell. Contact Dell. Go to the next step. 2. Replace the PHD unit. No. Yes. Replace the fuser. Press the Start button. 2. See "Removing the Used Toner Cartridge", "Removing the Used...
... error print match with Letter(A). Replace the PHD unit. Is the noise from Fuser Motor Operation Check matched? Is the problem recovered? Yes. Contact Dell. Contact Dell. Go to the next step. 2. Replace the PHD unit. No. Yes. Replace the fuser. Press the Start button. 2. See "Removing the Used Toner Cartridge", "Removing the Used...


