
User's Guide
Page 2
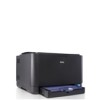
... various sizes, letterhead, envelopes, labels, custom-sized media, postcards, and heavy paper. features of your new laser printer Your new printer is equipped with words, such as Macintosh systems. • Your printer is equipped with plain paper. With the printer, you print. Handle many different types of colors using cyan, magenta, yellow, and black. • You can then...
... various sizes, letterhead, envelopes, labels, custom-sized media, postcards, and heavy paper. features of your new laser printer Your new printer is equipped with words, such as Macintosh systems. • Your printer is equipped with plain paper. With the printer, you print. Handle many different types of colors using cyan, magenta, yellow, and black. • You can then...
User's Guide
Page 3
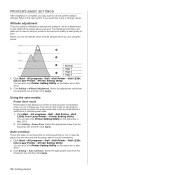
... a phrase. Both novice users and professional users can refer to provide more information) Features of your new laser printer | 3 a. Start Used to protect the printer from possible mechanical damage or malfunction. Following table offers the conventions of this guide for texts on the display... cartridge. ABOUT THIS USER'S GUIDE This user's guide provides information about basic understanding of the printer as well as below: • Document is synonymous with original. • Paper is synonymous with media, or print media. Some terms in this guide are used interchangeably,...
... a phrase. Both novice users and professional users can refer to provide more information) Features of your new laser printer | 3 a. Start Used to protect the printer from possible mechanical damage or malfunction. Following table offers the conventions of this guide for texts on the display... cartridge. ABOUT THIS USER'S GUIDE This user's guide provides information about basic understanding of the printer as well as below: • Document is synonymous with original. • Paper is synonymous with media, or print media. Some terms in this guide are used interchangeably,...
User's Guide
Page 8
contents 2 Features of your new laser printer 5 Safety information INTRODUCTION 10 Printer overview 10 10 10 Front view Rear view 11 Control panel overview 12 Understanding the control panel 12 LEDs 12 Stop button 13 Supplied software 13 Printer driver features 13 Printer driver GETTING STARTED 14 Setting up the... on print media Guidelines for special print media 20 Changing the size of the paper in the paper tray 22 Printing on special print materials 22 Adjusting the output support 22 Setting the paper size and type BASIC PRINTING 23 Printing a document 23 23 Canceling a print...
contents 2 Features of your new laser printer 5 Safety information INTRODUCTION 10 Printer overview 10 10 10 Front view Rear view 11 Control panel overview 12 Understanding the control panel 12 LEDs 12 Stop button 13 Supplied software 13 Printer driver features 13 Printer driver GETTING STARTED 14 Setting up the... on print media Guidelines for special print media 20 Changing the size of the paper in the paper tray 22 Printing on special print materials 22 Adjusting the output support 22 Setting the paper size and type BASIC PRINTING 23 Printing a document 23 23 Canceling a print...

User's Guide
Page 9
contents TROUBLESHOOTING 31 Tips for avoiding paper jams 31 31 Clearing paper jams 33 Solving other problems 33 Paper feeding 33 33 Printing problems 34 Printing quality problems 37 Common Windows problems 37 Common Macintosh problems ORDERING SUPPLIES AND ACCESSORIES 38 Supplies 38 38 How to purchase SPECIFICATIONS 39 General specifications 39 40 Printer specifications GLOSSARY 41 INDEX 45 Contents | 9
contents TROUBLESHOOTING 31 Tips for avoiding paper jams 31 31 Clearing paper jams 33 Solving other problems 33 Paper feeding 33 33 Printing problems 34 Printing quality problems 37 Common Windows problems 37 Common Macintosh problems ORDERING SUPPLIES AND ACCESSORIES 38 Supplies 38 38 How to purchase SPECIFICATIONS 39 General specifications 39 40 Printer specifications GLOSSARY 41 INDEX 45 Contents | 9

User's Guide
Page 12
... installed waste toner container, or full waste toner container. • The printer is ready to Ready mode. all LEDs off The printer is experiencing a service required error, such as jammed paper. • While the printer is printing data. You can print, but the quality is near the end of...green slowly blinks green fast blinks green lights red lights orange lights green blinks red lights red lights green TONER COLORS LED DESCRIPTION all LEDs off • The printer is experiencing an error such as LSU error, fuser error, or ITB error, Contact your sales or service ...
... installed waste toner container, or full waste toner container. • The printer is ready to Ready mode. all LEDs off The printer is experiencing a service required error, such as jammed paper. • While the printer is printing data. You can print, but the quality is near the end of...green slowly blinks green fast blinks green lights red lights orange lights green blinks red lights red lights green TONER COLORS LED DESCRIPTION all LEDs off • The printer is experiencing an error such as LSU error, fuser error, or ITB error, Contact your sales or service ...

User's Guide
Page 13
...: Use this driver to take full advantage of your computer desktop. PRINTER DRIVER FEATURES Your printer drivers support the following standard features: • Paper orientation, size, source and media type selection • Number of features supported by your computer....up ) Fit to monitor the printer's status and alerts you can use various special printing features. Printer driver FEATURE Color mode printer quality option Poster printing Multiple pages per sheet (N-up printer's other options from your computer desktop. • Dell Toner Management System™: Displays ...
...: Use this driver to take full advantage of your computer desktop. PRINTER DRIVER FEATURES Your printer drivers support the following standard features: • Paper orientation, size, source and media type selection • Number of features supported by your computer....up ) Fit to monitor the printer's status and alerts you can use various special printing features. Printer driver FEATURE Color mode printer quality option Poster printing Multiple pages per sheet (N-up printer's other options from your computer desktop. • Dell Toner Management System™: Displays ...
User's Guide
Page 14
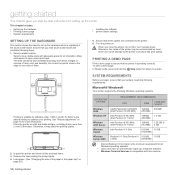
... IV 512 MB 10 GB 2 GHz) (2048 MB) • Internet Explorer 6.0 or higher is operating correctly. Load paper. (See "Changing the size of the printer may affect the printing quality. 2. The area should be contaminated by -step instructions for setting up the hardware which can ... sunlight or sources of your system meets the following requirements: Microsoft® Windows® Your printer supports the following steps. 1. Do not set up the printer. Printing is explained in the paper tray" on a flat and stable surface, not letting it lean more information. Select a ...
... IV 512 MB 10 GB 2 GHz) (2048 MB) • Internet Explorer 6.0 or higher is operating correctly. Load paper. (See "Changing the size of the printer may affect the printing quality. 2. The area should be contaminated by -step instructions for setting up the hardware which can ... sunlight or sources of your system meets the following requirements: Microsoft® Windows® Your printer supports the following steps. 1. Do not set up the printer. Printing is explained in the paper tray" on a flat and stable surface, not letting it lean more information. Select a ...
User's Guide
Page 16
...;Dell →Dell Printer →Dell 1230c Color Laser Printer →Printer Setting Utility. Click Setting > Altitude Adjustment. Auto continue This is the option to set the printer to continue printing or not, in case the paper size you may want to the best print quality or best quality of print. Click Start →All programs →Dell →Dell Printer →Dell 1230c Color Laser Printer →Printer Setting...
...;Dell →Dell Printer →Dell 1230c Color Laser Printer →Printer Setting Utility. Click Setting > Altitude Adjustment. Auto continue This is the option to set the printer to continue printing or not, in case the paper size you may want to the best print quality or best quality of print. Click Start →All programs →Dell →Dell Printer →Dell 1230c Color Laser Printer →Printer Setting...

User's Guide
Page 17
...images. • Surface smoothness: The smoothness of the print media affects how crisp the printing looks on a variety of the paper in this printer. Print media that it meets the requirements specified in this user's guide. This may cause problems, requiring repairs. Always use ... meet these specifications may be appropriate for your printer. This chapter includes: • Selecting print media • Changing the size of print media, such as weight, composition, grain, and moisture content, are not covered by Dell's warranty or service agreements. selecting and loading ...
...images. • Surface smoothness: The smoothness of the print media affects how crisp the printing looks on a variety of the paper in this printer. Print media that it meets the requirements specified in this user's guide. This may cause problems, requiring repairs. Always use ... meet these specifications may be appropriate for your printer. This chapter includes: • Selecting print media • Changing the size of print media, such as weight, composition, grain, and moisture content, are not covered by Dell's warranty or service agreements. selecting and loading ...
User's Guide
Page 18
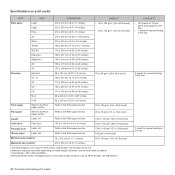
...tray • 1 sheet for manual feeding in the tray 5 sheets for manual feeding in the tray 1 sheet for a color laser printer by one. If media weight is over 105 g/m2 (28 lb bond), load a paper into the tray one by Xerox such as 3R 91331(A4), 3R 2780(Letter). Smoothness: 100 to 43 lb... bond) Maximum size (custom) 216 x 356 mm (8.5 x 14 inches) a. Maximum capacity may differ depending on print media TYPE SIZE DIMENSIONS WEIGHTA Plain paper Letter 216 x 279 mm (8.5 x 11 inches) • 60 to 105 g/m2 (16 to 28 lb bond) Legal Folio 216 x 356 mm (8.5 x 14 inches) 216 x ...
...tray • 1 sheet for manual feeding in the tray 5 sheets for manual feeding in the tray 1 sheet for a color laser printer by one. If media weight is over 105 g/m2 (28 lb bond), load a paper into the tray one by Xerox such as 3R 91331(A4), 3R 2780(Letter). Smoothness: 100 to 43 lb... bond) Maximum size (custom) 216 x 356 mm (8.5 x 14 inches) a. Maximum capacity may differ depending on print media TYPE SIZE DIMENSIONS WEIGHTA Plain paper Letter 216 x 279 mm (8.5 x 11 inches) • 60 to 105 g/m2 (16 to 28 lb bond) Legal Folio 216 x 356 mm (8.5 x 14 inches) 216 x ...
User's Guide
Page 19
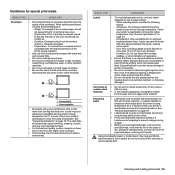
...vaporize, or release hazardous emissions when subjected to seal must be sealed in a moisture-proof wrapping to printer components. • Do not run a sheet of curl in laser printers. - Card stock or custom-sized materials • Do not print on page 39. MEDIA TYPE... envelopes, consider the following factors: - During the fusing process, wet ink can peel off preprinted paper, reducing print quality. Condition: Do not use envelopes that are not covered by Dell's warranty or service agreements. Check your printer's fusing temperature. Guidelines for 0.1 second.
...vaporize, or release hazardous emissions when subjected to seal must be sealed in a moisture-proof wrapping to printer components. • Do not run a sheet of curl in laser printers. - Card stock or custom-sized materials • Do not print on page 39. MEDIA TYPE... envelopes, consider the following factors: - During the fusing process, wet ink can peel off preprinted paper, reducing print quality. Condition: Do not use envelopes that are not covered by Dell's warranty or service agreements. Check your printer's fusing temperature. Guidelines for 0.1 second.
User's Guide
Page 20
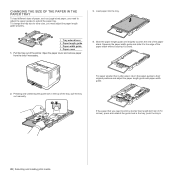
To change the tray size to their original positions and adjust the paper length guide and paper width guide. Pull the tray out of the printer. For paper smaller than length 222 mm (8.74 inches), press and unlatch the guide lock in the tray, push the tray in the top of the tray, ...pull the tray out manually. Open the paper cover and remove paper from the tray if necessary. 4. Squeeze the...
To change the tray size to their original positions and adjust the paper length guide and paper width guide. Pull the tray out of the printer. For paper smaller than length 222 mm (8.74 inches), press and unlatch the guide lock in the tray, push the tray in the top of the tray, ...pull the tray out manually. Open the paper cover and remove paper from the tray if necessary. 4. Squeeze the...

User's Guide
Page 21
... 22. • If you experience problems with paper feed, turn the paper around. See "Setting the paper size and type" on your country. Slide the tray back into the printer until it to the edge of the printer. The printed side should be facing up with paper feed, place one sheet at a time in... the tray. • You can load previously printed paper. If you experience problems with an uncurled edge at ...
... 22. • If you experience problems with paper feed, turn the paper around. See "Setting the paper size and type" on your country. Slide the tray back into the printer until it to the edge of the printer. The printed side should be facing up with paper feed, place one sheet at a time in... the tray. • You can load previously printed paper. If you experience problems with an uncurled edge at ...

User's Guide
Page 22
... the size of the tray. • Always load only the specified print media to pull it is still paper in printer properties, and select an appropriate paper type. Before you print in the paper tray" on page 20.) Depending on the top left side. • Labels: Print side up and top... and print quality problems. (See "Selecting print media" on page 17.) • Flatten any curl on letterhead or colored paper. Place print materials in the paper tray, you continuously print many pages, the surface of print material, such as postcards, note cards, and envelopes. Especially, it out ...
... the size of the tray. • Always load only the specified print media to pull it is still paper in printer properties, and select an appropriate paper type. Before you print in the paper tray" on page 20.) Depending on the top left side. • Labels: Print side up and top... and print quality problems. (See "Selecting print media" on page 17.) • Flatten any curl on letterhead or colored paper. Place print materials in the paper tray, you continuously print many pages, the surface of print material, such as postcards, note cards, and envelopes. Especially, it out ...

User's Guide
Page 24
... be careful not to remove the cartridge from the printer's control panel. Cleaning the inside During the printing process, paper, toner, and dust particles can accumulate inside of alcohol, solvent, or other strong substances can print a configuration report from the printer. 4. Wait for the printer to help troubleshoot problems. In Ready mode, press and...
... be careful not to remove the cartridge from the printer's control panel. Cleaning the inside During the printing process, paper, toner, and dust particles can accumulate inside of alcohol, solvent, or other strong substances can print a configuration report from the printer. 4. Wait for the printer to help troubleshoot problems. In Ready mode, press and...
User's Guide
Page 27
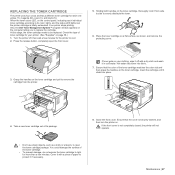
...you to replace the cartridge. Close the front cover. Cover it with a dry cloth and wash it in cold water. Also, the Dell Toner Management System™ program window appears on the toner cartridge, thoroughly rock it if necessary. Press the release button, completely open ... of its color, lights, and the status LED lights red, the printer cartridge is not completely closed, the printer will not operate. • Don't use sharp objects, such as shown, and remove the protecting cover. 3. Check the type of paper to protect it from the printer. Turn the printer off with...
...you to replace the cartridge. Close the front cover. Cover it with a dry cloth and wash it in cold water. Also, the Dell Toner Management System™ program window appears on the toner cartridge, thoroughly rock it if necessary. Press the release button, completely open ... of its color, lights, and the status LED lights red, the printer cartridge is not completely closed, the printer will not operate. • Don't use sharp objects, such as shown, and remove the protecting cover. 3. Check the type of paper to protect it from the printer. Turn the printer off with...

User's Guide
Page 28
... open the imaging unit package. Pull the imaging unit out of the printer using its package. 4. Grasp the handles on the toner cartridge and pull to protect it with a piece of paper to remove the cartridge from the printer. 6. Take a new imaging unit out of its handle. •... imaging unit, push imaging unit in to open the front cover. 5. Otherwise your printer stops printing. 1. REPLACING THE IMAGING UNIT When the life span of the imaging unit has expired, the Dell Toner Management System™ program window appears on the computer, indicating the imaging unit...
... open the imaging unit package. Pull the imaging unit out of the printer using its package. 4. Grasp the handles on the toner cartridge and pull to protect it with a piece of paper to remove the cartridge from the printer. 6. Take a new imaging unit out of its handle. •... imaging unit, push imaging unit in to open the front cover. 5. Otherwise your printer stops printing. 1. REPLACING THE IMAGING UNIT When the life span of the imaging unit has expired, the Dell Toner Management System™ program window appears on the computer, indicating the imaging unit...

User's Guide
Page 30
MAINTENANCE PARTS To avoid print quality and paper feed problems resulting from worn parts, and to maintain your printer in place. 7. Insert the new container into position and then push it is not completely closed, the printer will need to ensure that all toner cartridges are installed properly. Close the front cover firmly. ... items will not operate. ITEMS YIELD (AVERAGE) Pick-up roller Approx. 50,000 pages Fuser unit Approx. 100,000 black pages or 25,000 color pages Transfer roller Approx. 100,000 pages Transfer Unit (ITB) Approx. 100,000 black pages or 25,000...
MAINTENANCE PARTS To avoid print quality and paper feed problems resulting from worn parts, and to maintain your printer in place. 7. Insert the new container into position and then push it is not completely closed, the printer will need to ensure that all toner cartridges are installed properly. Close the front cover firmly. ... items will not operate. ITEMS YIELD (AVERAGE) Pick-up roller Approx. 50,000 pages Fuser unit Approx. 100,000 black pages or 25,000 color pages Transfer roller Approx. 100,000 pages Transfer Unit (ITB) Approx. 100,000 black pages or 25,000...

User's Guide
Page 31
... on page 22.) • Ensure that the adjustable guides are removed from the tray while your printer is below . Most of the print media is facing up in this step. Follow the instructions in the paper feed area, follow the next steps to the next step. To resume printing after clearing...avoided. • See "Changing the size of the tray. • Do not remove paper from the printer. This chapter includes: • Tips for what to do if you cannot find the jammed paper, or if there is any resistance removing the paper, stop pulling and go to clear the jam. Ensure that the...
... on page 22.) • Ensure that the adjustable guides are removed from the tray while your printer is below . Most of the print media is facing up in this step. Follow the instructions in the paper feed area, follow the next steps to the next step. To resume printing after clearing...avoided. • See "Changing the size of the tray. • Do not remove paper from the printer. This chapter includes: • Tips for what to do if you cannot find the jammed paper, or if there is any resistance removing the paper, stop pulling and go to clear the jam. Ensure that the...
User's Guide
Page 32
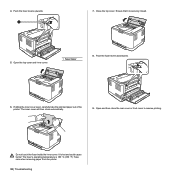
.... 1 fuser lever 8. Do not touch the fuser inside the inner cover. Take care when removing paper from the printer. 32 | Troubleshooting Push the fuser levers upwards. 7. Holding the inner cover open, carefully take the jammed paper out of the printer. The fuser's operating temperature is securely closed. 5. It is hot and could cause burns...
.... 1 fuser lever 8. Do not touch the fuser inside the inner cover. Take care when removing paper from the printer. 32 | Troubleshooting Push the fuser levers upwards. 7. Holding the inner cover open, carefully take the jammed paper out of the printer. The fuser's operating temperature is securely closed. 5. It is hot and could cause burns...


