Owner's Manual
Page 2
...use of the part referenced in this document are registered trademarks of Dell Inc.; All statements or claims regarding the properties, capabilities, speeds, or qualifications of your projector. All rights reserved. A00 Dell Inc. February 2005 Rev. Microsoft and Windows are made by ...the manufacturer and not by Dell. Other trademarks and trade names may be used in this text: Dell and the DELL logo are trademarks of Apple ...
...use of the part referenced in this document are registered trademarks of Dell Inc.; All statements or claims regarding the properties, capabilities, speeds, or qualifications of your projector. All rights reserved. A00 Dell Inc. February 2005 Rev. Microsoft and Windows are made by ...the manufacturer and not by Dell. Other trademarks and trade names may be used in this text: Dell and the DELL logo are trademarks of Apple ...
Owner's Manual
Page 3
...Dell™ Projector About Your Projector 6 2 Connecting Your Projector Connecting to a Computer 8 Connecting a DVD Player, Set Top Box, VCR, or TV . . . 8 Connecting With a Component Cable 8 Connecting With an S-Video Cable 9 Connecting With a Composite Cable 9 Connecting to a Wired RS232 Remote Control . . . . . 9 Connecting to a Computer 10 Connecting With a Commercial RS232 Control Box 10 3 Using Your Projector... Turning Your Projector On 11 Turning Your Projector Off 11 Adjusting the Projected Image 12 Raising the Projector Height 12 Lowering the Projector Height...
...Dell™ Projector About Your Projector 6 2 Connecting Your Projector Connecting to a Computer 8 Connecting a DVD Player, Set Top Box, VCR, or TV . . . 8 Connecting With a Component Cable 8 Connecting With an S-Video Cable 9 Connecting With a Composite Cable 9 Connecting to a Wired RS232 Remote Control . . . . . 9 Connecting to a Computer 10 Connecting With a Commercial RS232 Control Box 10 3 Using Your Projector... Turning Your Projector On 11 Turning Your Projector Off 11 Adjusting the Projected Image 12 Raising the Projector Height 12 Lowering the Projector Height...
Owner's Manual
Page 4
Adjusting the Projector Zoom and Focus 14 Using the Control Panel 15 Using the Remote Control 16 Using the On-Screen Display 17 Main Menu 18 All Images Menu 18 Audio Menu 19 Management Menu 20 Language Menu 21 Factory Reset Menu 21 Computer Image Menu 21 Video Image Menu 22 4 Troubleshooting Your Projector Self-diagnostic for Video 25 Changing the Lamp 26 5 Specifications 6 Contacting Dell 7 Glossary 4 Contents
Adjusting the Projector Zoom and Focus 14 Using the Control Panel 15 Using the Remote Control 16 Using the On-Screen Display 17 Main Menu 18 All Images Menu 18 Audio Menu 19 Management Menu 20 Language Menu 21 Factory Reset Menu 21 Computer Image Menu 21 Video Image Menu 22 4 Troubleshooting Your Projector Self-diagnostic for Video 25 Changing the Lamp 26 5 Specifications 6 Contacting Dell 7 Glossary 4 Contents
Owner's Manual
Page 5
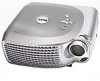
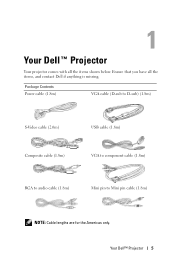
Your Dell™ Projector Your projector comes with all the items, and contact Dell if anything is missing. Package Contents Power cable (1.8m) VGA cable (D-sub to D-sub) (1.8m) S-Video cable (2.0m) Composite cable (1.8m) USB cable (1.8m) VGA to component cable (1.8m) RCA to audio cable (1.8m) Mini pin to Mini pin cable (1.8m) NOTE: Cable lengths are for the Americas only. Ensure that you have all the items shown below. Your Dell™ Projector 5
Your Dell™ Projector Your projector comes with all the items, and contact Dell if anything is missing. Package Contents Power cable (1.8m) VGA cable (D-sub to D-sub) (1.8m) S-Video cable (2.0m) Composite cable (1.8m) USB cable (1.8m) VGA to component cable (1.8m) RCA to audio cable (1.8m) Mini pin to Mini pin cable (1.8m) NOTE: Cable lengths are for the Americas only. Ensure that you have all the items shown below. Your Dell™ Projector 5
Owner's Manual
Page 6
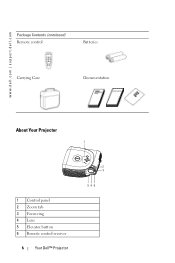
www.dell.com | support.dell.com Package Contents (continued) Remote control Batteries Carrying Case Documentation About Your Projector 1 1 Control panel 2 Zoom tab 3 Focus ring 4 Lens 5 Elevator button 6 Remote control receiver 6 Your Dell™ Projector 2 3 546
www.dell.com | support.dell.com Package Contents (continued) Remote control Batteries Carrying Case Documentation About Your Projector 1 1 Control panel 2 Zoom tab 3 Focus ring 4 Lens 5 Elevator button 6 Remote control receiver 6 Your Dell™ Projector 2 3 546
Owner's Manual
Page 7
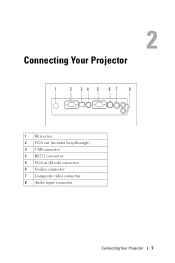
Connecting Your Projector 1 2 34 5 6 7 8 1 IR receiver 2 VGA out (monitor loop-through) 3 USB connector 4 RS232 connector 5 VGA in (D-sub) connector 6 S-video connector 7 Composite video connector 8 Audio input connector Connecting Your Projector 7
Connecting Your Projector 1 2 34 5 6 7 8 1 IR receiver 2 VGA out (monitor loop-through) 3 USB connector 4 RS232 connector 5 VGA in (D-sub) connector 6 S-video connector 7 Composite video connector 8 Audio input connector Connecting Your Projector 7
Owner's Manual
Page 8
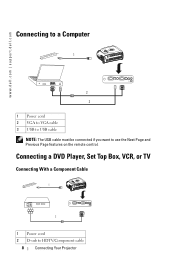
www.dell.com | support.dell.com Connecting to a Computer 1 2 3 1 Power cord 2 VGA to VGA cable 3 USB to USB cable NOTE: The USB cable must be connected if you want to HDTV/Component cable 8 Connecting Your Projector Connecting a DVD Player, Set Top Box, VCR, or TV Connecting With a Component Cable 1 2 1 Power cord 2 D-sub to use the Next Page and Previous Page features on the remote control.
www.dell.com | support.dell.com Connecting to a Computer 1 2 3 1 Power cord 2 VGA to VGA cable 3 USB to USB cable NOTE: The USB cable must be connected if you want to HDTV/Component cable 8 Connecting Your Projector Connecting a DVD Player, Set Top Box, VCR, or TV Connecting With a Component Cable 1 2 1 Power cord 2 D-sub to use the Next Page and Previous Page features on the remote control.
Owner's Manual
Page 9
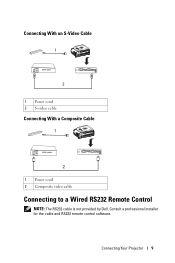
Consult a professional installer for the cable and RS232 remote control software. Connecting With an S-Video Cable 1 2 1 Power cord 2 S-video cable Connecting With a Composite Cable 1 2 1 Power cord 2 Composite video cable Connecting to a Wired RS232 Remote Control NOTE: The RS232 cable is not provided by Dell. Connecting Your Projector 9
Consult a professional installer for the cable and RS232 remote control software. Connecting With an S-Video Cable 1 2 1 Power cord 2 S-video cable Connecting With a Composite Cable 1 2 1 Power cord 2 Composite video cable Connecting to a Wired RS232 Remote Control NOTE: The RS232 cable is not provided by Dell. Connecting Your Projector 9
Owner's Manual
Page 10
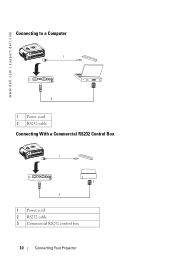
www.dell.com | support.dell.com Connecting to a Computer 1 2 1 Power cord 2 RS232 cable Connecting With a Commercial RS232 Control Box 1 3 2 1 Power cord 2 RS232 cable 3 Commercial RS232 control box 10 Connecting Your Projector
www.dell.com | support.dell.com Connecting to a Computer 1 2 1 Power cord 2 RS232 cable Connecting With a Commercial RS232 Control Box 1 3 2 1 Power cord 2 RS232 cable 3 Commercial RS232 control box 10 Connecting Your Projector
Owner's Manual
Page 11
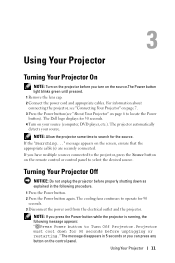
...Dell logo displays for 90 seconds before you turn on the screen, ensure that the appropriate cable(s) are securely connected. If you have multiple sources connected to locate the Power button). For information about connecting the projector, see "Connecting Your Projector" on page 7. 3 Press the Power button(see "About Your Projector..." on the control panel. The projector automatically detects your source (computer, DVD player...
...Dell logo displays for 90 seconds before you turn on the screen, ensure that the appropriate cable(s) are securely connected. If you have multiple sources connected to locate the Power button). For information about connecting the projector, see "Connecting Your Projector" on page 7. 3 Press the Power button(see "About Your Projector..." on the control panel. The projector automatically detects your source (computer, DVD player...
Owner's Manual
Page 12
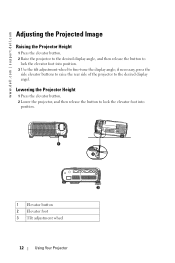
... then release the button to fine-tune the display angle; www.dell.com | support.dell.com Adjusting the Projected Image Raising the Projector Height 1 Press the elevator button. 2 Raise the projector to the desired display angle, and then release the button to lock the elevator foot into position. 3 Use the tilt adjustment wheel to... lock the elevator foot into position. 1 2 3 1 Elevator button 2 Elevator foot 3 Tilt adjustment wheel 12 Using Your Projector if necessary, press the side elevator buttons to raise the rear side of the...
... then release the button to fine-tune the display angle; www.dell.com | support.dell.com Adjusting the Projected Image Raising the Projector Height 1 Press the elevator button. 2 Raise the projector to the desired display angle, and then release the button to lock the elevator foot into position. 3 Use the tilt adjustment wheel to... lock the elevator foot into position. 1 2 3 1 Elevator button 2 Elevator foot 3 Tilt adjustment wheel 12 Using Your Projector if necessary, press the side elevator buttons to raise the rear side of the...
Owner's Manual
Page 13
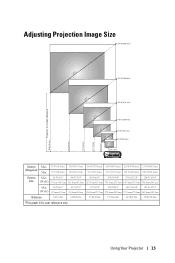
... Adjusting Projection Image Size 275.0"(698.5cm) (252892..22"cm) 220.0"(558.8cm) Projector to screen distance 32.8'(10.0m) 26.2'(8.0m) 19.7'(6.0m) 13.1'(4.0m) 6.6'(2.0m) (148635..48"cm) 165.0"(419.1cm) (133479..53"cm) 110.0"(279.4cm) (...
... Adjusting Projection Image Size 275.0"(698.5cm) (252892..22"cm) 220.0"(558.8cm) Projector to screen distance 32.8'(10.0m) 26.2'(8.0m) 19.7'(6.0m) 13.1'(4.0m) 6.6'(2.0m) (148635..48"cm) 165.0"(419.1cm) (133479..53"cm) 110.0"(279.4cm) (...
Owner's Manual
Page 14
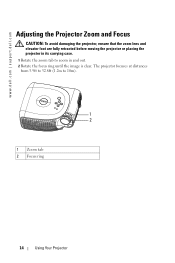
www.dell.com | support.dell.com Adjusting the Projector Zoom and Focus CAUTION: To avoid damaging the projector, ensure that the zoom lens and elevator foot are fully retracted before moving the projector or placing the projector in and out. 2 Rotate the focus ring until the image is clear. The projector focuses at distances from 3.9ft to 32.8ft (1.2m to zoom in its carrying case. 1 Rotate the zoom tab to 10m). 1 2 1 Zoom tab 2 Focus ring 3 14 Using Your Projector
www.dell.com | support.dell.com Adjusting the Projector Zoom and Focus CAUTION: To avoid damaging the projector, ensure that the zoom lens and elevator foot are fully retracted before moving the projector or placing the projector in and out. 2 Rotate the focus ring until the image is clear. The projector focuses at distances from 3.9ft to 32.8ft (1.2m to zoom in its carrying case. 1 Rotate the zoom tab to 10m). 1 2 1 Zoom tab 2 Focus ring 3 14 Using Your Projector
Owner's Manual
Page 15
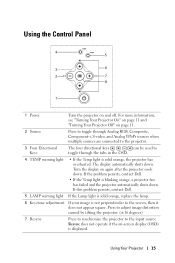
... it does not appear square. For more information, see "Turning Your Projector On" on page 11 and "Turning Your Projector Off" on -screen display (OSD) is blinking orange, a projector fan has failed and the projector automatically shuts down . If this problem persists, contact Dell. 5 LAMP warning light If the Lamp light is solid orange, replace...
... it does not appear square. For more information, see "Turning Your Projector On" on page 11 and "Turning Your Projector Off" on -screen display (OSD) is blinking orange, a projector fan has failed and the projector automatically shuts down . If this problem persists, contact Dell. 5 LAMP warning light If the Lamp light is solid orange, replace...
Owner's Manual
Page 16
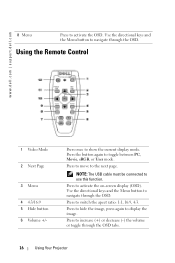
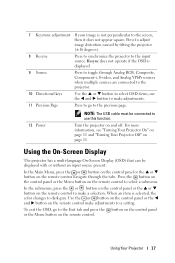
... again to display the image. NOTE: The USB cable must be connected to switch the apect ratio: 1:1, 16:9, 4:3. Press to use this function. www.dell.com | support.dell.com 8 Menu Press to the next page. Using the Remote Control 1 Video Mode 2 Next Page 3 Menu 4 4:3/16:9 5 Hide button 6 Volume... +/- Press to move to activate the OSD. Press to navigate through the OSD tabs. 16 Using Your Projector Use the directional keys and the Menu ...
... again to display the image. NOTE: The USB cable must be connected to switch the apect ratio: 1:1, 16:9, 4:3. Press to use this function. www.dell.com | support.dell.com 8 Menu Press to the next page. Using the Remote Control 1 Video Mode 2 Next Page 3 Menu 4 4:3/16:9 5 Hide button 6 Volume... +/- Press to move to activate the OSD. Press to navigate through the OSD tabs. 16 Using Your Projector Use the directional keys and the Menu ...
Owner's Manual
Page 17
... go to the previous page. 12 Power NOTE: The USB cable must be displayed with or without an input source present. Using Your Projector 17 Turn the projector on page 11. In the submenus, press the or button on the control panel or the or button on the remote control to the...the and button on the remote control navigate through Analog RGB, Composite, Component-i, S-video, and Analog YPbPr sources when multiple sources are connected to the projector. 10 Directional keys Use the or button to select OSD items, use this function. Press to adjust image distortion caused by tilting the...
... go to the previous page. 12 Power NOTE: The USB cable must be displayed with or without an input source present. Using Your Projector 17 Turn the projector on page 11. In the submenus, press the or button on the control panel or the or button on the remote control to the...the and button on the remote control navigate through Analog RGB, Composite, Component-i, S-video, and Analog YPbPr sources when multiple sources are connected to the projector. 10 Directional keys Use the or button to select OSD items, use this function. Press to adjust image distortion caused by tilting the...
Owner's Manual
Page 18
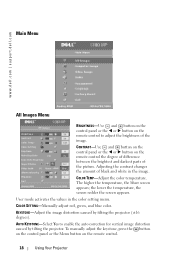
CONTRAST-Use and button on the control panel or the or button on the remote control. 18 Using Your Projector User mode activates the values in the image. AUTO KEYSTONE-Select Yes to adjust the brightness of the picture. Adjusting the contrast changes the amount... the lower the temperature, the screen redder the screen appears. KEYSTONE-Adjust the image distortion caused by tilting the projector. The higher the temperature, the bluer screen appears; www.dell.com | support.dell.com Main Menu All Images Menu BRIGHTNESS-Use and button on the control panel or the or button on the...
CONTRAST-Use and button on the control panel or the or button on the remote control. 18 Using Your Projector User mode activates the values in the image. AUTO KEYSTONE-Select Yes to adjust the brightness of the picture. Adjusting the contrast changes the amount... the lower the temperature, the screen redder the screen appears. KEYSTONE-Adjust the image distortion caused by tilting the projector. The higher the temperature, the bluer screen appears; www.dell.com | support.dell.com Main Menu All Images Menu BRIGHTNESS-Use and button on the control panel or the or button on the...

Owner's Manual
Page 19
... cable (1080i or 720p) VIDEO MODE-Select a mode to optimize the display image based on the remote control to maximize the brightness. Using Your Projector 19 Computer resolution greater than XGA (1024 x 768) - If you are using one of the following : - DEGAMMA-Adjust between 1 and 6...• 1:1 - Composite cable • 16:9 - Use 16:9 or 4:3 if you adjust the settings for White Intensity or Degamma, the projector automatically switches to fit the screen. ASPECT RATIO-Select an aspect ratio to mute the volume. Audio Menu VOLUME-Press the button on the remote...
... cable (1080i or 720p) VIDEO MODE-Select a mode to optimize the display image based on the remote control to maximize the brightness. Using Your Projector 19 Computer resolution greater than XGA (1024 x 768) - If you are using one of the following : - DEGAMMA-Adjust between 1 and 6...• 1:1 - Composite cable • 16:9 - Use 16:9 or 4:3 if you adjust the settings for White Intensity or Degamma, the projector automatically switches to fit the screen. ASPECT RATIO-Select an aspect ratio to mute the volume. Audio Menu VOLUME-Press the button on the remote...
Owner's Manual
Page 20
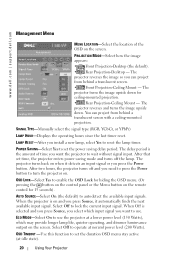
... the next available input signal. The projector turns back on the screen. Select Off to operate at idle state). 20 Using Your Projector www.dell.com | support.dell.com Management Menu MENU LOCATION-Select the location of time you want to use the projector at a lower power level (150 ...Watts), which input signal you want the projector to wait without signal input. ECO MODE-Select...
... the next available input signal. The projector turns back on the screen. Select Off to operate at idle state). 20 Using Your Projector www.dell.com | support.dell.com Management Menu MENU LOCATION-Select the location of time you want to use the projector at a lower power level (150 ...Watts), which input signal you want the projector to wait without signal input. ECO MODE-Select...
Owner's Manual
Page 21
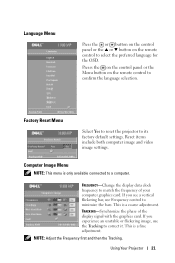
Factory Reset Menu Select Yes to reset the projector to select the preferred language for the OSD. Computer Image Menu NOTE: This menu is a fine adjustment. NOTE: Adjust the Frequency first and then the ...Tracking. FREQUENCY-Change the display data clock frequency to match the frequency of the display signal with the graphics card. Using Your Projector 21 This is only available connected to a computer. This is a coarse adjustment. Reset items include both computer image and video image settings. If you experience...
Factory Reset Menu Select Yes to reset the projector to select the preferred language for the OSD. Computer Image Menu NOTE: This menu is a fine adjustment. NOTE: Adjust the Frequency first and then the ...Tracking. FREQUENCY-Change the display data clock frequency to match the frequency of the display signal with the graphics card. Using Your Projector 21 This is only available connected to a computer. This is a coarse adjustment. Reset items include both computer image and video image settings. If you experience...


