
Owner Manual
Page 4
... from wall socket. - Ensure that for examination, repair or adjustment. - Before moving the air conditioner, empty water from debris and blockages. - Do not use and before cleaning. - To disconnect, turn control to the nearest authorised service centre for which it was intended. - The Pinguino should always be combustible gases in water or other than that the outlet of the discharge hose is used...
... from wall socket. - Ensure that for examination, repair or adjustment. - Before moving the air conditioner, empty water from debris and blockages. - Do not use and before cleaning. - To disconnect, turn control to the nearest authorised service centre for which it was intended. - The Pinguino should always be combustible gases in water or other than that the outlet of the discharge hose is used...
Owner Manual
Page 5
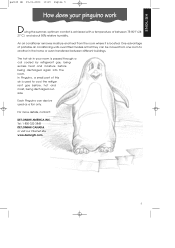
... visit our Internet site www.delonghi.com 5 An air conditioner removes moisture and heat from one room to cool the refrigerant gas before being discharged outside. The hot air in the home or even transferred between 75-80°F (24- 27°C) and about 50% relative humidity. In Pinguino, a small part of portable air conditioning units over fitted models is used as a fan only. For more details...
... visit our Internet site www.delonghi.com 5 An air conditioner removes moisture and heat from one room to cool the refrigerant gas before being discharged outside. The hot air in the home or even transferred between 75-80°F (24- 27°C) and about 50% relative humidity. In Pinguino, a small part of portable air conditioning units over fitted models is used as a fan only. For more details...
Owner Manual
Page 6
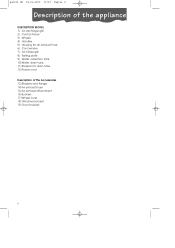
pac160 GB 25-01-2003 10:19 Pagina 6 Description of the appliance DESCRIPTION MODEL 1) Air discharge grill 2) Control Panel 3) Wheels 4) Handles 5) Housing for air exhaust hose 6) Cord winder 7) Air intake grill 8) Rating plate 9) Water collection tank 10)Water drain tube 11)Stopper for drain tube 12)Power cord Description of the Accessories 13)Stopper and flange 14)Air exhaust hose 15)Air exhaust attachment 16) Suckers 17)Wheel locks 18) Window bracket 19) Door bracket 6
pac160 GB 25-01-2003 10:19 Pagina 6 Description of the appliance DESCRIPTION MODEL 1) Air discharge grill 2) Control Panel 3) Wheels 4) Handles 5) Housing for air exhaust hose 6) Cord winder 7) Air intake grill 8) Rating plate 9) Water collection tank 10)Water drain tube 11)Stopper for drain tube 12)Power cord Description of the Accessories 13)Stopper and flange 14)Air exhaust hose 15)Air exhaust attachment 16) Suckers 17)Wheel locks 18) Window bracket 19) Door bracket 6
Owner Manual
Page 7
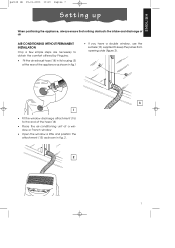
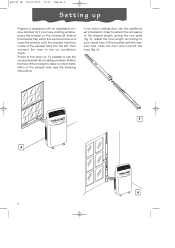
... air exhaust hose (14) in its housing (5) at the rear of the appliance as shown in fig.1 • If you have a double window, use the suckers (16) supplied to keep the panes from opening wide (figure 3). 12 3 1 • Fit the window discharge attachment (15) to the end of the hose (14) • Place the air-conditioning unit at a window or French window • Open...
... air exhaust hose (14) in its housing (5) at the rear of the appliance as shown in fig.1 • If you have a double window, use the suckers (16) supplied to keep the panes from opening wide (figure 3). 12 3 1 • Fit the window discharge attachment (15) to the end of the hose (14) • Place the air-conditioning unit at a window or French window • Open...
Owner Manual
Page 8
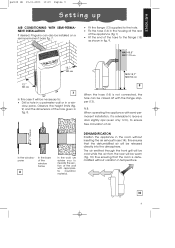
... a correct installation of the exhaust hose into the slot, then connect the hose to the air conditioner (Fig.4). If you have a sliding window, place the bracket on the window sill, extend the bracket fully within the window frame and lower the window onto the bracket. Insert the nozzle of the exhaust hose (see the following instructions). Thanks to the wing nut, it's possible to use the additional set provided...
... a correct installation of the exhaust hose into the slot, then connect the hose to the air conditioner (Fig.4). If you have a sliding window, place the bracket on the window sill, extend the bracket fully within the window frame and lower the window onto the bracket. Insert the nozzle of the exhaust hose (see the following instructions). Thanks to the wing nut, it's possible to use the additional set provided...
Owner Manual
Page 9
... height limits (fig. 9) and the dimensions of the wall with the flange stopper (13). this case it is dehumidified without variation in the room without inserting the air exhaust hose (14); 4.2" / 106 mm ENGLISH pac160 GB 25-01-2003 10:19 Pagina 9 Setting up AIR CONDITIONING WITH SEMI-PERMANENT INSTALLATION If desired, Pinguino can be released directly into the atmosphere. MAX 45...
... height limits (fig. 9) and the dimensions of the wall with the flange stopper (13). this case it is dehumidified without variation in the room without inserting the air exhaust hose (14); 4.2" / 106 mm ENGLISH pac160 GB 25-01-2003 10:19 Pagina 9 Setting up AIR CONDITIONING WITH SEMI-PERMANENT INSTALLATION If desired, Pinguino can be released directly into the atmosphere. MAX 45...
Owner Manual
Page 10
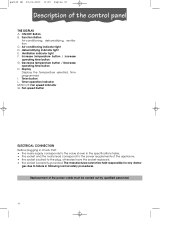
dehumidifying indicator light E. Timer operation indicator M/N/O/P. Air-conditioning indicator light D. Display Displays the temperature selected, time programmed I. Increase temperature button / increase operating time button G. The manufactures cannot be carried out by qualified personnel. 10 Function Button Air-conditioning, dehumidifying, ventilation C. Ventilation indicator light F. Fan speed indicator Q. Timer button L. ON/OFF Button B. Fan speed button ELECTRICAL CONNECTION Before plugging in check that: • the mains supply corresponds to the value ...
dehumidifying indicator light E. Timer operation indicator M/N/O/P. Air-conditioning indicator light D. Display Displays the temperature selected, time programmed I. Increase temperature button / increase operating time button G. The manufactures cannot be carried out by qualified personnel. 10 Function Button Air-conditioning, dehumidifying, ventilation C. Ventilation indicator light F. Fan speed indicator Q. Timer button L. ON/OFF Button B. Fan speed button ELECTRICAL CONNECTION Before plugging in check that: • the mains supply corresponds to the value ...
Owner Manual
Page 11
... " " will re-start automatically. pac160 GB 25-01-2003 10:19 Pagina 11 ENGLISH Operation SWITCHING THE APPLIANCE ON Connect the appliance to select the fan speed for reducing humidity in the atmosphere while avoiding increases or decreases in temperature (in the tank at the rear of condensation may discharge the excess water directly into the hole provided, after selecting...
... " " will re-start automatically. pac160 GB 25-01-2003 10:19 Pagina 11 ENGLISH Operation SWITCHING THE APPLIANCE ON Connect the appliance to select the fan speed for reducing humidity in the atmosphere while avoiding increases or decreases in temperature (in the tank at the rear of condensation may discharge the excess water directly into the hole provided, after selecting...
Owner Manual
Page 12
..., up to flash. • Set the number of 24 hours. How to flash. • Set the number of air filtered; these increase and decrease by mode. • Press the timer button (I ): on the display the two central segments will automatically change the time more than 2 seconds will start to set using the buttons + (F) or - (G); "Silent" speed "Min" speed "Max" speed 24 12 buttons. "AUTO" function cannot be changed. The indicator...
..., up to flash. • Set the number of 24 hours. How to flash. • Set the number of air filtered; these increase and decrease by mode. • Press the timer button (I ): on the display the two central segments will automatically change the time more than 2 seconds will start to set using the buttons + (F) or - (G); "Silent" speed "Min" speed "Max" speed 24 12 buttons. "AUTO" function cannot be changed. The indicator...
Owner Manual
Page 13
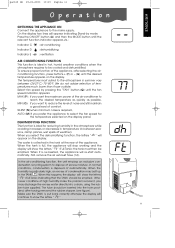
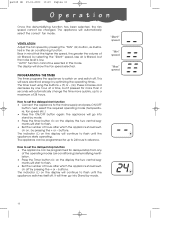
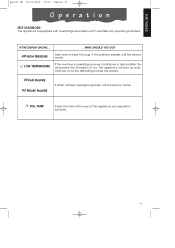
ENGLISH pac160 GB 25-01-2003 10:19 Pagina 13 Operation SELF-DIAGNOSIS The appliance is operating as an air-conditioner or dehumidifier, this will start up automatically once the defrosting process has ended. H P HIGH PRESSURE Insert and re-insert the plug. The appliance will prevent the formation of the appliance and reposition correctly. 13 If the problem persists...
ENGLISH pac160 GB 25-01-2003 10:19 Pagina 13 Operation SELF-DIAGNOSIS The appliance is operating as an air-conditioner or dehumidifier, this will start up automatically once the defrosting process has ended. H P HIGH PRESSURE Insert and re-insert the plug. The appliance will prevent the formation of the appliance and reposition correctly. 13 If the problem persists...
Owner Manual
Page 14
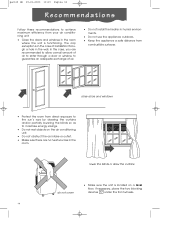
... not install the heater in humid environments. • Do not use the appliance outdoors. • Keep the appliance a safe distance from combustible surfaces close doors and windows • Protect the room from direct exposure to the sun's rays by drawing the curtains and/or partially lowering the blinds so as to achieve maximum efficiency from your air conditioning unit: •...
... not install the heater in humid environments. • Do not use the appliance outdoors. • Keep the appliance a safe distance from combustible surfaces close doors and windows • Protect the room from direct exposure to the sun's rays by drawing the curtains and/or partially lowering the blinds so as to achieve maximum efficiency from your air conditioning unit: •...
Owner Manual
Page 15
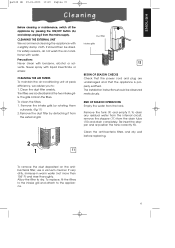
... BEGIN OF SEASON CHECKS Check that the power cord and plug are located behind the two intake grills. To replace, fit the filters to the intake grill and attach to the appliance. 15 CLEANING THE EXTERNAL UNIT We recommend cleaning the appliance with liquid insecticide or similar. It should be dried. Clean the dust filter weekly. The installation instructions should then be observed meticulously. Re-insert...
... BEGIN OF SEASON CHECKS Check that the power cord and plug are located behind the two intake grills. To replace, fit the filters to the intake grill and attach to the appliance. 15 CLEANING THE EXTERNAL UNIT We recommend cleaning the appliance with liquid insecticide or similar. It should be dried. Clean the dust filter weekly. The installation instructions should then be observed meticulously. Re-insert...

Owner Manual
Page 16
... the conditions or the dimen- pac160 GB 25-01-2003 10:19 Pagina 16 Troubleshooting PROBLEM CAUSES The air-conditioner • the power is off does not work for about 3 minutes after turning on the display: FF, HP, LT, FT, PF. 16 Strange odour in the room. • the thermostat is set too high • set the thermostat to a lower temperature • air filters are dirty • clean the filters...
... the conditions or the dimen- pac160 GB 25-01-2003 10:19 Pagina 16 Troubleshooting PROBLEM CAUSES The air-conditioner • the power is off does not work for about 3 minutes after turning on the display: FF, HP, LT, FT, PF. 16 Strange odour in the room. • the thermostat is set too high • set the thermostat to a lower temperature • air filters are dirty • clean the filters...
Owner Manual
Page 17
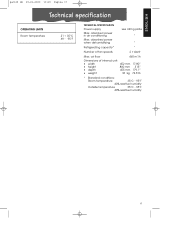
... power when dehumidifying see rating plate " " Refrigerating capacity* " Number of internal unit: • width 452 mm 17.80" • height 800 mm 315" • depth 455 mm 179.1" • weight 33 kg 72.8 lb * Standard conditions: Room temperature 35°C - 95°F 40% relative humidity Outside temperature 35°C - 95°F 40% relative humidity 17 air flow 460 m3/h Dimensions of fan...
... power when dehumidifying see rating plate " " Refrigerating capacity* " Number of internal unit: • width 452 mm 17.80" • height 800 mm 315" • depth 455 mm 179.1" • weight 33 kg 72.8 lb * Standard conditions: Room temperature 35°C - 95°F 40% relative humidity Outside temperature 35°C - 95°F 40% relative humidity 17 air flow 460 m3/h Dimensions of fan...
Owner Manual
Page 18
... 18 If repairs become necessary or spare parts are needed, please write to assume for us any liability in connection with the sale or use of our AIR-CONDITIONER. This warranty is used in lieu of the compressor, evaporator, condenser and factory connected refrigerant tubing. This warranty shall apply only if the AIR-CONDITIONER is in accordance with an additional four (4) years on any part of...
... 18 If repairs become necessary or spare parts are needed, please write to assume for us any liability in connection with the sale or use of our AIR-CONDITIONER. This warranty is used in lieu of the compressor, evaporator, condenser and factory connected refrigerant tubing. This warranty shall apply only if the AIR-CONDITIONER is in accordance with an additional four (4) years on any part of...


