
Owner Manual
Page 5
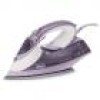
Index DESCRIPTION OF THE APPLIANCE 7 USING THE APPLIANCE FOR THE FIRST TIME 8 PREPARATIONS FOR USE 8 What water to use 8 Filling the tank 8 Adjusting plate temperature 9 STEAM IRONING 9 DRY IRONING 10 VERTICAL IRONING 10 TURBO FUNCTION 11 SPRAY BUTTON 11 NO-DRIP SYSTEM 11 AUTO-OFF 11 AFTER IRONING 12 Cleaning and maintenance 12 Limescale prevention and SELF CLEAN 12 Limited Warranty 13 4
Index DESCRIPTION OF THE APPLIANCE 7 USING THE APPLIANCE FOR THE FIRST TIME 8 PREPARATIONS FOR USE 8 What water to use 8 Filling the tank 8 Adjusting plate temperature 9 STEAM IRONING 9 DRY IRONING 10 VERTICAL IRONING 10 TURBO FUNCTION 11 SPRAY BUTTON 11 NO-DRIP SYSTEM 11 AUTO-OFF 11 AFTER IRONING 12 Cleaning and maintenance 12 Limescale prevention and SELF CLEAN 12 Limited Warranty 13 4
Owner Manual
Page 6
... appliances, basic safety precautions should always be turned to "MIN" before plugging or unplugging from outlet. Loop cord loosely around iron when storing. 6. Not intended for examination and repair. Always disconnect appliance from electrical outlet before filling with a damaged cord ... to a qualified serviceman for use . 2. Do not leave the appliance unattended while plugged in a risk of electric shock when the iron is necessary for it's intended use by or near children. Use appliance only for any appliance being used after reassembly. 7. Unsupervised use...
... appliances, basic safety precautions should always be turned to "MIN" before plugging or unplugging from outlet. Loop cord loosely around iron when storing. 6. Not intended for examination and repair. Always disconnect appliance from electrical outlet before filling with a damaged cord ... to a qualified serviceman for use . 2. Do not leave the appliance unattended while plugged in a risk of electric shock when the iron is necessary for it's intended use by or near children. Use appliance only for any appliance being used after reassembly. 7. Unsupervised use...
Owner Manual
Page 7
... arrange the cord so that it cannot be pulled or be used. 9. Care shall be taken to or greater than the maximum rating of the iron shall be tripped over. 3. If in doubt do not operate a high wattage appliance on the same circuit. 2. For the same reason you are always recommended...
... arrange the cord so that it cannot be pulled or be used. 9. Care shall be taken to or greater than the maximum rating of the iron shall be tripped over. 3. If in doubt do not operate a high wattage appliance on the same circuit. 2. For the same reason you are always recommended...
Owner Manual
Page 8
... under running water. • Do not direct the steam jet toward people, animals, or iron clothes when they are being worn as this could be dangerous. • After ironing, allow the iron to cool before putting away. • The iron must be used and rested on a stable surface. • When placing the... iron on its stand, ensure that the surface on which the stand is placed is stable. &#...
... under running water. • Do not direct the steam jet toward people, animals, or iron clothes when they are being worn as this could be dangerous. • After ironing, allow the iron to cool before putting away. • The iron must be used and rested on a stable surface. • When placing the... iron on its stand, ensure that the surface on which the stand is placed is stable. &#...
Owner Manual
Page 9
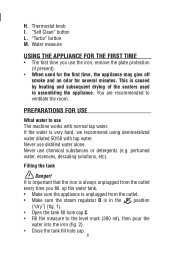
... several minutes. Never use chemical substances or detergents (e.g. Never use distilled water alone. "Self Clean" button L. It is important that the iron is always unplugged from the outlet. • Make sure the steam regulator D is very hard, we recommend using demineralized water diluted 50/...50 with normal tap water. PREPARATIONS FOR USE What water to use the iron, remove the plate protection (if present). • When used in the position ("dry") (fig. 1). • Open the tank fill hole ...
... several minutes. Never use chemical substances or detergents (e.g. Never use distilled water alone. "Self Clean" button L. It is important that the iron is always unplugged from the outlet. • Make sure the steam regulator D is very hard, we recommend using demineralized water diluted 50/...50 with normal tap water. PREPARATIONS FOR USE What water to use the iron, remove the plate protection (if present). • When used in the position ("dry") (fig. 1). • Open the tank fill hole ...
Owner Manual
Page 10
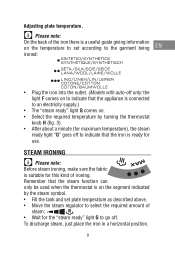
... After about a minute (for maximum temperature), the steam ready light "G" goes off . To discharge steam, just place the iron in a horizontal position. 9 Adjusting plate temperature. Remember that the iron is on the segment indicated by the steam symbol. • Fill the tank and set plate temperature as described above. &#...only be used when the thermostat is ready for the "steam ready" light G to select the required amount of ironing. STEAM IRONING Please note: Before steam ironing, make sure the fabric is suitable for this kind of steam: . • Wait for use.
... After about a minute (for maximum temperature), the steam ready light "G" goes off . To discharge steam, just place the iron in a horizontal position. 9 Adjusting plate temperature. Remember that the iron is on the segment indicated by the steam symbol. • Fill the tank and set plate temperature as described above. &#...only be used when the thermostat is ready for the "steam ready" light G to select the required amount of ironing. STEAM IRONING Please note: Before steam ironing, make sure the fabric is suitable for this kind of steam: . • Wait for use.
Owner Manual
Page 11
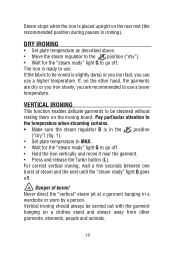
...be steamed without resting them on a clothes stand and always away from other hand, the garments are dry or you iron slowly, you can use . Steam stops when the iron is placed upright on the other garments, elements, people and animals. 10 If the fabric to go off . VERTICAL... IRONING This function enables delicate garments to be ironed is ready to use a lower temperature. For correct vertical ironing, wait a few seconds between one burst of burns! The iron is slightly damp or you iron fast, you are recommended to use a higher temperature...
...be steamed without resting them on a clothes stand and always away from other hand, the garments are dry or you iron slowly, you can use . Steam stops when the iron is placed upright on the other garments, elements, people and animals. 10 If the fabric to go off . VERTICAL... IRONING This function enables delicate garments to be ironed is ready to use a lower temperature. For correct vertical ironing, wait a few seconds between one burst of burns! The iron is slightly damp or you iron fast, you are recommended to use a higher temperature...
Owner Manual
Page 12
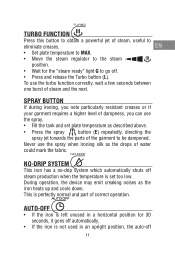
...to MAX. • Move the steam regulator to the steam position. • Wait for 30 seconds, it goes off automatically. • If the iron is perfectly normal and part of steam, useful to eliminate creases. Never use the spray. • Fill the tank and set too low. TURBO FUNCTION...the Turbo button (L). During operation, the device may emit creaking noises as the drops of steam and the next. AUTO-OFF • If the iron is left unused in a horizontal position for the "steam ready" light G to go off steam production when the temperature is set plate temperature as...
...to MAX. • Move the steam regulator to the steam position. • Wait for 30 seconds, it goes off automatically. • If the iron is perfectly normal and part of steam, useful to eliminate creases. Never use the spray. • Fill the tank and set too low. TURBO FUNCTION...the Turbo button (L). During operation, the device may emit creaking noises as the drops of steam and the next. AUTO-OFF • If the iron is left unused in a horizontal position for the "steam ready" light G to go off steam production when the temperature is set plate temperature as...
Owner Manual
Page 13
...; Clean the plate with a dry cloth as traces of the iron. 12 to indicate auto-off. To begin ironing again, shake the iron slightly forwards until the iron is cold before putting away. AFTER IRONING To extend the working life of the iron, whenever you finish ironing, you are recommended to empty the tank as follows: •...
...; Clean the plate with a dry cloth as traces of the iron. 12 to indicate auto-off. To begin ironing again, shake the iron slightly forwards until the iron is cold before putting away. AFTER IRONING To extend the working life of the iron, whenever you finish ironing, you are recommended to empty the tank as follows: •...
Owner Manual
Page 14
...part thereof, other than parts damaged in material and workmanship. The repaired or new model will be free from the outlet. • Leave the iron to cool and clean the outside with the factory directions, which accompany it . • Release the SELF CLEAN button. • Plug the ...caused by a build-up of limescale. EN • Plug the appliance into the outlet and place the thermostat in the MAX position. • When the iron has reached the required temperature (light off), unplug the appliance. • Place over a sink and in a horizontal position. • Press the SELF ...
...part thereof, other than parts damaged in material and workmanship. The repaired or new model will be free from the outlet. • Leave the iron to cool and clean the outside with the factory directions, which accompany it . • Release the SELF CLEAN button. • Plug the ...caused by a build-up of limescale. EN • Plug the appliance into the outlet and place the thermostat in the MAX position. • When the iron has reached the required temperature (light off), unplug the appliance. • Place over a sink and in a horizontal position. • Press the SELF ...