Owner Manual
Page 1
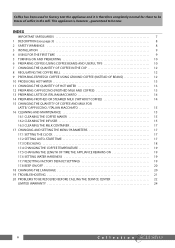
...CHANGING THE QUANTITY OF HOT WATER 13 12 PREPARING CAPPUCCINO (FROTHED MILK AND COFFEE 13 13 PREPARING LATTE OR ITALIAN MACCHIATO 14 14 PREPARING FROTHED OR STEAMED MILK (WITHOUT COFFEE 14 15 CHANGING THE QUANTITY OF COFFEE AND MILK FOR LATTE/ CAPPUCCINO / ITALIAN MACCHIATO 15 16 CLEANING AND MAINTENANCE... 15 16.1 CLEANING THE COFFEE MAKER 15 16.2 CLEANING THE INFUSER 15 16.3 CLEANING THE MILK CONTAINER 17 17 CHANGING AND SETTING THE MENU PARAMETERS 17 17.1 SETTING THE CLOCK 17 17.2 SETTING AUTO-START TIME 17 17.3 DESCALING 18...
...CHANGING THE QUANTITY OF HOT WATER 13 12 PREPARING CAPPUCCINO (FROTHED MILK AND COFFEE 13 13 PREPARING LATTE OR ITALIAN MACCHIATO 14 14 PREPARING FROTHED OR STEAMED MILK (WITHOUT COFFEE 14 15 CHANGING THE QUANTITY OF COFFEE AND MILK FOR LATTE/ CAPPUCCINO / ITALIAN MACCHIATO 15 16 CLEANING AND MAINTENANCE... 15 16.1 CLEANING THE COFFEE MAKER 15 16.2 CLEANING THE INFUSER 15 16.3 CLEANING THE MILK CONTAINER 17 17 CHANGING AND SETTING THE MENU PARAMETERS 17 17.1 SETTING THE CLOCK 17 17.2 SETTING AUTO-START TIME 17 17.3 DESCALING 18...
Owner Manual
Page 3
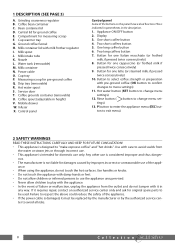
...scoop for ground coffee E. Coffee spout (adjustable in the description. 1. Two short coffees button 5. Coffee bean container C. Cup warmer tray G. Milk container N. Two long coffees button 7. Use with care to play with the appliance. • In the event of the appliance. • ... 10. Button to select coffee strength or preparation with it must be used. Failure to change menu settings) 13. Grinding coarseness regulator B. Milk intake tube K. ous. • The manufacturer is indicated in parentheses in height) V. Bean container lid D. Nozzle L. Use handles or ...
...scoop for ground coffee E. Coffee spout (adjustable in the description. 1. Two short coffees button 5. Coffee bean container C. Cup warmer tray G. Milk container N. Two long coffees button 7. Use with care to play with the appliance. • In the event of the appliance. • ... 10. Button to select coffee strength or preparation with it must be used. Failure to change menu settings) 13. Grinding coarseness regulator B. Milk intake tube K. ous. • The manufacturer is indicated in parentheses in height) V. Bean container lid D. Nozzle L. Use handles or ...
Owner Manual
Page 8
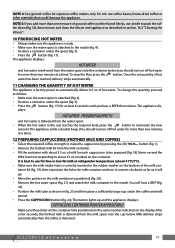
...infuser". 10 PRODUCING HOT WATER • Always make the cappuccino by pressing the OK/ button (fig. 1). • Remove the frothed milk lid from the milk container. • Fill the container with about 25 oz.) marked on the container lid is delivered. of hot water has been reached,... emits a double beep. (You should not run off hot water for at least 8 seconds until you add more than one measure of milk for each cappuccino to automatically deliver 8.5 oz. The button lights up and the appliance displays: CAPPUCCINO: CONTAINER POINTER IN POSITION 2 Make sure...
...infuser". 10 PRODUCING HOT WATER • Always make the cappuccino by pressing the OK/ button (fig. 1). • Remove the frothed milk lid from the milk container. • Fill the container with about 25 oz.) marked on the container lid is delivered. of hot water has been reached,... emits a double beep. (You should not run off hot water for at least 8 seconds until you add more than one measure of milk for each cappuccino to automatically deliver 8.5 oz. The button lights up and the appliance displays: CAPPUCCINO: CONTAINER POINTER IN POSITION 2 Make sure...

Owner Manual
Page 9
...) if you want to make ITALIAN MACCHIATO (ITALIAN MACCHIATO button). • Press the LATTE button (fig. 27). You should not leave the milk outside the refrigerator for at least 8 seconds (fig. 25). The button lights up and the appliance displays: ITALIAN MACCHIATO: CONTAINER POINTER IN POSITION... 2 Make sure the pointer on the container lid is complete, remove the milk container and place in section 15. 13 PREPARING LATTE OR ITALIAN MACCHIATO • Prepare the appliance as described to make cappuccino. •...
...) if you want to make ITALIAN MACCHIATO (ITALIAN MACCHIATO button). • Press the LATTE button (fig. 27). You should not leave the milk outside the refrigerator for at least 8 seconds (fig. 25). The button lights up and the appliance displays: ITALIAN MACCHIATO: CONTAINER POINTER IN POSITION... 2 Make sure the pointer on the container lid is complete, remove the milk container and place in section 15. 13 PREPARING LATTE OR ITALIAN MACCHIATO • Prepare the appliance as described to make cappuccino. •...
Owner Manual
Page 10
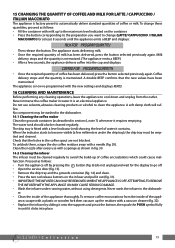
...symbol fully in fig. 30. 16.2 Cleaning the infuser The infuser must be cleaned regularly to automatically deliver standard quantities of coffee or milk. It is memorized. Clean the nozzle after every use solvents, abrasive cleaning products or alcohol to cool down and unplug from the inside... water, without using detergents. Never wash the infuser in section 6, note 7) whenever it contains. 15 CHANGING THE QUANTITY OF COFFEE AND MILK FOR LATTE / CAPPUCCINO / ITALIAN MACCHIATO The appliance is factory preset to avoid the build-up of coffee encrustations which could cause malfunction.
...symbol fully in fig. 30. 16.2 Cleaning the infuser The infuser must be cleaned regularly to automatically deliver standard quantities of coffee or milk. It is memorized. Clean the nozzle after every use solvents, abrasive cleaning products or alcohol to cool down and unplug from the inside... water, without using detergents. Never wash the infuser in section 6, note 7) whenever it contains. 15 CHANGING THE QUANTITY OF COFFEE AND MILK FOR LATTE / CAPPUCCINO / ITALIAN MACCHIATO The appliance is factory preset to avoid the build-up of coffee encrustations which could cause malfunction.
Owner Manual
Page 12
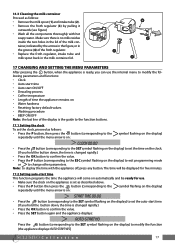
...display) CLOCK 00:00 • Press the button (corresponding to the SET symbol flashing on the display) to set as follows: • Remove the milk spout (1) and intake tube (2). • Remove the froth regulator (3) by the arrows in the figure,or in the groove (4) of the froth regulator.... • Replace the froth regulator, intake tube and milk spout back in the milk container lid. 4 3 1 2 17 CHANGING AND SETTING THE MENU PARAMETERS After pressing the button, when the appliance is ready, you can use ...
...display) CLOCK 00:00 • Press the button (corresponding to the SET symbol flashing on the display) to set as follows: • Remove the milk spout (1) and intake tube (2). • Remove the froth regulator (3) by the arrows in the figure,or in the groove (4) of the froth regulator.... • Replace the froth regulator, intake tube and milk spout back in the milk container lid. 4 3 1 2 17 CHANGING AND SETTING THE MENU PARAMETERS After pressing the button, when the appliance is ready, you can use ...

Owner Manual
Page 18
... (about 41°F/5°C). Collection 23 The holes in the spouts are clogged • with a needle (see section 16.1, fig. 29). inserted incorrectly. The milk is not cold enough or is dirty. Scrape the holes with dry coffee. of the spouts, • but from around the service door. If you...to swing smoothly. The mobile drawer inside the service • door is not well frothed. • Clean the milk lid as described in the milk con- The milk is blocked and cannot swing. The milk does not run out • The intake tube is not inserted or is • Insert the intake tube ...
... (about 41°F/5°C). Collection 23 The holes in the spouts are clogged • with a needle (see section 16.1, fig. 29). inserted incorrectly. The milk is not cold enough or is dirty. Scrape the holes with dry coffee. of the spouts, • but from around the service door. If you...to swing smoothly. The mobile drawer inside the service • door is not well frothed. • Clean the milk lid as described in the milk con- The milk is blocked and cannot swing. The milk does not run out • The intake tube is not inserted or is • Insert the intake tube ...

