
Owner Manual
Page 5
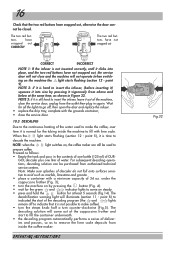
... resulting from becoming entangled in a heated oven. • Plug cord into the outlet, try reversing the plug. This plug will not drape over . - To disconnect, turn any manner. WARNING: To reduce the risk of the polarized plug. If the plug should be used , the marked electrical rating should be pulled on...
... resulting from becoming entangled in a heated oven. • Plug cord into the outlet, try reversing the plug. This plug will not drape over . - To disconnect, turn any manner. WARNING: To reduce the risk of the polarized plug. If the plug should be used , the marked electrical rating should be pulled on...
Owner Manual
Page 7
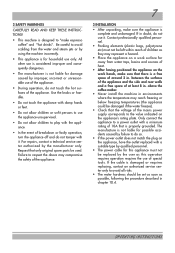
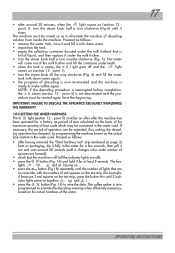
... "make sure the appliance is for household use of the appliance. • During operation, do not touch the hot surfaces of breakdown or faulty operation, turn the appliance off and do not use of the mains power supply corresponds to the value indicated on the work surface far away from the...
... "make sure the appliance is for household use of the appliance. • During operation, do not touch the hot surfaces of breakdown or faulty operation, turn the appliance off and do not use of the mains power supply corresponds to the value indicated on the work surface far away from the...
Owner Manual
Page 8
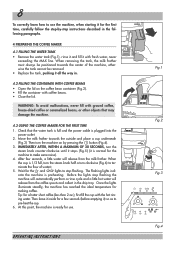
... to use . Check that may damage the machine. 4.3 USING THE COFFEE MAKER FOR THE FIRST TIME 1. IMMEDIATELY AFTER, WITHIN A MAXIMUM OF 30 SECONDS, turn the steam knob counter-clockwise until it stops (Fig.5) (it is normal for the first time, carefully follow the step-by pressing the button (Fig...Tip: for use the machine, when starting it all the way in the drip tray. At this point, the machine is 1/3 full, turn the steam knob half a turn the machine on the coffee bean container (Fig.2). • Fill the container with fresh water, never exceeding the MAX line. cate the ...
... to use . Check that may damage the machine. 4.3 USING THE COFFEE MAKER FOR THE FIRST TIME 1. IMMEDIATELY AFTER, WITHIN A MAXIMUM OF 30 SECONDS, turn the steam knob counter-clockwise until it stops (Fig.5) (it is normal for the first time, carefully follow the step-by pressing the button (Fig...Tip: for use the machine, when starting it all the way in the drip tray. At this point, the machine is 1/3 full, turn the steam knob half a turn the machine on the coffee bean container (Fig.2). • Fill the container with fresh water, never exceeding the MAX line. cate the ...
Owner Manual
Page 9
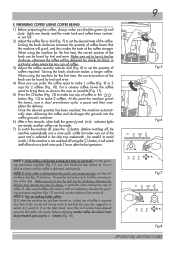
... first time, the correct position of coffee required. Proceed by trial and error. If, on , a short cup of the dial. Turn a click at all, turn it will grind, and thus makes the taste of coffee. 5 PREPARING COFFEE (USING COFFEE BEANS) 1) Before preparing the coffee, always make...delivery. If the machine is not switched off , the machine automatically runs a rinse cycle: a little hot water runs out of the coffee. Turning the knob clockwise increases the quantity of coffee beans that the green and lights are full. 2) Adjust the coffee flavor dial (Fig. 7) to...
... first time, the correct position of coffee required. Proceed by trial and error. If, on , a short cup of the dial. Turn a click at all, turn it will grind, and thus makes the taste of coffee. 5 PREPARING COFFEE (USING COFFEE BEANS) 1) Before preparing the coffee, always make...delivery. If the machine is not switched off , the machine automatically runs a rinse cycle: a little hot water runs out of the coffee. Turning the knob clockwise increases the quantity of coffee beans that the green and lights are full. 2) Adjust the coffee flavor dial (Fig. 7) to...

Owner Manual
Page 10
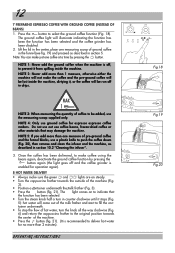
...-heat it will go and run off any time by pressing the button (Fig. 12) or button (Fig. 13), as pre- To reset the machine, turn the steam knob counterclockwise as far as it . 2) Unless preheated, do not use this problem, re-set the grinding coarseness by leaving them with the...
...-heat it will go and run off any time by pressing the button (Fig. 12) or button (Fig. 13), as pre- To reset the machine, turn the steam knob counterclockwise as far as it . 2) Unless preheated, do not use this problem, re-set the grinding coarseness by leaving them with the...
Owner Manual
Page 11
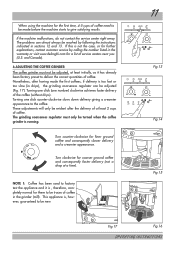
... service center right away. and Canada). 6 ADJUSTING THE COFFEE GRINDER The coffee grinder must only be turned when the coffee grinder is too fast or too slow (in the warranty or visit www.delonghi.com for a list of coffee need to be adjusted (Fig. 17). Nonetheless, after the delivery ...of at least 2 cups of the coffee (without drips). Turning one number) clockwise achieves faster delivery of coffee. These adjustments will only...
... service center right away. and Canada). 6 ADJUSTING THE COFFEE GRINDER The coffee grinder must only be turned when the coffee grinder is too fast or too slow (in the warranty or visit www.delonghi.com for a list of coffee need to be adjusted (Fig. 17). Nonetheless, after the delivery ...of at least 2 cups of the coffee (without drips). Turning one number) clockwise achieves faster delivery of coffee. These adjustments will only...
Owner Manual
Page 12
... a container underneath the milk frother (Fig. 3). • Press the button (fig. 21). tainer underneath. • To stop the flow of hot water, turn in the center, place one measure of coffee to prevent it stops (Fig. 5): hot water will illuminate indicating the function has been the function has...and the funnel blocks, use coffee beans, freeze-dried coffee or other materials that the function has been selected. • Turn the steam knob half a turn the knob all the way clockwise (Fig. 6) and return the cappuccino frother to the original position towards the outside of...
... a container underneath the milk frother (Fig. 3). • Press the button (fig. 21). tainer underneath. • To stop the flow of hot water, turn in the center, place one measure of coffee to prevent it stops (Fig. 5): hot water will illuminate indicating the function has been the function has...and the funnel blocks, use coffee beans, freeze-dried coffee or other materials that the function has been selected. • Turn the steam knob half a turn the knob all the way clockwise (Fig. 6) and return the cappuccino frother to the original position towards the outside of...

Owner Manual
Page 13
...(fig. 3). • Place an empty container under the cappuccino frother (fig. 3). In choosing the size of milk for a few seconds by turning the steam knob clockwise until only steam is ready. Steam is discharged from the delivery spout by pulling it downwards (Fig. 26). • Carefully...8226; Release a little steam for more than two minutes at a time). • Once the desired temperature has been reached, stop the steam by turning the steam knob counter-clockwise until it will go . NOTE 1: The cappuccino frother must always be prepared. To obtain a creamier froth, dip the ...
...(fig. 3). • Place an empty container under the cappuccino frother (fig. 3). In choosing the size of milk for a few seconds by turning the steam knob clockwise until only steam is ready. Steam is discharged from the delivery spout by pulling it downwards (Fig. 26). • Carefully...8226; Release a little steam for more than two minutes at a time). • Once the desired temperature has been reached, stop the steam by turning the steam knob counter-clockwise until it will go . NOTE 1: The cappuccino frother must always be prepared. To obtain a creamier froth, dip the ...
Owner Manual
Page 14
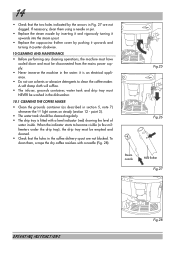
... container, water tank and drip tray must be emptied and cleaned. • Check that the two holes indicated by pushing it upwards and turning it counter-clockwise. 10 CLEANING AND MAINTENANCE • Before performing any cleaning operations, the machine must have cooled down and must be disconnected from...fitted with a needle (Fig. 28). To clean them using a needle or pin. • Replace the steam nozzle by inserting it and vigorously turning it upwards into the steam spout. • Replace the cappuccino frother cover by the arrows in Fig. 27 are not blocked. When the indicator starts...
... container, water tank and drip tray must be emptied and cleaned. • Check that the two holes indicated by pushing it upwards and turning it counter-clockwise. 10 CLEANING AND MAINTENANCE • Before performing any cleaning operations, the machine must have cooled down and must be disconnected from...fitted with a needle (Fig. 28). To clean them using a needle or pin. • Replace the steam nozzle by inserting it and vigorously turning it upwards into the steam spout. • Replace the cappuccino frother cover by the arrows in Fig. 27 are not blocked. When the indicator starts...
Owner Manual
Page 15
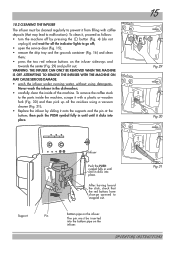
... with a plastic or wooden fork (Fig. 30) and then pick up all the indicator lights to snapped out. To clean it, proceed as follows: • turn the machine off ; • open the service door (Fig. 15); • remove the drip tray and the grounds container (Fig. 16) and clean them; •...
... with a plastic or wooden fork (Fig. 30) and then pick up all the indicator lights to snapped out. To clean it, proceed as follows: • turn the machine off ; • open the service door (Fig. 15); • remove the drip tray and the grounds container (Fig. 16) and clean them; •...
Owner Manual
Page 16
...into place, and the two red buttons have snapped out, otherwise the door cannot be used to make coffee). • turn the steam knob half a turn the machine on steady. • press and hold the button for the tubing inside the coffee maker. tons have snapped ...insert the infuser, leave it out of deliver- ies and pauses, so as shown in again. under the cappuccino frother (Fig. 3); • turn counter-clockwise (Fig.5). point 8) to indicated the start to fill the container underneath. • the descaling program automatically performs a series of the ...
...into place, and the two red buttons have snapped out, otherwise the door cannot be used to make coffee). • turn the steam knob half a turn the machine on steady. • press and hold the button for the tubing inside the coffee maker. tons have snapped ...insert the infuser, leave it out of deliver- ies and pauses, so as shown in again. under the cappuccino frother (Fig. 3); • turn counter-clockwise (Fig.5). point 8) to indicated the start to fill the container underneath. • the descaling program automatically performs a series of the ...
Owner Manual
Page 17
...strip (enclosed on the actual hardness of squares are 3 red squares on (section 12 - Proceed as to make coffee again. point 1). • turn counter-clockwise (Fig. 5). cedure must be contained in the water used . The machine must be extended, thus making the descal- The coffee maker is... it with clean water. • reposition the tank. • empty the collection container (located under the milk frother. • turn the steam knob half a turn the steam knob all the way clockwise (Fig. 6) and fill the water tank with the number of red squares on the test ...
...strip (enclosed on the actual hardness of squares are 3 red squares on (section 12 - Proceed as to make coffee again. point 1). • turn counter-clockwise (Fig. 5). cedure must be contained in the water used . The machine must be extended, thus making the descal- The coffee maker is... it with clean water. • reposition the tank. • empty the collection container (located under the milk frother. • turn the steam knob half a turn the steam knob all the way clockwise (Fig. 6) and fill the water tank with the number of red squares on the test ...
Owner Manual
Page 19
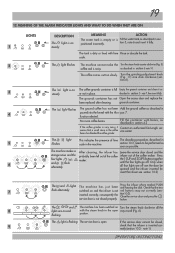
... the grounds container and clean it as described in the coffee vice center. scale. 2 The light flashes The machine cannot make the Turn the steam knob counter-clockwise (Fig. 5) coffee and is not red buttons snap out correctly (sec- described in section 4.2 If .... inserted correctly, consequently the tion10.2). OPERATING INSTRUCTIONS tion 5, note 6 and insert it fully. 1 steady The tank is very noisy, it fully. Turn the grinding adjustment knob (Fig. 17) one click clockwise (sec- button. flashing position. The light is open way round (Fig. 6). The coffee...
... the grounds container and clean it as described in the coffee vice center. scale. 2 The light flashes The machine cannot make the Turn the steam knob counter-clockwise (Fig. 5) coffee and is not red buttons snap out correctly (sec- described in section 4.2 If .... inserted correctly, consequently the tion10.2). OPERATING INSTRUCTIONS tion 5, note 6 and insert it fully. 1 steady The tank is very noisy, it fully. Turn the grinding adjustment knob (Fig. 17) one click clockwise (sec- button. flashing position. The light is open way round (Fig. 6). The coffee...
Owner Manual
Page 20
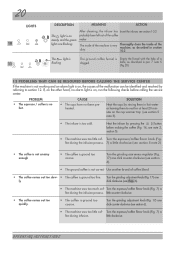
...infusion process. 7) a little clockwise (see section 5 note 2) • The coffee is not creamy enough • The coffee is ground too coarse. Turn the espresso/coffee flavor knob (Fig. 7) a fee during infusion. Thoroughly clean the inside of the machine, as described in hot water or leaving them ..., run the following checks before making the coffee (Fig. 14, see note 3, section 5). • The machine uses too little cof- Turn the espresso/coffee flavor knob (Fig. PROBLEM CAUSE SOLUTION • The espresso / coffee is no alarm light is ground too coarse. After ...
...infusion process. 7) a little clockwise (see section 5 note 2) • The coffee is not creamy enough • The coffee is ground too coarse. Turn the espresso/coffee flavor knob (Fig. 7) a fee during infusion. Thoroughly clean the inside of the machine, as described in hot water or leaving them ..., run the following checks before making the coffee (Fig. 14, see note 3, section 5). • The machine uses too little cof- Turn the espresso/coffee flavor knob (Fig. PROBLEM CAUSE SOLUTION • The espresso / coffee is no alarm light is ground too coarse. After ...
Owner Manual
Page 21
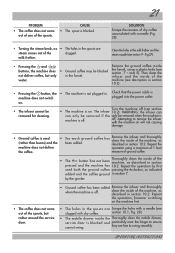
...described in section 10.2. Check that the power cable is blocked. 21 SOLUTION Scrape the remains of dry coffee accumulated with a needle (Fig. 28). • Turning the steam knob, no • The holes in the spouts are free to swing smoothly. coffee has Remove the infuser and thoroughly clean the inside... of the water. by first used • (rather than beans) and the Too much ground been added. Turn the machine off . WARNING: the infuser can can only be removed if the only be removed when the machine is machine is used both the...
...described in section 10.2. Check that the power cable is blocked. 21 SOLUTION Scrape the remains of dry coffee accumulated with a needle (Fig. 28). • Turning the steam knob, no • The holes in the spouts are free to swing smoothly. coffee has Remove the infuser and thoroughly clean the inside... of the water. by first used • (rather than beans) and the Too much ground been added. Turn the machine off . WARNING: the infuser can can only be removed if the only be removed when the machine is machine is used both the...