Owner Manual
Page 4
... been used to factory test the appliance and it is , however, guaranteed to be resolved before calling the service center 20 Limited warranty 22 OPERATING INSTRUCTIONS This appliance is , therefore, completely normal for the first time 8 5 Preparing coffee (using steam 13 10 Cleaning and maintenance 14 10.1 Cleaning the coffee maker...
... been used to factory test the appliance and it is , however, guaranteed to be resolved before calling the service center 20 Limited warranty 22 OPERATING INSTRUCTIONS This appliance is , therefore, completely normal for the first time 8 5 Preparing coffee (using steam 13 10 Cleaning and maintenance 14 10.1 Cleaning the coffee maker...

Owner Manual
Page 5
... use is provided with 3- wire, grounding type cord, the extension should always be followed, including the following: • Read all instructions. • Do not touch hot surfaces. Your product is to be considered improper and therefore, dangerous. Do not defeat the safety ...plug fully into the wall outlet. WARNING: To reduce the risk of the appliance. SAVE THESE INSTRUCTIONS THIS PRODUCT IS FOR HOUSEHOLD USE ONLY SHORT CORD INSTRUCTIONS - OPERATING INSTRUCTIONS Return the appliance to the nearest authorized service facility for other than the other). If an ...
... use is provided with 3- wire, grounding type cord, the extension should always be followed, including the following: • Read all instructions. • Do not touch hot surfaces. Your product is to be considered improper and therefore, dangerous. Do not defeat the safety ...plug fully into the wall outlet. WARNING: To reduce the risk of the appliance. SAVE THESE INSTRUCTIONS THIS PRODUCT IS FOR HOUSEHOLD USE ONLY SHORT CORD INSTRUCTIONS - OPERATING INSTRUCTIONS Return the appliance to the nearest authorized service facility for other than the other). If an ...
Owner Manual
Page 6
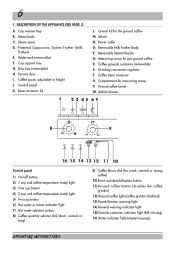
... grinder disabled) 13) Decalcification warning light 14) General warning indicator light 15)Grounds container indicator light (full/missing) 16) Water indicator light (empty/missing) OPERATING INSTRUCTIONS Ground coffee funnel W.
... grinder disabled) 13) Decalcification warning light 14) General warning indicator light 15)Grounds container indicator light (full/missing) 16) Water indicator light (empty/missing) OPERATING INSTRUCTIONS Ground coffee funnel W.
Owner Manual
Page 7
... tamper with damp hands or feet. • Do not allow children or unfit persons to do not touch the hot surfaces of the appliance. OPERATING INSTRUCTIONS Use the knobs or handles. • Do not touch the appliance with it . 2 SAFETY WARNINGS CAREFULLY READ AND KEEP THESE... INSTRUCTIONS! • This machine is designed to respect the above the coffee maker. • Never install the machine in . Be careful to a power outlet with a suitable ...
... tamper with damp hands or feet. • Do not allow children or unfit persons to do not touch the hot surfaces of the appliance. OPERATING INSTRUCTIONS Use the knobs or handles. • Do not touch the appliance with it . 2 SAFETY WARNINGS CAREFULLY READ AND KEEP THESE... INSTRUCTIONS! • This machine is designed to respect the above the coffee maker. • Never install the machine in . Be careful to a power outlet with a suitable ...
Owner Manual
Page 8
...automatically perform a rinse cycle and a little hot water will release from the coffee spouts and collect in the drip tray. ing water. OPERATING INSTRUCTIONS Fig.1 Fig.2 Fig.3 Fig.4 Tip: for use the machine, when starting it for the first time, carefully follow the step-by pressing the...-clockwise until it stops (Fig.5) (it all the way in. 4.2 FILLING THE CONTAINER WITH COFFEE BEANS • Open the lid on by -step instructions described in the following paragraphs. 4 PREPARING THE COFFEE MAKER 4.1 FILLING THE WATER TANK • Remove the water tank (Fig.1), rinse it and fill...
...automatically perform a rinse cycle and a little hot water will release from the coffee spouts and collect in the drip tray. ing water. OPERATING INSTRUCTIONS Fig.1 Fig.2 Fig.3 Fig.4 Tip: for use the machine, when starting it for the first time, carefully follow the step-by pressing the...-clockwise until it stops (Fig.5) (it all the way in. 4.2 FILLING THE CONTAINER WITH COFFEE BEANS • Open the lid on by -step instructions described in the following paragraphs. 4 PREPARING THE COFFEE MAKER 4.1 FILLING THE WATER TANK • Remove the water tank (Fig.1), rinse it and fill...
Owner Manual
Page 9
... reached, the machine automati- be careful, to turn the coffee flavor dial (fig. 7) clockwise. NOTE 3: Tips on making two cups of coffee. Fig.7 Fig.8 OPERATING INSTRUCTIONS Make sure not to turn it will switch itself off and run a brief rinse cycle 3 hours after several coffees, the cream is not creamy enough...
... reached, the machine automati- be careful, to turn the coffee flavor dial (fig. 7) clockwise. NOTE 3: Tips on making two cups of coffee. Fig.7 Fig.8 OPERATING INSTRUCTIONS Make sure not to turn it will switch itself off and run a brief rinse cycle 3 hours after several coffees, the cream is not creamy enough...

Owner Manual
Page 10
... will not be emptied, even if it will remain on the front (pulling the handle, Fig. 15), the light flashes (see section 12, point 9); OPERATING INSTRUCTIONS Fig.9 Fig.10 Fig.11 Fig.12 IMPORTANT: when removing the drip tray, the grounds container MUST be able to make the coffee.
... will not be emptied, even if it will remain on the front (pulling the handle, Fig. 15), the light flashes (see section 12, point 9); OPERATING INSTRUCTIONS Fig.9 Fig.10 Fig.11 Fig.12 IMPORTANT: when removing the drip tray, the grounds container MUST be able to make the coffee.
Owner Manual
Page 11
..., 4-5 cups of service centers near you. (U.S. This appliance is not the case, or for further explanations, contact customer service by following the instructions indicated in the grinder (mill). Turning one number) clockwise achieves faster delivery of coffee. and Canada). 6 ADJUSTING THE COFFEE GRINDER The coffee grinder... must only be turned when the coffee grinder is too fast or too slow (in the warranty or visit www.delonghi.com for a list of coffee need to be adjusted, at least 2 cups of coffee in sections 12 and 13. Nonetheless, after...
..., 4-5 cups of service centers near you. (U.S. This appliance is not the case, or for further explanations, contact customer service by following the instructions indicated in the grinder (mill). Turning one number) clockwise achieves faster delivery of coffee. and Canada). 6 ADJUSTING THE COFFEE GRINDER The coffee grinder... must only be turned when the coffee grinder is too fast or too slow (in the warranty or visit www.delonghi.com for a list of coffee need to be adjusted, at least 2 cups of coffee in sections 12 and 13. Nonetheless, after...
Owner Manual
Page 12
... you add more than 2 minutes). tainer underneath. • To stop the flow of the milk frother and start to be run off in section 5. OPERATING INSTRUCTIONS Fig.18 Fig.19 Fig.20 The light comes on steady. • Turn the cappuccino frother towards the outside of the machine (Fig. 3). • Position...
... you add more than 2 minutes). tainer underneath. • To stop the flow of the milk frother and start to be run off in section 5. OPERATING INSTRUCTIONS Fig.18 Fig.19 Fig.20 The light comes on steady. • Turn the cappuccino frother towards the outside of the machine (Fig. 3). • Position...

Owner Manual
Page 13
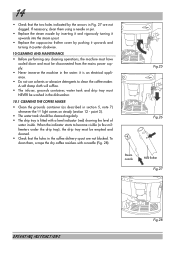
... (Fig. 26). • Carefully wash the cappuccino frother and the steam nozzle in warm water. 13 Fig.21 Fig.22 Fig.23 Fig.24 OPERATING INSTRUCTIONS Proceed as it stops (Fig. 5). Run off . • Then interrupt steam delivery by the arrow in section 5, using large enough cups, then fill with the...
... (Fig. 26). • Carefully wash the cappuccino frother and the steam nozzle in warm water. 13 Fig.21 Fig.22 Fig.23 Fig.24 OPERATING INSTRUCTIONS Proceed as it stops (Fig. 5). Run off . • Then interrupt steam delivery by the arrow in section 5, using large enough cups, then fill with the...
Owner Manual
Page 14
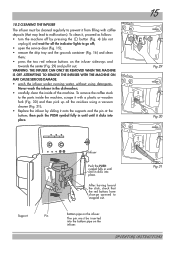
... by the arrows in section 5, note 7) whenever the light comes on steady (section 12 - Fig.25 Fig.26 Steam nozzle Milk frother Fig.27 OPERATING INSTRUCTIONS Fig.28
... by the arrows in section 5, note 7) whenever the light comes on steady (section 12 - Fig.25 Fig.26 Steam nozzle Milk frother Fig.27 OPERATING INSTRUCTIONS Fig.28
Owner Manual
Page 15
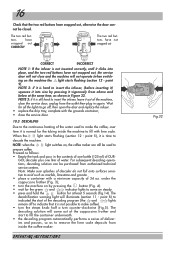
OPERATING INSTRUCTIONS ATTEMPTING TO REMOVE THE INFUSER WITH THE MACHINE ON MAY CAUSE SERIOUS DAMAGE. • wash the infuser under running water, without using a vacuum cleaner (Fig. ...
OPERATING INSTRUCTIONS ATTEMPTING TO REMOVE THE INFUSER WITH THE MACHINE ON MAY CAUSE SERIOUS DAMAGE. • wash the infuser under running water, without using a vacuum cleaner (Fig. ...
Owner Manual
Page 16
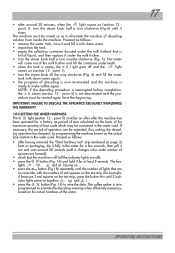
... insert the infuser, (before inserting it) squeeze it into place, and the two red buttons have snapped out, otherwise the door cannot be closed. OPERATING INSTRUCTIONS Fig.32 point 9). NOTE 2: if it is still hard to descale the machine. Proceed as marble, limestone and granite. • place a container with lime scale...
... insert the infuser, (before inserting it) squeeze it into place, and the two red buttons have snapped out, otherwise the door cannot be closed. OPERATING INSTRUCTIONS Fig.32 point 9). NOTE 2: if it is still hard to descale the machine. Proceed as marble, limestone and granite. • place a container with lime scale...
Owner Manual
Page 17
... of the maximum quantity of lime scale which may be contained in the water used . Hot water will come out of the water. 17 OPERATING INSTRUCTIONS ing operation less frequent, by programming the machine based on the actual lime content in the water for at least 5 seconds. The coffee maker is...
... of the maximum quantity of lime scale which may be contained in the water used . Hot water will come out of the water. 17 OPERATING INSTRUCTIONS ing operation less frequent, by programming the machine based on the actual lime content in the water for at least 5 seconds. The coffee maker is...
Owner Manual
Page 18
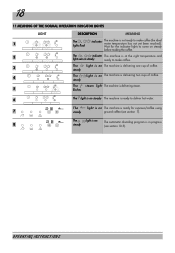
...). The light is on The machine is delivering one cup of coffee. ready to come on steady The machine is ready to make coffee. OPERATING INSTRUCTIONS The steady The steady light is on The automatic descaling program is in progress 8 steady (see section 7). The , indicator The machine is at the right...
...). The light is on The machine is delivering one cup of coffee. ready to come on steady The machine is ready to make coffee. OPERATING INSTRUCTIONS The steady The steady light is on The automatic descaling program is in progress 8 steady (see section 7). The , indicator The machine is at the right...
Owner Manual
Page 19
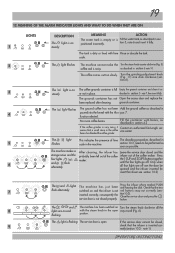
... Fill the water tank as described in place. note 7, then insert it as steady or not in sec- Press 6 four lights , , and flash alternately. OPERATING INSTRUCTIONS tion 6). 3 The light is on and the infuser is full Empty the grounds container and clean it fully. par. 7. note 1).
... Fill the water tank as described in place. note 7, then insert it as steady or not in sec- Press 6 four lights , , and flash alternately. OPERATING INSTRUCTIONS tion 6). 3 The light is on and the infuser is full Empty the grounds container and clean it fully. par. 7. note 1).
Owner Manual
Page 20
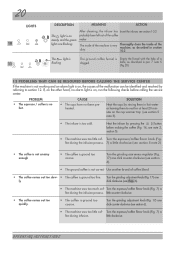
... counter-clockwise (see note 3, section 5). • The machine uses too little cof- Turn the espresso/coffee flavor knob (Fig. 7) a fee during the infusion process. OPERATING INSTRUCTIONS After cleaning, the infuser has Insert the infuser, see section 10.2 probably been left out of the coffee maker The inside of the machine, as...
... counter-clockwise (see note 3, section 5). • The machine uses too little cof- Turn the espresso/coffee flavor knob (Fig. 7) a fee during the infusion process. OPERATING INSTRUCTIONS After cleaning, the infuser has Insert the infuser, see section 10.2 probably been left out of the coffee maker The inside of the machine, as...
Owner Manual
Page 21
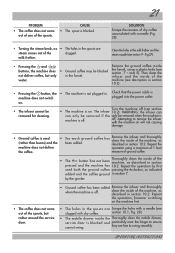
... when the machine is off . Check that the power cable is blocked. 21 SOLUTION Scrape the remains of dry coffee accumulated with dry coffee. OPERATING INSTRUCTIONS infuser and the inside buttons, the machine does • Ground coffee may be removed for cleaning. The infuser 10.2). off . CAUSE • The spout is...
... when the machine is off . Check that the power cable is blocked. 21 SOLUTION Scrape the remains of dry coffee accumulated with dry coffee. OPERATING INSTRUCTIONS infuser and the inside buttons, the machine does • Ground coffee may be removed for cleaning. The infuser 10.2). off . CAUSE • The spout is...
Owner Manual
Page 22
...defects in material and workmanship. The above limitation may not apply to you. We warrant each appliance to be returned at www.delonghi.com. For all other person or company to assume for Mexico (see contact information below: U.S. Friday 8:30am - 8pm, ...liability in transit. How does state law apply? Our obligation under this warranty is limited to repair at www.delonghi.com. Residents of any appliance, which has been subject to abuse, misuse, negligence or accidents. De'Longhi ... period set forth above exclusions may not apply to state. OPERATING INSTRUCTIONS
...defects in material and workmanship. The above limitation may not apply to you. We warrant each appliance to be returned at www.delonghi.com. For all other person or company to assume for Mexico (see contact information below: U.S. Friday 8:30am - 8pm, ...liability in transit. How does state law apply? Our obligation under this warranty is limited to repair at www.delonghi.com. Residents of any appliance, which has been subject to abuse, misuse, negligence or accidents. De'Longhi ... period set forth above exclusions may not apply to state. OPERATING INSTRUCTIONS