Owner Manual
Page 4
... 7 Preparing espresso/coffee with ground coffee (instead of beans 12 8 Producing Hot Water 12 9 Preparing cappuccinos (using steam 13 10 Cleaning and maintenance 14 10.1 Cleaning the coffee maker 14 10.2 Cleaning the infuser 15 10.3 Descaling 16 10.4 Setting the water hardness 17 11 Meaning of the normal operation indicator lights 18...
... 7 Preparing espresso/coffee with ground coffee (instead of beans 12 8 Producing Hot Water 12 9 Preparing cappuccinos (using steam 13 10 Cleaning and maintenance 14 10.1 Cleaning the coffee maker 14 10.2 Cleaning the infuser 15 10.3 Descaling 16 10.4 Setting the water hardness 17 11 Meaning of the normal operation indicator lights 18...

Owner Manual
Page 5
...the extension should be done by the appliance manufacturer may result in fire, electrical shock or personal injury. • Do not use and before cleaning the appliance. • Do not operate with a damaged cord or plug, or after the appliance malfunctions, or has been damaged in a ...cord. - If the appliance is a safety feature. Longer, detachable power supply cords or extension cords are unable to "off parts, and before cleaning. Use handles and knobs. • To protect against fire, electrical shock and personal injury, do not remove the cover. WIRE CORD. Repair should...
...the extension should be done by the appliance manufacturer may result in fire, electrical shock or personal injury. • Do not use and before cleaning the appliance. • Do not operate with a damaged cord or plug, or after the appliance malfunctions, or has been damaged in a ...cord. - If the appliance is a safety feature. Longer, detachable power supply cords or extension cords are unable to "off parts, and before cleaning. Use handles and knobs. • To protect against fire, electrical shock and personal injury, do not remove the cover. WIRE CORD. Repair should...

Owner Manual
Page 10
...normal for a few seconds. viously selected. NOTE 6: when the indicator light comes on (section 12, point 1), the water tank must be emptied and cleaned. NOTE 8: the grinder in the coffee maker may fill over time and consequently the coffee will change taste as described in chap. 6). If you ... with hot water or alternatively by leaving them with the appliance on. remove the drip tray (Fig. 16), empty and clean. If this operation must be cleaned, as described in section 10.2. 10 Run off the water into the underlying drip tray or alternatively use cups that are ...
...normal for a few seconds. viously selected. NOTE 6: when the indicator light comes on (section 12, point 1), the water tank must be emptied and cleaned. NOTE 8: the grinder in the coffee maker may fill over time and consequently the coffee will change taste as described in chap. 6). If you ... with hot water or alternatively by leaving them with the appliance on. remove the drip tray (Fig. 16), empty and clean. If this operation must be cleaned, as described in section 10.2. 10 Run off the water into the underlying drip tray or alternatively use cups that are ...
Owner Manual
Page 12
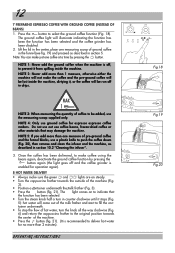
..., dirtying it stops (Fig. 5): hot water will come out of the milk frother and start to push the coffee down (Fig. 20), then remove and clean the infuser and the machine, as described in drips. Lift the lid in the center, place one measuring scoop of pre-ground coffee and the... coffee grinder is recommended to make just one measure of ground coffee in the funnel (see fig. 19) and proceed as described in section 10.2 "Cleaning the infuser". 3. Do not use not use the measuring scoop supplied only.
..., dirtying it stops (Fig. 5): hot water will come out of the milk frother and start to push the coffee down (Fig. 20), then remove and clean the infuser and the machine, as described in drips. Lift the lid in the center, place one measuring scoop of pre-ground coffee and the... coffee grinder is recommended to make just one measure of ground coffee in the funnel (see fig. 19) and proceed as described in section 10.2 "Cleaning the infuser". 3. Do not use not use the measuring scoop supplied only.

Owner Manual
Page 13
... in fig. 24).Turn the steam knob a half turn counter-clockwise as far as to use . of the container, bear in mind that may be cleaned after use skim or 2% milk at a time). • Once the desired temperature has been reached, stop the steam by turning the steam knob counter-clockwise...
... in fig. 24).Turn the steam knob a half turn counter-clockwise as far as to use . of the container, bear in mind that may be cleaned after use skim or 2% milk at a time). • Once the desired temperature has been reached, stop the steam by turning the steam knob counter-clockwise...
Owner Manual
Page 14
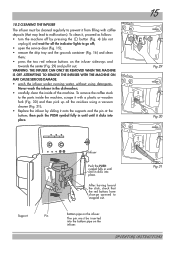
...abrasive detergents to become visible (a few millimeters under the drip tray), the drip tray must be washed in the dishwasher. 10.1 CLEANING THE COFFEE MAKER • Clean the grounds container (as described in section 5, note 7) whenever the light comes on steady (section 12 - Fig.25 Fig..... • Never immerse the machine in the water: it counter-clockwise. 10 CLEANING AND MAINTENANCE • Before performing any cleaning operations, the machine must have cooled down and must NEVER be emptied and cleaned. • Check that the two holes indicated by pushing it upwards and turning...
...abrasive detergents to become visible (a few millimeters under the drip tray), the drip tray must be washed in the dishwasher. 10.1 CLEANING THE COFFEE MAKER • Clean the grounds container (as described in section 5, note 7) whenever the light comes on steady (section 12 - Fig.25 Fig..... • Never immerse the machine in the water: it counter-clockwise. 10 CLEANING AND MAINTENANCE • Before performing any cleaning operations, the machine must have cooled down and must NEVER be emptied and cleaned. • Check that the two holes indicated by pushing it upwards and turning...
Owner Manual
Page 15
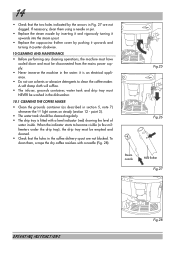
... • turn the machine off ; • open the service door (Fig. 15); • remove the drip tray and the grounds container (Fig. 16) and clean them; • press the two red release buttons on the infuser. WARNING: THE INFUSER CAN ONLY BE REMOVED WHEN THE MACHINE IS OFF. To remove... pin must be inserted into place. 15 Fig.29 Fig.30 Support Pin Infuser Push the PUSH symbol fully in the dishwasher; • carefully clean the inside the machine, scrape it with coffee deposits (that the red buttons have change opened to snapped out. After having heard the click, check...
... • turn the machine off ; • open the service door (Fig. 15); • remove the drip tray and the grounds container (Fig. 16) and clean them; • press the two red release buttons on the infuser. WARNING: THE INFUSER CAN ONLY BE REMOVED WHEN THE MACHINE IS OFF. To remove... pin must be inserted into place. 15 Fig.29 Fig.30 Support Pin Infuser Push the PUSH symbol fully in the dishwasher; • carefully clean the inside the machine, scrape it with coffee deposits (that the red buttons have change opened to snapped out. After having heard the click, check...
Owner Manual
Page 17
...procedure is not deactivated and the pro- cedure must be rinsed so as follows: • remove the water tank, rinse it and fill it with clean water again. • the program of operation can be contained in the water for a few seconds, then pull it out and wait around 30 ...color anda number of squares are formed); • check that the machine is off (all the way clockwise (Fig. 6) and fill the water tank with clean water. • reposition the tank. • empty the collection container (located under the milk frother) that is full of liquid, and then replace it under...
...procedure is not deactivated and the pro- cedure must be rinsed so as follows: • remove the water tank, rinse it and fill it with clean water again. • the program of operation can be contained in the water for a few seconds, then pull it out and wait around 30 ...color anda number of squares are formed); • check that the machine is off (all the way clockwise (Fig. 6) and fill the water tank with clean water. • reposition the tank. • empty the collection container (located under the milk frother) that is full of liquid, and then replace it under...
Owner Manual
Page 19
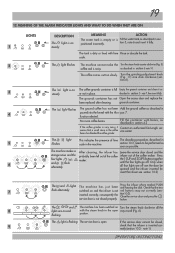
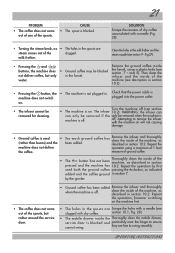
...2 The light flashes The machine cannot make the Turn the steam knob counter-clockwise (Fig. 5) coffee and is full Empty the grounds container and clean it as described in the machine. tion 6). 3 The light is on and the infuser is dirty or lined with the steam knob in section ...is inserted correctly (section 10.2 - note 1). The grounds container has not Open the access door and replace the been replaced after cleaning. par. 7. The machine makes a After cleaning, the infuser has Leave the service door closed properly. Only when all the 8 lights are off . tion 5, note 6 and...
...2 The light flashes The machine cannot make the Turn the steam knob counter-clockwise (Fig. 5) coffee and is full Empty the grounds container and clean it as described in the machine. tion 6). 3 The light is on and the infuser is dirty or lined with the steam knob in section ...is inserted correctly (section 10.2 - note 1). The grounds container has not Open the access door and replace the been replaced after cleaning. par. 7. The machine makes a After cleaning, the infuser has Leave the service door closed properly. Only when all the 8 lights are off . tion 5, note 6 and...
Owner Manual
Page 20
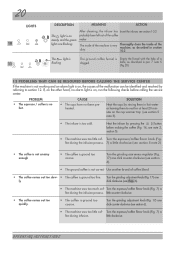
After cleaning, the infuser has Insert the infuser, see section 10.2 probably been left out of the coffee maker The inside of the machine, as described in ... the machine is not working and an alarm light is on the cup warmer tray (see section 5 note 3). • The infuser is too cold. Thoroughly clean the inside of the malfunction can be identified and resolved by referring to section 12. Turn the grinding adjustment knob (Fig. 17) one ly click...
After cleaning, the infuser has Insert the infuser, see section 10.2 probably been left out of the coffee maker The inside of the machine, as described in ... the machine is not working and an alarm light is on the cup warmer tray (see section 5 note 3). • The infuser is too cold. Thoroughly clean the inside of the malfunction can be identified and resolved by referring to section 12. Turn the grinding adjustment knob (Fig. 17) one ly click...
Owner Manual
Page 21
...mobile drawer inside buttons, the machine does • Ground coffee may be blocked the funnel, using a maximum of 1 level the coffee. off . clean the inside of the water. they are Scrape the holes with a needle (see section • The machine is on will risk causing damage. •... pressed and the machine has 10.2. WARNING: the infuser can can only be removed if the only be removed for cleaning. machine (see section 9 - Then clean the not deliver coffee, but rather around the service door. • Ground coffee has been added Remove the infuser...
...mobile drawer inside buttons, the machine does • Ground coffee may be blocked the funnel, using a maximum of 1 level the coffee. off . clean the inside of the water. they are Scrape the holes with a needle (see section • The machine is on will risk causing damage. •... pressed and the machine has 10.2. WARNING: the infuser can can only be removed if the only be removed for cleaning. machine (see section 9 - Then clean the not deliver coffee, but rather around the service door. • Ground coffee has been added Remove the infuser...


