Owner Manual
Page 3
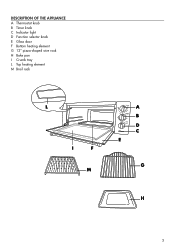
DESCRIPTION OF THE APPLIANCE A Thermostat knob B Timer knob C Indicator light D Function selector knob E Glass door F Bottom heating element G 12" pizza-shaped wire rack H Bake pan I Crumb tray L Top heating element M Broil rack L I F M A B D C E G H 3
DESCRIPTION OF THE APPLIANCE A Thermostat knob B Timer knob C Indicator light D Function selector knob E Glass door F Bottom heating element G 12" pizza-shaped wire rack H Bake pan I Crumb tray L Top heating element M Broil rack L I F M A B D C E G H 3
Owner Manual
Page 4
...be replaced. READ ALL THE INSTRUCTIONS 2. Before using the appliance, move it . Remove any parts. 7. Always place the Timer knob in the "OFF" position and the thermostat knob in water. Use maximum care when removing the bake pan or throwing out the hot fat. 16. Extreme care must not ...large for . 15. Do not use KEEP THESE INSTRUCTIONS WARNING: After having removed the appliance from glass and is hot. 4 Do not use the knobs or handles to "•". Only use metal sponges to avoid overheating. 25. If the appliance is designed exclusively for cleaning. 5. If it is ...
...be replaced. READ ALL THE INSTRUCTIONS 2. Before using the appliance, move it . Remove any parts. 7. Always place the Timer knob in the "OFF" position and the thermostat knob in water. Use maximum care when removing the bake pan or throwing out the hot fat. 16. Extreme care must not ...large for . 15. Do not use KEEP THESE INSTRUCTIONS WARNING: After having removed the appliance from glass and is hot. 4 Do not use the knobs or handles to "•". Only use metal sponges to avoid overheating. 25. If the appliance is designed exclusively for cleaning. 5. If it is ...
Owner Manual
Page 5
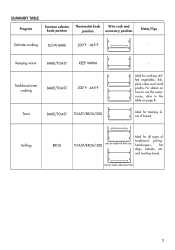
...;F Toast BAKE/TOAST TOAST/BROIL/500 - For details on how to use the accessories, refer to the table on page 8. SUMMARY TABLE Program Function selector knob position Thermostat knob Wire rack and position accessory position Notes/Tips Delicate cooking SLOW BAKE 200°F - 465°F -
...;F Toast BAKE/TOAST TOAST/BROIL/500 - For details on how to use the accessories, refer to the table on page 8. SUMMARY TABLE Program Function selector knob position Thermostat knob Wire rack and position accessory position Notes/Tips Delicate cooking SLOW BAKE 200°F - 465°F -
Owner Manual
Page 6
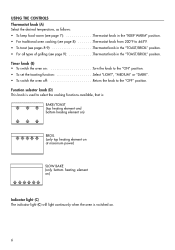
..., as follows: • To keep food warm (see page 7 Thermostat knob in the "KEEP WARM" position. • For traditional oven cooking (see page 8 Thermostat knob from 200°F to the "OFF" position. Function selector knob (D) This knob is used to select the cooking functions available, that is: BAKE/TOAST (...SLOW BAKE (only bottom heating element on) Indicator light (C) The indicator light (C) will light continuosly when the oven is switched on Turn the knob to the "ON" position. • To set the toasting function Select "LIGHT", "MEDIUM" or "DARK". • To switch the oven off ...
..., as follows: • To keep food warm (see page 7 Thermostat knob in the "KEEP WARM" position. • For traditional oven cooking (see page 8 Thermostat knob from 200°F to the "OFF" position. Function selector knob (D) This knob is used to select the cooking functions available, that is: BAKE/TOAST (...SLOW BAKE (only bottom heating element on) Indicator light (C) The indicator light (C) will light continuosly when the oven is switched on Turn the knob to the "ON" position. • To set the toasting function Select "LIGHT", "MEDIUM" or "DARK". • To switch the oven off ...
Owner Manual
Page 7
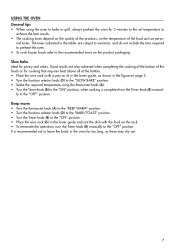
...) in the lower guide, as shown in the figure on page 5. • Turn the function selector knob (D) to the "SLOW BAKE" position. • Select the required temperature using the oven to bake or...the oven for 5 minutes to the set temperature to the "OFF" position. It is completed turn the Timer knob (B) manually to the "ON" position; Slow bake Ideal for cooking that requires heat above all at the ... wire rack (with the food on the rack. • To terminate the operation, turn the Timer knob (B) manually to achieve the best results. • The cooking times depend on the quality of the...
...) in the lower guide, as shown in the figure on page 5. • Turn the function selector knob (D) to the "SLOW BAKE" position. • Select the required temperature using the oven to bake or...the oven for 5 minutes to the set temperature to the "OFF" position. It is completed turn the Timer knob (B) manually to the "ON" position; Slow bake Ideal for cooking that requires heat above all at the ... wire rack (with the food on the rack. • To terminate the operation, turn the Timer knob (B) manually to achieve the best results. • The cooking times depend on the quality of the...
Owner Manual
Page 8
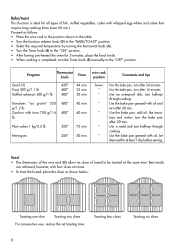
...; Plum cakes 1 kg/2.2 lb 350° Meringues 250° 44 min. 35 min. 30 min. 40 min. 40 min. 75 min. 50 min. Program Thermostat knob Times wire rack position Comments and tips Quail (3) Trout 500 g/1.1 lb Stuffed calamari 450 g/1 lb 430° 400° 400° Tomatoes "au gratin" 550... oil, the tomatoes and water; Bake/toast This function is ideal for 5 minutes, place the food inside. • When cooking is completed, turn the Timer knob (B) manually to the "OFF" position. Use an ovenproof dish, turn after 20 min. Let them rest for at the same time.
...; Plum cakes 1 kg/2.2 lb 350° Meringues 250° 44 min. 35 min. 30 min. 40 min. 40 min. 75 min. 50 min. Program Thermostat knob Times wire rack position Comments and tips Quail (3) Trout 500 g/1.1 lb Stuffed calamari 450 g/1 lb 430° 400° 400° Tomatoes "au gratin" 550... oil, the tomatoes and water; Bake/toast This function is ideal for 5 minutes, place the food inside. • When cooking is completed, turn the Timer knob (B) manually to the "OFF" position. Use an ovenproof dish, turn after 20 min. Let them rest for at the same time.
Owner Manual
Page 9
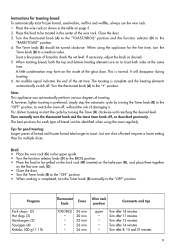
... "BAKE/TOAST" position. 4. Turn after 13 minutes. Place the wire rack as shown in the center of the glass door. Turn the thermostat knob (A) to the "TOAST/BROIL" position and the function selector (D) to toast both the top and bottom heating elements are on page 5. 2. Toast... time. Turn after 11 minutes. A little condensation may form on the flat wire rack (G). • Close the door. • Turn the Timer knob (B) to the "ON" position. • When cooking is preferred, simply stop the automatic cycle by turning the Timer (B) clockwise until reaching the desired...
... "BAKE/TOAST" position. 4. Turn after 13 minutes. Place the wire rack as shown in the center of the glass door. Turn the thermostat knob (A) to the "TOAST/BROIL" position and the function selector (D) to toast both the top and bottom heating elements are on page 5. 2. Toast... time. Turn after 11 minutes. A little condensation may form on the flat wire rack (G). • Close the door. • Turn the Timer knob (B) to the "ON" position. • When cooking is preferred, simply stop the automatic cycle by turning the Timer (B) clockwise until reaching the desired...