Owner Manual
Page 2
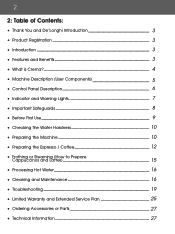
...De'Longhi Introduction 3 • Product Registration 3 • Introduction 3 • Features and Benefits 3 • What is Crema? 4 • Machine Description (User Components) 5 • Control Panel Description 6 • Indicator and Warning Lights 7 • Important Safeguards 8 • Before First... Use 9 • Checking the Water Hardness 10 • Preparing the Machine 10 • Preparing the Espresso / Coffee 12 • Frothing or Steaming (How to Prepare Cappuccinos and Lattes) 15 • Processing Hot...
...De'Longhi Introduction 3 • Product Registration 3 • Introduction 3 • Features and Benefits 3 • What is Crema? 4 • Machine Description (User Components) 5 • Control Panel Description 6 • Indicator and Warning Lights 7 • Important Safeguards 8 • Before First... Use 9 • Checking the Water Hardness 10 • Preparing the Machine 10 • Preparing the Espresso / Coffee 12 • Frothing or Steaming (How to Prepare Cappuccinos and Lattes) 15 • Processing Hot...
Owner Manual
Page 3
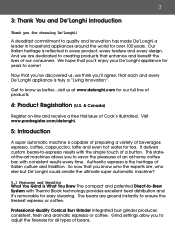
... and even hot water for over 100 years. The beans are , who the experts are ground instantly to -espresso results with consistent results every time. Visit www.prodregister.com/delonghi. 5: Introduction A super automatic machine is reflected in household appliances around the world for tea. Professional-Quality Conical Burr Grinder Integrated burr grinder produces...
... and even hot water for over 100 years. The beans are , who the experts are ground instantly to -espresso results with consistent results every time. Visit www.prodregister.com/delonghi. 5: Introduction A super automatic machine is reflected in household appliances around the world for tea. Professional-Quality Conical Burr Grinder Integrated burr grinder produces...
Owner Manual
Page 4
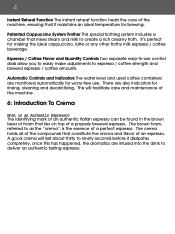
... temperature for rinsing, cleaning and decalcifying. A good crema will facilitate care and maintenance of the machine. 6: Introduction To Crema What is the essence of a perfect espresso. Automatic Controls and Indicators The water level and used coffee containers are monitored automatically for making the...that mixes steam and milk to as the "crema", is an Authentic Espresso? There are also indicators for brewing. 4 Instant Reheat Function The instant reheat function heats the core of the machine, ensuring that it dissipates completely, once this has happened, the aromatics are...
... temperature for rinsing, cleaning and decalcifying. A good crema will facilitate care and maintenance of the machine. 6: Introduction To Crema What is the essence of a perfect espresso. Automatic Controls and Indicators The water level and used coffee containers are monitored automatically for making the...that mixes steam and milk to as the "crema", is an Authentic Espresso? There are also indicators for brewing. 4 Instant Reheat Function The instant reheat function heats the core of the machine, ensuring that it dissipates completely, once this has happened, the aromatics are...
Owner Manual
Page 6
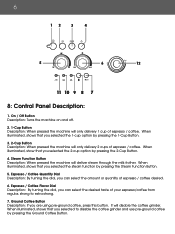
.... 6 8: Control Panel Description: 1. When illuminated, shows that you can select the desired taste of espresso / coffee desired. 6. On / Off Button Description: Turns the machine on and off. 2. 1-Cup Button Description: When pressed the machine will only delivery 2 cups of espresso / coffee. When illuminated, shows that you are using pre-ground coffee, press this button.
.... 6 8: Control Panel Description: 1. When illuminated, shows that you can select the desired taste of espresso / coffee desired. 6. On / Off Button Description: Turns the machine on and off. 2. 1-Cup Button Description: When pressed the machine will only delivery 2 cups of espresso / coffee. When illuminated, shows that you are using pre-ground coffee, press this button.
Owner Manual
Page 8
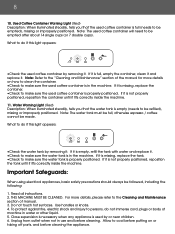
... it is missing, replace the tank. •Check to make sure the used by removing it fits correctly inside the machine. 11. THIS MACHINE MUST BE CLEANED. Close supervision is necessary when any appliance is used coffee container is not properly positioned, reposition the tank...To protect against fire, electric shock and injury to be emptied), missing or improperly positioned. Note: The water tank must be full, otherwise espresso / coffee cannot be followed, including the following: 1. Note: The used coffee container by or near children. 6. Used Coffee Container Warning Light...
... it is missing, replace the tank. •Check to make sure the used by removing it fits correctly inside the machine. 11. THIS MACHINE MUST BE CLEANED. Close supervision is necessary when any appliance is used coffee container is not properly positioned, reposition the tank...To protect against fire, electric shock and injury to be emptied), missing or improperly positioned. Note: The water tank must be full, otherwise espresso / coffee cannot be followed, including the following: 1. Note: The used coffee container by or near children. 6. Used Coffee Container Warning Light...

Owner Manual
Page 9
...(U.S. If an extension cord is used if care is provided to avoid burning from becoming entangled in fire, electric shock or injury to make espresso / coffee and other hot drinks, be used : a. As a safety feature, this manual for detailed instructions.) Keep all packaging material and ...-322-3848. (U.S. Dry thoroughly. Clean the water tank with damp hands. This appliance has a polarized plug (one way. After unpacking the machine, check to persons. 9. Note: Test the water hardness before use outdoors. 10. the longer cord should be arranged so that may have ...
...(U.S. If an extension cord is used if care is provided to avoid burning from becoming entangled in fire, electric shock or injury to make espresso / coffee and other hot drinks, be used : a. As a safety feature, this manual for detailed instructions.) Keep all packaging material and ...-322-3848. (U.S. Dry thoroughly. Clean the water tank with damp hands. This appliance has a polarized plug (one way. After unpacking the machine, check to persons. 9. Note: Test the water hardness before use outdoors. 10. the longer cord should be arranged so that may have ...
Owner Manual
Page 10
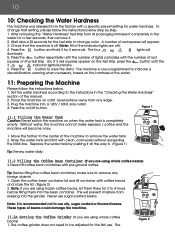
...the water tank and fill it with coffee beans and close the lid. (Figure 2) 2. Tip: Before filling the coffee bean container, make espresso / coffee and the machine will prevent moisture from seeping into a 120V / 60Hz only outlet. 4. If 3 red squares appear on when the water tank is completely ...few seconds, then remove it. 2. Wait about 30 seconds for 5 seconds. Figure 1 11.1 Filling the Water Tank Caution: Never switch the machine on the test strip, press the button until the number of lights coincides with pre-ground coffee. To change color. After removing the "Water...
...the water tank and fill it with coffee beans and close the lid. (Figure 2) 2. Tip: Before filling the coffee bean container, make espresso / coffee and the machine will prevent moisture from seeping into a 120V / 60Hz only outlet. 4. If 3 red squares appear on when the water tank is completely ...few seconds, then remove it. 2. Wait about 30 seconds for 5 seconds. Figure 1 11.1 Filling the Water Tank Caution: Never switch the machine on the test strip, press the button until the number of lights coincides with pre-ground coffee. To change color. After removing the "Water...

Owner Manual
Page 11
... steadily. Figure 6 10. When the lights are flashing, the machine is on. 11.3 Filling the Ground Coffee Container (If you have plugged the machine into an outlet and turned it too fast or too slow (in espresso machines. Turn the machine on /off . • Never add more than 1 full ...measure of pre-ground coffee. Note: Before preparing the espresso/coffee, always make sure that may damage the machine. • Never use in drops), the grinding coarseness...
... steadily. Figure 6 10. When the lights are flashing, the machine is on. 11.3 Filling the Ground Coffee Container (If you have plugged the machine into an outlet and turned it too fast or too slow (in espresso machines. Turn the machine on /off . • Never add more than 1 full ...measure of pre-ground coffee. Note: Before preparing the espresso/coffee, always make sure that may damage the machine. • Never use in drops), the grinding coarseness...
Owner Manual
Page 12
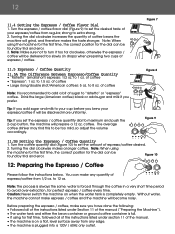
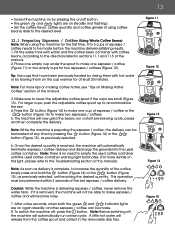
... be too mild, so adjust the volume accordingly. Figure 8 Figure 9 11.5B Setting the Espresso / Coffee Quantity 1. Turning the dial clockwise makes a longer coffee. Caution: Never switch the machine on a flat, level surface away from any quantity of espresso/coffee from regular, strong to turn it will be found by trial and error...
... be too mild, so adjust the volume accordingly. Figure 8 Figure 9 11.5B Setting the Espresso / Coffee Quantity 1. Turning the dial clockwise makes a longer coffee. Caution: Never switch the machine on a flat, level surface away from any quantity of espresso/coffee from regular, strong to turn it will be found by trial and error...
Owner Manual
Page 13
... (Figure 14) or the button (Figure 15), as previously selected, until the used coffee container. If it is reached, the machine will automatically terminate espresso / coffee delivery and discharge the grounds into the used coffee container warning light illuminates. (For more tips on making coffee hotter, ... . 8. This operation must be terminated at least 20 minutes. Note: For more details on the cup warmer for two espressos / coffees (Figure 12). The machine will release from the coffee spout and collect in sections 11.1 and 11.3 of the manual). Fill the water tank with...
... (Figure 14) or the button (Figure 15), as previously selected, until the used coffee container. If it is reached, the machine will automatically terminate espresso / coffee delivery and discharge the grounds into the used coffee container warning light illuminates. (For more tips on making coffee hotter, ... . 8. This operation must be terminated at least 20 minutes. Note: For more details on the cup warmer for two espressos / coffees (Figure 12). The machine will release from the coffee spout and collect in sections 11.1 and 11.3 of the manual). Fill the water tank with...
Owner Manual
Page 14
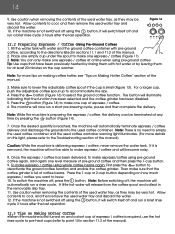
...a time when using pre-ground coffee. If it is delivering espresso / coffee, never remove the water tank. Once the espresso / coffee has been delivered, to make espresso / coffee and will switch itself off , press the button. To switch the machine off and run a brief rinse cycle 3 hours after the...the manual). Note: Before switching off using the button, it will automatically terminate espresso / coffee delivery and discharge the grounds into the used water tray and discard the water. 12. If the machine is no need to empty the used coffee container until the used water tray,...
...a time when using pre-ground coffee. If it is delivering espresso / coffee, never remove the water tank. Once the espresso / coffee has been delivered, to make espresso / coffee and will switch itself off , press the button. To switch the machine off and run a brief rinse cycle 3 hours after the...the manual). Note: Before switching off using the button, it will automatically terminate espresso / coffee delivery and discharge the grounds into the used water tray and discard the water. 12. If the machine is no need to empty the used coffee container until the used water tray,...
Owner Manual
Page 15
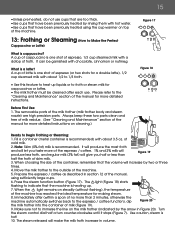
... First Use: 1. Always keep these two parts clean and free of milk residue. (See "Cleaning and Maintenance" section of the machine has reached the ideal temperature for more detailed instructions. Prepare the espresso / coffee as described in volume. Press the steam function button (Figure 17). The light (Figure 18) starts flashing to...
... First Use: 1. Always keep these two parts clean and free of milk residue. (See "Cleaning and Maintenance" section of the machine has reached the ideal temperature for more detailed instructions. Prepare the espresso / coffee as described in volume. Press the steam function button (Figure 17). The light (Figure 18) starts flashing to...
Owner Manual
Page 16
... function button (Figure 17 ) to deactivate steam function. 12. Note (Making espresso / coffee after using the milk frother, press the steam function button to the top. To stop the flow of the machine (Figure 3). 3. It's an electrical appliance. • Do not use solvents... the milk frother to the original position towards the outside surface of the machine can be cleaned. • Remove the used coffee container needs to make espresso / coffee again, the machine is not suitable for making espresso / coffee. Position a container underneath the milk frother (Figure 3). 4....
... function button (Figure 17 ) to deactivate steam function. 12. Note (Making espresso / coffee after using the milk frother, press the steam function button to the top. To stop the flow of the machine (Figure 3). 3. It's an electrical appliance. • Do not use solvents... the milk frother to the original position towards the outside surface of the machine can be cleaned. • Remove the used coffee container needs to make espresso / coffee again, the machine is not suitable for making espresso / coffee. Position a container underneath the milk frother (Figure 3). 4....
Owner Manual
Page 18
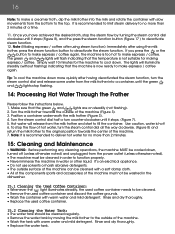
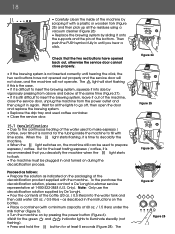
.... • If the brewing system is not inserted correctly until you decalcify the machine when the light starts to prepare espresso / coffee. as indicated on the packaging of the machine, close , and the machine will start flashing if this is the case. • If it is difficult ... vacuum cleaner (Figure 26) • Replace the brewing system by De'Longhi. • Pour the contents of the water used to make espresso / coffee, over time it out of the decalcification product supplied with lime scale. To the purchase the decalcification solution, please contact a De'...
.... • If the brewing system is not inserted correctly until you decalcify the machine when the light starts to prepare espresso / coffee. as indicated on the packaging of the machine, close , and the machine will start flashing if this is the case. • If it is difficult ... vacuum cleaner (Figure 26) • Replace the brewing system by De'Longhi. • Pour the contents of the water used to make espresso / coffee, over time it out of the decalcification product supplied with lime scale. To the purchase the decalcification solution, please contact a De'...
Owner Manual
Page 19
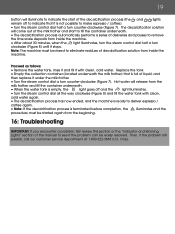
...a turn clockwise (Figure 8) until it is terminated before completion, the illuminates and the procedure must be easily resolved. Note: The machine must be started again from the beginning. 16: Troubleshooting IMPORTANT: If you encounter a problem, first review this section or the "...clean, cold water again. • The decalcification process has now ended, and the machine is ready to deliver espresso / coffee again. • Note: If the decalcification process is not possible to make espresso / coffee). • Turn the steam control dial half a turn counter-clockwise (...
...a turn clockwise (Figure 8) until it is terminated before completion, the illuminates and the procedure must be easily resolved. Note: The machine must be started again from the beginning. 16: Troubleshooting IMPORTANT: If you encounter a problem, first review this section or the "...clean, cold water again. • The decalcification process has now ended, and the machine is ready to deliver espresso / coffee again. • Note: If the decalcification process is not possible to make espresso / coffee). • Turn the steam control dial half a turn counter-clockwise (...
Owner Manual
Page 20
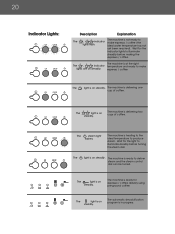
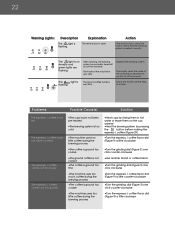
... ideal water temperature has not yet been reached). The machine is in progress. The machine is ready for the indicator lights to make espresso / coffee (the lights flash. 20 Indicator Lights: Description Explanation The machine is not ready to produce steam. The light is ...of coffee. The light is ready to illuminate steadily before making the espresso / coffee. The machine is delivering one cup of coffee. Wait for espresso / coffee delivery using pre-ground coffee. The machine is at the right The , indicator temperature and ready to illuminate...
... ideal water temperature has not yet been reached). The machine is in progress. The machine is ready for the indicator lights to make espresso / coffee (the lights flash. 20 Indicator Lights: Description Explanation The machine is not ready to produce steam. The light is ...of coffee. The light is ready to illuminate steadily before making the espresso / coffee. The machine is delivering one cup of coffee. Wait for espresso / coffee delivery using pre-ground coffee. The machine is at the right The , indicator temperature and ready to illuminate...
Owner Manual
Page 21
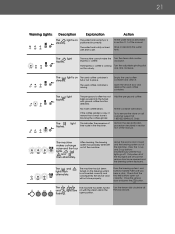
... water tank is empty or is not inserted correctly and consequently the service door will not close properly. espresso / coffee. clockwise. full or not in the machine. The light flashes. light The pre-ground coffee has not been poured into the funnel with beans. ... with ground coffee function selected. Perform the decalcification procedure described in the open out correctly. The machine has just been turned on the brewing system is steadily. The espresso / coffee is steadily. Empty the used coffee container is coming Turn the adjustable grinding dial out...
... water tank is empty or is not inserted correctly and consequently the service door will not close properly. espresso / coffee. clockwise. full or not in the machine. The light flashes. light The pre-ground coffee has not been poured into the funnel with beans. ... with ground coffee function selected. Perform the decalcification procedure described in the open out correctly. The machine has just been turned on the brewing system is steadily. The espresso / coffee is steadily. Empty the used coffee container is coming Turn the adjustable grinding dial out...
Owner Manual
Page 22
... the brewing process •Heat cups by rinsing them in section 15 of the machine is on the cup warmer •Heat the brewing system by pressing the button before making the espresso / coffee (Figure 29) •Turn the espresso / coffee flavor dial (Figure 9) a little clockwise •Turn the grinding dial (Figure 3) one...
... the brewing process •Heat cups by rinsing them in section 15 of the machine is on the cup warmer •Heat the brewing system by pressing the button before making the espresso / coffee (Figure 29) •Turn the espresso / coffee flavor dial (Figure 9) a little clockwise •Turn the grinding dial (Figure 3) one...
Owner Manual
Page 23
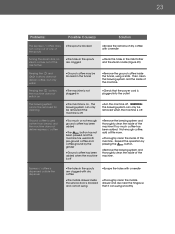
...ground coffee has been added •The button has not been pressed and the machine has used (rather than beans) and the machine does not deliver espresso / coffee •Ground coffee may be removed if the machine is on The brewing system cannot be removed for cleaning Ground coffee is used... nozzle (Figure 23) Pressing the and buttons does not deliver coffee, but only water Pressing the button, the machine does not switch on . 23 Problems: Possible Cause(s) Solution The espresso / coffee does not come out of one of the spouts •The spout is blocked Turning the steam dial...
...ground coffee has been added •The button has not been pressed and the machine has used (rather than beans) and the machine does not deliver espresso / coffee •Ground coffee may be removed if the machine is on The brewing system cannot be removed for cleaning Ground coffee is used... nozzle (Figure 23) Pressing the and buttons does not deliver coffee, but only water Pressing the button, the machine does not switch on . 23 Problems: Possible Cause(s) Solution The espresso / coffee does not come out of one of the spouts •The spout is blocked Turning the steam dial...

