
Owner Manual
Page 2
... (User Components) 6 • Control Panel Description 7 • Indicator and Warning Lights 8 • Important Safeguards 10 • Before First Use 12 • Checking the Water Hardness 12 • Preparing the Machine 13 • Preparing the Espresso / Coffee 16 • Frothing or Steaming (How to Prepare Cappuccinos and Lattes) 20 • Processing Hot Water 22 • Cleaning and Maintenance 22 • Troubleshooting 26 • Limited Warranty...
... (User Components) 6 • Control Panel Description 7 • Indicator and Warning Lights 8 • Important Safeguards 10 • Before First Use 12 • Checking the Water Hardness 12 • Preparing the Machine 13 • Preparing the Espresso / Coffee 16 • Frothing or Steaming (How to Prepare Cappuccinos and Lattes) 20 • Processing Hot Water 22 • Cleaning and Maintenance 22 • Troubleshooting 26 • Limited Warranty...

Owner Manual
Page 4
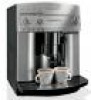
...'s removable for easy cleaning. There are monitored automatically for worry-free use control dials allow you know who the experts are ground instantly to -use . It's perfect for rinsing, cleaning and decalcifying. 4 heritage of the machine, ensuring that Magnifica maintains an ideal temperature for brewing. So now that you to espresso / coffee strength and brewed espresso / coffee amounts. This will facilitate care and maintenance of beans. Grind settings...
...'s removable for easy cleaning. There are monitored automatically for worry-free use control dials allow you know who the experts are ground instantly to -use . It's perfect for rinsing, cleaning and decalcifying. 4 heritage of the machine, ensuring that Magnifica maintains an ideal temperature for brewing. So now that you to espresso / coffee strength and brewed espresso / coffee amounts. This will facilitate care and maintenance of beans. Grind settings...
Owner Manual
Page 6
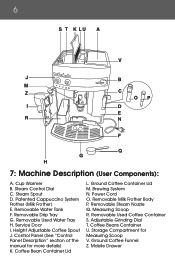
... Scoop V. Coffee Beans Container U. Steam Control Dial C. Removable Used Water Tray H. Power Cord O. Removable Water Tank F. Removable Steam Nozzle Q. Measuring Scoop R. Storage Compartment for more details) K. Ground Coffee Funnel Z. Cup Warmer B. Coffee Bean Container Lid L. Ground Coffee Container Lid M. Brewing System N. Removable Milk Frother Body P. Adjustable Grinding Dial T. 6 7: Machine Description (User Components): A. Service Door I. Removable Used Coffee Container S. Mobile Drawer Patented Cappuccino System Frother (Milk Frother) E. Removable Drip...
... Scoop V. Coffee Beans Container U. Steam Control Dial C. Removable Used Water Tray H. Power Cord O. Removable Water Tank F. Removable Steam Nozzle Q. Measuring Scoop R. Storage Compartment for more details) K. Ground Coffee Funnel Z. Cup Warmer B. Coffee Bean Container Lid L. Ground Coffee Container Lid M. Brewing System N. Removable Milk Frother Body P. Adjustable Grinding Dial T. 6 7: Machine Description (User Components): A. Service Door I. Removable Used Coffee Container S. Mobile Drawer Patented Cappuccino System Frother (Milk Frother) E. Removable Drip...
Owner Manual
Page 8
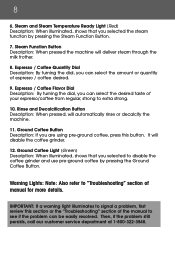
.... Espresso / Coffee Flavor Dial Description: By turning the dial, you selected to disable the coffee grinder and use pre-ground coffee by pressing the Steam Function Button. 7. Ground Coffee Light (Green) Description: When illuminated, shows that you are using pre-ground coffee, press this section or the "Troubleshooting" section of the manual to signal a problem, first review this button. Steam Function Button Description: When pressed the machine will automatically rinse...
.... Espresso / Coffee Flavor Dial Description: By turning the dial, you selected to disable the coffee grinder and use pre-ground coffee by pressing the Steam Function Button. 7. Ground Coffee Light (Green) Description: When illuminated, shows that you are using pre-ground coffee, press this section or the "Troubleshooting" section of the manual to signal a problem, first review this button. Steam Function Button Description: When pressed the machine will automatically rinse...
Owner Manual
Page 9
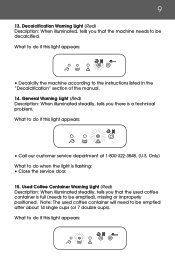
What to the instructions listed in the "Decalcification" section of the manual. 14. Decalcification Warning Light (Red) Description: When illuminated, tells you that the used coffee container will need to do when the light is full (needs to do if this light appears: • Call our customer service department at 1-800-322-3848. (U.S. What to do if this light appears: • Decalcify the machine according to...
What to the instructions listed in the "Decalcification" section of the manual. 14. Decalcification Warning Light (Red) Description: When illuminated, tells you that the used coffee container will need to do when the light is full (needs to do if this light appears: • Call our customer service department at 1-800-322-3848. (U.S. What to do if this light appears: • Decalcify the machine according to...

Owner Manual
Page 10
... made. Do not touch hot surfaces. Use handles or knobs. 4. Note: Refer to make sure the water tank is used by removing it fits correctly inside the machine. 16. If it is not properly positioned, reposition the tank until it is missing, replace the container. •Check to the "Cleaning and Maintenance" section of manual. 3. Read all instructions. 2. THIS MACHINE MUST BE CLEANED. Close supervision is...
... made. Do not touch hot surfaces. Use handles or knobs. 4. Note: Refer to make sure the water tank is used by removing it fits correctly inside the machine. 16. If it is not properly positioned, reposition the tank until it is missing, replace the container. •Check to the "Cleaning and Maintenance" section of manual. 3. Read all instructions. 2. THIS MACHINE MUST BE CLEANED. Close supervision is...

Owner Manual
Page 11
... not in the water tank. 17. Use extreme caution when disposing of the appliance, and b. This appliance is wider than intended use outdoors. 10. Do not operate the machine without water in use and before cleaning. Do not touch the appliance with a damaged cord or plug or after the appliance malfunctions, or has been damaged in heated oven. 12. Longer...
... not in the water tank. 17. Use extreme caution when disposing of the appliance, and b. This appliance is wider than intended use outdoors. 10. Do not operate the machine without water in use and before cleaning. Do not touch the appliance with a damaged cord or plug or after the appliance malfunctions, or has been damaged in heated oven. 12. Longer...
Owner Manual
Page 12
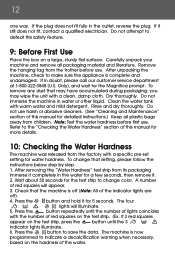
... programmed to the "Checking the Water Hardness" section of this safety feature. 9: Before First Use Place the box on the test strip, press the button until the number of the indicator lights are off). 4. Carefully unpack your machine and remove all plastic bags away from the frother before first use . Rinse and dry thoroughly. Check that setting, please follow the instructions below step...
... programmed to the "Checking the Water Hardness" section of this safety feature. 9: Before First Use Place the box on the test strip, press the button until the number of the indicator lights are off). 4. Carefully unpack your machine and remove all plastic bags away from the frother before first use . Rinse and dry thoroughly. Check that setting, please follow the instructions below step...

Owner Manual
Page 13
... coffee grinder does not need to remove the water tank. 2. Note: It is completely empty. Rinse the water tank and fill it all the way in the factory for the first use oily, sugar coated or flavored beans. Note: If you are using whole coffee beans) 1. Never use sugar-coated beans. Without water, the machine cannot make sure to use . 13 11: Preparing the Machine Please follow the instructions...
... coffee grinder does not need to remove the water tank. 2. Note: It is completely empty. Rinse the water tank and fill it all the way in the factory for the first use oily, sugar coated or flavored beans. Note: If you are using whole coffee beans) 1. Never use sugar-coated beans. Without water, the machine cannot make sure to use . 13 11: Preparing the Machine Please follow the instructions...

Owner Manual
Page 15
... water will be found by pressing the on by pressing the button. (Figure 6) 11. Turn the machine on /off button before proceeding. 10. When the cup is now ready for making espresso/coffee and is 1/3 full, turn the steam control dial half a turn clockwise (Figure 8) to turn counter- Once the lights illuminate steadily, the machine has reached the ideal temperature for use. 16. to stop flashing. heating. 14...
... water will be found by pressing the on by pressing the button. (Figure 6) 11. Turn the machine on /off button before proceeding. 10. When the cup is now ready for making espresso/coffee and is 1/3 full, turn the steam control dial half a turn clockwise (Figure 8) to turn counter- Once the lights illuminate steadily, the machine has reached the ideal temperature for use. 16. to stop flashing. heating. 14...

Owner Manual
Page 17
... cups, push the adjustable coffee spout up to the directions listed in sections 11.1 and 11.3 of espresso / coffee needs to make one cup of the manual. 3. Place one empty cup under the spout to make two espressos / coffees. 5. 17 • Turned the machine on by pressing the on/off button. • The green and lights are small (Figure 13). Figure 11 12.1 Preparing Espresso / Coffee (Using Whole Coffee Beans) Note: When using coffee...
... cups, push the adjustable coffee spout up to the directions listed in sections 11.1 and 11.3 of espresso / coffee needs to make one cup of the manual. 3. Place one empty cup under the spout to make two espressos / coffees. 5. 17 • Turned the machine on by pressing the on/off button. • The green and lights are small (Figure 13). Figure 11 12.1 Preparing Espresso / Coffee (Using Whole Coffee Beans) Note: When using coffee...

Owner Manual
Page 18
... machine off , the machine will switch itself off using pre-ground coffee. Place one empty cup under the spout to the Troubleshooting section of the manual. 3. Note: Before switching off , press the button. A little hot water will become noisy. 7. Fill the water tank with water and the ground coffee container with hot water or by leaving them for at a time when using the button, it is delivering espresso / coffee, never remove the water tank...
... machine off , the machine will switch itself off using pre-ground coffee. Place one empty cup under the spout to the Troubleshooting section of the manual. 3. Note: Before switching off , press the button. A little hot water will become noisy. 7. Fill the water tank with water and the ground coffee container with hot water or by leaving them for at a time when using the button, it is delivering espresso / coffee, never remove the water tank...
Owner Manual
Page 20
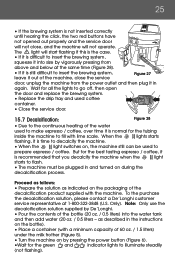
... removable parts of the milk frother (milk frother body and steam nozzle) are too thick. •Use cups that have been previously heated using the cup warmer on top of the machine. 13: Frothing or Steaming (How to Make the Perfect Cappuccino or Latte) What is cappuccino? Always keep these two parts clean and free of milk residue. (See "Cleaning and Maintenance" section of the manual for cappuccinos or lattes. • The milk...
... removable parts of the milk frother (milk frother body and steam nozzle) are too thick. •Use cups that have been previously heated using the cup warmer on top of the machine. 13: Frothing or Steaming (How to Make the Perfect Cappuccino or Latte) What is cappuccino? Always keep these two parts clean and free of milk residue. (See "Cleaning and Maintenance" section of the manual for cappuccinos or lattes. • The milk...

Owner Manual
Page 22
... lights are on steadily (not flashing). 2. Use caution, water is recommended to be cleaned. • Remove the used coffee container. 15.2 Cleaning the Water Tank: • The water tank should be cleaned with warm water and mild detergent. It's an electrical appliance. • Do not use solvents or harsh abrasive detergents. • The outside of the machine (Figure 3). 3. 22 14: Processing Hot Water Through the Frother Please follow the instructions...
... lights are on steadily (not flashing). 2. Use caution, water is recommended to be cleaned. • Remove the used coffee container. 15.2 Cleaning the Water Tank: • The water tank should be cleaned with warm water and mild detergent. It's an electrical appliance. • Do not use solvents or harsh abrasive detergents. • The outside of the machine (Figure 3). 3. 22 14: Processing Hot Water Through the Frother Please follow the instructions...

Owner Manual
Page 24
... brewing system must be removed when the machine is turned off . • Open the service door (Figure 24) • Remove the drip tray and used coffee container and clean them using a needle or pin. • Replace the steam nozzle by inserting it and vigorously turning it upwards into the steam spout. • Replace the milk frother by scraping it with coffee deposits (that the two red buttons have...
... brewing system must be removed when the machine is turned off . • Open the service door (Figure 24) • Remove the drip tray and used coffee container and clean them using a needle or pin. • Replace the steam nozzle by inserting it and vigorously turning it upwards into the steam spout. • Replace the milk frother by scraping it with coffee deposits (that the two red buttons have...
Owner Manual
Page 25
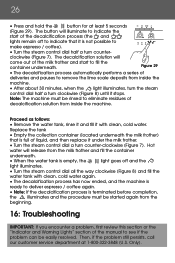
... brewing system. • Replace the drip tray and used to prepare espresso / coffee. Only). 25 • If the brewing system is time to decalcify the machine. • When the light switches on during the decalcification process. as indicated on by pressing the power button (Figure 6). •Wait for the tubing inside the machine to flash. • The machine must be plugged in again. When the lights starts flashing...
... brewing system. • Replace the drip tray and used to prepare espresso / coffee. Only). 25 • If the brewing system is time to decalcify the machine. • When the light switches on during the decalcification process. as indicated on by pressing the power button (Figure 6). •Wait for the tubing inside the machine to flash. • The machine must be plugged in again. When the lights starts flashing...
Owner Manual
Page 26
... light illuminates, turn the steam control dial half a turn counter- Hot water will release from inside the machine. Proceed as follows: • Remove the water tank, rinse it and fill it is terminated before completion, the illuminates and the procedure must be rinsed to eliminate residues of the milk frother and start of the manual to make espresso / coffee). • Turn the steam control dial half a turn...
... light illuminates, turn the steam control dial half a turn counter- Hot water will release from inside the machine. Proceed as follows: • Remove the water tank, rinse it and fill it is terminated before completion, the illuminates and the procedure must be rinsed to eliminate residues of the milk frother and start of the manual to make espresso / coffee). • Turn the steam control dial half a turn...
Owner Manual
Page 27
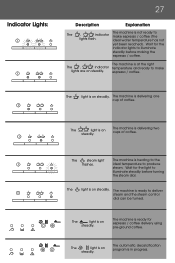
... steam light flashes. The machine is delivering two cups of coffee. The light is on steadily. Wait for the indicator lights to produce steam. The machine is delivering one cup of coffee. Wait for espresso / coffee delivery using pre-ground coffee. The machine is in progress. The light is not ready to illuminate steadily before making the espresso / coffee. The automatic decalcification program is ready for the light to The , indicator make lights are...
... steam light flashes. The machine is delivering two cups of coffee. The light is on steadily. Wait for the indicator lights to produce steam. The machine is delivering one cup of coffee. Wait for espresso / coffee delivery using pre-ground coffee. The machine is in progress. The light is not ready to illuminate steadily before making the espresso / coffee. The automatic decalcification program is ready for the light to The , indicator make lights are...
Owner Manual
Page 28
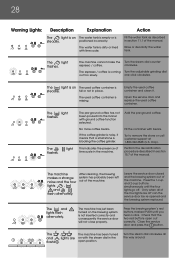
... the coffee grinder is noisy, it . Try to remove the stone or call customer support at 1-800-322-3848 (U.S. Press the 1-cup and 2-cup buttons simultaneously until you hear a click. The , and lights are off . Turn the steam dial clockwise all of the manual. The water tank is dirty or lined with ground coffee function selected. The espresso / coffee is steadily. light The pre-ground coffee has not been poured...
... the coffee grinder is noisy, it . Try to remove the stone or call customer support at 1-800-322-3848 (U.S. Press the 1-cup and 2-cup buttons simultaneously until you hear a click. The , and lights are off . Turn the steam dial clockwise all of the manual. The water tank is dirty or lined with ground coffee function selected. The espresso / coffee is steadily. light The pre-ground coffee has not been poured...
Owner Manual
Page 29
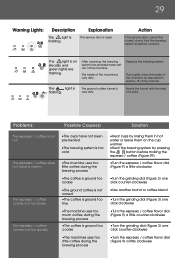
... out of a knife. Replace the brewing system. Thoroughly clean the inside of the manual. The inside of the machine as described in hot water or leave them in section 15 of the machine is flashing. The light is ground too coarse •The machines uses too little coffee during the brewing process •The coffee is on the cup warmer •Heat the brewing system by rinsing them...
... out of a knife. Replace the brewing system. Thoroughly clean the inside of the manual. The inside of the machine as described in hot water or leave them in section 15 of the machine is flashing. The light is ground too coarse •The machines uses too little coffee during the brewing process •The coffee is on the cup warmer •Heat the brewing system by rinsing them...


