Owner Manual
Page 4
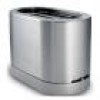
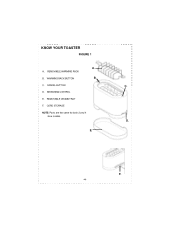
KNOW YOUR TOASTER FIGURE 1 A. C. CANCEL BUTTON C. REMOVABLE CRUMB TRAY F. BROWNING CONTROL E. E. CORD STORAGE NOTE: Parts are the same for both 2 and 4 slice models. D. REMOVABLE WARMING RACK B. WARMING RACK BUTTON B. A. D. F. -4-
KNOW YOUR TOASTER FIGURE 1 A. C. CANCEL BUTTON C. REMOVABLE CRUMB TRAY F. BROWNING CONTROL E. E. CORD STORAGE NOTE: Parts are the same for both 2 and 4 slice models. D. REMOVABLE WARMING RACK B. WARMING RACK BUTTON B. A. D. F. -4-
Owner Manual
Page 6
.... Therefore, the browning control should be set at a lower setting than thickly sliced bread. In order to remove bread. 7. And thinly sliced bread toasts more quickly than fresh bread. Place the toaster on . For best results, ensure that detects when food is equipped with a... are cut first to fit the width of bread, you would like bagels or muffins) are only toasting one slice only or for the toasting slots. 6. OPERATING YOUR TOASTER PREPARING YOUR TOASTER: 1. SUGGESTIONS: 1. Select a lower setting for light browning, for thin or dry bread. When toasting a...
.... Therefore, the browning control should be set at a lower setting than thickly sliced bread. In order to remove bread. 7. And thinly sliced bread toasts more quickly than fresh bread. Place the toaster on . For best results, ensure that detects when food is equipped with a... are cut first to fit the width of bread, you would like bagels or muffins) are only toasting one slice only or for the toasting slots. 6. OPERATING YOUR TOASTER PREPARING YOUR TOASTER: 1. SUGGESTIONS: 1. Select a lower setting for light browning, for thin or dry bread. When toasting a...
Owner Manual
Page 7
... 5. OPERATING YOUR TOASTER (continued) 4. USING THE WARMING RACK 1. Watch to the toaster and place the cord in water or other liquid. Storage 3. NOTE: You can be cleaned by pressing the cancel button. 4. An audible signal indicates the completion of the rack (slice thick items in ...water or other liquid. Press the Warming Rack button (it from the crumb tray. Lift off the toaster and clean the crumb tray. CLEANING YOUR TOASTER CAUTION: Make sure your toaster can discontinue the warming process by wiping...
... 5. OPERATING YOUR TOASTER (continued) 4. USING THE WARMING RACK 1. Watch to the toaster and place the cord in water or other liquid. Storage 3. NOTE: You can be cleaned by pressing the cancel button. 4. An audible signal indicates the completion of the rack (slice thick items in ...water or other liquid. Press the Warming Rack button (it from the crumb tray. Lift off the toaster and clean the crumb tray. CLEANING YOUR TOASTER CAUTION: Make sure your toaster can discontinue the warming process by wiping...


